All posts by Tom

I'm the guy who writes the blog...

Tools I use – my Veritas Dovetail Saw


The Veritas Dovetail Saw
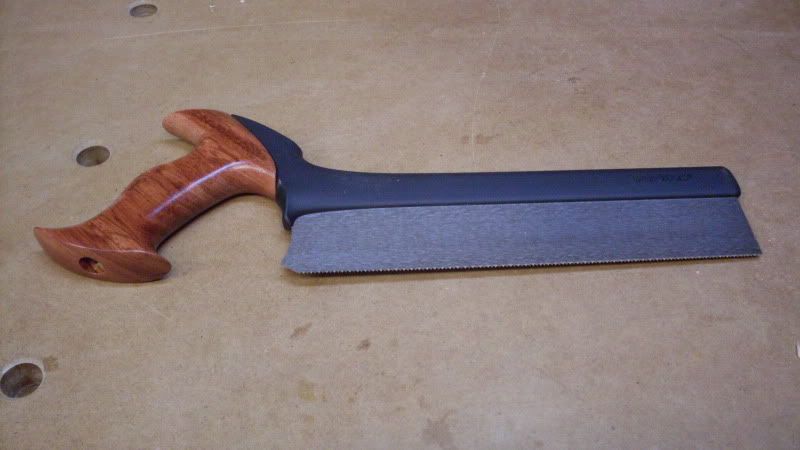
This is the newest tool in my arsenal – a fresh-out-of-the-package Veritas Dovetail Saw.  It may have arrived at my home just yesterday, but the journey to this tool has taken nearly a decade.

When I first started woodworking, my first saw was a Craftsman fine toothed panel saw.  It was a great saw for what I was doing, but it was huge and – yes – I was also lured away by the siren’s song of power tools.  Through  the following years, I have gotten my hands on some large  big-box Japanese style saws, a reversible ‘dovetail’ saw that flipped on its offset handle and some entry-level Japanese style saws from some of the larger online woodworking retailers.  They all did so-so work, and I always found myself making excuses for my poor saw work.

I thought I was in the clear about a year ago when I bought a new dozuki from Lee Valley.  It did cut beautifully, but the problem I had was that getting a grip on the traditional handle was kind of tricky.  I found myself gripping the saw slightly differently every time I picked it up, and my cuts would suffer.

While at the recent Woodworking Show in Tampa, I made a beeline to the Lee Valley booth.  There they were, all of the tools in the catalogs that I had drooled over for years.  Planes, chisels and measuring devices as far as the booth stretched.  While looking at all of the goodies, I saw the new Veritas Dovetail Saw sitting on a shelf.  I had read so many reviews of it, and I had been told by several woodworkers that I might be more successful with a western-style saw, I just had to pick it up and give it a try.  I was hooked and ordered one on the spot.

The Saw in action The saw is exceptionally well made, which has been my experience with all of the hand tools I have used from the Veritas line.  It’s a substantially built saw with absolutely no wiggle or slop in the handle (which is held to the saw with post and nut similar to a plane handle).  The grip, which has been modeled after an antique saw’s, seems to fit my hand perfectly.  The grip seems small at first, but you have to realize it’s not designed for you to clench your fist over.  Simply wrap your thumb and three fingers around the handle, and point your index finger down the saw’s spine.  This way, you will be ‘pointing’ to where your saw should go.  This is a very comfortable grip, and no matter how many times I picked up the saw, my hand rested in exactly the same spot.

The saw’s teeth are angled back to 60 degrees, which is drastically different than my dozuki’s teeth, which are 90 degrees to the blade.  The product literature says it’s filed that way because it makes the saw easier to start… something I have struggled with on cheaper saws.

The Saw Kerf showdown
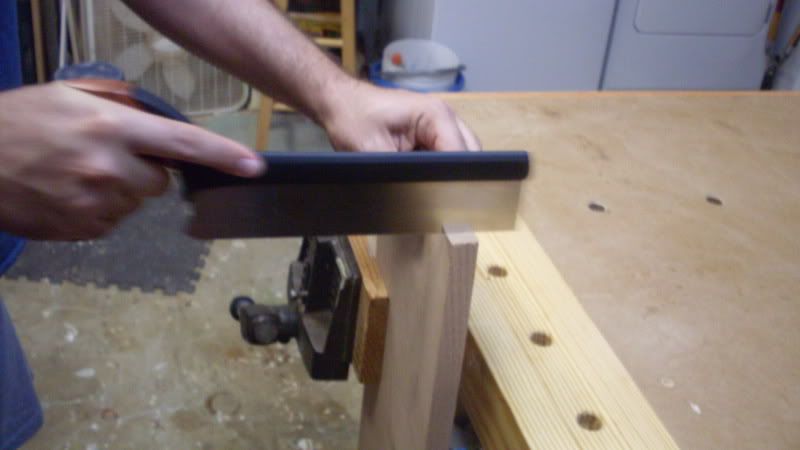
After handling the saw for a while, I just had to put it to use.  I clamped a piece of red oak in my vise and started cutting.  The saw starts easily by slightly tipping the nose down and pushing gently.  Not having to worry about my grip, I was able to focus on my body positioning and arm mechanics.  The saw cuts exceptionally well, taking about a dozen strokes with very minimal downward pressure to cut a one inch deep kerf.  The stiff blade and minimal tooth set helped keep the saw on track as I worked it through the cut.

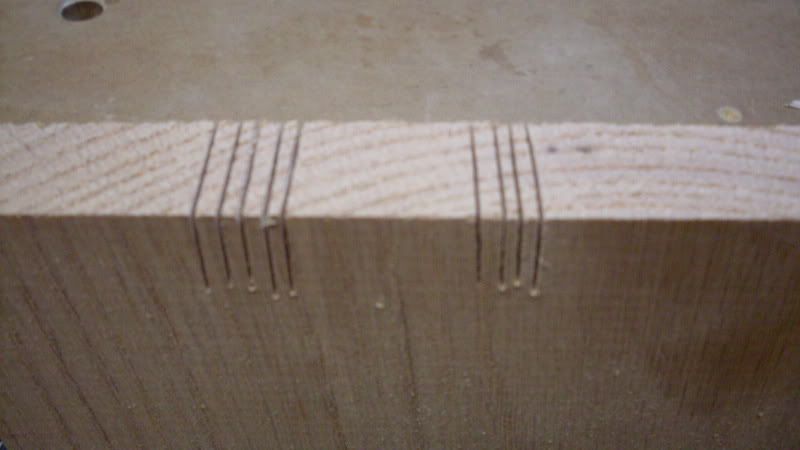
The results were impressive.  Here is the board I used with the Veritas saw cuts in the group to the left and cuts made by my dozuki on the right.  While the Japanese saw’s kerf was slightly narrower, the Veritas blade cut a very fine kerf as well.

After playing with the saw for a while, I finally buffed the blade with a little furniture paste wax, set the blade guard over the teeth and put it in the saw drawer of my tool chest.

A tool like this will be getting lots of use in my shop!

Stuff I’ve built: my kids’ step stool

  • April 2000

Being a dad is one of the best things that has ever happened to me.  Watching my two sons grow up from birth has filled me with awe and amazement.  From hearing them cry for the first time to hearing them figure out their math homework has been nothing short of a miracle.

Oh, sure, it’s had its ‘moments’, but those rough times have been more than compensated for in all of the good stuff.

The Kids' Step StoolOne of the toughest things to do as a parent is to let your kids discover their independence.  When that three-minute-old child is handed to you, he or she is 100% dependent on you.  Later, they will learn how to turn over, sit, stand, talk, eat for themselves, walk… then run.  All of this is preparation for the day they leave home and make their own way in the world.

To help my boys on their road to independence and self-reliance, I built this – a plain pine step stool.  After all, kids are pretty short and can’t reach all of the adult-sized amenities. Very roughly based on a Shaker design, it was – to that time – the most involved project I had ever tackled.

I built the sides out of pre-glued pine panels I picked up at the local Home Depot.  Those panels are pretty convenient for the beginner woodworker – they have tight joints and are made of solid wood.  The piece I bought was long enough for me to cut out both sides.

After I notched out for the step with my jigsaw, I also notched out for a back stretcher.  I saw this piece done for the fancier step stools Norm Abram built on the New Yankee Workshop and figured it would help strengthen the piece.

The step treads and back stretcher were cut from leftovers of the panel . Assembly was pretty easy – some glue and finish nails. I glued and nailed the little stretchers under the fronts of the treads to give them extra support.

I sanded the piece down with my 1/4 sheet finish sander and brushed on two coats of Minwax’s Poly Shades honey pine to give it a ‘pinier’ look.

While this step stool wasn’t made of high-end exotic hardwoods and put together with dovetail joints, it has held up for the past nine years under some pretty tough use.  Its primary home was parked in the kids’ bathroom, so the little fellas could reach the sink to brush their teeth and wash hands.  The stool even served the boys well in the kitchen where my wife and I gave them their first cooking lessons.

And, amazingly enough, my wife and I would use the stool to stand on when we painted the rooms in our home.  It was just tall enough to make trimming out the ceiling an easier chore.

Today, the piece is just as solid as it was the day it was completed.  It’s still sturdy and easily holds the weight of my boys (Who both now tip the scales over 65 pounds) and their dad (Who tips the scales at a much higher weight than when he built it).

While I would build something like this much differently now, this project wasn’t as tough as you might expect, and was pretty easy to build for a beginner with few basic tools.

Quick Poll

Unfinished kitchen cabinetsThere’s something to be said for momentum when you are working on woodworking projects.  For some projects, you can go from the first milling operation to totally done in a day.  For other projects, it may take longer because they are more involved.

And, then, there are those projects that linger.  You know the ones I’m talking about – “Oh, I have to make the drawers and doors, but, hey, the weather is beautiful and I need those special pieces of hardware…”

Before you know it, that bathroom vanity without the doors has become a long-standing family joke with your unfinished project at the punch line.

So, how long has it taken you to complete your longest-delayed project?  It’s OK, we won’t laugh at you!

[poll id=”66″]

Link of the Week

An (Addictive) Woodworkers’ Game

The Eyeballing Game
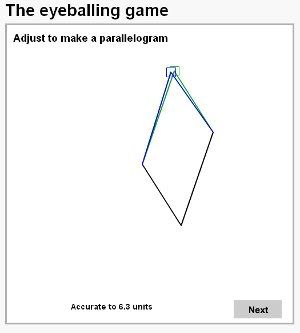
So, do you think you have a set of high quality calibrated eyeballs?  Can you bisect an angle on sight or put your finger on the exact middle of a circle without measuring?

If so, have we got a challenge for you.  ToolCrib.com has posted a simple yet maddening woodworker’s game on their site.  In this game, you will do three rounds of ‘eyeball’ measurements… how to make a parallelogram, how to find the center of a circle, how to find the midpoint of a line segment and other tasks.  Once you make your selection, the computer will calculate how far off from true you are.

So far, after *ahem* a ‘few’ rounds of play, my best score was 5.5 units… not bad, but not good enough to trust when doing a project installation.

I will give one word of warning… this game is addictive.  Set your computer alarm for a few hours from when you start so you don’t continue playing well past your bedtime!

Doing the jig

Jim Heavey at the Wood ShowsAt the recent Woodworking Show, one of the highlights was to get reacquainted with Jim Heavey. Jim is the Contributing Craftsman with Wood Magazine, and, just as last year, he brought his funny approach and common sense tips to his seminars.

This year, Jim’s talks were based on building and using jigs and fixtures. For those who get to see this presentation, Jim doesn’t disappoint. His first supposedly 45 minute presentation stretched to nearly an hour and a half, and the audience sat spellbound, hanging on every tip he presented.

In this first presentation, Jim flatly told the audience that in these tough economic times, we all have to get the most out of our tools. Jigs and fixtures not only make tools like a table saw multi-taskers, they also increase the accuracy and safety of the tool as well.

Table saw zero clearance insertNever was this more evident than in the first fixture he built – the zero clearance insert. With a scrap of ½” multiply or baltic birch plywood, you can pump out a dozen or so blank inserts for your table saw. You can make them so cheaply, that Jim advised that you make them for your commonly used blade setups – one for a regular kerf blade, one for a thin kerf, a separate one for different common dado set ups… and you can still have a few blanks laying around for specialized setups with bevels.

The sacrificial fence he made was a little more complicated than the average board-clamped-to-the-fence. It was built like a torsion box with two sides of MDF and some middle ribs. With glue and screws on all but the middle ribs, even the slightest potential movement of the other face is prevented. Also, even after the first face is chewed up, you can still set the amount of blade buried in the fence by flipping the jig over and referencing off the good back side. Jim advised that woodworkers should built two versions – one that is the length of the fence and another that is about six feet long. The longer fence can trail behind the rip fence and gives a broad reference fence for a long sheet of plywood to rest against while doing rips.

Panel cutting sledJim also showed that by flipping the ‘fence’ of a sliding cut off jig to the front of the sled, you can keep it from tipping off the table saw. A marked improvement over ones built with a trailing fence.

As the jig projects were rolled out one after another, Jim acknowledged that the jigs were plans which appeared in Wood magazine. However, he was quick to point out, “Hey, this stuff isn’t rocket science. If you look at the jig and come up to play with it after the presentation, you should be able to go back to your shop and build something similar.”

In his second presentation, Jim could have billed himself as a magician. In the front of the audience, he showed a beautiful mission style night stand with through mortises and exposed tenons made of quarter sawn white oak. The joinery looked very complex and appeared to take an entire arsenal of tools to craft, but, as he said, “Everything – including the mortises and tenons – was cut on a table saw.”

As he described the methods he used, it became clear how it was done. Arts and Crafts style side tableThe capital letter I shaped cutout was done by ripping the board in half, cutting the decorative cutouts with a scroll saw and then gluing back a ½” spacer. The mortises were cut by slicing out a ¾” stick strip, crosscutting that strip and then gluing it back together spaced far enough apart to allow a corresponding tenon to fit inside. Even the tenons were inlaid strips.

“Really, it’s THAT easy,” he kept saying as he explained his techniques. When he was done, the audience members came forward to inspect the work, and were able to find where the cuts were made only after careful inspection of the piece. “Oh, and when someone tells you how good your project looks… SHUT UP and take the compliment. They will only see it if you point it out.”

I’m sure I’ll be working with a few of these techniques in some upcoming projects.

Again, while most – if not all – of these techniques were described in the pages of Wood Magazine, having a professional – and quite talented – craftsman there to explain each of the operations was valuable.

Expo-sing myself to new stuff

The Woodworking Show logoThis past weekend, I went to the Tampa edition of the Woodworking Show, and I’m glad I did.

For those of you not familiar, the Woodworking Show is a traveling woodworking expo where woodworkers can come to see new tools, buy scads of new products and get a great deal of advice.  This is now my fourth year of attending the Tampa show, and every year I look forward to it.

This year, I noticed something very interesting and quite unexpected – the place was crowded.  Even in these uncertain economic times, woodworkers were packed shoulder to shoulder at demonstration booths taking in the presentations about Carter band saw guides, Grip Tite magnetic feather boards and the Prazi Chestmate dovetail jig.  I spoke with several of the exhibitors who all sang the same refrain – there has been a significant increase in attendance over  the past few years, and people were buying – the smaller items.

Oh, sure, the ‘big iron’ was there.  I got to see both Saw Stop table saw models at the same time, and the newly redesigned Delta Unisaw attracted a crowd.  However, those units were not moving as they had in years gone by.  To me, it appeared that the folks who were lovingly caressing the handles and cast iron tops were taking mental notes to consider a later purchase.

Surprisingly, there were very few ‘brand new’ designs being offered.  The folks at the Kreg Tools booth (one of the larger ones at the show) were even lamenting openly that the only really ‘new’ item they were offering was their brand new corner clamp to help with cabinet assembly.

Hawking the wares
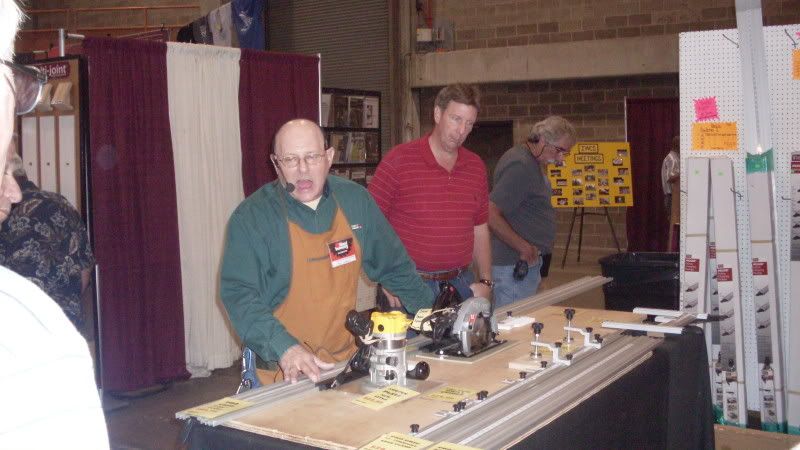
While most of the tools weren’t bleeding edge new to the industry, they were certainly new to me.  I finally had an opportunity to see the DeWalt and Festool track saws almost side-by-side (they were a two minute walk apart, but that was manageable).  I’m not sure which model is ‘better’, but both systems are very slick and quite an improvement over your basic circular saw.

I also rediscovered something about the craft – namely that there must be a thousand different ways to get from point A to point B.  No fewer than four ‘dovetailing’ systems were being demonstrated – systems that made through dovetails, half-blind dovetails, decorative dovetails… the works.

My favorite vendor booth was from Lee Valley tools. They had a great selection of chisels, planes, saws and other tools from their catalog, and had benches set up where customers could use them.  I had my eye on about a dozen tools, but the woodworking budget was far from enough to cover everything I wanted.  I settled on one of the new design Veritas dovetail saws, which should be coming in the next few days.

There was a new emphasis on hand tools at the show, with an exhibit area called the hand tool rodeo.  The presentation primarily covered the hand plane and was valuable in showing what the working parts were and how the functioned.  At this booth, a local woodworker had brought a selection of his own tools for expo goers to use.  It was a treat to use his massive beech jointer on a piece of cherry.  More to come on this…

Learn to turn 
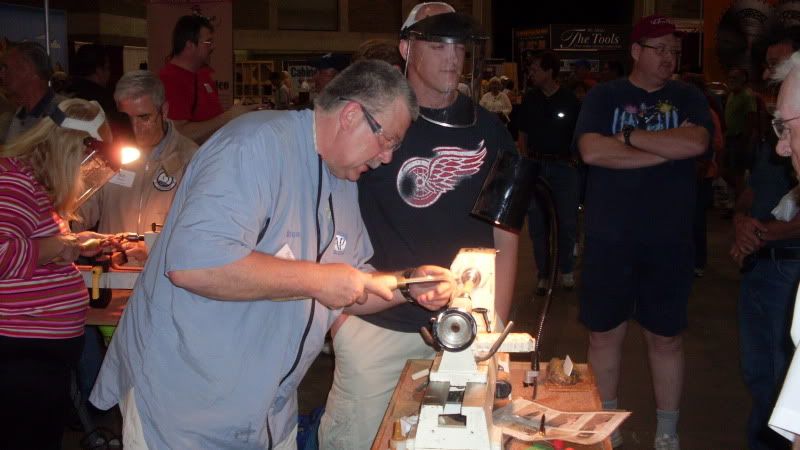
Tucked away on one side of the expo was one of the most valuable areas – it was the table set up for several of the local woodworking guilds.  There, local woodworkers and turners were showing off their projects and touting the advantages of joining the clubs.  I know this would run counter to the purpose of the expo, but I would have loved to have seen those tables in a more prominent place where they could have seen some additional traffic.

Finally, the best part were the education booths.  Wow, from cabinet building to finishing, those booths offered a great deal of advice for novice to advanced woodworkers.  Turning, finishing and cabinetmaking lessons were all taught, but the highlight of the show was the booth sponsored by Wood Magazine.  There, Jim Heavey was offering some common-sense woodworking tips to help stretch your woodworking dollar, get more accuracy in your cutting and improve the safety of your shop.

After six hours of wandering the Florida State Fairgrounds entertainment hall, I was beat.  But, I also left the expo feeling recharged, wanting to get out into the shop to try some of the new techniques I learned and tools I purchased.

All in all, an excellent way to spend a Saturday.

Quick Poll

Looking to buy at the woodworking showWhile they may have lost some of their luster due to the Internet and the current economic situation, woodworking shows and expos are some very interesting places to visit.  You get to meet and talk with – in many cases – the same people who created the tools they are selling, to hold the tools in your hands and see them in operation.

Yesterday, while I was at the Woodworking Show in Tampa, I saw some folks hugging the wall just taking some mental notes on what they wanted to buy, while others were staggering out the doors of the convention hall, struggling to carry home all of their goodies.

This week, we want to know how you feel about purchasing something – anything – at a woodworking show or expo.

[poll id=”65″]