
- April 2000
Being a dad is one of the best things that has ever happened to me. Watching my two sons grow up from birth has filled me with awe and amazement. From hearing them cry for the first time to hearing them figure out their math homework has been nothing short of a miracle.
Oh, sure, it’s had its ‘moments’, but those rough times have been more than compensated for in all of the good stuff.
 One of the toughest things to do as a parent is to let your kids discover their independence. When that three-minute-old child is handed to you, he or she is 100% dependent on you. Later, they will learn how to turn over, sit, stand, talk, eat for themselves, walk… then run. All of this is preparation for the day they leave home and make their own way in the world.
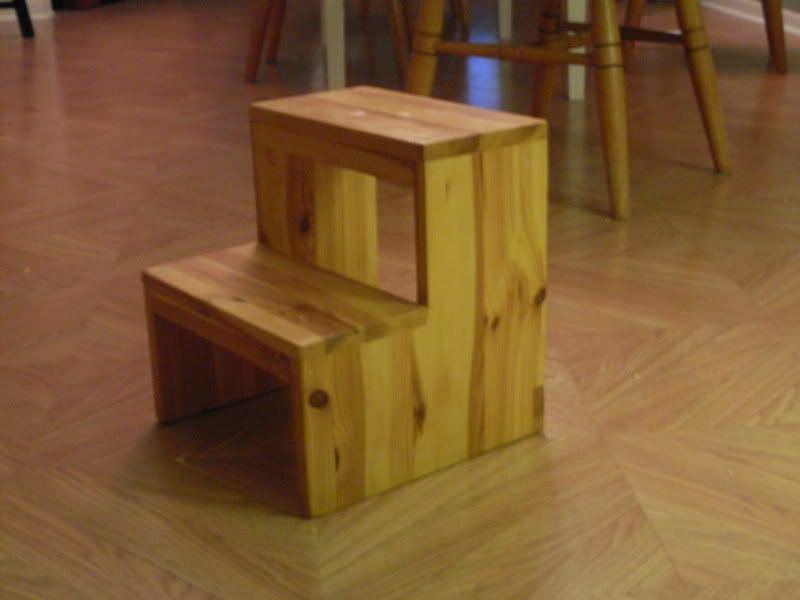
To help my boys on their road to independence and self-reliance, I built this – a plain pine step stool. After all, kids are pretty short and can’t reach all of the adult-sized amenities. Very roughly based on a Shaker design, it was – to that time – the most involved project I had ever tackled.
I built the sides out of pre-glued pine panels I picked up at the local Home Depot. Those panels are pretty convenient for the beginner woodworker – they have tight joints and are made of solid wood. The piece I bought was long enough for me to cut out both sides.
After I notched out for the step with my jigsaw, I also notched out for a back stretcher. I saw this piece done for the fancier step stools Norm Abram built on the New Yankee Workshop and figured it would help strengthen the piece.
The step treads and back stretcher were cut from leftovers of the panel . Assembly was pretty easy – some glue and finish nails. I glued and nailed the little stretchers under the fronts of the treads to give them extra support.
I sanded the piece down with my 1/4 sheet finish sander and brushed on two coats of Minwax’s Poly Shades honey pine to give it a ‘pinier’ look.
While this step stool wasn’t made of high-end exotic hardwoods and put together with dovetail joints, it has held up for the past nine years under some pretty tough use. Its primary home was parked in the kids’ bathroom, so the little fellas could reach the sink to brush their teeth and wash hands. The stool even served the boys well in the kitchen where my wife and I gave them their first cooking lessons.
And, amazingly enough, my wife and I would use the stool to stand on when we painted the rooms in our home. It was just tall enough to make trimming out the ceiling an easier chore.
Today, the piece is just as solid as it was the day it was completed. It’s still sturdy and easily holds the weight of my boys (Who both now tip the scales over 65 pounds) and their dad (Who tips the scales at a much higher weight than when he built it).
While I would build something like this much differently now, this project wasn’t as tough as you might expect, and was pretty easy to build for a beginner with few basic tools.
Tom — thanks for this writeup. My son is 8 months old and I’m already planning a step stool for him (after the baby gate 😉 Thinking of the one recently built by T-Chisel in FineWoodWorking (shaker inspired). Any tips on the height/width for stability? I know things this size can be pretty tippy…
Hey, Mort, actually, with little kids, tippiness isn’t really an issue… I made the piece I believe 16″ x 16″… it’s pretty compact and the kids never had an issue with instability (other than when dealing with their dad.).
Just as long as you base it on an existing plan, and understand kids don’t have the longest legs, you should be fine…
Hey Tom,
I am a new woodwoker and am in the middle of building a step stool for my boys. I built another one based on a different design and made several mistakes but well it is very sturdy and holds me. I weigh close to 250! Anyway the one I am building is very similar to yours. It is based on an I can do that from pop wood working. The only thing is I have done some things differently. It suggested pocket screws for the glue up and I used biscuts. It seems really strong! However I need to put the stretchers on and was going to use pocket joints. Did you notch out for the front risers? Then just glue???
I did notch out for the stretcher in the back, then glued it in place and used finish nails to further secure the piece. It’s maybe not the way I would do it today, but it was sturdy for years.
Wow — just discovered this page again via a Google search. And found that left a comment like 3 years ago!! Haha, awesome.
Repeat customers are the Best! 🙂