Eureka

There was this guy back in ancient Greece. He was pretty smart. His name was Archimedes, and he created a bunch of things. The Archimedes screw. He was able to describe how a lever worked in great detail. He even supposedly invented a ‘heat ray’ that focused reflected sun rays on to attacking ships, supposedly setting them on fire.

Eureka!But, the biggest thing he did was figure out the Archimedes Principle. This describes how to measure the mass of an object by measuring how much water it displaced. Faced with trying to find a way to determine if a crown was made of pure gold or something a little less valuable, he thought he would soak in a tub to think about it. As he slipped in the water, he noticed that the level of water in the tub rose. The synapses fired, and, “EUREKA!” Which is exactly what he was reported to say as he leaped out of the tub and raced outside to announce to the world his discovery. In the buff. That must have been an exciting day for Archimedes – and the rest of the folks out on the street.

Lock Miter BitWhile I didn’t discover something as important as that, I did have my very own fully-clothed eureka moment in my shop.  It involved my nemesis, the lock miter bit. Yes, the same bit that caused me to swear it off years ago. However, the folks over at Infinity Cutting Tools told me that they had the answer to my problem, and that I should give it a try.

The lock miter master jig
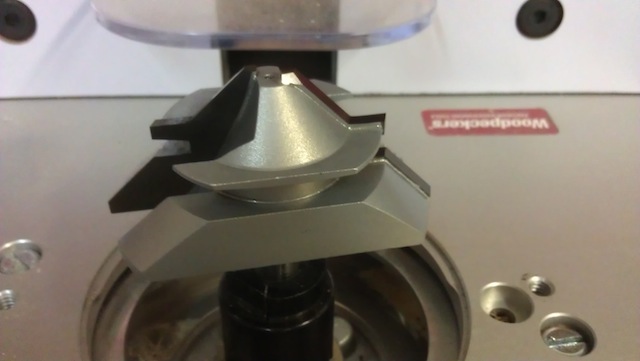
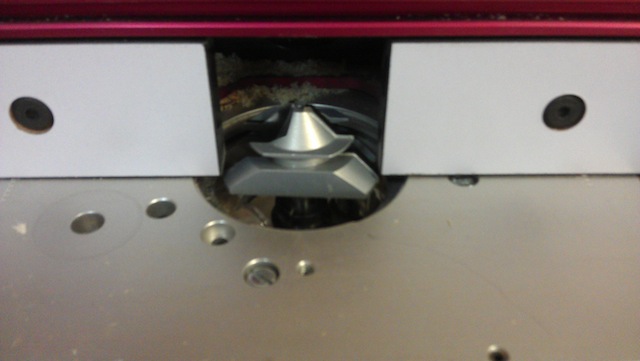
This is the tool, the Lock Miter Master Jig. It’s a piece of aluminum with a pair of rare-earth magnets that attach to the bit. The fun part is that when it is registered, the long tick marks point to the exact center of the bit profile. By adjusting the bit to these marks, it becomes easy to get a good result using the bit.

Find that center
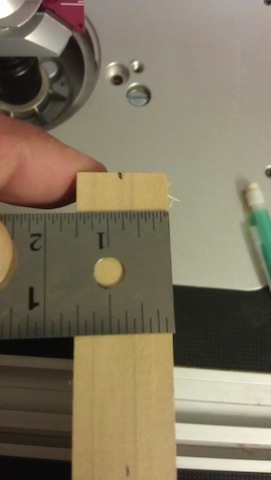
This, of course necessitates finding the exact center of your board. Those set up blocks that most bits come with are great – if your wood is exactly that thickness. Free from set board thicknesses, heck, anything’s possible. I use a center finding ruler to get things lined up properly, but you should be able to do that without one. Use the center line on the board to set the height of the bit, and then the fence depth, ensuring it is centered on the board.

Push sticks
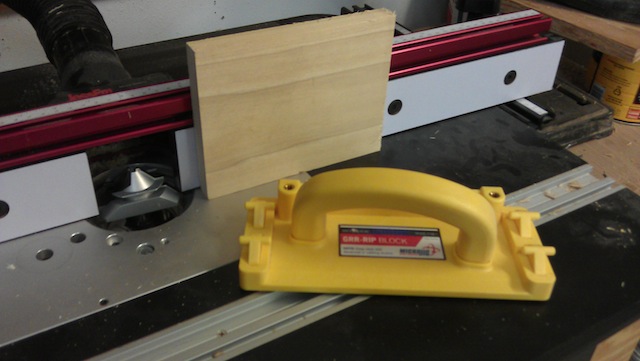
Now, one of the most important parts of this set up is to use featherboards and push blocks. Seriously. This is a big bit that removes a lot of stock in one pass, so everything you can do to keep positive control on the work is going to make it a safer and more accurate operation.

Close the gapAnother important step is to close the gap on the fence as much as possible. This helps to keep the possibility of things going wrong to a minimum.

Ooops...
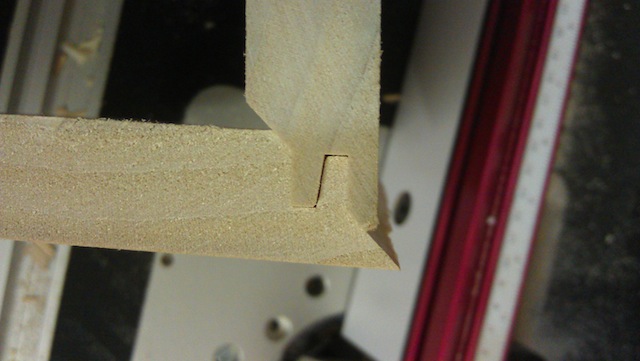
Now, I’m sure the folks at Infinity aren’t happy that I showed this shot, but this jig is not foolproof. I am a much better fool than they could have anticipated. The reason I show this is that you have to ensure during your measurements that the jig is perpendicular to the fence when you measure the center of the board. If not, yes, it is still possible to make a big boo-boo…

Getting better
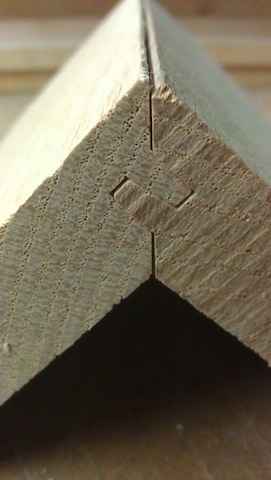
There, that’s much better. Not perfect, but hey, for a second pass in a hot, sweaty Sunday in the shop, that’s much better than I had done after HOURS of working the old way. Just a few more tweaks, and I’m sure I’ll be looking at perfect joint after perfect joint.

Eureka!

Quick Poll

While frameless (European) cabinet construction is growing in popularity, the face frame cabinet is still a popular building method.

While it does take some extra time and involves extra material, the face frame offers extra strength to the assembly, can be used to square a cabinet, allows an easy way to scribe a cabinet to fit a wall and can be decorative to boot.

There are many methods woodworkers can use to join the elements of the face frame together.  Some are traditional, others are ultra modern.  Some take very little time, others can be quite time consuming.

So, this week, I want to know if you build cabinets with face frames, and just how you join the elements together…


Link of the Week

Grant McMillan Wood Carving

One of the skills I hope to master is wood carving. Sure, I did a little of it on my niece’s Confirmation box, and the medal rack saw some ‘carving-like’ features – but, being able to look at a block of wood and make something out of it, gosh.

Holy ship!  Nice work!Fortunately, talented carvers like Grant McMillan have taken the time to post their work and their instructions online. From carved embellishments on larger projects to full-on carving in the round, Grant’s work is truly a pleasure to look at.

One day…


She’s a new turner

One of the best parts of my job as the county’s emergency preparedness spokesperson is that I get to speak at a lot of disaster preparation events. Since the Tampa Bay area is most vulnerable to hurricanes and other tropical weather events, I frequently share top billing with the local TV meteorologists. They are a fun group of folks who love to talk weather and can take a general ribbing when their forecasts don’t always pan out.

Leigh Spann on the air One TV Mets I have presented with is Leigh Spann, the morning forecaster for WFLA-TV, Channel 8 here in the Tampa Bay area.  She was out this past weekend banging the drum about hurricane awareness, when the folks at NOVA Tools  – just a few booths over – invited her in for a spin. Here’s Leigh’s account of the experience. (And, yes, I warned Leigh about the dangers of woodworking without safety glasses. She needs to watch Norm’s weekly admonishment.)

I arrived at the St. Pete Downtown Food and Wine Fest to hand out hurricane guides at the WFLA vender booth. As I walked to the booth, I passed a woodworking vender, and I didn’t actually think twice about it.

About 10 minutes later, the vender popped over to our table and asked if I wanted to try my hand at his craft. I couldn’t have been happier!

Leigh gets a lessonHe had small blocks of wood that attendees of the Fest could transform into ink pens. He asked me what kind of wood I like, and I responded that I typically choose darker colored woods. He held up a dark walnut, but in his other hand was a lighter block. He said the lighter one is actually from a tree you can no longer cut down, but it can be brought up from the bottom of bodies of water. He said that this wood could be thousands of years old. (Sadly, I can’t remember the name of the wood now.) I quickly said “Well, I HAVE to choose the one with the better story!”

Then, we stood behind the machine, and he assembled the pieces to secure the block of light wood. He flipped the switch, and it started spinning. He handed me a tool that looked like a long knife with appropriately enough a wooden handle, but the “blade” was scooped on the sides and not sharp. He explained that as I lightly held the tool to the spinning piece of wood it would take the corners off and give the block a cylinder shape.’

Leigh sanding the pen on the latheAfter a few false starts, I had a nice rounded piece of wood that looked somewhat pen-like. Next came the sandpaper. Then, the wax. He handed me a block of hard wax that I would slowly slide over the wood as it spun. The heat generated from the friction causes the wax to melt and helped shine up the wood. Finally, we grabbed some of the wood shavings from the table and slowly ran those over the wood. As the shavings heated up on the cylindrical-shaped wood, it really seemed to draw out the various colors in the natural wood grain.

The proud owner of her first pen!He connected the ink pen to the piece of wood I had crafted, and I had my own one-of-a-kind self-made writing utensil. Who knew I was so crafty?! I look forward to setting up a time to meet with him again to create a wooden bowl that can be auctioned off during the Empty Bowls event to benefit Feeding America Tampa Bay.

I dunno… it looks like someone may be asking for a new lathe this holiday season. Hey, Leigh, keep us up to date on what you make next!

Stuff I’ve built: Sydney’s medal and ribbon rack

YES!  There’s nothing like a lazy weekend in the shop to get a project done, and that’s exactly what I had. It’s a great feeling to take a project from a big stack of lumber to the finished piece, and this project was no exception.  Here’s a quick look back at how Kevin’s daughter’s piece came to be.

The initial glue upAs with just about every project, everything starts with a good glue up. This one was for the back board. Yes, I had some problems with the resawing, but a quick call to the folks at Laguna helped me get through the work and end up with some beautiful pieces.

The back board cut to sizeWith the glue up done, the next big step was to cut that backboard to the right size. I got it to the final width by ripping the edges on my table saw, and then trimmed up the bottom with the track saw to get the bottom even and at a right angle to both edges. I cut the top arch out with my jigsaw and smoothed it out with a belt sander. The top made a nice, fair arch…

smoothing plane and cabinet scraperBefore everything was assembled, I took the opportunity to smooth everything out. Yes, I used a random orbit sander for some of the work, but using the smoothing plane and the cabinet scraper was a whole lot of fun.

The case is taking shapeOnce everything was smoothed, I cut some rabbet and dado joints to join the sides of the case together. This was, of course, the dry fit, because before I glued everything together, I took the opportunity to drill the five sets of holes that would accept the cherry dowels that would hold the medals and ribbons Sydney won.

The decorative cherry bracesOnce everything was glued up, I needed to make the vast expanse of maple a little more interesting, and attempt to keep this large piece from warping in the dry Yuma air. To do this, I used some cherry decorative ‘strongbacks’, except they were mounted to the front. Yes, this is a cross-grain situation. That’s why these were held in from the back of the case with three screws. One was screwed into the middle of the piece, with the other two screwed into the cherry pieces through slots I cut in the maple back, allowing the piece to move with the screws in place.

Clamping the overlayThe next step was the overlay with Sydney’s name cut out of a cherry overlay. I showed you how I did the cutout, and this arrangement was how I clamped the piece in place using a few clamps and my heavy toolbox on a plywood platen. This was the best way to get everything in place and make it all happen.

The final piece, ready to shipNow, all I needed was to finish the piece. First, I finished the sanding to ensure it was looking good, then I did my finishing regimen of a seal coat of shellac, followed by a thorough sanding and then wiped on the finish of poly, boiled linseed oil and thinner.

Today, it gets packaged up and sent on its merry way to Yuma. I just hope that Syd the Kid likes it!

Quick Poll

I am coming into the home stretch on the piece for my friend’s daughter. The piece has been signed, the finish is going on and now there’s just a few details to handle before I ship to out to Yuma.

Adding the finishWhile this has been going on, I have been purposely avoiding starting a new project. Do I not have one on my list of things to do? Of course I do, but because this is a project that a client is asking for, I have to push through to ensure it is totally complete.

However, this isn’t normally how I do things. There has been many times that I just begin another one – or two – while in the midst of things.

This week, tell us how you usually work on projects. It is one at a time all the time, or do you find yourself with several irons in the fire?


Link of the week

Tai Workshop’s Wood Bending page

How many different ways can you think to bend a piece of wood? Sure, there’s steam bending. And bent laminations. And cold bending. And… well, there are lots of different ways to bend wood.

A bent lamination in progressOne of the most complete sites I have ever seen is this one. The author doesn’t just list the wood bending methods, he goes into detail about why they work, what equipment is required to do this and the best way to succeed.  It’s an impressive and thorough collection, and worth a visit for sure.


part of the Wood Talk Online community