Link of the week

Compwood Products

So, you want to build a project with bent pieces.  Does that mean that you have to slice a board down to make bent laminations? Maybe. How about building a steam box to soften wood for bending around a form? You could do that.

But, what about taking wood straight from a package and bending it immediately with no special tools or tedious preparation? If that sounds like a better idea, you might want to give Compwood a try.

Treated with an interesting compression process at the factory, hardwood boards such as walnut, cherry, ash and maple come shipped to you in plastic to maintain a higher moisture level. From there, you can bend the wood by hand and clamp it in place and let the piece dry. That’s it.

While the wood is more expensive (about three times the board foot cost of regular wood), the convenience can save a lot of time in the shop.


The shop Hurricane Ike visited – part two

When last we left Kyle Barton, he had just relocated to Dallas to help run his company’s operations in preparation for the potential impact of Hurricane Ike.

After roaring through the Greater Antilles, Ike grew tremendously in size, becoming one of the largest storms ever recorded in the Atlantic basin. While this increase in size translated into lower wind speeds in the hurricane, the area the storm covered increased dramatically.  So, while the storm was blowing at Category 2 on the Saffir-Simpson intensity scale, the impact was far greater than anyone had expected. When the storm was nearly 300 miles away from Florida’s west coast – moving due west away from the Tampa Bay area – we still had storm surge from the massive system.  Ike didn’t pull any punches when it made it to the Galveston/Houston area, eventually becoming the third costliest hurricane in American history – behind 2005’s Katrina and 1992’s Andrew.

“The morning after landfall I picked up the USA Today left in front of the door at the La Quinta we were staying at. The front page showed a picture taken from an overpass on I-45 looking south toward Galveston. The highway was littered with boats and all sorts of debris, and there in the picture was the off ramp that went to my community – Bayou Vista. My first thought, was not for my shop but for my house. I had no idea what kind of shape it was in.”

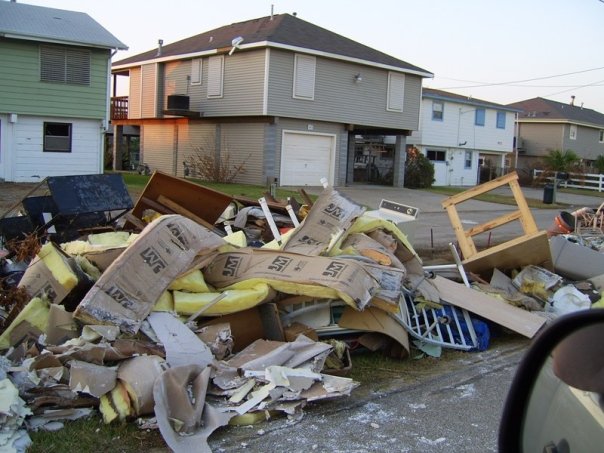
Kyle later saw pictures of his community taken from neighbors who had foolishly stayed behind to ride out the storm.  All of the homes in Bayou Vista had flooding of at least six feet in their ground levels. While he could see the damage, it took nearly a week to get clearance to return to his home. “My Shop and downstairs storage area was a real mess. The OSB walls I had just put up were warped and growing a funky mold in places, the floor was covered in a slippery black mud, all the doors were swelled shut, and everything that was left downstairs was all jumbled together.”

“One funny thing was that I had left a roll of paper towels on my bench. The roll was still there; dry just like I left it. But the bench it was on had moved from the back of my shop to the front. So I knew the water had “gently” risen up to about six feet and then gently drained back away.”

Kyle had his hands full over the next months stripping his entry foyer and shop back to the studs, dealing with debris clearance, working through the insurance process and getting things back to normal. Since insurance was not going to cover his Jet planer/jointer, he set about restoring that tool by himself.

Initially, he had used a product called CorrosionX, which helped to keep the rust to a minimum.  “All the cast iron was covered in surface rust. It only has one tiny subsurface pit on the out feed table. I completely disassembled the entire thing into its 383 parts – don’t ask me how I know – then I soaked all the parts in Evapo-Rust. I went through 4 gallons of the stuff.  I then replaced the motor, switch, cables, belts, and all the bearings. All in all it cost about $500, but it runs like a champ, has zero snipe, and there’s nothing I don’t know about that machine.”

Kyle bought other tools to replace the ones lost in the flood, and he was also able to  rearrange some storage areas in his old basement to make the shop a little larger. Today, his shop is a comfortable place to get some woodworking done. “The shop now is bigger, brighter and more functional. Except for a finishing room, I have all the space I need or want.”

Knowing that disaster recovery for a workshop – whether from a hurricane, tornado, fire, flood or other hazard – is possible, I wanted to leave the last few paragraphs for Kyle to share the lessons he learned with each of you.

“The biggest and corniest piece of advice is ‘Be Prepared.’ But also know what the worst-case could be and allow for it. That is where my preparations were lacking. Every year at the start of Hurricane Season, I call three local movers and confirm the cost and lead time they need to pack-up and move my heavy machinery to a secure storage facility. I visit a couple of storage facilities and confirm availability, space and costs. And I also check out box truck/trailer rentals in case I have to move everything myself. All of my heavy machinery is on wheels and I have bought a Harbor Freight Shop Crane to assist me in moving things and evacuating.”

“Next, check your insurance policies and know what is covered – and what is not covered –  for all types of disasters. You may be able to buy supplemental insurance to cover claims your current policies do not. In my case, I still can’t get coverage for my downstairs shop. But anything I can get upstairs – small power tools, hand tools, and the like – will be covered. Also document and photograph all your tools and kept that inventory in more than one location. In the cloud via Dropbox or other similar service is highly recommended.”

“Finally, know that if you do lose everything, you can recover and make your new shop better than the one that was lost.”

Remember, the Atlantic Hurricane Season runs from June 1 through November 30. The time to prepare is now.


The shop Hurricane Ike visited

This week, I’m instructing at the Florida Governor’s Hurricane Conference. Now, I’m sure you have got to be wondering why I’m letting you know about this. After all, it has nothing to do with woodworking and you may not even live in an area vulnerable to the impact of these storms.

Add to the fact that the last time a hurricane made landfall in the United States was during 2008’s Hurricane Ike, and you may believe you are starting to see me reach for a topic.

Not so. Last October at the Woodworking in America conference, I ran into Kyle Barton, a Galveston, Texas area woodworker. Kyle is very much your average hobby woodworking kind of guy. “Like most folks, I did some home remodeling and considered myself pretty handy. So when we were looking a buying some furniture I said, ‘I can build that better and cheaper.’ Now as we all know, it’s never cheaper, but it is better.”

His shop was in the basement level of his home – which actually sat up on 14 foot pilings to elevate the living area above potential storm surge flooding levels. “The shop was about 12’ feet wide but 36’ long. The sad part was I had just finished insulating and putting up walls. For the first couple of years it was uninsulated. The shop had an A/C and dehumidifier – a necessity on the Gulf coast. For lighting I had four T-8 fixtures from Home Depot that had 4 tubes per fixture. The walls were OSB, screwed into the studs, and painted with white oil based paint.”

He had built his shop around a Bosch bench top table saw and an assortment of other routers, a planer, dust collector and other hand tools. “Nothing too serious…” But, one of the tools he had just purchased – and was most proud of – was a Jet 12” jointer/planer. “A great tool… I had just bought it, and was discovering what it was capable of.”

This was a great place for Kyle to build all kinds of furniture. Cabinets, tables, maybe a few chairs in the future.

Now, Kyle lives in a very vulnerable area of the country for hurricanes. The Texas Gulf Coast, much like the west coast of Florida where I call home, is flat country next to the bathwater warm waters. “It had been more than 20 years since a major Hurricane – Alicia – had impacted Galveston. And according to some neighbors that lived there then, only a couple of inches of water got into any of the houses. So, why I knew it was a possibility – actually, a certainty over long time period – I never thought I would have major water in my shop.”

“I was putting on the last coat of paint on the walls of shop when I first heard of Ike. We had just has a close call with Gustav earlier in the season. Ike was still a ways out, but the projection look like it was coming straight for us.”

Knowing that he would not be covered by insurance for anything that got damage in his shop, he moved all of the small tools upstairs into the house. “The only thing left in the shop was the table saw, jointer/planer, dust collector, router table, drill press, and spindle sander. The only thing that wasn’t on a stand of some sort was the jointer/planer. I put that on blocks in case I got a foot or so of water in the shop.”

Kyle also had the presence of mind to do a complete shop inventory before he left to go to work. Photos and a list of the items in the shop, just in case. With this in hand, he headed to Dallas to prepare for his company’s relocation to a safer area.

As he pulled away from his home, Kyle’s last thought? “I just hoped I would not get any water on the baseboards, because I really didn’t want to have to replace them.”

Hurricane Ike, apparently, didn’t share Kyle’s feelings toward his baseboards.

Come back on Wednesday to read part two of Kyle’s story about Hurricane Ike.


Quick Poll

So, I meant to get into the shop to put stuff away today.  Really.

But, I’m packing up to go to the Governor’s Hurricane Conference.  And, I had to make a big pot of marinara sauce for a party I went to tonight. And… well… I had a few excuses.

It’s a shame, because my shop could use a very good cleaning.

This got me to wondering… take a moment before you answer this poll.  Pop your head into your shop.  Give it a good once over.  And, let us know, just what is the state of cleanliness in your shop right now?


Link of the week

Mike Rowe’s Senate Testimony

Many days, I doubt if anyone really has a clue in Washington, D.C. So many times we hear about partisan bickering, bad decisions and unproductive meetings.

That wasn’t the case yesterday.  Mike Rowe, the creator, host and executive producer of the Discovery Channel’s show Dirty Jobs was on Capitol Hill to testify to the Senate Committee on Commerce, Science and Transportation. He was called before the committee to talk about the lack of vocational training in our schools and the number of jobs available that can’t be filled because there are not enough qualified tradespeople to do the work.

Mike’s brief presentation was riveting as he spoke about his grandfather – a jack of all trades – and how today’s education system has significantly reduced the importance of vocational education.

His call for a nationwide PR effort to bring vocational education back to schools was funny, impassioned and thought provoking. You can read the text of the statement at the link above, but Mike is a very effective communicator, and you would miss the emotion in his voice. If you want the full impact of the testimony, check out the video here.

Watching that video, it’s difficult to figure out who was more impressed to be in the others presence – Committee Chairman Senator Jay Rockefeller or Mike.


Tools I use: my circle cutter

OK, this I know my drill press is on the list of tools I would like to use more. And, when I wrestle it out of the body of the rolling shop table, I love to use it.

But, I like to use my corded hand drill to make small holes with twist, spade or forstner bits. And, I like to use my router to cut larger holes.  And, I have a spindle sander that I use to sand inside and outside curves. That’s a big part of the reason I don’t haul it out.

But, this past weekend, I used a new accessory while making the wine bottle balancers that may have me turning to the drill press for more moderately-sized holes.

The accessory is a combination circle and wheel cutter. It’s a pretty complicated looking contraption that works fairly well on holes from 1 inch to about six inches.

It’s a tool with a body that chucks into the drill press. There is a slot in the body for a beam to pass through and a drill bit at the bottom for starting a hole. The beam is adjustable and it holds a cutting head equipped with a sharp angled blade underneath.

It’s simple to operate. Just chuck the tool in, loosen a set screw to adjust the cutting head on the beam until it matches the radius of the circle you would like to cut and tighten it down.

You will also want to take this opportunity to adjust your drill press speed to its slowest setting – about 500 rpm. You are swinging a lot of steel around, and you’ll want to keep it under control at all times.

Mark the center of the circle you would like to cut on the board and adjust the piece until the bit is right over the center. Clamp the work to the table, start the press and slowly plunge the bit into the wood.

It takes a little getting used to when you use this for the first time.  Keep an eye on your fingers when you turn the press on, because that beam has one heck of a swing. I was anticipating a lot of wobble with the drill press, but it stayed solidly on the bench.

The cutting action was pretty interesting. Because the cutter is ground on an angle to a point, there is a definite slicing action at the cutter. Keep a light hand on the plunge – you don’t want to force it.

One of the down sides to this is that it doesn’t have a great plunge depth. So, even if you are drilling a piece one inch thick, you will have to stop the press, flip the work over and go at it from the other side.

The results are pretty sweet.  Yes, you will need to sand the inside of the hole – it does leave things a little rough – and you will have to go slowly to prevent tear out where the cutter enters the wood, but the work goes very quickly – even in dense purpleheart.

The cutter is also reversible, so you can also use the cutter to cut wheels for small toy vehicles, faces for clocks and other more imaginative uses. Since you are also drilling a center hole, you will need to keep that in mind as well.

Can I cut holes with forstnter bits, hole saws and other specialty bits? Of course. But, the hole cutter allows for a great range of adjustability… negating the need to amass a great collection of specialty bits for the drill.

For the small holes I had to drill, the offcuts almost look as if they would make some cool toy tops.  Hmmm… maybe that would be fodder for another article!


Stuff I’ve built: The wine bottle balancers

In addition to watching the Kentucky Derby at the big soiree this past weekend, we also held a wine tasting event.  At the same party.  The wackiest wine name or label won a prize. (For the record, a wine named Cardinal Zin took the top honors)

So, I had to figure out what to give as the big award.  Some of those wine glass charms are always appreciated.  A waiter’s corkscrew was also a nice addition. But, I knew I had to add something special.  But, what to build?

I had thought about those balancing wine holders.. you know, the simple sticks with a bevel cut on one end and a hole drilled in the other… and realized that it could be a simple but interesting project to build.

Yes, it is an insanely simple plan.  But, as with all simple plans, you have to get the details right.  In this case, how large of a hole to cut, how long a stick of wood and what angle to cut the bevel? That could be critical later when actually putting a wine bottle in the holder.

I did a quick search and found a drawing at the Timeless Treasure Trunk Wood Shoppe that showed the details of the project. Easy Peasey!

I fished around in my scrap barrel and found a few choice pieces of walnut, spalted maple and purpleheart that were big enough for the pieces.  I cut them to rough size and planed each of them by hand to get them square, flat and true.

From there, I cut the bevel on one end of a test piece.  I wanted to make sure that everything was going to work well when I put the bottle in. The plan called for a 40 degree bevel – not sure how that was arrived at, but I wasn’t going  to mess with the plan – for now, at least.

The next task was to cut a circle on the other end of the board to accommodate the neck.  The plan called for a 1 3/16″ hole, but I wanted to go a little larger so it would work with fluted bottles and other larger bottle necks.

When I took the bottle  holder inside, it worked.  VERY well. Once I got the measurements done, I jumped on the other ones.  If it was easy to make one, it was easier to make a dozen!  I cut the bevels on the other ones and started to drill. I used a 1 1/2″ forstner bit to cut the hole on the walnut holders, but the going was much tougher with the maple and purpleheart. For that, I switched to my drill press and a circle cutter.

I put a 1/4″ roundover bit in my table mounted router and rounded over all the edges except the ones at the bevel. I then sanded the pieces down with my random orbit sander and used my spindle sander to make the inside nice and smooth.

I finished each of them with three coats of Watco Danish oil.

Now, the trick to using these is to push the neck of the bottle in as far as it will go, then set the bevel flat on a (stable!) table. Slowly let go of the bottle, and then let go of the stand, and it should stay put. The weight of a full 750 ml bottle of wine will counterbalance the tendency of the holder to tip, making a very impressive display.

I went with the basic rectangular shape for the holders, but you could go with a fancier design if so moved!


part of the Wood Talk Online community