All posts by Tom

I'm the guy who writes the blog...

Stuff I’ve Built: Draw Leaf Dining Room Table

November, 2007

    Way back in 1994, my wife and I were living in a small apartment in St. Pete Beach on the lovely Gulf of Mexico. And, in that tiny apartment, all we had room for was a tiny dining room table.

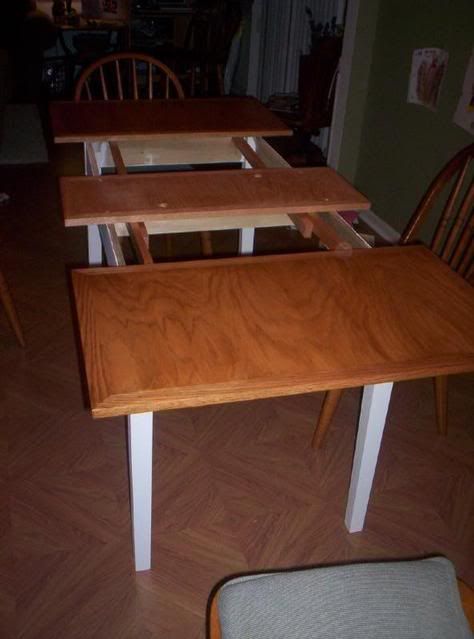
    Well, that table served us well for 13 years, but our situation definitely changed. With two kids, a house of our own and relatives who like to come over for holidays, our dining needs have increased. What we needed was a table that could sit four of us for day-to-day family dining, but expand to fit a houseful of guests. And, since we didn’t want to give up any of our precious storage space, any table extension leaves had to be stored within the table itself.

    I pored over ideas for a project that would fill the bill, but was stuck. Finally, I remembered that in the house I grew up in, we had what is known as a draw-leaf table, with extensions that stored under the table. I had to look long and hard to find plans, but eventually discovered Tage Frid’s plan for a ‘Dutch Pullout’ table he had published in Fine Woodworking magazine. I found the plan in a book called Tage Frid Teaches Woodworking. You can also find the plans at Fine Woodworking’s website, but you will have to subscribe for the service.

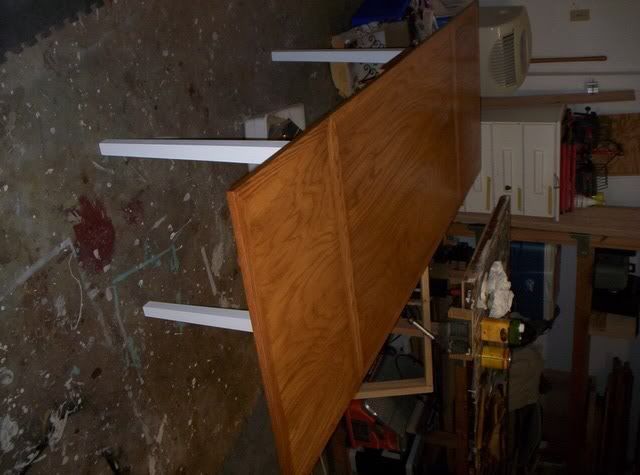
    I built the table with a poplar base, since it was going to be painted. The stretchers are mortised into the tapered legs.

    The table running gear is pretty interesting. Basically, the leaves are attached to tapered runners. The taper rises 3/4″ – the same height as the table top’s thickness – as they are pulled out. This means that the leaves slide nicely under the main table top when not in use – saving valuable storage space in a house that’s already cramped with toys, books and the other stuff that goes along with being a homeowner.

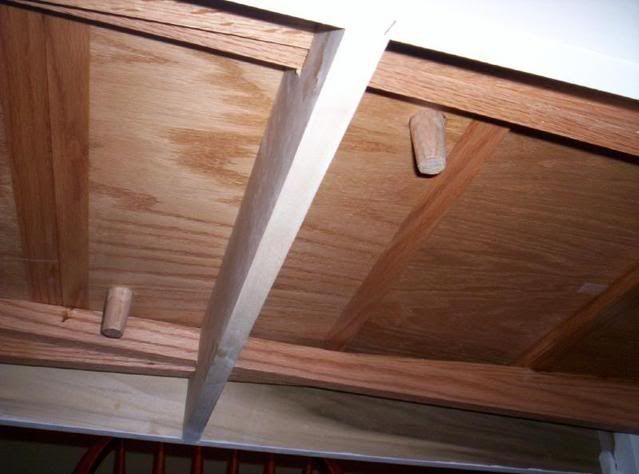
    The main top indexes with 3/4″ dowels glued into the underside of the top. They go through a set of holes in the middle fixed sub-top. That allows the main table top to rise as the leaves are extended. A pretty clever design.

    The base was painted with a sponge-rubber roller – a coat of Kilz II. Sanded when dry. Two topcoats of a white latex enamel. The top was finished with a coat of 1# dewaxed shellac, sanded, then seven coats of Waterlox glossy. I had to tint coats three and four to achieve a darker tone on the table.

    I raced to get the table done in time for Thanskgiving… and moved it to the dining room the Tuesday of Thanksgiving week. Whew.

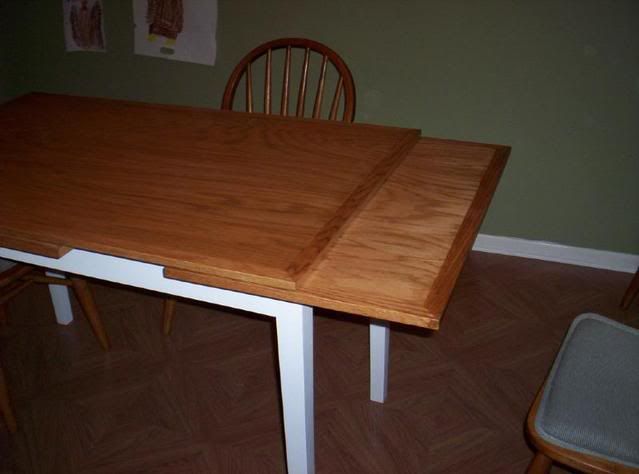
    For the big day, we were able to seat 10 around the table. Quite an improvement over using the card table.

    Edge Jointing using hand planes

    So, last time I showed how I face plane using hand planes. Now, we move over to the edge of the board. Believe it or not, this is actually easier to do than face planing… No, really, it is.

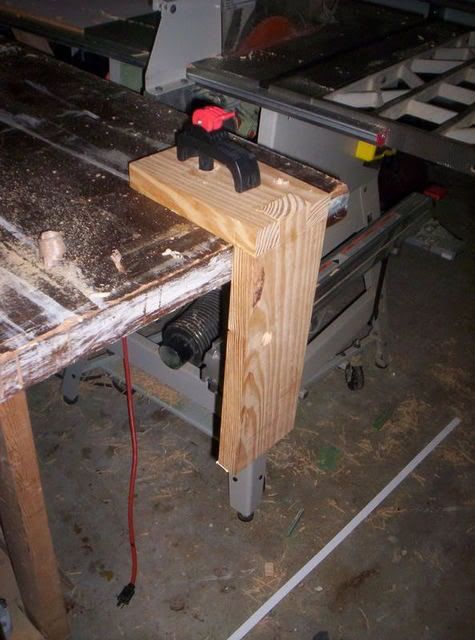
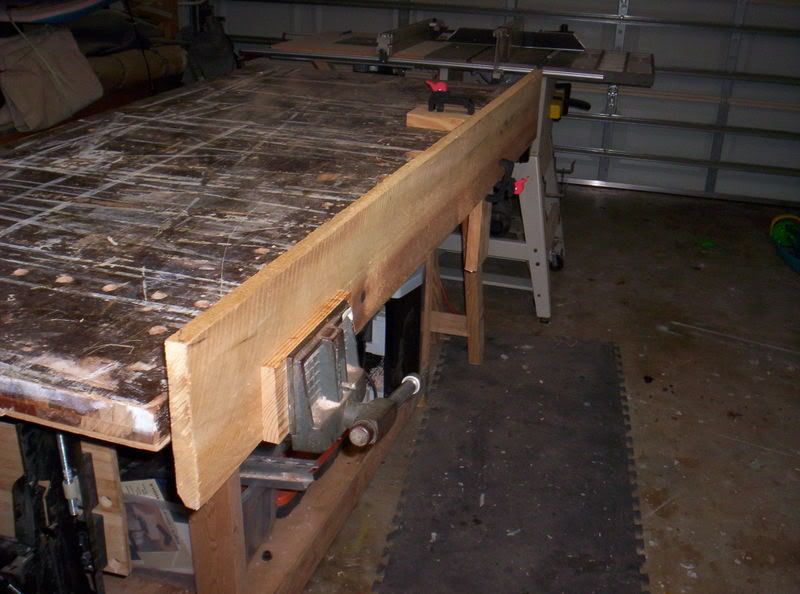
    (Click on images for larger versions) First thing you have to do is secure your board to your bench. You can do that with a regular woodworking vise and a special ‘appliance’ you build to hold the wood. Mine is made of two pieces of southern yellow pine dovetailed together (it’s a VERY rough dovetail…) with holes for some inexpensive hold-down clamps. This is the end of the board that doesn’t fit into the vise.

    Can you use two face vises? I don’t see why not… but the one to the right (for right handers) is not going to get a lot of use in a traditional set up… this appliance can be removed when not in use… and it costs a whole lot less!

    This is what your wood should look like when you get it all set in the vise and appliance. In this arrangement, there is little – if any – chance the board will slip. That is essential when you plane – you want the wood to stay still while you move the tool.

    Once it’s locked in, sight down the length of the board. Get as close as you can to the edge and squint, looking with one eye to see if there is a crown or dip in the board. If you notice high spots, mark them in chalk or with a pencil so you will know where to do the first work.

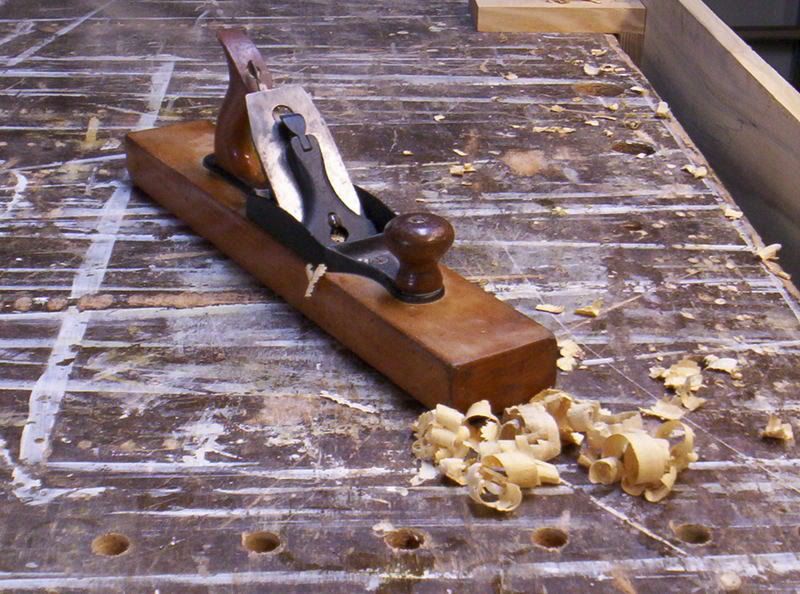
    The next thing I do is take out my old No. 32 transitional fore plane set for a heavy cut. I want to get those high areas out of the way quickly and get that edge as straight as possible. This task can also be done with a No. 5 jack plane with a metal sole. I just prefer the wooden soled plane because I think it slides more nicely on the wooden edge. As you can see, the shavings aren’t curls… they are much more like wood chips. I’m not going for finesse here, I’m roughing in.

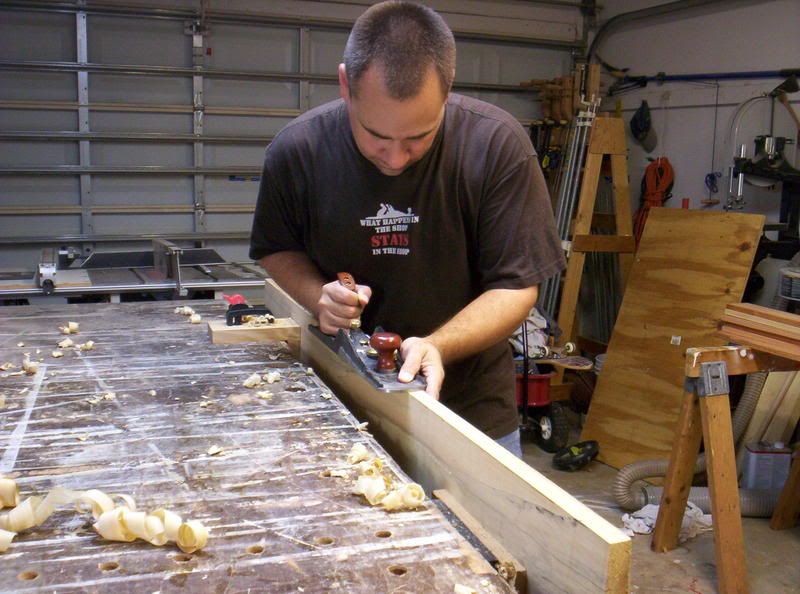
    From there, I get out my trusty Veritas bevel-up jointer plane. Yes, I bought a newly minted plane instead of finding a quality used one. I haven’t had much luck finding a complete No. 7 Stanley jointer – most of the ones I have purchased had ‘issues’ that were beyond my abilities to repair. Since my shop is relatively crowded, and the plane was less expensive than a powered jointer, I figured I would spend the money I was saving for a powered model on this beautiful tool.

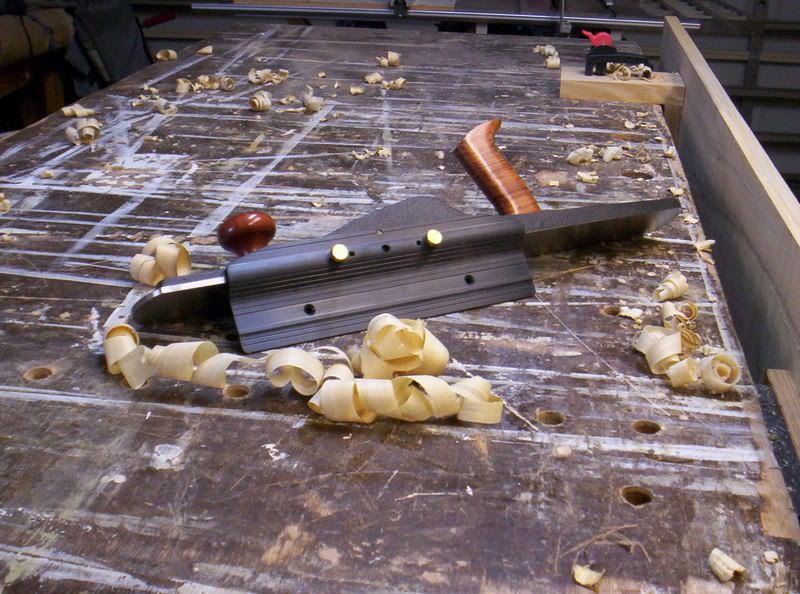
    I also bought the 90 degree fence for the plane. True, if I was edge jointing two boards for a glue up, I could plane them both side by side in the vise, with any variations in angles canceling each other out. But, I have found that true, crisp 90 degree angles glue together more nicely. That’s my experience – of course, your mileage may vary.

    The technique is very simple. When you start planing, push down hard on the front knob while you push the plane along. Once the plane is completely on the board, push down evenly as the plane glides along. When you get to the end, relax your pushing down on the front knob and bear down on the tote (the back handle). Think about scooping up a bucket of water. Practice, practice, practice and it will come easily.

    As you can see, the are the nice, board-length curls you come to expect from a hand plane. When I get to the jointer, that’s when I want to make the cuts a lot finer to refine the edge of the board.

    The real test comes when you run a square along the edge to confirm you have planed at 90 degrees, and you remove the board from the vise and appliance and lay it down on the bench top. You should not be able to see any light passing under the board.

    Total time to edge a board? I dunno – three to four minutes. No snipe. No screaming motor. No chance of losing fingers or the board exploding if a jointer knife snags a knot. There’s a lot to be said about those hand planes!

    Link of the week

    Trappist Caskets

    They say in life that only two things are certain – death and taxes.

    A monk inspects the timber for the casketsAnd, when the time comes to shuffle off this mortal coil, what would be a more fitting tribute to a woodworker than to be laid to rest in a hand-built wooden casket?

    The monks at the New Melleray Abbey in Poesta, Iowa have set their hands – and prayerful attention – to the crafting of these final resting places. Built from wood harvested from their carefully-managed forest, each casket is built with strict attention to detail in a spiritual atmosphere.

    The monks' workbenchFrom the most basic, unadorned pine casket (the one that the monks lay their brethren to rest in) to more ornate offerings in oak and walnut with raised panels, there is a wide selection of items to choose from. Cremation urns and children’s caskets are also offered with prayerful respect.

    As Cistercians, the order follows the ancient monastic Rule of St. Benedict. Consistent with that rule, their vocation is expressed in a life of contemplative prayer, community liturgy, and manual labor.

    Even though death is not a pleasant topic, a visit to the site provides a peaceful view of the work these spiritually dedicated men perform.

    Woodworking Spotlight: Ralph Laughton

    Some woodworkers are made, while it seems that others are born to the craft. That just might be the case for Ralph Laughton, a London-area woodworker and published woodworking author.

    Growing up in a houseful of boys, Ralph’s first exposure to the craft was with his uncle, a professional cabinetmaker. “We had all sorts of materials to hand. Off cuts of timber, second hand shuttering ply, scaffold poles and the like,” Ralph says, as he recalls his early days. “The tool kit consisted of a tin bucket half full of rusty nails, hinges, door bolts and other useful ‘stuff’, a couple of claw hammers and a saw.”

    At age 11, Ralph started at comprehensive school – sort of a technical school – where he had his first formal training in the craft. His lessons started with the most basic and essential skill any woodworker should know. “Our very first lesson was on sharpening hand tools. From that day on I was hooked and the passion has never left me.”

    At 15, Ralph moved on to three years of technical college where he studied mechanical engineering for three more years. “While I found that work interesting, I did not pursue a career in engineering but opted instead to enter the world of specialist publishing working for a military book publisher and subsequently moved on to design and commercial art. But, my passion has always been woodworking”

    Over the years, Ralph’s skills increased. He’s tackled many different styles of furniture, and has even ‘dabbled’ in turning. “Mostly, I turn round parts for square projects.” Even though there is a millennium’s worth of cultural history in his native Great Britain, one of his favorite furniture styles comes from across the pond – the clean lines of Shaker projects.

    As Ralph’s expertise grew, he was called upon by the editors of two British woodworking magazines – The Router and New Woodworking – to write his first two works – Success with Sharpening (ISBN – 978-1861083296) and Success with Joints (ISBN – 978-1861084156).

    The books were well received, and, through them, he caught the attention of the late Danny Proulx. Danny, already a well-respected woodworking author in his own right, recognized Ralph’s ability to explain difficult woodworking concepts clearly, and introduced Ralph to his publishers at F&W Publications. “According to Danny, they were looking for some British authors to add a different perspective on things. I said ‘yes’, and things started to happen.”

    After much thinking and collaboration with his wife Sue, Ralph hit on the idea for a book of storage projects for the home woodworking shop. Aptly titled Workshop Storage Solutions (ISBN – 978-1558708129), the book offers some interesting projects that draw their inspiration from some unlikely sources. “One day in the shop, Sue and I were talking about somewhere to put routers. A few sketches were made but nothing seemed right. A couple of days later Sue came up with the idea that the routers need to be taken to the work, just like a hairdresser uses a trolley to take the tools to the customer. A couple of thousand words, A few sketches and a working drawing, some MDF, a few wheels and the trolley was a reality.”

    The creative process is helped along by Ralph’s prior experience with graphic layout and publishing. According to Ralph, putting the thoughts into words and creating the projects are the easy parts. “Writing books is just a long slog. Sue and I will formulate the idea, write a table of contents and then I will sit down and write the whole thing. From there, it’s off to the workshop to build the projects according to the instructions I have just written. We shoot the photographs following the captions like a script – that’s all there is to it…”

    Time always seems to be at a premium for Ralph. “I have a few things in the planning stage such as some Victorian style built-ins in the master bedroom, I need to build a hobby chest to house a huge vintage Meccano – I think you call it ‘Erector’ in the US – collection. There are a few other projects needed to complete the follow-up to the Storage Solutions book and there are always the ‘requests’ from editors.”

    Even as a published and well-respected woodworker, Ralph knows that he – and his readers – still have discoveries to make and skills to improve. “My goal is to pass on the basics, the first principles if you like. Once someone has mastered the basics the rest is just practice. Lots of it. In fact I am still practicing now.”

    Face Planing using hand planes

    Have you ever needed to face plane a board without a jointer? It’s not as difficult as you might think.

    For this example, I used a rough piece of cherry that needed to be face and edge planed. If I had a jointer, I would simply run the piece over the cutter head and get a flat face through multiple passes. In my shop, however, I don’t have the room to keep a jointer, and I don’t think I’ll be able to get the money out of the household budget to buy one any time soon. Being a hobby woodworker requires a little ingenuity, and a willingness to try other ways. In this case, it’s the old-fashioned way – hand planes.

    Here’s what I used – a jack plane, a jointer plane and a No. 32 transitional fore plane. I purchased all of the planes from eBay for a combined total of about $40. All were in pretty good shape and required just a few touch ups and sharpening to be usable. The thickness planer will come into play later on in the process.

    After I cross cut the board to rough length (there’s no need to do the entire board – that’s just a waste of time and wood), I placed the board cup down (it had a cup) and rock the sides and edges looking for the board to wobble. Sure enough, it did!

    Once I identified where the board was highest, I flipped the board over and marked the high areas with chalk. This way, I wouldn’t lose track of where I need to work first. Yes, that happens in my shop, too.

    Before I used bench dogs and other more traditional hold-downs, I clamped across the bench and got to work with the No. 5 and No. 32 planes. If you have only a jack or a fore, you can do this with only that one plane. I just prefer to use the fore plane for the roughest removal, then the more finely-tuned jack plane to even the work out. My first task was to shave down the high areas.

    Once the high areas were down to a manageable level, I switched to the No. 7 jointer and waxed the sole with the stub of an old candle. Waxing your plane sole makes the plane slide nicely.

    After working on the board with the jointer, and flipping it back onto its face to make sure I had removed the warp, the board sat solidly on the work bench. At this point, I knew I had one side of the board flat enough to go through the thickness planer.

    Now, I found the thickest part of the board – in this case, a hair under 1 1/4″. I set the planer’s head, plugged in the cord and watched the wood chips fly After getting the top side completely smooth, I flipped the board over and planed out the rough areas on the bottom and got the piece to its final thickness.

    Total time from start to finish? Maybe five minutes…

    Now that the board had flat and parallel faces, I took it to the table saw to straight-line rip the board and joint the edges, but, that’s for another post!

    Who says those old planes are just wall decorations?