Category Archives: Joinery

The Quick Drawer

If I’ve learned anything from watching movies, it’s that directors of western movies love to feature gunfights during climactic scenes. It’s a big time cliche. You usually had the bad guy (you are able to tell he’s the bad guy because he wears a black hat) staring down the main street of some western city at the good guy (yup, he’s usually wearing at white hat and, more often than not, a badge marking him as a lawman).

As the two adversaries face off, there’s usually a tumbleweed that goes blowing past, then the camera will focus on the anxious eyes of the townsfolk. All they are waiting for is the 12th chime, indicating that high noon has struck and it’s time to draw and shoot.

Apparently, all the steely-eyed gunslinger needs is a fast draw – and some accuracy – to defeat his opponent and bring peace and order back to the town.

During my cabinet build, I have also discovered that fast drawers are a good  thing. Since I had to build eight of them for the cabinets, I needed a design that would be simple to execute but strong to survive years of abuse.

Of course, many woodworkers turn to dovetail joints to provide the maximum durability.  Since my drawers were going to be made out of plywood, I decided to go against that plan. Something about dovetails and plywood didn’t seem to sit too well with me. I’m sure it can be done, but I wanted to try a different plan for the build.  Besides, it’s really hot in the shop this time of the year.  The thought of spending hours dovetailing wasn’t appealing.

My next thoughts ran toward the very fast. Biscuits. Dowels. Pocket screws. And, I’m sure that I could have made all of the drawers in very short order using these methods and produced serviceable drawers in short order.  But, that just seemed too easy.  Plus, there is still the chance that something could go wrong and the work could slip while I was assembling. Maybe not the best choice.

What I needed was a drawer joint I could produce easily that would be strong, easy to assemble and ensure nothing could possibly slip. That’s when I decided on the tongue and dado (a.k.a. lock rabbet) joint.

Basically, this joint involves cutting a dado in the side piece that is half the width of the front and back set back that same distance from the front edge of the sides.  (Check out Wood Magazine’s tutorial)

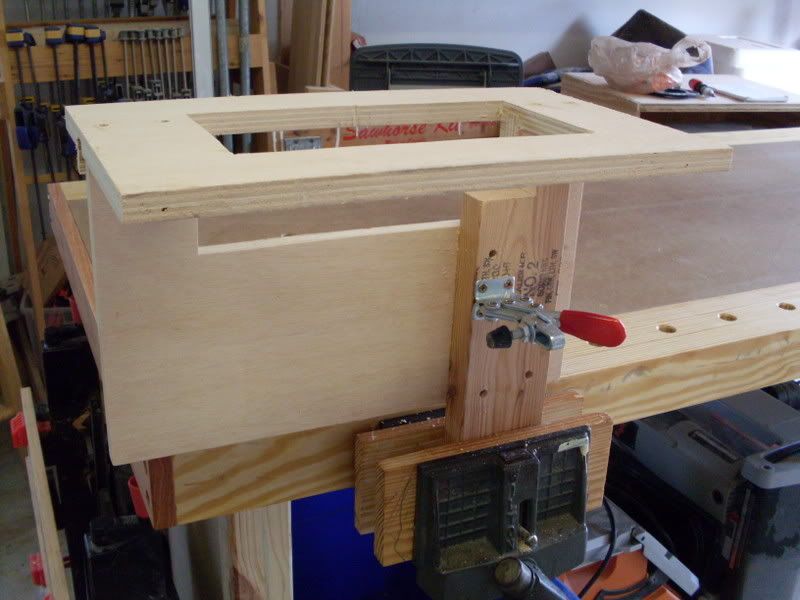
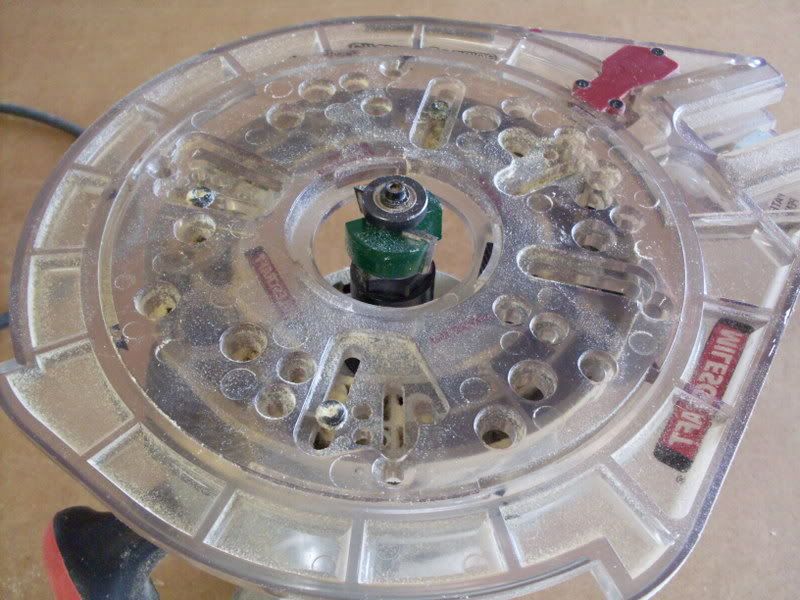
To start, I measured the thickness of the the front and back pieces – the same nominally 3/4″ birch plywood used on the cabinet boxes.  It came to .700″ when measured with a caliper. Translated into fractions, that came to about 11/16″, so I set up my stacked dado blade to 11/32″ using a combination of shims and cutters. I set the cutting depth to 3/8″ for the dado and tongue.

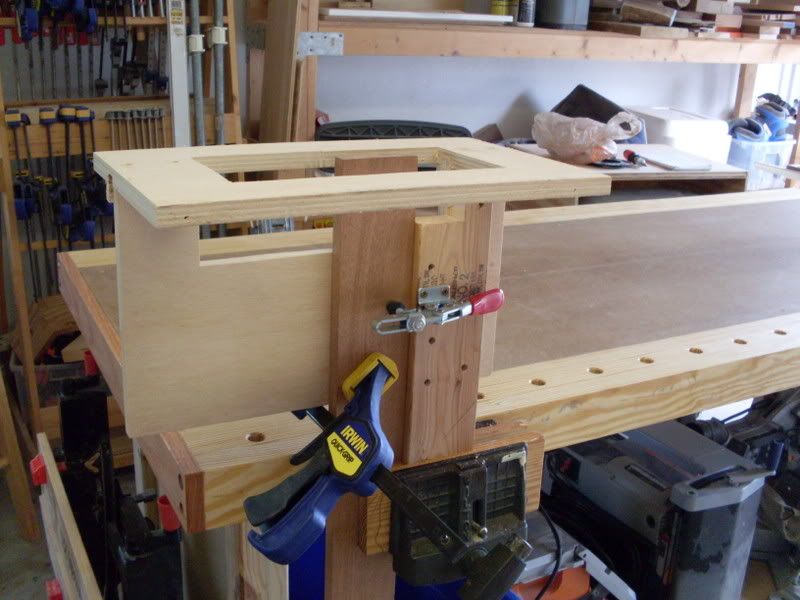
I set the distance between the rip fence and the inside of the dado to 3/8″ and ran the side pieces through. I made two dadoes on each piece – one for the box front and one for the back.  Those were easy to cut.

What I did then was reposition the fence so I would make a rabbet on the ends of the front and back pieces.  It took a little fiddling, but once I got it dialed in on some scrap, the tongues were cut in very short order.

A little touching up with a block plane, some grooves for the bottoms, glue and clamps and bingo… drawers!  Now, all that’s needed are the drawer fronts and some hardware. Since Paul is an engineer, I’m leaving the fancy fitting to him!

Next, some tops for the cabinet bases, shelves for the bookcases and toe kick covers, and we’re into the home stretch…

Panel psychology

No doubt you have heard about star athletes who, after tremendous success, suddenly have issues doing some of the more basic tasks.  The golfer who suddenly can’t putt straight.  The basketball player whose free throw percentage drops through the floor.  The baseball pitcher who has trouble finding the strike zone.

When something like that happens, the athlete’s livelihood and career are instantly threatened.  And, given the severity of the downturn, these athletes will try just about anything to get their performance back to the top.  Some will try different equipment.  Some will start carrying a good luck charm.

And, others will seek the help of a sports psychiatrist to get their mojo back.

Maybe I need to see one who can help me with my panel glue ups.

I’m not sure what’s happening lately, but my past two projects that required edge-to-edge panel glue ups have not been very successful. The cradle I donated to charity was the first sign I was having issues.  The project I am currently working on is the latest head scratcher.

My method is pretty simple.  I flatten the face of the boards I’m working on with a jack plane, whacking off the high spots until the board sits on the bench top with no issues.  I then run that face down through the thickness planer to get the boards to an even thickness.

For edge jointing, I’ve been using a Veritas bevel up jointer plane – the same one I’ve been using since 2005.  I sight down the board, level the high spots, continue until I get a continuous shaving and check the side-to-side for square.  90 degrees spot on.

It’s when I glue that things get sideways.  I glue the edge, get everything set on my clamps then tighten them down.  One edge might rise up.  I put a handscrew on that.  Another edge pops up.  A few mallet taps to get it down.  I’m happy with the left side, but then the right is messed up.  Back and forth until I think it’s OK, and then – CRAP! – not another stepped glue up!

I know I have to improve my technique.  My guess is that I am putting too much pressure on the clamps, or maybe not tightening them in the right order. Or, maybe the clamps aren’t 100% square to the board edge when I tighten them down? Not sure.

I know the glue makes  the boards slippery, so any quirks in the clamping process will totally mess me up in the finished product.

Until I can get this hitch out of my technique, I’m going to start relying on two ‘insurance policies’ to give me an advantage.

First, I’m gonna bust out the biscuit jointer.  No, I know it’s not going to add any strength to the joint, but they will certainly help with alignment.  The other is to cut some 2 x 4’s down to make cauls.  If I can pinch the entire glue-up under the cauls, I’m certain it couldn’t hurt.

How am I fixing the stepped glue up I have now?  Well, I after further review, it wasn’t quite as bad as I had thought.  Maybe 1/16″ of a step.  To remedy, I clamped the panel on my bench and started planing.  I got my bevel up jointer and planed across the grain from side to side.

I know what you are thinking.  “DANGER, TOM!  You’ll tear your boards up doing that!”  That’s what I thought, too.  However, with a freshly-honed iron, a coat of wax on the plane’s sole and a light setting, I could hear the long plane slicing down the high spots as I went back and forth over the board.  Eventually, I started getting full-width shavings.  Snick.  Snick.  Snick.  That side is flat.  I flipped the panel over and did it on the back.  Beauty!

The shavings I am getting kind of look like – well – shavings you would expect from a jointer plane.  Not too thin, but not gouged-out chunks.  Just a good set of shavings.

There were some rough tracks, so I leveled most of those out with a smoothing plane.  It’s a Stanley No. 4 – terrible for final work on highly-figured wood like this curly maple, but enough to take down the plane tracks.  Before I did any tearing-out, I turned to a belt sander to further smooth the surface.

I’ll sand some more to refine the scratch pattern and then do some through dovetails.  Finally, I’ll scrape the final piece down before the finish.

But, that’s a long time off.  I have a lot of shavings to clean up before then.

Maybe all of that cleaning can serve as a good way to meditate and reflect on the errors of my technique…

Mortising Magic

Step right up, ladies and gentleman.  I, The Great Trained Shop Monkey,will amaze and astound you with the paranormal mortising abilities taught to me by the mystic woodworkers of Exotic Imperial China and the Indian Subcontinent.  Using no more than a common table saw, I will cut a crisp-shouldered through mortise with absolutely no tear out which can accent any piece of work you want to add it to.  That’s right, folks.  No mortising machines.  No fancy chisels. No router jigs.  No new expensive tooling of any kind. Notice… nothing up my sleeve, nothing between my ears…

First thing I’m gonna do is cut some pieces of mahogany and maple.  That’s right, the mahogany will serve as the bulk of the leg stand for a bench, and the maple strip will serve as an accent piece to show some interesting contrast.  I also cut a length of tenon stock the exact dimensions I need the mortise to be.

From there, I set up the two side pieces of mahogany on the clamps, giving some room for the maple accent strips to be glued…

Then, I glue up the first maple strip, set it to the magic line of measuring, and clamp it in place, keeping the faces flush.

Without further ado, I wedge the tenon stock in and glue up the second maple strip, insert the tenon stock in the gap and glue the top maple strip into place, again keeping it flush with the faces.

Now, I say the magic works – Abra cadabra, hokus pokus, alakazam –  and blammo – I knock the tenon stock out of the hole leaving a perfect nothingness surrounded by a square-shouldered mortise with absolutely no tear out.  No mirrors, no tricks, no sleights of hand…

Now, all I have to do is work a little magic on shaping the legs of this bench….

Great Jigs: The Four-Faced Tenon Jig

There is little doubt that the mortise and tenon joint is one of the most important in woodworking. It’s incredibly stout and can be found in many different projects as an essential piece of joinery.

While cutting the mortise has its own challenges, cutting tenons can be even more difficult.  First of all, the tenon has to have very smooth faces and square shoulders. Then, you have to make sure you have the length of the tenon exact.  Finally, how do you cut these tenons on long pieces without creating a dangerous situation?

I’ve cut tenons several ways in the past – on a table saw, on the band saw, with hand tools. All did a fair job, but I may have hit on the solution I will be able to use more often than not.

While building my bench, I had to cut tenons on the end of the long side rails.  I wasn’t looking forward to trying to balance these standing on end on my table saw, and trying to push them flat on the table while keeping them square to the blade could prove challenging.

The Tenoning JigThat’s when I went to my bookshelf and came out with Pat Warner’s book Easy, Fast and Accurate Router Jigs.  There, I found the plan to build this.

The jig is insanely simple, yet yields such incredible results.  It consists of a top and a vertical fin – both made out of scraps (11″ x 17″) of cabinet grade plywood.  The top has a window cut in the middle about 4″ x 9″, and a rectangular cutout roughly the same size in the fin.  This assembly has to be square and tough, so I dadoed the fin into the top and screwed it.  I also used some glue blocks on the back side of the assembly to further reinforce the joint.

The next piece is a fence.  I used a 2×4 and notched it so the fence would protrude into the opening but not block the routing action.  Again, make sure this is perfectly perpendicular to the top, or you won’t like the results.

The board ready to cutI screwed a toggle clamp to the fence, which holds the jig to the board I’m routing.  However, I also throw a second clamp on the board, just to make sure the workpiece doesn’t move at all.

Now, clamp the board you want to tenon to the jig firmly against the fence.  Set the top of the board slightly below the top of the jig – you can use a coin under the straight edge to set the depth.

Next, put a rabbeting bit into your router.  The depth of the rabbet will help determine the width of your tenon.  For this example, I put a 1/4″ deep cutting rabbet bit to use on a board with a width of 3/4″.  This will leave me with a 1/4″ thick tenon 1/2″ shorter than the height of the board.  If I wanted a 3/8″ wide tenon, I would use a rabbeting bit that cut 3/16″ deep.

The router base and rabbeting bitSet the length of the tenon by adjusting the depth of the bit below the router base.  I’ve measured on my Freud router and found I could push the bit to cut a maximum of 1 1/4″ below the base – a decent sized tenon.  If you need to extend the length of the tenon, you can use a top-bearing flush trim bit that can reach even further down the board after the initial rabbet cut.

Another key component of this jig is to use a larger than normal base to ensure the router doesn’t fall into the jig.  Here, you can see I’m using a Turn Lock offset router base to ensure that the router stays firmly in contact with the top of the jig during the cut.  You could use an offset base such as this or even build a ‘ski’ type base made of plywood to get the necessary width.

The final tenonNext, you simply rout around all four sides of the board.  The result is extremely impressive – a very crisp, square-cornered tenon that came out exactly to 1/4″ wide on this test board.  It takes just seconds to cut this, and you never have to change the setup.  So, in effect, you can cut dozens of identical tenons one after another in very short order.

And, what about really long boards that need to be tenoned?  Well, you could clamp the work vertically in a vise and climb a ladder, but the beauty of this jig is that you can actually clamp the board on an angle in your vise.  Put one edge on the ground and tip the rail over until the end is at a comfortable height for you to work.  Put the jig on the board with the fence to the top of the work and clamp it in place.  Sure, you’ll be working with your router at an angle, but I had no trouble with this setup as long as I kept the router pressed firmly against the top of the jig.

If you cut your mortise with a router bit, you will have to round the corners of the tenon.  I did this on the rail tenons for my new bench by carefully paring back with a sharp chisel and then sanding the corners perfectly round to fit the radius.

Even after cutting just a few tenons with this jig, I know I’m going to be using it again and again to cut tenons.

Link of the week

Hand-Cut Dovetails After Fifty  

Hand-cutting dovetailsWow, if this week’s quick poll is any indication, it looks as if the majority of our readers prefer to hand cut their dovetails. That’s quite a surprise to me.

This site’s author Norman Havens proves you can teach an old dog new tricks. This site offers step-by-step instructions with clear photographic illustration of the hand-cut dovetail process – from the initial steps of marking out the pins to the final fitting of the completed joints.

The most valuable part of the site is that Havens not only describes the process, he also discusses the difficulties and mistakes he made along the way.  This way, the novice dovetailer can hopefully avoid some common pitfalls.

While there are many other processes to cut these complicated joints, this site will get the novice up and running with the basics.

The Roller Coaster ride of experience

Kumbaat Busch Gardens - WOW!I’ll remember it like the day it happened. I was standing in Busch Gardens, the Dark Continent in Tampa one steamy August afternoon. Looking up, my sight fell upon the aqua and red tracks of Kumba, the new enormous roller coaster the park had just opened. 143 feet tall. 114 foot vertical loop. Batwing maneuvers. Not one, but TWO inverted cobra rolls. This thing was a monster.

As the train whooshed by at 60 miles per hour, I could feel myself being knocked backward by the rush of air and deafened by the roar.

And, I was in line to take a ride on it.

I grew up in a family where my mom couldn’t stand to see her sons in peril. She cringed through six football seasons as my younger brother took to the gridiron. We grew up within short driving distance of a ski resort, but never went because it was too dangerous. Needless to say, whenever we went anywhere with a roller coaster, we were told just how perilous they were.

So, you could imagine my fear when I boarded the train – my first real roller coaster train – and it started to go up the lift hill.

Now, sure, it may not be as dramatic as that first rush down the hill in the coaster, but why do I sometimes feel the same apprehension before trying anything new when I woodwork?

My first dovetails
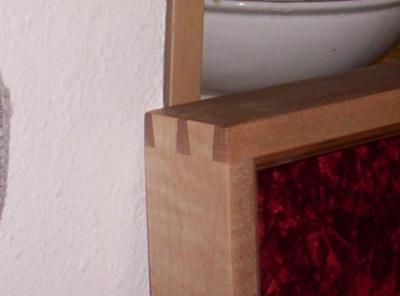
For instance, a few years ago, I was building a shadow box for my dad to house his military badges and medals. I found some choice maple that would be perfect when finished. I also found a nice scrap of cherry molding that would be just long enough to dress the piece up and serve as a glass stop. Everything was going to be perfect.

In order to make this piece extra special, I decided I was going to use dovetails. My first ones. Ever. Gulp.

No one could accuse me of not doing my homework. I read everything I could get my hands on about machine vs. hand cut. I visited every woodworking forum I could think of. I asked every woodworker I knew for their opinion.

Finally, after nearly two months of weighing my options, I went to my local Woodcraft, walking with the swagger of a seasoned woodworking veteran, and headed straight to the dovetail jigs. When I got there, I froze. The choices were staggering. Akeda. Leigh. Shop Fox. Stots Template Master. I had that blank look in my face when one of the employees walked up and asked me what I was looking for.

When I told him I was a complete novice and never had even seen a dovetail jig before, he recommended the Keller setup. I plunked down my hard earned dead presidents and headed to the car.

When I got home, there was no bravado or swagger left. I found myself staring at the manual, trying to make heads or tails of what I was reading. Tentatively, I assembled the jig and put the bit in the collet. I laid the router down, wood clamped to the jig, and walked inside.

Six days later, when I finally got the courage up to actually make a cut into the lumber I had lovingly jointed, planed and cut to length, I gingerly stepped into the shop and plugged the router in. The router whined to life and, after stopping six or seven times to ensure everything was the way it had to be, I touched bit to wood and stared cutting. Sawdust flew everywhere. Cut, cut, cut.

When I was done, I flipped the jig around and cut the pins. Cut, cut, cut.

Much to my amazement, the joint slipped together – perfectly – on the first try. I was so jacked, I took the pieces inside and showed my wife, who happened to be taking a nap on the family room sofa.

“Wha… Oh, that’s great.” She closed her eyes and lay back down to sleep.

I walked back to the shop, and proceeded to cut the rest of the joints. That afternoon, I had met dovetails, and I had kicked their butts.

When I stepped off Kumba after my first ride, I was pumping my fist in the air.

Now, THAT’S what I’m talking about!

After that, I looked at all roller coasters with a sense of anticipation. “Honey, when can we go to Sandusky, Ohio to ride the coasters up there?” I want a new challenge.

Funny how that first success can breed so much confidence…

The Perfect Joint

Woodworking magazines are a wealth of information. I’ve been a subscriber to Popular Woodworking since 1998, and I have plenty of editions of Fine Woodworking, Wood, Woodcraft, Shop Notes, Woodsmith and many others on my book shelf. Every so often I trot out an entire year’s collection and look through all of the offerings. Great step-by-step projects. Excellent technique articles. Outstanding tool reviews. Each edition has much to offer.

Of course, there are the times when you’ll seem to read the same article over and over again in several editions of different magazines. “Master the Mortise and Tenon!” “Mortise and Tenons made easy.” “Cut spot on mortises and tenons.” And, those may be in three different magazines in the span of eight months. Hey, let’s face it; some topics are so essential to woodworking that you need to see them every so often.

A few years ago, there was this big push to do an article that really left me confounded. I saw it first in Popular Woodworking, then later in Wood. I’m sure it must have been in a few others. It was a wood joint torture test. The premise of these articles is a sound one – let’s find out just how much strength do each of these joints have. It’s a topic that has reared its ugly head in woodworking circles for generations. The tests were devilishly simple, and looked like they were cooked up by Wile E. Coyote of Looney Tunes fame. Basically, a sample of each of frequently used joints – dovetails, mortise and tenon, rabbets, biscuits, etc. – were placed on a work platform, and a 55 pound anvil was dropped a certain distance onto the joint.

The results, as they say, were spectacular. All of these joints, save the beefiest mortise and tenon, were demolished. Splintered. Crushed. The test did expose some of the strengths and weaknesses of each type of joint. For instance, a 90 degree box joint totally flattened out after its date with the anvil, while the dovetail did offer some resistance to the force of gravity.

My only question, however, is what exactly was the point of each of these tests? Sure, if you routinely abuse your woodworking projects, you had better build them like timber framed structures. But, for a hope chest, is a box joint necessarily worse than dovetails? The tests also showed that wood breaks away from pocket screwed joints when hit by an anvil. If this makes you believe that a mortised and tenoned face frame is superior to one that’s pocket screwed, and you have the time and determination to do all of that extra work, be my guest. However, aren’t most face frames joined to the cabinet box, gaining tremendous support from the case itself? In some cases, speed of assembly AND strength are the guiding principles.

Some woodworkers may use this test as further evidence that the ‘Old Masters’ who built furniture before us used only classically cut joints because that is the only way to do it right. But, hey, if the Shakers were so creative as to create work saving devices as the circular saw blade and the washing machine, don’t you think they would have relished the opportunity to use pocket screws or biscuits if they had the opportunity?

Am I saying that there’s no place for classic woodworking joints? Not at all.

Am I saying that there’s no place for new-fangled woodworking joinery techniques? Absolutely not.

What I am saying is that woodworking is an incredible craft, and there is an incredible array of choices available to today’s woodworker. Feel free to pick the right joint for the right job, regardless of the era from which it came, or how it fared when an anvil fell on it.