If I’ve learned anything from watching movies, it’s that directors of western movies love to feature gunfights during climactic scenes. It’s a big time cliche. You usually had the bad guy (you are able to tell he’s the bad guy because he wears a black hat) staring down the main street of some western city at the good guy (yup, he’s usually wearing at white hat and, more often than not, a badge marking him as a lawman).
As the two adversaries face off, there’s usually a tumbleweed that goes blowing past, then the camera will focus on the anxious eyes of the townsfolk. All they are waiting for is the 12th chime, indicating that high noon has struck and it’s time to draw and shoot.
Apparently, all the steely-eyed gunslinger needs is a fast draw – and some accuracy – to defeat his opponent and bring peace and order back to the town.
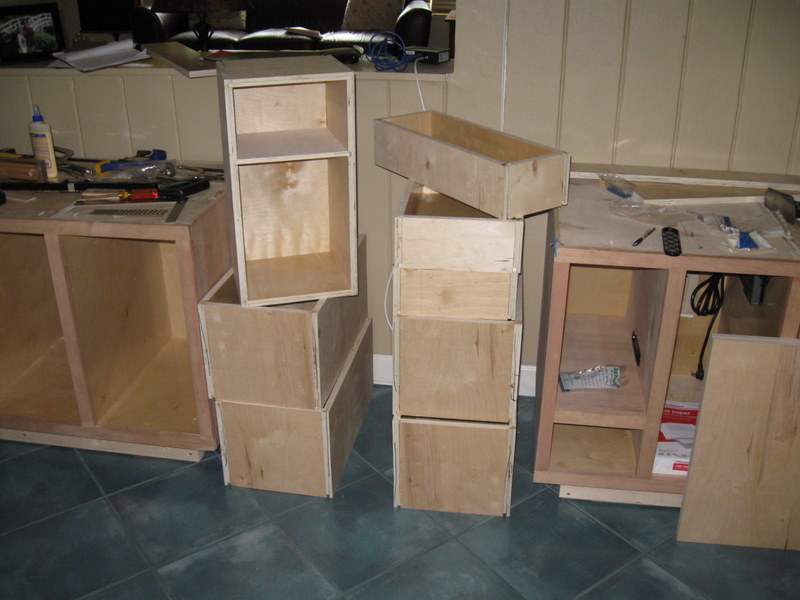
During my cabinet build, I have also discovered that fast drawers are a good thing. Since I had to build eight of them for the cabinets, I needed a design that would be simple to execute but strong to survive years of abuse.
Of course, many woodworkers turn to dovetail joints to provide the maximum durability. Since my drawers were going to be made out of plywood, I decided to go against that plan. Something about dovetails and plywood didn’t seem to sit too well with me. I’m sure it can be done, but I wanted to try a different plan for the build. Besides, it’s really hot in the shop this time of the year. The thought of spending hours dovetailing wasn’t appealing.
My next thoughts ran toward the very fast. Biscuits. Dowels. Pocket screws. And, I’m sure that I could have made all of the drawers in very short order using these methods and produced serviceable drawers in short order. But, that just seemed too easy. Plus, there is still the chance that something could go wrong and the work could slip while I was assembling. Maybe not the best choice.
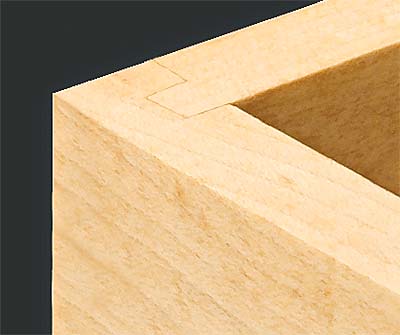
What I needed was a drawer joint I could produce easily that would be strong, easy to assemble and ensure nothing could possibly slip. That’s when I decided on the tongue and dado (a.k.a. lock rabbet) joint.
Basically, this joint involves cutting a dado in the side piece that is half the width of the front and back set back that same distance from the front edge of the sides. (Check out Wood Magazine’s tutorial)
To start, I measured the thickness of the the front and back pieces – the same nominally 3/4″ birch plywood used on the cabinet boxes. It came to .700″ when measured with a caliper. Translated into fractions, that came to about 11/16″, so I set up my stacked dado blade to 11/32″ using a combination of shims and cutters. I set the cutting depth to 3/8″ for the dado and tongue.
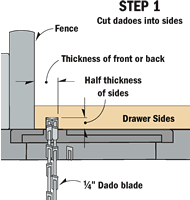 I set the distance between the rip fence and the inside of the dado to 3/8″ and ran the side pieces through. I made two dadoes on each piece – one for the box front and one for the back. Those were easy to cut.
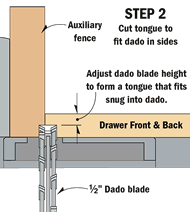
What I did then was reposition the fence so I would make a rabbet on the ends of the front and back pieces. It took a little fiddling, but once I got it dialed in on some scrap, the tongues were cut in very short order.
A little touching up with a block plane, some grooves for the bottoms, glue and clamps and bingo… drawers! Now, all that’s needed are the drawer fronts and some hardware. Since Paul is an engineer, I’m leaving the fancy fitting to him!
Next, some tops for the cabinet bases, shelves for the bookcases and toe kick covers, and we’re into the home stretch…

Nicely done and explained, Tom. Looks like your cabinet project is coming together nicely.
Excellent presentation Tom, I love this joint for shop stuff, or when I have to batch out a bunch of drawers at once. One thing I do differently when making “higher quality” drawers, is cut the dado in the side board, a little more (1/64 – 1/32) than 1/2 the width of the front board back from the edge. This gives me some wiggle room when it comes to setting up the cuts. Once the drawers are glued up I remove the excess with a block plane.