
There is little doubt that the mortise and tenon joint is one of the most important in woodworking. It’s incredibly stout and can be found in many different projects as an essential piece of joinery.
While cutting the mortise has its own challenges, cutting tenons can be even more difficult. First of all, the tenon has to have very smooth faces and square shoulders. Then, you have to make sure you have the length of the tenon exact. Finally, how do you cut these tenons on long pieces without creating a dangerous situation?
I’ve cut tenons several ways in the past – on a table saw, on the band saw, with hand tools. All did a fair job, but I may have hit on the solution I will be able to use more often than not.
While building my bench, I had to cut tenons on the end of the long side rails. I wasn’t looking forward to trying to balance these standing on end on my table saw, and trying to push them flat on the table while keeping them square to the blade could prove challenging.
 That’s when I went to my bookshelf and came out with Pat Warner’s book Easy, Fast and Accurate Router Jigs. There, I found the plan to build this.
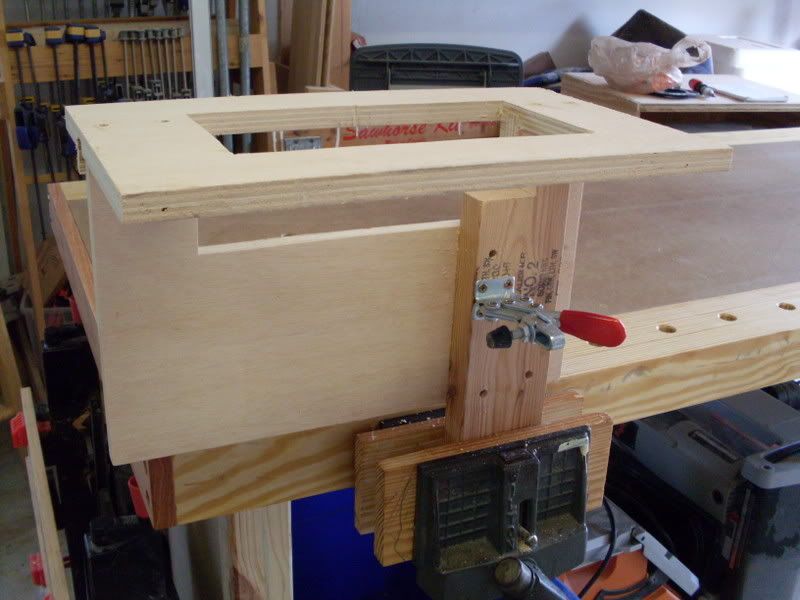
The jig is insanely simple, yet yields such incredible results. It consists of a top and a vertical fin – both made out of scraps (11″ x 17″) of cabinet grade plywood. The top has a window cut in the middle about 4″ x 9″, and a rectangular cutout roughly the same size in the fin. This assembly has to be square and tough, so I dadoed the fin into the top and screwed it. I also used some glue blocks on the back side of the assembly to further reinforce the joint.
The next piece is a fence. I used a 2×4 and notched it so the fence would protrude into the opening but not block the routing action. Again, make sure this is perfectly perpendicular to the top, or you won’t like the results.
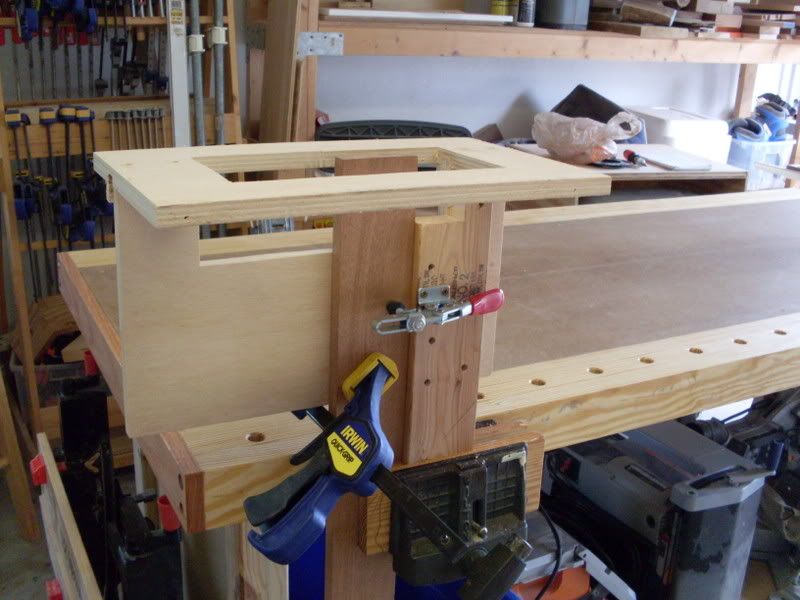 I screwed a toggle clamp to the fence, which holds the jig to the board I’m routing. However, I also throw a second clamp on the board, just to make sure the workpiece doesn’t move at all.
Now, clamp the board you want to tenon to the jig firmly against the fence. Set the top of the board slightly below the top of the jig – you can use a coin under the straight edge to set the depth.
Next, put a rabbeting bit into your router. The depth of the rabbet will help determine the width of your tenon. For this example, I put a 1/4″ deep cutting rabbet bit to use on a board with a width of 3/4″. This will leave me with a 1/4″ thick tenon 1/2″ shorter than the height of the board. If I wanted a 3/8″ wide tenon, I would use a rabbeting bit that cut 3/16″ deep.
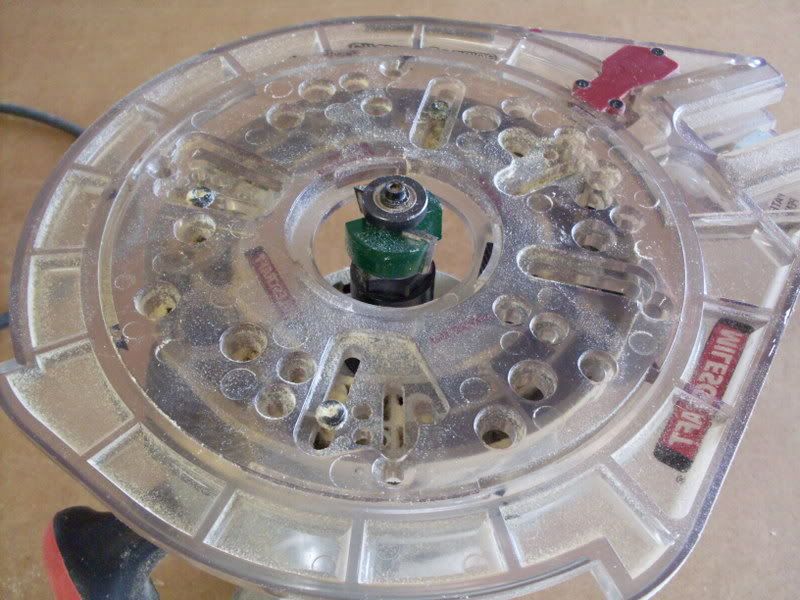 Set the length of the tenon by adjusting the depth of the bit below the router base. I’ve measured on my Freud router and found I could push the bit to cut a maximum of 1 1/4″ below the base – a decent sized tenon. If you need to extend the length of the tenon, you can use a top-bearing flush trim bit that can reach even further down the board after the initial rabbet cut.
Another key component of this jig is to use a larger than normal base to ensure the router doesn’t fall into the jig. Here, you can see I’m using a Turn Lock offset router base to ensure that the router stays firmly in contact with the top of the jig during the cut. You could use an offset base such as this or even build a ‘ski’ type base made of plywood to get the necessary width.
 Next, you simply rout around all four sides of the board. The result is extremely impressive – a very crisp, square-cornered tenon that came out exactly to 1/4″ wide on this test board. It takes just seconds to cut this, and you never have to change the setup. So, in effect, you can cut dozens of identical tenons one after another in very short order.
And, what about really long boards that need to be tenoned? Well, you could clamp the work vertically in a vise and climb a ladder, but the beauty of this jig is that you can actually clamp the board on an angle in your vise. Put one edge on the ground and tip the rail over until the end is at a comfortable height for you to work. Put the jig on the board with the fence to the top of the work and clamp it in place. Sure, you’ll be working with your router at an angle, but I had no trouble with this setup as long as I kept the router pressed firmly against the top of the jig.
If you cut your mortise with a router bit, you will have to round the corners of the tenon. I did this on the rail tenons for my new bench by carefully paring back with a sharp chisel and then sanding the corners perfectly round to fit the radius.
Even after cutting just a few tenons with this jig, I know I’m going to be using it again and again to cut tenons.
I am trying to find out what type of toggle clamp you are using. I see different types advertised (horizonal, vertical) and no one in the city I live in sells them.
Thanks
Oh, I used a horizontal one…
http://www.eagleamerica.com/product/v449-2279/clamps
These are some options for Internet ordering…
Thanks for the writeup Tom. I have been collecting a number of different ways to cut both mortises and tenon’s one of these weekends I intend on trying them out to see what works best for me. (tagged on Delicious)
Great jig. Why does the opening need to be so large unless you are using huge boards? I would think you could use a regular router base with a smaller opening and have more control.
I cut the opening kinda large to accommodate much larger boards, but, if you are working with smaller stuff as a more standard size, go right ahead and make the hole however large you would like it to be!
Tom
What happens when the stock changes in size.? Doesn’t each piece have to be the exact size as the next as the router registers against the wood being routed?
Since the rabbeting bit does cut a fixed depth based on the bearing, you would need to change the depth of the rabbet to keep the same size of tenon. For instance… if you want a 3/8″ wide tenon in a 3/4″ board, you would need to cut rabbets at 3/16″ on each side. If that board increases to 1″ in thickness, you would have to now cut a rabbet that is 5/16″ deep.
But, if you cut your tenons on a table saw with a dado stack, you would still have to readjust the dado cutter’s depth to make the right sized cut as well…