Tools I use: my band saw

This was one of those purchases I made because I ‘thought’ I should have one.  It turns out that while I don’t use it for every project, it has become an essential tool for several of them.

My Delta Band Saw
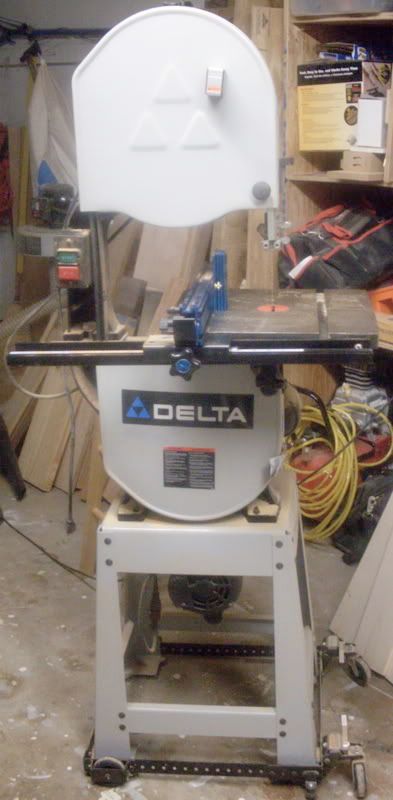
This is a Delta model 28-276 14″ band saw I bought at Lowe’s about four years ago.  Oh, sure, I looked at some of those fancy smaller models (the guys at Home Depot really wanted to sell me the 12″ Ryobi band saw), but I decided on this model because 14″ is a common size for most home machines. That way, it  would accept the most common upgrades.  Boy, am I happy I considered that.

I set it up in my shop exactly as described in the manual, turned it on and – boy – was I disappointed by the performance.  Unlike my Ridgid table saw I had set up a few years earlier, I discovered that band saws take some fiddling to get them to work properly.

Yes, this is a warning to all of you prospective band saw owners – don’t be disappointed if you don’t get perfect cuts right off the bat. It take some time.

Some things I like about the saw include the blade tension release control, which means I don’t have to change the tension setting after a day at the saw.  I can just flip the tension off and take the pressure off the blade.  I also added a rolling tool stand to the purchase, so I can move the saw around the shop as necessary.

Once I got the saw tuned up – it took a day or so – things started to improve dramatically.  The saw began to track more easily.  The cuts were a little smoother.  Things were definitely looking up.

I would strongly recommend that when you buy a band saw, you get a good band saw book to go along with it.  My choice was Cutting Edge Band Saw Tips and Tricks.  A book like this will give you far more information than the manual ever could.

The monumental step in my bandsaw experiece was when I started to upgrade some items on the saw.  First up, I ditched the original blade that came with the saw and bought some replacement Viking/Timberwolf blades.  These are made of a Swedish silicon steel and cut very true.  The product manual says you can run these blades at a lower tension, but I have noticed some tracking issues if I lower the tension to the recommended levels.

I also recently added the Kreg bandsaw fence.  As with the saw, I am still in the stages of fiddling with the fence to get the best fence performance.  It is a solid and easy to use fence, so I’m sure once I get it tuned up, I’ll be in the butter zone.

I have used the saw to cut curves and resaw, and the 3/4 hp motor will sometimes struggle with harder woods.  If I slow my feed rate, I can get good performance.

Some upgrades I would like to make to the saw include adding a task light to the bottom of the top case.  Where I have the saw right now, it’s not in the best lighting situation, so that will have to be addressed.  Also, one day, I would like to add the riser block.  Sure, I’ll gain an additional 6″ of cutting capacity, but I’ll have to buy new blades.  Also, I’d like to upgrade the original steel guide block with some type of bearing system to control the blade,  but that’s something to consider in the future.

All in all, the saw has been a decent performer and has served me well.  However, if I had to do it again, I would spend the extra cash to get a more capable model which would include a more powerful motor, a larger resaw capacity, a better guide roller system, a quality stock fence and a mobile base as part of the standard package.  Probably would have cost less than the saw’s original price and the upgrade money I have spent so far.

Live and learn!

Stuff I’ve Built: The low Craftsman-style entertainment credenza

December, 2004

    The low entertainment credenza
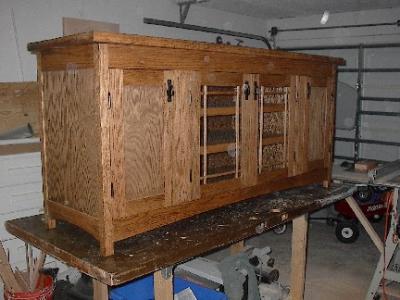
This is the project that made me a ‘made man,’ according to some folks over at the Woodworkers’ Website Association. This was my first big commission, and it fell into my lap.  Looking back, however, I can see so many better ways I could have built it.  Different construction methods.  Different materials. Ultimately, the customer was happy, and that’s all that mattered!

    It all started when I was shopping for a desk for my oldest son, who was in first grade at the time.  My wife and I went to the nearest unfinished furniture store to look for something, and boy, was I dismayed.  Everything was made out of pine, and the joinery methods left something to be desired.  Of course, I exclaimed several times, “I could build something better than this for less money!”

    After my third pronouncement, a gentleman tapped me on the shoulder.  At first, I thought I was busted by the store staff for scaring off customers, but it was another customer who asked if I was a woodworker.  After telling him yes, he asked me to look at something for him.  He wanted a low oak credenza-style entertainment center for his big screen TV, and all the store had was a short pine unit.  “Can you build something like this?” he asked as he pulled out a drawing of a Craftsman style unit.

    Sure I could.

    Before we agreed on a price, we exchanged info and I said I would draw up a plan.  Once I e-mailed a drawing and told him of the construction details, he gave me the go ahead, and I agreed to build the piece for a $1,000 commission.  I asked for half the funds up front to buy materials, and was off to the races.

    Now, I have to confess, at this time, I had never built anything like this. There were many firsts for me.  My first glass doors.  My first inset doors.  My first big casework.

    The cabinet is built frame and stile with 1/4″ oak plywood panels.  The door on the left had shelves for storage, and the door on the right had two pull-out trays for DVD storage and the like.  The center doors had shelves for electronic components.

    I went to a local stained glass shop and had the owner inset the glass for the two doors.  It was an antique-style seedy glass, which lent some character to the piece.  The wooden grille on the front was made of half-lapped oak pieces glued together and inserted as a tight friction fit with clear silicone adhesive caulk on the back to help stick it in place.

    The top is a solid piece of 6/4 oak I sanded the heck out of.  Sure, I didn’t have to build it like that, but I didn’t know any better.

    I finished the piece with Watco dark walnut danish oil to give the darker Mission-style finish to the piece, and topcoated the top with two coats of wipe-on poly to give it more durability.  The hardware was from the Craftsman collection over at Lee Valley.

    When it was ready, I gave the gentleman a call and asked him to bring a truck and three of his biggest friends – once the piece was assembled on my bench, I wasn’t about to move it.

    The reaction when he saw it was priceless.  I opened the garage door, and he and his three buddies said, “Woah.”  They rubbed their hands over it like the monkeys did to the monolith in 2001:  A Space Odyssey.

    The owner took a shot of it with his cell phone and sent it to his wife.  Within a minute, she called back and said, “I love it!  Tell Joe to ride in the back of the truck with it and make sure NOTHING happens to it!”

    With a little grunting and groaning, the four gents were able to hoist the piece into the back of the truck, and the guy’s poor friend Joe had to ride in the bed of the truck on a chilly night with the piece until it was delivered.

    Every so often, I think back to building that piece and wonder how I managed to build it.  However, it was an experience I will never trade.  My first real commission!

    Quick Poll

    The plans have been drawn up.  The tools have been sharpened.  The shop has been prepped.

    The only thing you need to do is buy wood to build that special project.

    Now, where will you get the wood from?

    In years past, there was little choice – all lumber was bought locally at a hardwood supplier, construction yard or at a local sawmill.

    Today, the Internet offers a tremendous variety of sources to choose from.  Whether you look at an online auction such as eBay or find an online provider, your purchasing options are seemingly limitless.

    So, this week, I want to know if you have ever taken the plunge and bought your lumber online.

    [poll id=”58″]

    Link of the week

    The Artisans’ Program

    On the tough streets of Washington, DC, many young men and women believe they have very few choices available to them.  Poverty and violence are widespread, and a life of drug dealing and crime is often seen as the only way to success.

    However, there are organizations staffed with volunteers who are working hard to show that there is a better way.  One of these organizations is the Covenant House.  In addition to providing shelter, food, drug counseling and other services to these at-risk kids, they put a major emphasis on vocational training – including woodworking.

    The Artisans’ Workshop is a woodworking program run through Covenant House.  Troubled kids who show the dedication to learning and are serious about staying out of trouble can enter this program and learn the necessary skills to build projects.

    This isn’t merely some program to keep these kids occupied.  It’s an intensive course which teaches these budding craftsmen valuable vocational skills and offers job placement assistance.  Their success stories are impressive, with graduates going to land positions with home builders and other finish carpentry companies.

    The students help fund the program through the sale of items they build.  The projects are impressive, with tight joinery and an outstanding choice of hardwoods.

    Woodworking to the extreme

    It has happened again… and I couldn’t be happier!

    A cribbage board built at the Palmer Base wood shopLee Valley tools has published another one of my articles.  This time, I interviewed Frank Howell with the Raytheon Polar Services Company (and a talented hobby woodworker) who told me about the exciting woodworking taking place in Antarcica.

    Believe it or not, woodworking thrives on the desolate frozen continent.  It turns out that all three of the American Antarctic bases has a woodworking shop, and the hobby woodworkers who are stationed there have the opportunity to use the tools to keep themselves busy during their down time.

    Click here if you want to read Lee Valley’s current newsletter or subscribe to receive a copy by e-mail.

    If you would like to read some of my older published woodworking articles, visit my Woodworking Chops page.

    Shop Q&A – Face Vise Location

    I’m building a bench/cabinet for the shop with the intention of having a bench for planing; my assembly table doesn’t have dogs and doesn’t have enough clearance for a face vice.

    So, my question: I’m right handed and have the board to the right of me when planing.  Where’s the face vice go for edge planing?  Is it on the right side of the bench (hence, at the beginning of the stroke) or on the left side (end of stroke)?  I could see putting it on the left to get it out of the way except when planing and using a jack board on the right side, and I have provisions for jack board holes.  If the choice is arbitrary, do you see a down side to putting it on the left, thus, out of the way for most bench work?

    -Paul-Marcel

    My vise is on the front left side of the benchHey, Paul, thanks for the question.  Of course, where you place the vise is your own decision, but I think that you’ll find the traditional place is on the corner opposite of your main hand.  In your case (and mine), it’s gonna be on the left side of the bench front.  Basically, you want to push the plane toward where the vise is located.  This way, a board jack merely has to support the work, while you get the gripping power and most support from the vise at the end of the push.

    I’ve seen people put two vises on the front of their bench, but that’s overkill.  Just get a solid face vise, shoulder vise or leg vise and crank down on that sucker.  You’ll be happy…

    Quick Poll

    Building kitchen cabinetsWhen it comes to building large projects, there has been a big shift in the past 30 years.  For instance, if I go to the Reader’s Digest Complete Do-It-Yourself Manual published in 1973, their instructions to build a set of kitchen cabinets indicated that you should build them piece by piece on site.  Judging from what I have seen my friends tear out of their kitchens from homes built in that time period, it seems that was the primary, if not only, way to build.

    Fast forward to the 1990’s, and wow, what a change.  New kitchens are built in modular units in workshops close to the large table saws, miter saws and workbenches to ensure a high level of accuracy.  Then, once assembled, these modules are brought to the site to be installed.

    While this applies primarily to kitchen cabinets, plans to build other large projects have reflected this change.

    Yet, still, I have seen and heard of woodworkers who still build their projects the old way, stick by stick on site.

    So, my question this week is about your building process.  Do you build on site, in your shop or have your methods changed?

    [poll id=”57″]

    part of the Wood Talk Online community