
Ridgid model 3612
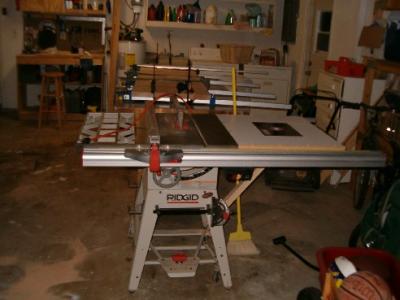 My first table saw was a Delta benchtop model. It worked OK for a year and a half, but, as I quickly discovered, a 12″ rip capacity is really too puny to get serious work done. So, back in 2001, I upgraded to the Ridgid table saw I had been drooling over at the Home Depot. Some of the features that caught my attention were:
- A 36″ rip capacity – larger than most contractor saws.
- A beefy rip fence with t-track built in.
- The saw came with with the Herc-u-lift caster system. I work in a two car garage and have to move the saw frequently to get it out of the way. Without a caster system, I couldn’t easily use such a big saw in my small shop.
- The Ridgid uses a very easy-on, easy-off blade guard and splitter. This is a VERY IMPORTANT feature of the saw. Obviously, you can’t use a splitter when you dado or rabbet, so it has to be removed for these operations. I can have it off in about five seconds, and right back on again – perfectly aligned – in the same amount of time.
- The saw has micro-adjustments for blade alignment. Rather than unbolting the entire trunnion assembly and wrenching it the very small distance to get the blade parallel with the fence, you simply loosen a bolt where the manual tells you to, and you can inch everything into alignment – no fuss, no muss.
- The saw came with a lifetime warranty.
- The saw’s motor is built by Emerson Electric who used to build Craftsman motors back in the day.
- The saw easily handles a 8″ stacked dado blade.
- The saw always seems to rate well in magazine reviews.
There are a few downsides to the saw.
- It is a contractor’s saw with the motor hanging out the back and the cabinet open, so dust collection can be a problem. In fact, my most effective dust control scheme is to open the garage door when I cut and blow a fan outside…
- The saw can bog down on rip cuts in thick hardwoods due to it’s 1.5 horsepower motor. I have overcome most of the problems by using a 24 tooth rip blade, dialing in the blade parallelism and feeding the stock carefully while listening to how the saw is performing.
- It does take quite a few turns of the handwheel to raise the blade. This is great if you are trying to nudge the blade up to make a slight adjustment, but it takes more time to get the blade to the right height for other cuts.
Of course I have tricked out my saw. Besides building many panel cutting, tapering and other shop-made jigs, I added an Osborne EB-3 miter gauge. That sucker really cuts spot-on angles, has a flip-down stop to allow consistent cut lengths and allows a lot of support for stock while cutting.
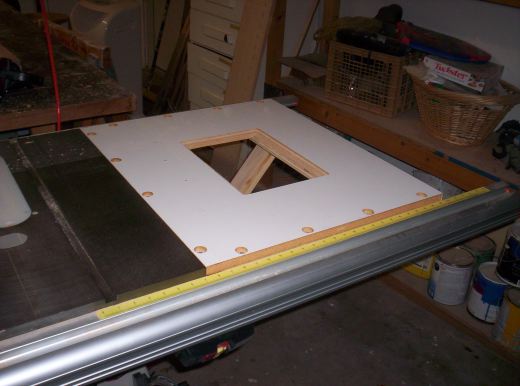 I also replaced the left cast iron wing with a home-built router table. I routed it out to accept a Rousseau router plate (which supports a Freud FT 2000 router). I can use the saw’s rip fence as a fence for the router table, which allows me the same micro-adjustability that benefits me using the saw blade.
Since I may have to rout and rip moldings, I also have an auxiliary router table top that I can set up on a Black and Decker Workmate so I can dedicate a station to each task.
While you can no longer buy the saw brand new from Home Depot, you can get the follow on model – the 3650 – which has many of the same rock solid features found on my saw. While I do dream about upgrading to a high-performance cabinet saw, I have found my saw to be an effective performer that has yet to let me down.
I have the newer model, the orange one. And that too is a great saw. i dont know if my splitter is different than yours but mine is not very easy to get on and off
Hmmm, is it held on to a fixed post off the back of the saw with a fitting secured with a set thumb screw? That’s how mine is set up, and it goes back on aligned perfectly.
sell that thing at buy some old Disston’s or some new Wenzloff’s hand saws and truly feed that handtool addiction. I did and never regretted it.
Not entirely sure I want to rip all my boards by hand… 😉
Thanks, this is a very good review of what I consider a very good saw. I really have nothing to compare it to since this is my first table saw but overall I am very pleased with the performance so far. Well besides the factory miter sled which is terrible cheap and like you I replaced mine as well with one I made from some plans.
I spent a few hours cleaning up my saw and doing routine maintenance today and found the blade and fence alignment to be super easy once you get the hang of it.
Having looked at other more expensive and feature rich saws the one place I would argue that needs improvement is the rip fence. Most of the bigger saws have a much beefier rip fence. I also do not care for the rip fence’s requirement to clamp onto the back rail which makes it much more difficult to add on an extension table. I have considered replacing the rip fence and front rail with an after market fence to eliminate this problem.
The only other issue I see which has been resolved in the newer model of this saw is that the miter slots are not t-track. There are so many t-track miter accessories available that would sure be nice to use but alas. At least rigid was on the ball with the newer version.
2 posts in 2 days. Well I went to purchase a delta after market fence and while looking at it and the $150 purchase price I decided to get a little more use out of the old fence. I had always sort of ignored the fence as useless due to it’s flimsy appearance and all of my t-track hardware did not work with it so I assumed it was non standard t-track that I could not really take advantage of without buying some accessory kit from rigid. When I got home and started playing around with it and looking at the t-track it dawned on me that I could use standard #18 hex head bolts and after about 1 minute of searching I found one and lo-and-behold it works perfectly. All of those times I wanted to use the t-track on that fence have now come rushing back to me and I see unlimited potential in what I can do with some #18 bolts and the existing fence.
Ya know, Andrew, the fence for me has been one of the most pleasant surprises on the saw. The T-Track built in has really helped attach fixtures for specialty tasks.
I’ve been able to keep the fence aligned very well through the years. In fact, just last night I was ripping some 1/4″ strips and and they were coming out beautifully… good blade, good technique and a good fence!
I have the sears model table saw which is identical to yours. I’ve had it for several years and I agree on the dust collection, however they did sell a dust chute/bin which has an orifce for a shopvac. Unfortunately they do not sell it anymore.
On to the real question. Do you have plans for your router extension. I see you already set the fence up to be longer on the right (as I have mine set up.) but I struggle with the idea that particle board will be able to withstand the stress of being bolted to the table and fence.
Carl –
The plans were all kinda done on the fly – basically, I have aluminum angle around the three sides that meet with the table and rails, and I ground the heads of some bolts down to fit inside the rail track. I also drilled out the cast iron table to make holes that worked for the aluminum angle that bolted there.
I epoxied two pieces of plywood around the table cutout, and screwed a diagonal brace from the stand to a point near where the router sets in. So far (Knock on wood), no trouble with the table or rails sagging…. It’s held up well!
I also have the same ridgid table saw, I purchased back in ’01. Its a great saw
I installed a bench dog router table onto the table which wirks great. The Bench Dog is made up a solid cast iron which involves removing one side & placing the new solid tale in place, exactly the same size, also came with a fence & mounting plate as well. I have my ridgid router attached to the plate which has predrilled holes & also purchased a bench dog easy switch for the router on/off. Very nice to use.
I’m glad you had success with your saw, Angela. I have heard a lot of good things about that setup.
I had this tablesaw since 2001 as well and it has the best fence ever. I wish it a had a different splitter, mine tends to get loose and I have to retight it all the time.
I added also a cast iron router table, but I put it to the left of the blade. I find it more usefull there
Tom,
I have the saw pictured above and am wanting to add a router station to it. Can you please help.
Regards,
Stephen Saussy
504-232-6324
Hey, Steve, it was pretty simple. It’s just a piece of melamine with two pieces of angle aluminum bolted to it. I drilled through the angle iron and inserted bolts so their heads rode in the rail slot (Of course, I had to remove the cast iron extension wing to make this happen), then used those nylon-filled nuts to tighten down. I cut and routed the melamine to accept my Rousseau router plate, and mounted my Freud Ft2000 to it. I put the wooden angle brace on the table and bolted it to the saw base so there would be no sag.
I could take some shots, but just Google “Router Table Ridgid table saw) and there are all sorts of jury-rigged plans out there.
Hope that helps.