Category Archives: How-to

Become your own mixologist

The coolest job in any restaurant belongs to the bartender.  Sure, the chef gets the credit for the outstanding meal, the maître d’ for the ambiance of the place and the wait staff for the overall dining experience.

But, when people want to have fun and strike up a conversation, they turn to the bartender.  Think Isaac on the Love Boat.  Tom Cruise in that stinkin’ movie about being a bartender.

“Yes, Mr. Bond would like his martini shaken, not stirred,  Mr. Sinatra wants a highball, and Evel Knievel wants two fingers of Wild Turkey before he tries to jump the fountain in the parking lot on his Harley.”

While no one may be hanging out in your wood shop, you can be just as cool by mixing your own wiping finish.  Why mix your own?  Instead of just relying on what a manufacturer thinks is the best mix, you can adjust your formula to fit your own needs – faster drying time, more film build, etc.  Also, if you have cans and bottles of the components, you can use them in your finish instead of throwing them out.

Mixing your own finish is very easy.  There are dozens of formulas out there to suit individual needs, but this is my formula I have used very successfully through the years.

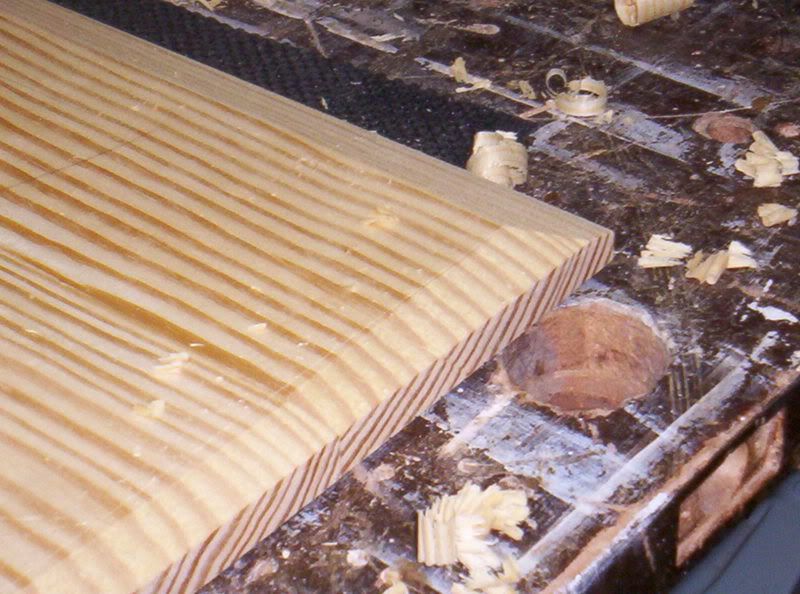
The ingredients can be found in any hardware store and start with boiled linseed oil (BLO).  This natural oil helps the figure in wood ‘pop’ and gives it a rich, deep finish.  The next ingredient is polyurethane or some other type of varnish. It offers a great deal of protection from water, abrasion and other hazards.  Finally, you have to add a thinner to the mix.  I like turpentine, but paint thinner or naptha will work as well.  It makes the finish flow nicely and level without brush marks and runs.

Now, here comes the hard part – mixing it together.  The ‘standard’ mix that a lot of people refer to is 1/3 varnish, 1/3 BLO, 1/3 thinner.  While this does make a nice mix, I have found that I can mix it 1/2 varnish, 1/4 BLO and 1/4 thinner.  It gives me a little faster build on the finish while still making for an easy wipe on.

My scientific method for mixing involves an old pickle jar.  I measured up from the bottom in one inch increments, and poured the ingredients up to the lines.  No, you are not trying to send people to the Moon or split the atom, close enough will work…

After sanding the piece, I again prefer to wipe on a coat of 1# cut dewaxed shellac and sand it down to 400 grit after letting it cure.  Then, I wipe on the finish with a rag.  Don’t be bashful, the wood will soak up a lot of the finish – especially in end grain.   Let it sit for about five minutes, then wipe off any excess with a dry cloth.

I love how easy the mix is to use, and I have yet to be let down.

Now, after all that hard work, I think I’ll take one of those fancy martinis to celebrate.

Raider of the lost arc

Well, it might be hard for me to hide my excitement…

I was published!

Drawing the arcLee Valley Tools has published an article I wrote about two easy ways to draw arcs on projects. Rather than rely on a bent piece of masonite or some other contraption, simple shop algebra or geometry (OK, stop laughing!) can ensure your arc will perfectly fit what you have in mind for your project.

You can click here to read the entire article and maybe learn a thing or two!

Click here if you want to read Lee Valley’s current newsletter or subscribe to receive a copy by e-mail.

If you would like to read some of my older published woodworking articles, visit my Woodworking Chops page.

Making centered mortises with a plunge router

I was working in my shop this past weekend using this mortising base kit I picked up at Eagle America to make centered mortises in a project I’m working on. It’s fitted out with two roller bearings that ride along the side of the piece allowing a gliding action over the surface of the wood.

Sure, there are lots of plans out there to build a base like this, but for $19, well, I couldn’t pass that one up!

The mortising base plateFirst, I had to drill the base plate to fit the base of my DeWalt router. Proper alignment is essential so the base is perfectly centered over the collet. Believe me, if you don’t get the base perfectly aligned, it’s not going to work as advertised. You may want to use a centering pin to ensure proper alignment.

Marking the mortise limitsThe next step is to mark out the limits of the mortise you want to cut. Since the mortise will be centered on the piece, marking the left and right sides of the mortise isn’t critical – the length, however, is.

Router in placeI put a 3/8″ up-spiral into the collet and set the router up on the workpiece. I set the depth of the bit at 9/16″ – allowing space for a 1/2″ deep mortise with 1/16″ space at the bottom of the joint to serve as a glue reservoir. When I rotated the base on the workpiece, the bearings made contact with the sides of the piece, ensuring the base is aligned with the work and the bit will land dead center.

Plunge cutsNext up, I started cutting the mortise. Rather than try making the mortise pass by pass, I started by plunging the bit to its full depth at both ends of the mortise. This established the start and end limits. Then I made a series of full-depth plunges the length of the mortise to remove the majority of the waste.

Clean mortiseFinally, I ran the router bit from end to end in the mortise to clean up the areas I had missed during the plunging action. Since there was very little to remove, I could plunge right to full depth and run the length of the mortise to get a clean mortise ready for a tenon.

Planing a bevel on a panel

So, you want to put a bevel on the edge of a panel? Well, you could use a special router bit. Or, you could rig up a high fence that works on your table saw. But, what if you don’t have the bit or feel uncomfortable with a large panel on edge?

Have you tried hand planes?

The tools you needIt’s not as tough as you think. In fact, with just a few tools, this is a fast method that will work quickly on any size panel.

First of all, you have got to have at least one tool, and the other one makes the job a whole lot easier. The tools I used are an old Stanley Bailey No. 5 Jack plane (essential) and a wheel marking gauge. The gauge is going to mark out what needs to be removed, and the plane’s gonna do the removing.

.

Marking the depthMarking the width The next step is pretty essential, I’d say. You have to carefully mark the depth and width of the area you want to bevel. This way, you know exactly what you need to remove, and you’ll be able to keep a consistent bevel. For this exercise, I used one inch wide and one quarter inch deep.

.

.

Planing the bevelNow, with the panel securely clamped to your work bench, you can use your plane to remove the material to form the bevel. I start with the end grain, planing slightly ‘down’ and ‘out’ with the plane to prevent tear out. Once that’s done, then I move to the edge grain to remove any tear out – just as when you use a router.

.

.

Finished bevelFinally, what you are left with is a crisp bevel that just needs a little sanding – especially on the end grain bevel. The beauty about this method is that you can use it to create any number of different bevel geometries. And, if you want to bevel a door panel, table top or any other piece of furniture, well, this method doesn’t require complicated jigs or expensive router bits.

.

Buying lumber: The hardwood supplier

When you want to buy hardwood for your woodworking project, there are a few different routes you can go. There are Internet dealers, home improvement centers and – if you are lucky – you know a buddy with a portable sawmill and access to a lot of trees in your area.

While these are all good options, if you want the greatest selection and the ability to load and go, look for a decent hardwood supplier in your area. How do you find one? Look in your local yellow pages under hardwood supply, visit Wood Finders and start your search for suppliers near your zip code, or look for local cabinetmakers. No doubt, they deal with at least one reputable supplier, and might be convinced to give you their information.

Jeff Weiss in his showroomI recently paid a visit to Weiss Hardwoods in Largo, Florida to see what happens in a well-stocked, full service hardwood supplier’s warehouse. There, I met owner Jeff Weiss in his well-appointed customer idea center. “Here, we show off some of the interesting things people can build – or have built – from our supply.” A sapele bar trimmed topped with a specially-treated leather top gleamed among the floor samples, fireplace mantles and stairway components. It’s not difficult to get more than a few decent ideas there.

Racks of MoldingThrough a very plain looking door to the right of the service counter is where the fun really begins. The warehouse is abuzz with contractors and employees getting the supplies they need for upcoming projects.

Dozens of tall racks hold common molding profiles in maple, cherry, mahogany, oak and poplar. Some pieces of molding are greater than 20′ long and all clear. Other racks toward the back of the warehouse contain planed dimensional lumber in the same common species. The middle of the massive warehouse holds racks full of premilled staircase supplies and cabinet grade plywood of different species. “We serve a lot of different people here – contractors, homeowners working as their own contractor, hobby woodworkers… the list goes on and on. We try to have enough variety on hand to suit everyone’s needs.”

The rough stuffThrough two massive garage doors, there is an outside covered lot where the rough timbers are stored. Some planks up to 8/4 and 16′ long are stacked by species. Besides oak, maple and poplar, customers can choose soft maple, hickory, walnut and several other species that you can’t find in your local home center. If you have the tools and like to mill your own, this is the place to look.

And, if you are looking for something a little more exotic for a project, you can get your hands on zebrawood, cocobolo, bubinga, rosewood, ebony and others. These can really give your project the character it deserves.

Helping the customers outWay in the back of the warehouse is the milling operation. I had a chance to watch Earl Ogden, one of the millwrights, plane some boards down to a customer’s specs. Earl has even skip-planed a few boards to give his customers a chance to see what the final wood grain will look like. “We’re kind of like Burger King here – you can have it your way. We’ll mill exactly to a customer’s specs because that’s the kind of service they want.”

Since these hardwood suppliers do a lot of milling for the trades, you might want to ask to see their shorts – also known as offcuts. These shorter boards can be purchased at a lower cost and are perfect for smaller scale projects like boxes and clocks.

From rough boards to fully milled pieces, a full-service hardwood supplier can meet just about all of your woodworking needs.

Edge Jointing using hand planes

So, last time I showed how I face plane using hand planes. Now, we move over to the edge of the board. Believe it or not, this is actually easier to do than face planing… No, really, it is.

(Click on images for larger versions) First thing you have to do is secure your board to your bench. You can do that with a regular woodworking vise and a special ‘appliance’ you build to hold the wood. Mine is made of two pieces of southern yellow pine dovetailed together (it’s a VERY rough dovetail…) with holes for some inexpensive hold-down clamps. This is the end of the board that doesn’t fit into the vise.

Can you use two face vises? I don’t see why not… but the one to the right (for right handers) is not going to get a lot of use in a traditional set up… this appliance can be removed when not in use… and it costs a whole lot less!

This is what your wood should look like when you get it all set in the vise and appliance. In this arrangement, there is little – if any – chance the board will slip. That is essential when you plane – you want the wood to stay still while you move the tool.

Once it’s locked in, sight down the length of the board. Get as close as you can to the edge and squint, looking with one eye to see if there is a crown or dip in the board. If you notice high spots, mark them in chalk or with a pencil so you will know where to do the first work.

The next thing I do is take out my old No. 32 transitional fore plane set for a heavy cut. I want to get those high areas out of the way quickly and get that edge as straight as possible. This task can also be done with a No. 5 jack plane with a metal sole. I just prefer the wooden soled plane because I think it slides more nicely on the wooden edge. As you can see, the shavings aren’t curls… they are much more like wood chips. I’m not going for finesse here, I’m roughing in.

From there, I get out my trusty Veritas bevel-up jointer plane. Yes, I bought a newly minted plane instead of finding a quality used one. I haven’t had much luck finding a complete No. 7 Stanley jointer – most of the ones I have purchased had ‘issues’ that were beyond my abilities to repair. Since my shop is relatively crowded, and the plane was less expensive than a powered jointer, I figured I would spend the money I was saving for a powered model on this beautiful tool.

I also bought the 90 degree fence for the plane. True, if I was edge jointing two boards for a glue up, I could plane them both side by side in the vise, with any variations in angles canceling each other out. But, I have found that true, crisp 90 degree angles glue together more nicely. That’s my experience – of course, your mileage may vary.

The technique is very simple. When you start planing, push down hard on the front knob while you push the plane along. Once the plane is completely on the board, push down evenly as the plane glides along. When you get to the end, relax your pushing down on the front knob and bear down on the tote (the back handle). Think about scooping up a bucket of water. Practice, practice, practice and it will come easily.

As you can see, the are the nice, board-length curls you come to expect from a hand plane. When I get to the jointer, that’s when I want to make the cuts a lot finer to refine the edge of the board.

The real test comes when you run a square along the edge to confirm you have planed at 90 degrees, and you remove the board from the vise and appliance and lay it down on the bench top. You should not be able to see any light passing under the board.

Total time to edge a board? I dunno – three to four minutes. No snipe. No screaming motor. No chance of losing fingers or the board exploding if a jointer knife snags a knot. There’s a lot to be said about those hand planes!