All posts by Tom

I'm the guy who writes the blog...

Link of the Week

Scrollsaw.com

Working on a scroll sawThe scroll saw is one of the most underutilized tools in the shop.  Most woodworkers think about it when they need to cut an intricately patterned fretwork for a project, but fail to realize its full potential in cutting three -dimensional projects and joinery.

Scrollsaw.com is a site that is totally dedicated to the use of this versatile tool.  There is a free guide available for beginning scrollers which gives the basics and history of the tool, and technical information about blade selection, the proper setting of hold down pressure, how to keep your pattern free from dust as you cut and dozens of other topics.

The site also offers links to dozens of plans from the most basic to very challenging.  Toys, insartia and even furniture plans are covered in the selection.  Some are free while others are for sale.

If you have a scroll saw that’s collecting dust in your shop, this site is worth a visit.

Places I shop – Duluth Trading

We’re now entering spring, and that means a few important things.

First of all, my allergies are going haywire. But, that’s neither here nor there. It also means the start of the baseball season, lawnmowers will be coming out of their winter hibernation and the flowers will be blooming. Of course, this holds true if you live in the northern hemisphere… but, again, I’m getting away from myself.

It’s also the time that fashion designer start flocking to cutting-edge cities such as Paris, Milan and New York for the unveiling of the newest spring fashions. I’ve seen a few of these shows on TV, and, I have to confess, some of the designers must be playing with their Barbie dolls a little bit too much. There are very few self-respecting women who would admit to wearing any of those avant-garde designs right off the runway.

Duluth Trading's LogoThat’s why I like sensible clothes. Pants that are durable, shirts that fit and are comfortable and clothes that just don’t wear out when you are working hard.

In one small upper Midwestern city, that’s exactly what’s coming off the designer’s sketchpad. Duluth Trading, a company that sells clothes for working men and women, designs their work wear to last.

This company, which was founded in the late 1980’s by two brothers who invented the Bucket Boss, grew through the years to encompass other tool holders and a basic line of branded work wear.

A satisfied customer in Duluth Trading work pantsSuzanne Harms, the company’s marketing director, said that it was important early on for Duluth Trading to reach out to woodworkers through the woodworking magazines. “Our brand and products are built around guys who thrive on the craftsmanship and challenge of working with their hands. Carpenters, woodworkers, cabinet makers, builders, remodelers, hobbyists, the guy building a deck, tinkers and gadget and gear heads, car enthusiasts, bikers, hobby farmers. As our business has grown rapidly in the last 8 years, we’re appealing to a broader range of hands-on men and women. And our focus is more clearly on designing apparel and gear that supports what Duluth customers do – and help them do what they do better and safer.”

The Duluth Trading Trades PanelAll of their clothing – from the signature fire hose cotton canvas items down to belts, suspenders and other accessories, are designed with input from working men and women and then evaluated by the trades panel. “We have a trades panel of eight guys here locally, and the same type of test panel type group for women’s clothes. Our panel members are very direct and very connected to what works and what doesn’t.”

Features such as extremely durable stitching, oversized pockets and even longer zipper pulls were worked into the design of the clothes to provide longevity and convenience. In fact, the company is now offering a guarantee on their trademarked Fire Hose work pants. “If you can wear them out, send them back to us. We’ll buy you the next pair and take care of shipping as well.”

The same type of quality applies to the tools and tool bags offered in the catalogs. While Duluth Trading doesn’t offer large power tools or many hand tools, their offerings cover some interesting personal tools designed to be carried in a pocket. Pocket knives, small precision tool kits and flashlights don’t do a great deal of work, but they make working much easier. “We have gotten some outstanding reviews from Popular Mechanics, woodworking magazines, HGTVPro, woodworking school directors, contractors/remodeling magazines – the list can go on for a while.”

Crack SpackleWhile their products very tough and useful, the Duluth Trading ad copywriters have a great deal of fun when describing and designing their products. One of the funniest and longest-lived ads deals with their extra long tail work t-shirts. They are advertised to cover the dreaded ‘plumber’s butt,’ and are sold in a small plastic pail marked ‘Crack Spackle.’ “The fun atmosphere here leads to some often unexpected humor. The storytelling and ‘MacGuyver meets Paul Bunyan’ approach to product development makes it a great place to work.”

The work wear industry is a crowded one, but Duluth Trading is happiest when blazing their own trail. “We are who we are and we do not want to be the competition – we want to provide the best resource and experience for our customers.”

Stuff I’ve Built: The Simple Cross Project

I’m from a pretty large Italian-American (read Roman Catholic) family.  My wife’s family is also Roman Catholic.  This means that during the spring of every year, we get notified about upcoming First Communions and Confirmations for nieces and nephews.  These events are pretty special, and buying a gift card to Target really won’t cut it as an appropriate gift for the child being honored.

What I came up with was the simple cross project.  This is not only a memorable hand-made gift, it’s also a great way to practice your skills on a small project and use up some of that really choice scrap wood lying around your shop.

Cross BlankIn order to make the cross a little more visually interesting, you will want to do a glue up of some contrasting woods into a blank anywhere between 1 1/2″ – 2 ” wide.  Maple and walnut make a classic combination, but any combination will work.  For this cross, I used some tiger maple and padauk that had been lying around for a while.  I glued the pieces together into a strip that measured approximately 22″ long.  You won’t need all of the length, but it’s better to have more than less…

Once the glue is cured, that’s a great time to pull the piece out of the clamps and either sand or plane them flush.  You want the pieces to be a uniform thickness, but the exact thickness isn’t that critical.  I shoot for 3/4″ thick using my thickness planer.  I’m left with a pretty sweet looking strip that’s ready to work.

The next step is to square up the ends.  I did this on my table saw with my Osborne EB-3 miter guide.  If you left your blank long and you had snipe, you will be able to clip off those affected areas.  This is also the time to start cutting the pieces to size.

Cross BlankNow is a good time to tell you that when I built these crosses in the past, I would use a half-lap joint.  It’s a very good joint for this application, but they took a long time to cut and it seemed no matter how careful I was, I could count on something going wrong… maybe the joint would be a wee bit too sloppy, maybe the thicknesses weren’t perfect.  Now, I’m using dowels to do the joinery, and I have found it to be an easier way to go.

The upright piece – with my project’s width at 1 3/4″ – should be 12″ long.  That’s what looks right to my eye.  I also like to keep the upright intact from top to bottom – I feel this makes the cross look more ‘uplifting’. The crosspiece should measure out about 2/3 of that length – 8″ side to side.  Using the half-lap method, you would cut this 8″.  Using dowels, subtracting the width of the piece and dividing the remainder in half, I came up with two pieces 3 1/4″ long.

The hanging slotBefore you get into the joinery, there’s one more step that is critical to perform.  If the cross is going to hang on a wall, you will need to provide some method for that.  Sure, there are keyhole router bits that will give you the properly shaped slot, but I have found that a small diameter dovetail bit will be adequate.  Just plunge the work down onto the bit installed in a table mounted router somewhere above where the crosspiece will be, and push the work so the bit travels toward the top of the upright.  This will give you the right shape so someone could hang this on a nail in the wall. Do it now, or it will be tough going around the crosspieces.

The Joint GenieFor the dowel joinery, I turned to the Joint Genie. I have found this to be a very precise dowel jig that gives a lot of flexibility.  It consists of a nickel plated body with through holes spaced evenly.  It also has fins on the edges – by using the fins, it’s easy to roughly center the dowel spacing on the board and allows you to index all pieces to this same spacing.  A tail fin sets the position from the end of the board consistently.

Drilling the dowel holesUsing the block with the 1/4″ dowel openings and the supplied 1/4″ bit and stop collar, I clamped the jig in place and using the dowel holes at the bottom of the jig, drilled two holes.  I repeated this operation on the other side, flipping the fins to the opposite side of the jig to get the same reference.

From there, I used the jig to drill into the ends of the cross pieces.  Again, the Joint Genie allowed me to get the proper spacing the first time out – a very useful feature.

Ready with dowelsHere’s a shot of the cross dry-fitted with the dowels in place.  I know that dowels aren’t going to provide the strength of the cross-lap, but this is a decorative piece – and I have found myself having to make lots of these (My record for one session was five).  The dowel process really speeds my joinery and still provides all the strength I need.

All I need to do now is glue it up, sand and finish, and it will be ready to package and ship.  This one is going to my Godson for his Fist Communion, but I’m sure I’ll  be building more…

Quick Poll

Woodworking and listeningAll of the instruction manuals for your power tools tell you to give your complete, undivided attention to operating the tools.  However, if you look into most shops, you will find that woodworkers are splitting their attention – slightly – by listening to music or talk radio while doing their work.

Since it’s very unlikely that you will be continuously running your table saw or router for hours on end, most woodworkers are easily able to focus on those particular cuts for the necessary time and then listen to something else between operations.  And, when it comes to a tedious task like sanding, well, a radio is very much appreicated.

This week, we want to know what you listen to while in the shop.  Sure, you may listen to several different things, but which is the primary thing you will listen to.

[poll id=”64″]

Link of the Week

Woodzone’s Shop Tips, Tricks and Jigs

WoodZone OnlineBuying new tools and purchased accessories is great.  They can give you increased capability, improved assembly and flawless finishing results.

However, with the stock market tumbling, the threat of layoffs looming and pay freezes across many companies, woodworkers need to find ways to get more out of the tools they own.

That’s what makes Woodzone’s Shop Tips, Tricks and Jigs page so sweet.  These free gems of advice  can help make your power and hand tools more productive, prevent wasting of valuable hardwood and lead you to an outstanding finished piece.

These tips can apply to beginner, intermediate and advanced woodworkers.  A must see…

Get a Grip

A workbench or solid work table is a joy to use in a workshop. Being able to plunk a heavy board down on that work surface and cut, plane, drill, rout or do any other kind of work on it breeds confidence in even the novice woodworker. Adding a vise to a workbench only helps expand its usefulness. Whether a fast-acting metal model or a traditional wooden face vise you craft by hand, it’s the icing on the cake.

A bench and a vise are an excellent combination, but it you stop there, you aren’t using all of your bench’s potential. In fact, there are some common time-tested devices and strategies that can help complete your bench and make your woodworking more enjoyable.

The hole truth

Dog Holes in a workbenchLook at just about any workbench, and you’ll find holes it its top. No, those aren’t the handiwork of an eager drill operator with bad aim – they are called dog holes. These holes open an incredible array of opportunities to the woodworker through using some simple tools – dogs and hold downs. More on those tools in a minute…

In traditional workbenches, dog holes are square. They aren’t typically chiseled that way, they are built into the workbench top as it is being constructed by running dadoes across the boards before they are glued up. They are always directly in line with a vise – either a front or an end version, and are slightly angled back toward the bench’s tail vise so as the work is clamped in, the dogs don’t get pushed back beyond 90 degrees, which would make it easier for the work to slip.

If you didn’t build dog holes into your bench, you still have an opportunity to add them. By drilling holes into your bench, you can create round dog holes that can serve just as well. The typical diameter for these round holes is ¾”, and since they can be retrofitted, you can place them just about anywhere on your bench, but, it’s best to plan to line them up with your vises just as with the square versions. Just remember to drill the holes perfectly perpendicular or your dogs may have issues. You can use a plunge router with a ¾” bit to start the holes or build a jig that will allow you to drill them. I’ve used forstner and spade bits to drill holes in the past, but auger bits work beautifully for this task.

Your faithful companions

Bench DogsBench dogs have been found on the workbenches for generations of craftsmen, and can serve many purposes in today’s modern shop. They are equally at ease for securing boards to the workbench for traditional chores such as hand planing or more modern work such as routing mortises or edges.

The dogs can be made of metal, wood or even plastic, and have some means to prevent them from sliding through the dog hole onto the floor below. Wooden or metal springs can be used, or the top can be made larger than the hole.

They can be used by themselves as a stop to plane against or – even better – in conjunction with a vise to hold a board. In fact, many metal vises come equipped with an integral dog that can be raised to clamp work above the vise jaws.

Two dogs by themselves can be used to clamp work in place. Simply put two dogs far apart enough to allow the work to sit between them and use opposing wedges to lock the work in place.

Companies such as Veritas have made dogs even more useful through innovation. The Wonder Dog (or Wonder Pup – a shorter and smaller version) is a round metal dog with a threaded cross piece that passes through the dog body. By placing one of these dogs in a dog hole, you can create your own vise setup.

Hold that work!

HoldfastsVises and dogs are great for securing work that needs to be supported for uninterrupted work to take place on the face or edge of a piece. However, if your are doing something like chiseling for hand cut dovetails, you will need a way to secure the work that allows you to move the work as you progress. That’s where hold downs come in, and they are a time saver.

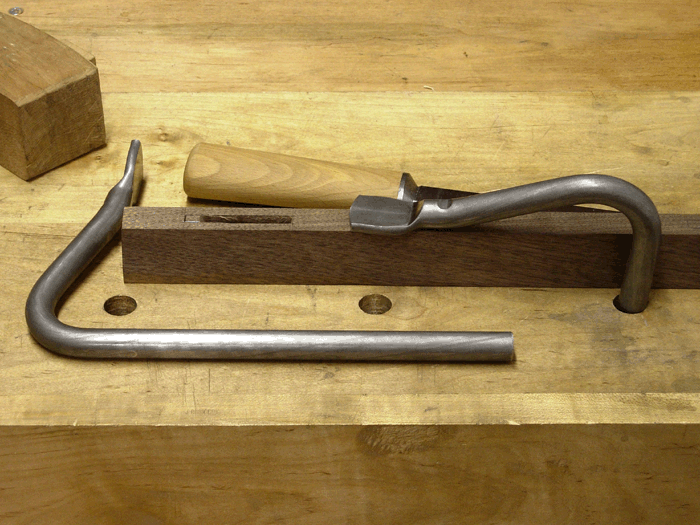
The traditional hold downs are called holdfasts. They are made from forged iron and are very simple to use. By inserting the long shaft into the dog hole, setting the holdfasts’ pad down on the work and giving the top a good whack, it will lock down on the work. When you need to release the grip, tapping the back with a mallet will unseat the holdfast, getting it ready to work again.

More modern holdfasts made of plastic or metal improve upon this devise by offering threaded fittings to make adjusting them easier. Some of these newer models, however, require the shaft to penetrate to the bottom of the bench in order to secure them. This may limit the thickness of the work you can clamp down.

Quick Grip Hold Downs
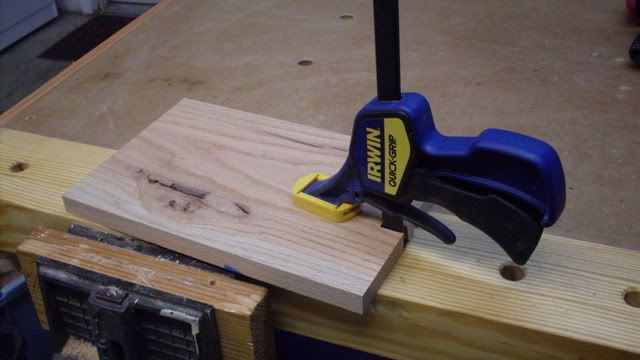
If you have a trigger clamp (Irwin’s Quick Grips type) where the head can be removed to turn the clamp into a spreader, you have a hold down just waiting to happen. I have found that by removing the head, inserting the bar through the dog hole and reattaching it below the bench, I now have a very handy hold down. The trigger gives me very good control, and it’s easy to release when I need to shift the work. For larger pieces, you may want to use two of these clamps to further ensure that the work doesn’t shift. Plus, you have now made these useful clamps even more versatile.

While dogs and hold downs are simple tools, they can make your bench a more versatile and useful asset in your shop. And, they can do so for a fraction of the cost of sophisticated new vises or rebuilding your bench from scratch.

Woodworking Spotlight – Roy ‘Bud’ Davis

When a new child is born, many woodworkers will go out of their way to craft a cradle to hold the newborn. It’s seen as an honor and a privilege to build the first place where a new person can rest his or her head.

But, what happens at the end of that life? Building a coffin or urn to hold the remains of a beloved family member is no less of an honor or a privilege. And, just as with cradles, the woodworker’s imagination and sense of design can play a tremendous part in shaping that coffin.

Roy “Bud” Davis is a woodworker who truly takes this to heart. At his company, Bert & Bud’s Vintage Coffins, Roy builds classic, artistic and some way out there coffins for his pre-need customers.

For Roy, working with his hands is a family trait. “I come from several generations of people who worked with their hands. “My mother was an expert seamstress and also decorated wedding cakes and birthday cakes that rivaled those done by upscale professionals. Her father caned chairs and she had two brothers, one a master carpenter and the other a master cabinetmaker. On my father’s side, his father was a carpenter and his grandfather was a blacksmith. And believe it or not, my dad’s stepfather was an undertaker. But I can’t claim that I learned anything about woodworking from any of them.”

Roy’s first woodworking experience came in 1962 when he decided to build a cabinet to hold his hi-fi stereo components. While this was quite an accomplishment, he waited 30 years to get back into the craft. That’s when he started building half-scale coffins to commemorate the lives of lost family members. “While working on those commemorative coffins, I thought it would be a great idea to build my own coffin as a work of art and that led me to think, ‘well, why shouldn’t everybody’s coffin be a work of art?'”

Roy has yet to build his own coffin, but that hasn’t stopped him from building others. In fact, he started building classic ‘toe pincher’ coffins to sell to Civil War reenactors. “So far, I have sold only one to a reenactor,” he said, “but I have had a lot of clients who have ordered these for their own use.” And, no, Roy properly pointed out that the ‘toe pincher’ form isn’t just a European convention – it was the most popular style of coffins in the United States from colonial times into the Civil War.

Another event which has affected Roy’s business was the passing of Pope John Paul II in 2005. People around the world were moved by the solemn ceremony, and woodworkers were amazed by the austere coffin the Pope was carried in. “Who could pass up the opportunity to work on a piece with such simple but strong design?” In recent years, reproductions of the Pontiff’s coffin have accounted for about half of his sales.

While these time-honored designs have been a mainstay for Roy, some of his clients have requested interesting and unique designs. “I’ve done a beer bottle coffin for Maxim magazine that was offered as a prize in a nationwide contest; a steamboat coffin for a feature-length film for the Public Broadcasting system (it’s now owned by an actual Mississippi riverboat captain) a dollhouse coffin and a window seat coffin. I never want to shy away from a design or construction challenge.”

This bold design process also spills over into the cremation urns Roy builds. One design that truly stands out is a piece shaped like a martini glass. “It was made for the mother of a friend of mine. He and I had several conversations about her; he sent me photographs of her in her prime years and told me how she had been a prominent party hostess in Washington, DC in the 1940s and ‘50s. And, she loved martinis. That’s how the process usually goes for all of my urns and for the coffins, too.”

Many woodworkers might be anxious about building a coffin for themselves or their loved ones because they may not believe that they have the necessary skills to build such a specialized piece of woodworking. “A coffin is really just a big box. The joints have to be tight, construction must be sturdy, but the coffin should also look light and graceful.”

While Roy will build a coffin for any customer, the one thing he cannot do is provide coffins on very short notice. “If someone’s relative died suddenly, I wouldn’t be able to help them. I keep no coffins or urns in stock. A kit coffin or plain toe-pincher coffin takes 7 to 10 days to build. Some of the fancier ones can take a couple of months. I build the coffins one at a time in order of when the deposit checks come in. So some customers have to wait until I finish the orders ahead of them. Most often they only have to wait 2 or 3 weeks.”

To help address this pre-need requirement, Roy has built several coffins which can double as window seats, table bases or book shelves. A new model, built from the same style box as the Pope John Paul II replica, serves as a tall clock until needed needed for its intended purpose.

While some people may see this as a macabre practice, Roy considers it to be an honor to be part of the grieving and life memorial process for a family member. “A man described the funeral of his mother who was buried in one of my plain pine toe-pinchers. They filled her coffin half-full of aromatic red cedar shavings, placed her on them and covered her with a blanket made of her Irish clan tartan. Her grandsons carried her on their shoulders while a piper piped her to the grave. It’s very rewarding to play a small yet significant part in a beautiful ceremony like that.”