
Ridgid model 3612
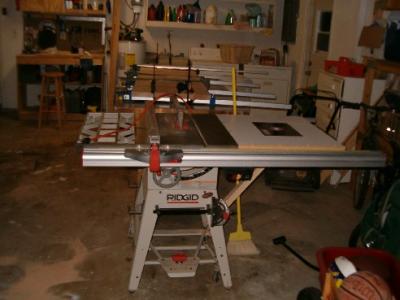 My first table saw was a Delta benchtop model. It worked OK for a year and a half, but, as I quickly discovered, a 12″ rip capacity is really too puny to get serious work done. So, back in 2001, I upgraded to the Ridgid table saw I had been drooling over at the Home Depot. Some of the features that caught my attention were:
- A 36″ rip capacity – larger than most contractor saws.
- A beefy rip fence with t-track built in.
- The saw came with with the Herc-u-lift caster system. I work in a two car garage and have to move the saw frequently to get it out of the way. Without a caster system, I couldn’t easily use such a big saw in my small shop.
- The Ridgid uses a very easy-on, easy-off blade guard and splitter. This is a VERY IMPORTANT feature of the saw. Obviously, you can’t use a splitter when you dado or rabbet, so it has to be removed for these operations. I can have it off in about five seconds, and right back on again – perfectly aligned – in the same amount of time.
- The saw has micro-adjustments for blade alignment. Rather than unbolting the entire trunnion assembly and wrenching it the very small distance to get the blade parallel with the fence, you simply loosen a bolt where the manual tells you to, and you can inch everything into alignment – no fuss, no muss.
- The saw came with a lifetime warranty.
- The saw’s motor is built by Emerson Electric who used to build Craftsman motors back in the day.
- The saw easily handles a 8″ stacked dado blade.
- The saw always seems to rate well in magazine reviews.
There are a few downsides to the saw.
- It is a contractor’s saw with the motor hanging out the back and the cabinet open, so dust collection can be a problem. In fact, my most effective dust control scheme is to open the garage door when I cut and blow a fan outside…
- The saw can bog down on rip cuts in thick hardwoods due to it’s 1.5 horsepower motor. I have overcome most of the problems by using a 24 tooth rip blade, dialing in the blade parallelism and feeding the stock carefully while listening to how the saw is performing.
- It does take quite a few turns of the handwheel to raise the blade. This is great if you are trying to nudge the blade up to make a slight adjustment, but it takes more time to get the blade to the right height for other cuts.
Of course I have tricked out my saw. Besides building many panel cutting, tapering and other shop-made jigs, I added an Osborne EB-3 miter gauge. That sucker really cuts spot-on angles, has a flip-down stop to allow consistent cut lengths and allows a lot of support for stock while cutting.
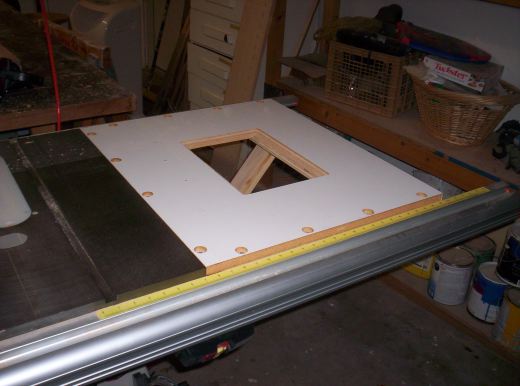 I also replaced the left cast iron wing with a home-built router table. I routed it out to accept a Rousseau router plate (which supports a Freud FT 2000 router). I can use the saw’s rip fence as a fence for the router table, which allows me the same micro-adjustability that benefits me using the saw blade.
Since I may have to rout and rip moldings, I also have an auxiliary router table top that I can set up on a Black and Decker Workmate so I can dedicate a station to each task.
While you can no longer buy the saw brand new from Home Depot, you can get the follow on model – the 3650 – which has many of the same rock solid features found on my saw. While I do dream about upgrading to a high-performance cabinet saw, I have found my saw to be an effective performer that has yet to let me down.

 All woodworking is a matter of scale. Some woodworkers build in huge dimensions – entire libraries of bookshelves, complete room paneling systems and kitchens full of cabinets. Others work on the small side – boxes, clocks and other small items such as toys.
 Doug has his father to thank for his woodworking roots. “My earliest
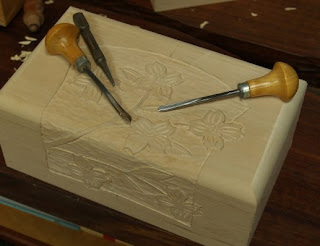 Doug has built a number of outstanding larger pieces, but his work with the smaller boxes is his calling card. His boxes are seen universally as creative, innovative and drop-dead gorgeous. While these masterpieces may seem beyond the abilities of an average home woodworker, they can serve as an excellent starting point for acquiring new skills and breaking out from beyond the norm. “Making boxes takes so little material, and so little space compared with larger work. You can learn so much from them. Nearly every technique associated with larger work can be learned through making boxes. You can more easily take risks in design making a box, so you get to be more experimental. When you make a box, you don’t have to think of the whole room setting the piece will compliment or dominate.”
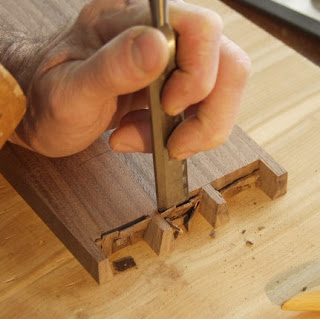 While his boxes are striking and dramatic, his preference for materials actually brings his interest closer to home. “I have a very strong preference for using Arkansas hardwoods. I seldom find Arkansas woods with very dramatic figure like you may find in exotic woods, but that is not a problem. Nearly every piece of wood is suitable for box making. If you have plain wood, you have to apply more craftsmanship to come up with something striking. And what’s wrong with that?”
 Besides the immense satisfaction Doug takes from building these boxes and teaching the craft to thousands through his writing, he also sees the big picture what people will take from these pieces years down the road. “We each can leave an important legacy in the things we make that tell more clearly than our words about caring for each other and for the planet. In the meantime, we become more potent, more creative, and more alive when we are engaged in making things from wood.”
 In much the same way, I have picked more than my share of loser tools. After woodworking for ten years, I have a collection of gadgets and gee-gaws that the inventor no doubt thought would change the face of woodworking forever. And, based on the reviews of some users, I fell hard for them, only to be terribly disappointed by their performance.
 That may be so, but I have a very different take on things.
 There was a wealth of knowledge there for the taking. Jim Heavey of Wood Magazine was offering a series of woodworking seminars. I watched him for about 30 minutes, and learned about six techniques I am going to add to my work. Sure, the information is out there on the Internet and in books, but I was able to stand next to him and look at how everything was set up. I could even ask questions and get immediate responses as well.
 If you are looking for an adhesive to stick your projects together, there are dozens of choices out there. Some you expect to see in today’s workshop (yellow carpenter’s glues). Others are prized for their specific properties such as being waterproof or extremely tough (epoxy).