Species Spotlight: Thuya Burl

Nebraska Ned, the second cousin twice removed from Indiana Jones, dismounts his camel in the exotic desert lands of Morocco. He ties his mount to the nearest scrubby looking bush and starts to examine the area, looking for the treasure he has come for. What could it be? Gold? Precious Gems? The sacred idol of the Berber peoples who call the Atlas mountains home?

This is Nebraska Ned's distant relative

Nah, you see, Ned is a woodworker. He takes out his shovel, digs into the sand at the base of the tree and finds what he has come looking for… Thuya burl!

The Thuya Tree

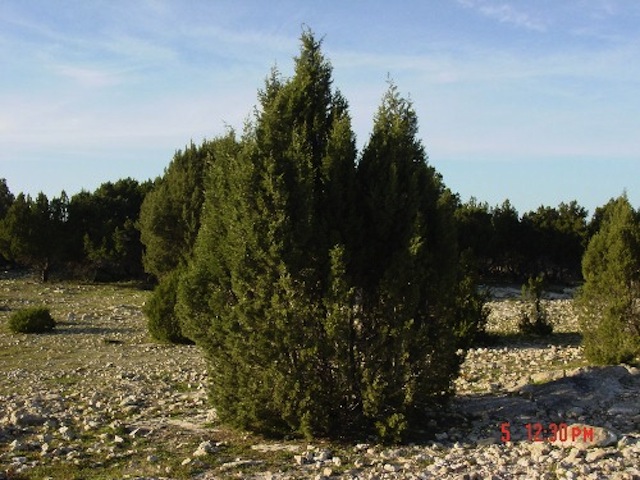
Thuya Burl comes from the thuya tree, an evergreen that once grew copiously in the Atlas Mountains of Morocco, Tunisia and Algeria. Trees can also be found as far away as southern Spain and in Malta.  It is a small, slow-growing tree, 15 – 45 feet tall and about 2 feet trunk diameter, often with two or more trunks from the base. The foliage forms in open sprays with scale-like leaves. The tree has an interesting defense mechanism that protects it from fire – it is capable of regenerating from a stump. Old trees that have sprouted repeatedly over a long period form large burls at the base, known locally as lupias.

Some Thuya burl stock

It is an exotic wood that the Greeks named thuya, meaning sacrifice, because they used an oil distilled from it as incense in their religious ceremonies. Some churches still use it and as sandarac oil it is valued for medicinal uses. The burls are as beautiful as they are fragrant and the Greeks and Romans vied with each other over furniture made from them.

Close up of a Thuya Burl Pen

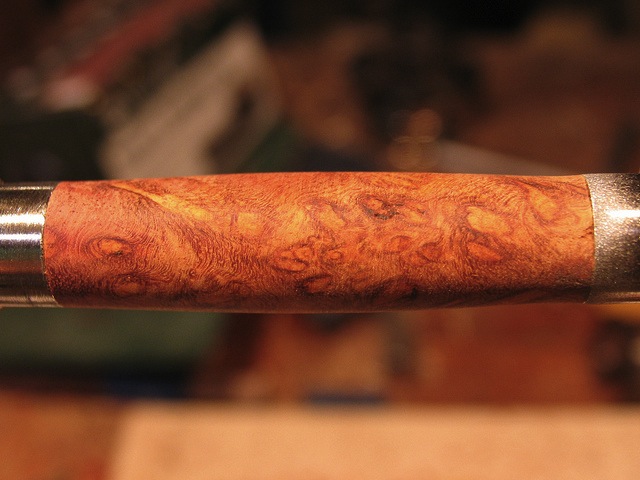
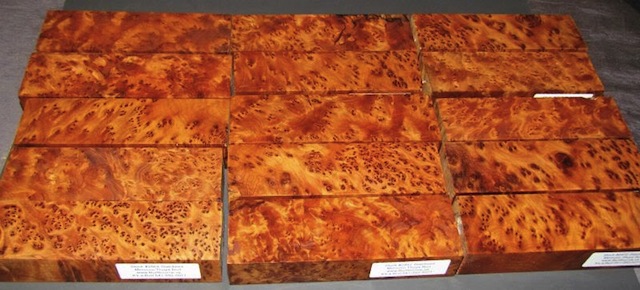
Thuya burl is fairly firm and dense with a high oil content, but tends to be brittle. Its color varies from a rich, lustrous golden brown to nearly black. The eyes, perfectly round, are scattered about in some burls like the figure in bird’s-eye maple; in others they are grouped as islands. An exquisite wood, today it is used for inlays, small boxes, turned pieces, and precious objects, although larger pieces may be found from time to time.

Thuya bass

“The beauty of thuya burl has been its undoing,” said Eric Poirier of Bell Forest Products. “It is just so desired that huge areas of trees have been cut down over the past centuries, leaving many native areas treeless.” That’s why Bell has been thoroughly checking out their suppliers to make sure they are not overharvesting areas. “By working with suppliers who get their supply from carefully managed areas, we can feel confident in providing this wood to our customers.”

So, once Nebraska Ned gets his treasure back to his shop, you can imagine what kind of fun he’s going to have working with it.  Hopefully, he won’t have to battle any bad guys to get his project done in time.


Convertable sanding

There’s a tool that I have used a lot over the past five plus years of blogging, but it has barely gotten a mention. Which is sad, because it is probably the best value I have ever seen in a tool.

Sanding is a job that can be a real challenge. I mean, it is just so darned boring. You sit there with a running sander in your hands, the work clamped down to the bench. The only excitement comes when you have a difficult area to sand and you can’t fit the random orbit sander.  That’s when I start to search for the right tool that can solve all of my problems.

The Ridgid sander

This one can’t solve ALL of my problems, but it can fix a bunch of them. It’s my Ridgid combination spindle/belt sander.  I picked this little jewel up back in 2006, and it has been a trusty performer for me since. It’s about the size of a portable thickness planer, so it can easily be tucked out of the way when you don’t need it.

When you do need the sander, you have an option  First, you can use it as a belt sander.  I have used that to sand outside curves on things like bandsawn boxes, as well as a straight sides on boxes I want to remove excess spline from.  The belt oscillates as it spins, allowing me to get the most out of the life of the belt.

Dominic working with the spindle on a curved piece

As if that would be enough on its own, the sander also converts to a spindle sander.  This little gem shines when it comes to doing inside curves, like I had when I was building a rocking horse for a charity build-along for the Wood Whisperer.  Again, the spindle oscillates as well, allowing you to get the most life out of your sanding sleeves. Changing between the belt and spindle sanders is very quick, and is completely toolless.

The aluminum top is a very good size for balancing larger workpieces on, giving a lot of support for larger work pieces. It also folds down to cover the spindles and attachments so they won’t get lost when you are moving it around. And, when it is time to deploy the sander, you can set it at any angle from 0 – 45 degrees, meaning it’s a piece of cake to sand bevels or miters. The table also has a sweet miter track on it, which allows you to use the miter fence from your table saw to get some additional purchase on a workpiece.

The sander has a 2 1/2″ dust port out of the back, which does a great job picking up the sawdust generated by the unit while in use. I have used the sander without dust collection for ‘quick’ jobs, and let me tell you, the dust collection makes a HUGE difference in your enjoyment of the work.

Best of all is the price… I picked up mine for less than $200, and I’m positive I have gotten more than my money’s worth over the years.  Plus, when I bought mine, it came with a free lifetime warranty. I think the new agreement is a 3 year warranty, with the option to buy a lifetime agreement. Not too shabby…


Quick Poll

Back when I first started woodworking, I labored under several misconceptions. Sure, I could glue end grain to end grain.  Every project needed tons of nails. And, most importantly, every single project had to be stained.

Brush that stain on!

Yup. It was some kind of unwritten code that I couldn’t shake. I would go to the home center, pick up a can of stain and apply it to the project. It didn’t matter what I was building, stain was an important part. Kind of like putting icing on top of a cake.

Since then, I have discovered that no – I don’t have to apply it on every project, but I still do have the occasional use for it. Today, tell us what you think about pigmented stain and how you use it.


Link of the week

Stu’s Shed

For today’s link of the week, we’re going down under – to Melbourne, Australia to be exact – to take a peek inside Stu’s Shed.

Stu enjoying one of his other pastimes

This site, run by Stuart Lees, is a wealth of information on woodworking. Plans, tool reviews and observations from the bench blend seamlessly with his numerous video offerings (nearly 100 at last count) and the articles he has had published in  Australian woodworking magazines.  Of course, the highlight of the site is his actual woodworking shed – which he has outgrown after six years of loyal service – and the new shed he is planning to replace the old structure.

Now, I’m sure that Stu would probably remark about our funny accents, but I’m pretty sure you will be able to understand him!  Goodonya, mate.

Tom talks finishing

I know this is kind of a short post, but this video was shot at the January meeting of the St. Petersburg Woodcrafter’s Guild. I was asked to do a quick presentation about my wood finishing regimen. I thought I would also post it here.

BTW – many thanks to Dave Knipfer of Maryland.. he’s the guy who taught me the method.  You see, Dave, I did pay attention!


Screws and glue

There’s this project I’ve been asked to tackle. I think the first request came in 2007. “Tom,” Rhonda asked, “Can you build a banquette for our dining room?”

For those who don’t know what a banquette is, it’s a built in bench that people can sit at while dining at a table. It’s useful for two reasons …. 1) it takes the place of chairs at the dining table, and 2) it gives basementless Florida homes a place where you can store stuff.  While these are great reasons, I was reluctant to start. My objection? Well, bench sitting at a table kind of reminded me a little bit of dining in a McDonald’s.

What I didn't want to see

Of course, that line of thought didn’t go over well with the boss, so I eventually relented, and dedicated myself to making sure this project was not going to look as if it was from a fast food dining establishment.

Unlike some recent projects I have tackled, this one could hardly be called a carefully crafted, meticulously jointed gorgeous piece of hardwood. No, if I was going to build this, it was going to have to be built more like a piece of cabinetry, which means lots of plywood. Which is exceptionally cool with me!  Plywood projects are great because they go together quickly, yet look great. A little bit after noon this past Sunday, Rhonda and I headed to the local home improvement emporium to get the materials. Two sheets of 3/4″ plywood and  four 1 x 4 clear pine boards. That was all I was going to need to build the base of the piece and the seating area. I was going to build the backrest a little later, so this was all I needed for now.

Have someone else cut your plywood

I had the folks over at the home center cut the plywood down to size. One sheet was ripped into two 2 x 8 foot sheets, and the other was ripped down to a 2 x 8 and two 1 x 8 strips. Those, together with the pine boards, were mounted on top of the kayak rack on our jeep, and bingo, we were off to the races.

Working the miter saw

I used my track saw to break one of the 2 x 8 boards down to some end caps. They were 2 feet wide by 11 1/4 inches tall. These had the two sides screwed to it while lying back on my workbench. This way, the sides and top were even, which would form the top of the box for the bench. I laid the 2 x 8 strip in the middle to form the base, and with a little persuasion, I was able to get the diagonals all nice and even. Then, I flipped it over and screwed through the sides to capture the base.  I also took the time to find the dead center of the box lengthwise and screw a 2 x 4 scrap across the top opening, to give the planned split lid a place to rest and to provide a little resistance to spreading. Pretty easy so far.

Here's what I was looking for

The real fun began when I planned for the feet. I wanted them  to taper back a little to lighten the look. So, I cut the legs to length and clipped the corners so they would look a little more graceful. Then, I glued and bradded them on to the case, and put a pair of screws into each leg from the inside for good measure. Between the legs, I just cut lengths of 1 x 4 to fill in to make it look a little like a mock rail and stile. I’m pretty happy with the results.

Not bad for what I'm doing

Next, I’ll have to make and attach the lid. I may buy another sheet of 3/4″ plywood, rip it into two 2 x 8 strips, glue them together and make the lid double thickness for extra strength. I’ll also edge that with solid wood so it looks nice. From there, I will rip it to build a solid back piece to mount the back rest on, and have the front as a hinged panel to access the storage.

But, that’s another post for another day.

Noticing how quickly the piece was going together, Rhonda commented, “Wow, if I knew it was going to take such little time, I would have insisted you start this earlier!”  I guess maybe now is the time to slow down a little so I don’t finish too quickly…


What’s your angle?

90 degrees. It’s the ultimate expression of accuracy in many woodworking projects. Cabinets. Tables. Chests. Boxes. If you can get two adjacent sides of your project to flush up to the legs of a square, you are there. If the diagonals match perfectly, rock the heck on. When your miters meet at a crisp edge, pat yourself on the back.

It's hip to be square

But, if you have to cut a diagonal, errr…. Maybe you want to mark out the slopes of your dovetails. Maybe you want to find the exact angle at which the back of a chair leaves from the seat.  This is where things get a little trickier, if you don’t have the right measuring tool.

Meet the sliding t bevel. Some folks may call it an angle finder, bevel gauge, bevel square or a host of other names, but whatever you call it, it’s  a great little multitasker that can help you get out of trouble. This simple tool has a handle typically made of wood or plastic with a separate adjustable blade made of steel. That blade can pivot freely around a pin inside the handle, yet can be secured in place with either a latch or a thumb screw once the angle is found. It really is that simple.

The Bora T Bevel

The model I use is a sweet little red number from Bora Tools. This baby comes with a red plastic handle with a spirit level vial in the handle. The blade also serves as a seven inch ruler, but also can be secured with an easy to use plastic lever. The end of the blade is clipped at a 45 degree angle, which allows it to read into tight spaces.

So, what can you do with one? First – and probably most obviously, you can use the tool to find the angle of something.  Place it against a leg on a chair, and you can find out what angle that leg meets the seat. If you want to know the exact degree of the angle, hold it against a protractor and bingo, you have that number.

mark that angle

But, say you don’t want to play the numbers game.  That’s cool, too. Simply take the t bevel from the angle you want and set up whatever tool you want to use to duplicate that angle. Just be sure to lock the blade in place before you move it, otherwise things won’t line up exactly.

Get the bevel down perfectly

Oh, and if you are trying to find the angle of blade drift on your band saw, a t bevel will make that job a piece of cake.

Lock the blade at 90 degrees against a known reference and – yes – you have another square to check an assembly.

Mark those dovetails

And, if you need to carefully mark out a given angle for a cut – maybe a dovetail – why invest money in a dedicated dovetail marker, when your t-bevel can be set to 7, 9, 14 or any other degree in between and locked in place to mark just one dovetail or a whole dresser’s worth.

While it’s not a tool I reach for every time I woodwork, for the times I do, it has been a true winner. At least that’s the angle I am taking.


part of the Wood Talk Online community