Link of the week

The Acanthus Workshop

  • Chuck Norris doesn’t do push ups. He pushes down, and the world moves away from him.
  • There is no theory of evolution – only a list of species Chuck Norris allows to live.
  • Chuck Norris can cut through a hot knife with butter.

Chuck Bender

And, you’ll never guess who taught Chuck Norris how to cut dovetails.  Why, it was Chuck Bender of the Acanthus Workshop.  All kidding aside (and who the heck am I kidding?), Chuck (Bender) is a magician when it comes to hand cut joinery. From the very simple to the mind-bendingly ornate (Bermuda Dovetails, anyone?), Chuck can do it , and – even better – teach you how to do the very same techniques online or at his school.

But, be careful. Chuck Bender cuts both is pins and tails at the same time…


Tools I use: My dust suckers

Woodworking can be a very messy business. If you use power tools, you will have lots of planer shavings, sawdust and other pulverized wood products spewing out of every one of your machines.  For hand tool folks, you have saw dust, planer shavings and other unwanted wood byproducts in your shop as well.

Hey, it’s a tough life, but someone has to clean it up.

That’s where I tend to get a little creative.  Hey, I have two boys, and I try to get them to clean the shop for me.  I tell them it’s a really cool game they will love.

That hasn’t worked since I think they were eight and five…

The Delta dust collector

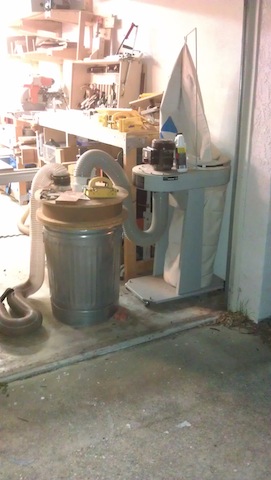
Since then, I have come to rely on a trio of machines to help keep the mess at bay. In addition to keeping the dust off the floor, catching it at the source helps to keep it out of the air – and my lungs.  That’s why I rely on my Delta dust collector. I bought this baby back in 2004, and it has been a real love/hate relationship. When I hook it up to a tool that has a dedicated dust port, this thing is a champ. My new Ridgid planer works great with it, and there are usually just a few bits of planer shavings after I am done.

I also have it going through a shop-built cyclone separator that sits on top of a trash can. This contraption works well, spinning the majority of chips into the can before they get to the collector bag. I think it helps make the collector work more efficiently.

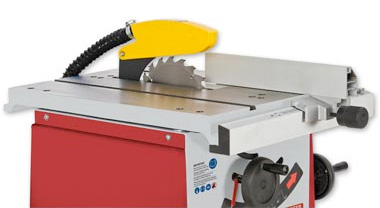
The hate part? When I try to hook a non dust port equipped machine to it (like my table saw), it stinks. The hose is heavy, and it doesn’t generate the suction to clear the dust from the large open area under the saw. Yes, I have seen the involved plans that allow you to build dust collection into your contractor’s saw, but no, I have never had the inclination to build one of them. I’d just rather be building furniture…

My shop vacuum

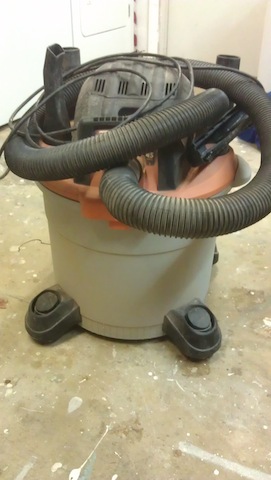
For the stuff that gets out of the table saw, I turn to my trusty shop vacuum. This baby sucks up everything, and with a dedicated floor cleaning fitting, it can make the place look relatively spotless in a short amount of time. That makes me happy…  I have also hooked it up to my combo belt/spindle sander, and the nozzle is a nice slip fit onto the port on that tool, making for very clean sanding sessions. It’s one of those tools you wonder how you get along without once you have to…

One Fein collector

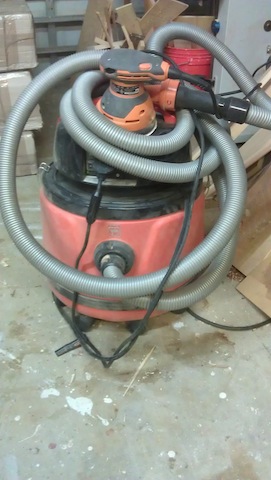
For really specialized dust collection, I turn to my Fein dust collector.  This baby is the bomb. It has an outlet built into it where you can plug the tool. In this case, I have my random orbit sander plugged in to the hose and into the machine.  When you turn the tool on, the power comes from the collector to power the tool, and it also turns on the collector’s motor. As you sand, the sawdust is pulled through the sander into the collector. When you lay off the trigger, the motor for the tool stops, and the collector runs for a few seconds more to ensure all of the dust is sucked into the canister. It also works great with my track saw, providing nearly dust free operation.

Now, I’m sure that some of you probably have more advanced whole shop systems, while others may be making due with smaller systems. But, one thing is for sure. My friend Mike Siemsen will give me a hard time for not relying on a simpler, more back to basics approach.

Mike Siemsen and his trusty broom

Now, if I can only find an apprentice who wants to use one of these babies…


A clean slice

This coming weekend is the St. Petersburg Woodcrafters Guild annual picnic on the shores of beautiful Lake Seminole Park in central Pinellas County. Sure, it’s getting a little warm to be outdoors in Florida this time of the year, but there are still just enough cool breezes – and a cold front nearby – to keep the temperatures tolerable. Besides – it’s an excellent opportunity to get to eat a bunch of great food and hang out with other woodworkers.  Oh, and I get to eat some Publix fried chicken… the local grocery chain makes the best stuff I have ever tasted.  Oh, boy, is it ever good….

Mmmm, Publix fried chicken

One of the activities for the big day will be a carving event. Last year, a few pieces of basswood were handed out with a few carving knives, and everyone at the event got to work. There were some beautiful carvings, and it was easy to quickly see how good some of us were, and how far many of us have to go to do a good job!  But, that’s part of the fun of going to a woodworking picnic, right?

My Sloyd knife

This year, I wanted to bring a knife I use in my shop. This is a Sloyd knife. My neighbor, originally from Sweden, told me that basically it is a craft knife that many Swedish woodworkers start off with as their first tool. It’s great for carving, slicing and other small shop tasks. I got mine a while back from a friend who saw it for sale in a shop up in New Jersey and sent it down to me. For years, it sat in my tool chest, just waiting for the day when I would use it.

As with most blades, it came from the store ground nicely, but needing a honing to really make it special. I have tried sharpening it by hand, but that can be tough on the fingers. The knife jig that came with my Tormek was available as well, but it never was able to get a good purchase on the blade – it was just too small.

Tormek Small Knife Jig

That’s why I was pleased to get the newest jig from Tormek. The new small knife jig is a clever piece of tooling that had me honing in very little time. It basically consists of two parts – a cross bar of metal that gets clamped into the jaws of the jig’s knife blade, and a plastic clamp that works by grabbing the handle of the knife.

First, I set the cross bar of the jig into the jaws of the knife jig blade. It’s critical that you get this crosspiece aligned parallel with those jaws. This makes the next step a whole lot easier. Fortunately, if you flush up the front of that crossbar with the front edges of the jig, you are in the butter zone.

The jig set up

The next step is to clamp the knife handle into the plastic clamp. There is a screw clamp knob on the back of the jig that allows this to grab knife handles of many different shapes and sizes. Since the Sloyd knife I am using has a wonderfully contoured grip, it took a little finessing to find the sweet spot to clamp it in place. But, once it was there, the blade was parallel with the rest of the set up and it was ready to go onto the sharpener.

The jig set up and working

It was a simple matter to run the blade over the sharpening wheel on the first side, then flip everything over and move to the second. Since this is a dual bevel took – not a single like a chisel or plane iron – I had to make sure I had everything geared toward a 30 degree measurement – two 15 degree sides – to ensure everything came out well.  After the initial grind on the rough setup, I used the grading stone to make the wheel smooth and proceed to the honing.  After that,  a quick spin on the leather stropping wheel, and this baby was ready to cut.

Ninja Slice!

Yeah, a clean slice through a piece of paper is a very good indication that I nailed it. With my new sharp knife, I’m looking forward to trying my hand at carving – or fending off other ravenous picnic goers who get too close to my fried chicken!


Quick Poll

Sorry I missed a post last Friday. I was down at the Governor’s Hurricane Conference doing a little teaching, doing a whole lot of learning, and picking up a piece of hardware…

The Best Public Information Program award of 2013 goes to...

Once I got back home, I realized how much I missed my woodworking. I started looking at the pieces I have built – the banquette, the two entertainment centers, the dining room table, and realized – wow – I do build a lot of pieces where I use paint as a finish. That’s not a terrible thing, since most of my mistakes can be hidden with a whole lot of putty and a an opaque topcoat (wait, did I just say that?).

My drop leaf dining room table with painted base

This week, tell us about the use of paint in your projects.  Do you use it all the time, or is it something you avoid like the plague?


Species Spotlight: Soft maple

When my boys were both born, I was a total wreck. I mean, there is nothing – and I mean nothing – as unbelievable as holding a person less than five minutes old in your arms. It’s a whole transcendental moment, connecting you with the new generation in your arms and the many generations that came before you.

Is this kid my 15 year old?

And, when I told my friends and co-workers about the moment – tears in my eyes –  many of them said the same thing to me. “Tom, you are such a softie.”

I’m pretty sure the meant that in the best way possible, but I’m sure a few of them meant that I was just too darned sentimental.  I mean, come on, people have been having kids for a long time before I did.  Couldn’t I just skip the emotional roller coaster?

And, I’m sure that when you look for hardwood (man, what a transition) – specifically maple – you are looking for the hard, sugar or rock maple for your project. And, many of you might turn up your noses at soft maple.  I spoke to Eric Poirier of Bell Forest Products about that, and he said, “If you did, though, you might be passing on some of the most beautiful wood you  have ever seen, and a great bargain in many cases.”

Unlike the hard maples (Acer Saccarum and Acer Nigrum), the soft maples – Red, Bigleaf and Silver – are a bit softer, and they can frequently sport a slightly coarser end grain texture and can feature more mineral streaks of different colors. But, then again, very lightly colored maples are known for featuring streaks of different colors, so this may not be the best way to identify the species.

 A beautiful soft maple table

The real test can come in if you get your hands on some ferrous sulfate (check out eBay – you’d be surprised what you can buy on there!) and dilute it a little bit. The chemical will  leave a dark blue spot, while the hard maples will leave a much paler blue/green spot.

Why use soft maple in the first place? The stuff works like a champ.  Because it’s not as hard as its harder cousins, it turns beautifully and works like a dream. Looking for a good alternative to ash and oak for bending? Why not give soft maple a shot? It steam bends very well.

And, the best part is that it usually costs less than the hard maples, making it a great bargain as well.

Bigleaf maple with a crazy pattern

It also has some tremendous figure. Bigleaf maples from the west coast frequently show some unbelievable, hypnotic tiger, burl and blisterfigure. And, when finished – wow. It’s enough to impress the heck out of you and just about anyone else who sees the project.

And, as far as you calling it soft?  Well, those may be fighting words. After all, this softie isn’t going to let the soft spot in his heart for soft maple be insulted.

The Safety Agenda

So, no poll yesterday, huh?  Yeah, I spent most of my day driving across the state of Florida to get to the Governor’s Hurricane Conference.  Yes, that’s the big event I go to every year to learn to learn more about how to keep folks safer come this season.

My friend Bob and I are here to teach a few classes on media relations.  Thus, no poll yesterday.

Yup, I'll be instructing again...

However, we will be focusing on the safety agenda for this season. And, when Bob is teaching, I’ll be working on making some notes on how to make my table saw a little safer.  (Hey, Bob’s an exciting teacher and all, but come on, man, he’s no woodworking!)

I’ve decided that – of c course – I will be working with my splitter in place for the time being. However, I think the time is coming  for a table saw upgrade.  Something with a lot better dust collection that the open stand contractors saw I’m working with.  And, something with a riving knife.

A riving knife

Those new saws with the riving knives are a real pleasure to use. I’ve seen more than a few saws demonstrated with this nifty feature and they are the bee’s knees.  The knife hovers just a fraction of an inch behind the rear of the saw blade, keeping the board from contacting the rear of the blade where the teeth, rising to the apex of the blade  – can grab the wood to flip it back.

I also found an interesting fact about the Delta Unifence and most European saws – the fence only comes to a point just beyond the front edge of the teeth of the blade. This ‘half fence’ set up helps prevent the pinching of the wood between the rear teeth and the rip fence, virtually eliminating any possibility of kickback.  I think I can do something to that effect with a piece of wood and my trusty fence clamps I use for my dado fence.  Pretty swift.

European saws have half-fences

Plus, wow, I really need some better  dust collection.  Sure, I have one of those Velcro on bags that sits below the fence in the stand, but I usually end up using a shop vac to clean things up after the fact. Almost all new saws come with a dust port that grabs a great portion of what’s generated.  Not only will my workspace be neater, I’ll be a lot safer.  Rhonda won’t be chasing after me with a broom to get me to clean up!

Plus, I’m sure I can get some money for the old saw. I have been treating it well for the past decade, and I’m sure it would be able to find a new home.

Hmm… now, how to get me a new one…

Link of the week

Gunpowder Woodworks

Following a lifelong passion for building things, Mark Hochstein’s interests went from building model airplanes, leatherwork and eventually his first woodworking project – a skateboard – when he was the ripe old age of 12. And, when he joined the military, he rediscovered the passion for building.

Mark's skill is evident in his joinery

Today, he runs Gunpowder Woodworks, his haven where he builds furniture in his blended tool workshop. The design of his work is classic and refined, with bold lines and skilled joinery. Take a look at his site and you will come to appreciate his skilled design eye and craftsmanship.

part of the Wood Talk Online community