The wood jumble solved

I just discovered that it was about four years ago when I left you hanging.  Yeah, sorry about that.

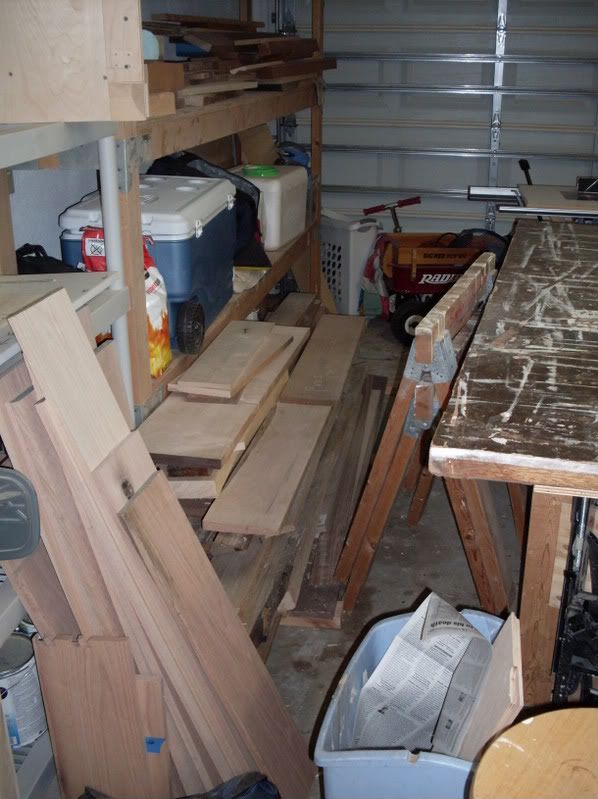
Back in August of 2009, I wrote about my wood jumble. It was in an area of my shop where I stacked wood with little organization, which made finding a particular board for a project a nightmare.

The original wood jumble

Fortunately, my wood storage has evolved to a little better arrangement. I found an area that was between my band saw and the standing storage tower that was open and would serve as a great place for some vertical storage for my boards.

The lumber storage now

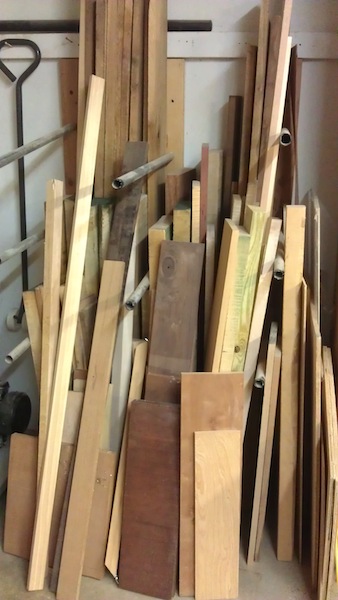
I spent this past weekend arranging the boards in my shop, creating this area to store all of my lumber. It was a pretty simple system, involving some Tapcon screws, a few 2 x 4 scraps that I picked up out of the scrap bin over at the local home improvement center and a few lengths of electric conduit.  All I did was bore some holes into the 2 x 4s to hold the conduit, and then mounted those 2 x 4 cleats into the wall.

The cleat arrangementI put three lengths of conduit into each of the cleats, using these as dividers to help control the stacks of wood so they don’t flop around. It’s not the most perfect arrangement – the boards seem as if they can push on the conduit, levering the cleats from the wall. I may have to go back to the drawing board on that one…

Anyway, i was able to get the boards in there.  Now, when I need to reach for a board, there’s no issue with finding my choice boards. I simply can look into there and find the rough or previously-milled pieces of wood to find the one I want for a new project.

A look down into the stack
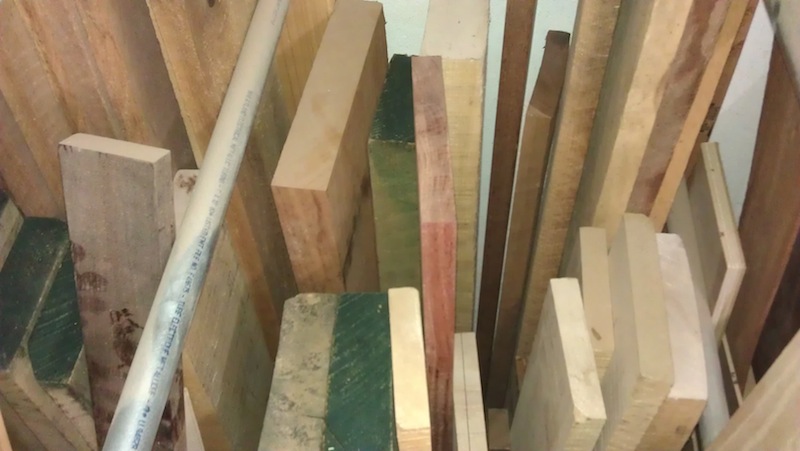
Dang, I have a lot of boards in there… Maybe I should build a few new projects!


Quick Poll

Woodworking has been practiced in one form or another for the past hundreds of thousands of years. Throughout the ages, there have been many important inventions and discoveries that have helped to make the craft what it is today.

I wonder what gadget I can invent today?

Lately, the pace of these inventions seems to be accelerating. In the secret testing rooms and laboratories, companies are inventing devices that can help you do everything from ensuring your bead of glue is laid dead center on a board you are working with to bench dogs with sophisticated pop-up mechanisms to innovative devices to lift your work off the surface of your bench while gripping it tightly.

In this week’s poll, let us know what you think about these devices. Must-have tools for your shop, or gadgets that leave you scratching your head wondering what they would be used for…


Link of the week

Rough Cut: Woodworking with Tommy Mac

A few years ago, shortly after Norm Abram hung up his tool belt from the New Yankee Workshop, a young woodworker with a distinct New England accent debuted a new woodworking show on PBS. It was Tommy MacDonald, and in the past three year, he has entertained and informed woodworkers with a variety of projects covering the basics all the way through more advanced techniques.

Tommy MacDonald from Rough Cut

This site features a listing of the projects he has tackled, some basic skill-building techniques, a peek behind the scenes of the productions and a whole lot more. If you are looking for a whole lot more background on the show, this is definitely the site to visit.


A dust gulper

Dust. Ugh. Sawdust is one of those things you have to deal with in a woodworking shop. One of the biggest contributors to the sawdust load is my contractor’s saw. I bought it about a decade ago, back in the days of open stand contractor’s saws with splitters. It’s been a good performer, but the dust that pours out of the bottom of the saw has always bothered me.

A Dust Cutter canvas bag

To help curb this problem, I have turned to several different types of solutions. A plastic plate that sat on top of the saw’s stand. It was a pain in the rear to get the dust collector hose to it. I went with the canvas bag type of setup, but that never held in place.

No, what I wanted was a hopper. With a dust fitting I could plug the hose into. That was sloped so the dust would migrate down to the outlet. But, how to make one?

I fished around on the Internet and saw lots of crazy complicated plans, but none of them did it for me. I broke out a sheet of graph paper and started figuring out an idea.  It wasn’t as tough as I thought it was going to be.

Taping the inside of the hopper

What I drew up was a five-part hopper. The first part was a plywood deck that had a hole cut into it. This serves as a frame for the rest of the hopper to fit onto. These pieces were complicated, but pretty simple to cut. The wall that holds the dust flange is attached to is 9 inches tall by 12 inches wide where it attaches to the top at a right angle.  This tapers down to 6 inches at the bottom. Before I cut everything out to size, I used a fly cutter on my drill press to cut a 4 inch diameter hole on this piece of the screw on dust flange.

A look into the mouth of the collector

The sloped piece that connects the deck to the flange piece took some finagling, but by using a little bit of scrap wood, I was able to determine the angles that both ends needed to be beveled at. Once I had them all cut to size, I simply glued and bradded into place.

The sides were cut out of some scrap 1/4″ plywood, and were very easy to cut by simply holding them up to sides and tracing them. More glue and brads, and they were ready.

Foil tape seals it up

The fun came in when I started using foil duct tape to make everything airtight. That stuff is sweet. If my car’s bumper gets damaged, I’ll just use this metal on a roll to make the whole thing look good again. The beauty about this stuff is that it sticks like nobody’s business, and really seals the thing up well.

I was able to hold it against the bottom of the saw’s stand, and then screw it through four conveniently placed holes at the top of the legs. I used some shop made wooden washers to bridge the width of the hole so the screw heads don’t slip through the hole.

The saw with the flange

As you can see, I have the dust flange facing the right side of the saw as you face it. This keeps it out of the way of the rip fence and miter fence storage, and out of the way of the foot pedal for the lift. It also happens to be the side that the dust collector is stationed to in my shop, so I don’t have to step over the hose.

By the time that I got this done, I was too tired to try it out. But, judging from some tests I have done, it should serve me well for a while.


Got this one pegged

Once people in your circles start to know you woodwork, from time to time, you get requests for some small jobs. Can I cut some things down to size? Can I drill a few holes into a board?  And, can I stretch the length of a piece of butcher block to fit a particular dimension in a new kitchen?

That last request came from a good friend who was the proud recipient of chunk of quartersawn white oak butcher block that was a grand total of 1 inch too short for the dedicated place. So, basically, I had to add a pair of strips to the sides. Yes, they had to go cross-grain, but the saving grace about this block is that the strips are quartersawn, which should limit the amount of cross-grain expansion.

The block ready to get the edges

So, I cut the strips from a larger piece and milled it straight and true – making half-inch thick strips.  I set four clamps up under the piece and glued the pieces in place with some Gorilla Glue yellow glue. It is a II rated yellow glue, which should be more than sufficient for kitchen use.

Miller Dowels

I wanted to use something else besides just the glue to hold the strips to the edge. I thought about just using screws, but I wanted to try something different – maybe just wood. I had always looked at the Miller Dowel system for joinery and wondered just how well they worked. Well, gosh, this would be the time to pick up a set and use it.

The Miller Dowel 1x bit

The set works around two components. First, there is a special stepped bit that works closely with the dowels in the set.

A Miller dowel

Those dowels are really kind of interesting.  They are tapered, and there is a section that has a set of grooves cut into it. They come in a variety of species, and I went with the birch. That’s what they had at the store.

The system works very easily. With the piece in the clamps, I measured where I wanted to put the holes, then I chucked the bit into my drill. The bit fed nicely and cut quickly, leaving me with six holes ready to go.  The instructions said to smear glue on the ridged part, and I took that to heart, putting enough on to coat the dowel.

Glued dowel


The next step was to tap the dowels into the holes once they were glued up. They didn’t push in too deeply, with finger pressure, but with a few taps of my hammer, they set right to the bottom. There was no play at all. It was good….

The end of the dowel

Once the glue dried, it was a simple matter to trim the dowels flush with the board, then to sand everything flush.  I took the time to plane the strips down to size and then sand the edges flush with the board. Once that was done, it was easy to run the random orbit sander over the surface of the butcher block to get everything nice and smooth.

The final product...

The end result? Gosh, I hope he likes it!


Quick Poll

Most woodworking tools do their jobs through the use of very sharp edges.  Woodworkers can spend countless hours grinding and honing their tools to a razor sharp edge.  Manufacturers can get a keen edge on carbide router bit cutters or table saw blades…

A rasp can handle some serious curves

And, then there are rasps and files.  These oddballs don’t slice the wood they are cutting – they grate the wood off much in the same way you might grate some parmigiano reggiano onto your pasta or into your risotto.

There are times when the only tool that can do the job is a rasp or a file, yet they aren’t normally the first tools a woodworker will purchase.

This week, we want to know what you think about files and rasps…


Link of the week

Oregon Woodworker: The Nicholson Bench Build

Workbenches have been a hot topic as of late with woodworkers. And, one of the most popular bench designs that has been built is the Roubo bench, with it’s thick top, through mortised legs and stout dimensions.

But, another design that should be considered is the English style – or Nicholson – bench. It’s a piece of engineering genius, giving plenty of clamping and working area.

Andy Margeson's finished Nicholson Bench

One of the best – and best documented – resources was put together by Andy Margeson. He took the time to show us how he designed, built and photographed the bench from start to finish. And, boy, what a finish!


part of the Wood Talk Online community