A very sticky situation… 
[poll id=”6″]

A very sticky situation…
[poll id=”6″]
Have you ever needed to face plane a board without a jointer? It’s not as difficult as you might think.

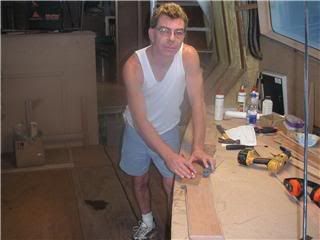
For this example, I used a rough piece of cherry that needed to be face and edge planed. If I had a jointer, I would simply run the piece over the cutter head and get a flat face through multiple passes. In my shop, however, I don’t have the room to keep a jointer, and I don’t think I’ll be able to get the money out of the household budget to buy one any time soon. Being a hobby woodworker requires a little ingenuity, and a willingness to try other ways. In this case, it’s the old-fashioned way – hand planes.

Here’s what I used – a jack plane, a jointer plane and a No. 32 transitional fore plane. I purchased all of the planes from eBay for a combined total of about $40. All were in pretty good shape and required just a few touch ups and sharpening to be usable. The thickness planer will come into play later on in the process.
After I cross cut the board to rough length (there’s no need to do the entire board – that’s just a waste of time and wood), I placed the board cup down (it had a cup) and rock the sides and edges looking for the board to wobble. Sure enough, it did!

Once I identified where the board was highest, I flipped the board over and marked the high areas with chalk. This way, I wouldn’t lose track of where I need to work first. Yes, that happens in my shop, too.
Before I used bench dogs and other more traditional hold-downs, I clamped across the bench and got to work with the No. 5 and No. 32 planes. If you have only a jack or a fore, you can do this with only that one plane. I just prefer to use the fore plane for the roughest removal, then the more finely-tuned jack plane to even the work out. My first task was to shave down the high areas.

Once the high areas were down to a manageable level, I switched to the No. 7 jointer and waxed the sole with the stub of an old candle. Waxing your plane sole makes the plane slide nicely.
After working on the board with the jointer, and flipping it back onto its face to make sure I had removed the warp, the board sat solidly on the work bench. At this point, I knew I had one side of the board flat enough to go through the thickness planer.

Now, I found the thickest part of the board – in this case, a hair under 1 1/4″. I set the planer’s head, plugged in the cord and watched the wood chips fly After getting the top side completely smooth, I flipped the board over and planed out the rough areas on the bottom and got the piece to its final thickness.
Total time from start to finish? Maybe five minutes…

Now that the board had flat and parallel faces, I took it to the table saw to straight-line rip the board and joint the edges, but, that’s for another post!
Who says those old planes are just wall decorations?
Alternate top bevel. Negative blade hook. Gullet spacing.
Why does buying a new blade for a table saw, radial arm saw or chop saw sound like you are speaking a foreign language?
 Buying a new blade can be a confusing experience. That’s why this guide from Rockler Tools is so valuable.
From clearly explaining the different teeth sets found on carbide blades to describing how the blade’s plate thickness can affect cut quality, this guide can answer the basic questions and make your decision a little easier.
While the guide is written to give advice to Rockler customers, it is definitely a must read before you upgrade your saw’s blade or if you have questions about your existing one.
 When woodworkers speak about the challenges they face, they normally mention something like cutting tight-fitting joints, selecting the proper wood and achieving a flawless finish. Now, imagine stepping up the challenge dramatically by working on a project entirely of curves, exposed to salt water and worth several million dollars.
That’s exactly what South African woodworker Francois Durocher tackles every day. Francois custom finishes the insides of expensive yachts with beautiful hardwoods, including teak, cherry and kiaat. His work is crisp, precise and accurate using skills he has honed for thirty years. “Way back in 1978, I helped my brother build a yacht. It took two years, and I learned a lot. After that, I moved to Durban and worked four years under a master craftsman from Hungary who really showed me the ropes.”<
 Achieving these outstanding results takes time, patience and a lot of planning. After receiving the yacht’s unfinished hull, it is taken to the boatyard where it first has to be set perfectly level to help make the woodwork easier. Once set, measurements are taken, pencil is put to paper and the real planning work begins in earnest. It typically takes several months to arrive at a plan that is both workable and approved by the client.
Actual woodworking is done in a very methodical manner. Drawn plans are transferred to particleboard to make accurate patterns to fit the yacht’s curves. This way, all cuts can be carefully executed to ensure an absolute minimum of waste and a very tight fit.
 With all of these curves, two tools are essential in Francois’ arsenal. “I’d really have a difficult time working without a band saw with a 6 mm blade and my router and bit collection. They give me the control and flexibility I need.”
Nearly every piece of wood, save some specialized molding, is milled on site, allowing Francois the ability to choose the right piece of wood for the job. “I look at each board’s grain, color and figure to make sure it’s right for the place I’m putting it. I like all of the wood we work with, but, by far, my favorite one is teak.”
While it’s difficult enough to cut the intricate pieces and ensure the client is satisfied, the job becomes even more challenging working around the other trades. “Electricians, plumbers, mechanics… it can get quite challenging trying to coordinate the timing of projects and making sure we aren’t running into each other.”
Finishing out a yacht can take more than two years from planning to her maiden voyage. And, as the process draws to a close, there’s satisfaction in even the smallest details. “I am so satisfied when I get the finish on the wood decks and put up the ‘No Shoes Allowed’ sign. I know that the end is in sight and we’re getting close.”
 You might expect the owners of these hand-crafted beauties to forget who did all of the work once the yacht is delivered, but that’s not the case. When Francois finished a yacht called Pegasus back in 2005, the owner invited him out for the first cruise. “The day it launched, we fired up the engine and went for a test run. The next day we fitted all the windscreen wipers and then went to top up the tank with diesel. Now it was time to go deep sea far out for sea trials which took about 6 hours. It was awesome to say the least.”
I’d be willing to bet the owner felt the same way about the craftsmanship.
[poll id=”5″]

Wikipedia’s Woodworking Workbench Entry
 Sure, some people laugh when you quote from Wikipedia – the Internet’s user-defined online encyclopedia.
However, you have got to check out this entry on woodworking workbenches.
This is one of the best written basic primers on workbench form, function and features.
Workbench materials are discussed at length, as are top and base construction. There’s even a section on proper bench placement which has me rethinking where my bench should be located. Sections on planing stops, vises, holdfasts round out this interesting entry.
As a major bonus, there are some pictures of workbenches that will inspire you to build your own – or leave you drooling uncontrollably.
I love watching football. During the NFL season, I’ll wrap up work in the shop early on a Sunday afternoon, call the kids in from the backyard, pop some popcorn, heat up some hot wings and the three of us will sit and watch a solid ten hours of games. The live drama. The hard hits. The raw emotion and energy. We cheer our fool heads off and eat all the foods we know we can’t have during the week.
In football, as in all professional sports, you start to notice that there is a sort of unwritten rule that most players follow. For example, in an after game press conference, you might see one team’s star running back or linebacker who had a career day tell the reporters, “We played a hard game against a tough team. The win was great, but there are some things we have got to work on to improve our game.” It always amazes me that you’ll hear this coming from the mouths of players or coaches – even after an impressive win. Don’t they know they just crushed the opposing team? Why doesn’t anyone ever admit to playing a perfect game?
Many woodworkers do the same thing with their projects.
 I’ve done it. You’ve done it. We all have done it. Here’s an example that happens to me. After three or four months of planning, picking out lumber, cutting precision joints and buffing the final finish to a lustrous shine, my wife walks into the shop.
“Oh, my goodness!” she says. “That is one impressive piece!”
“Well, honey, let me point out all of the goof ups I made. Look at this miter that didn’t close all the way, and this rail that I misglued and had to live with and this glue smudge under the finish and…”
Soon, I find myself on my hands and knees pointing out a drop of dried glue under the bottom shelf that only the dust bunnies will ever see. That’s when my wife will say something like, “Well, I think this is a very nice piece,” turn around and go back into the house as I frantically search for more major snafus lurking in my work.
Why on Earth do we do this to ourselves? Do we gain some type of masochistic joy in beating ourselves up over the slightest goof?
If you worked in an office where your boss came in after every project – even projects that win universal acclaim – and verbally flogged you for the smallest mistake, like not formatting the page footer exactly as she would have, would you stay at that job? After a while, most folks would hit the bricks, and anyone who stayed would be hard pressed to find any joy in coming to work.
Then why would you do that to yourself? Remember, in this case, you have to live with your boss every stinkin’ day.
To help regain my sanity – if I had any to start with – I had to create a new process when it came time to show my work to someone. Even though I have a list of the boo boos in my head, I’ll invite my wife into the shop and have her take a look at the finished project. I have to FORCE myself to be quiet while she takes in the piece. When she gets close to where the foul up is, I have to fight the urge to blurt out what she should be looking for as she runs her hand over the finished wood. Sometimes, I have to grab the vise handle and squeeze it while she picks up the smaller pieces and gives them a thorough once over. I sweat as she opens the doors and drawers, wondering if they are going to fall off the hinges or runners.
“I like it. Good job” Then, she leaves the shop.
I exhale hard. The tension drains. Maybe my mistakes REALLY aren’t as bad as I thought they were at first. Maybe you really do need an electron microscope to see that not-too-gappy joint that looks as big as the Grand Canyon in my eyes.
That’s when I start doing my end zone touchdown dance!