Now that we are in Woodworker’s Safety Week…
[poll id=”20″]

Now that we are in Woodworker’s Safety Week…
[poll id=”20″]
 Mention James Krenov’s name to most woodworkers, and visions of flawless cabinets perched atop graceful long-legged stands comes to mind. This is the official site of this well known legendary cabinet and furniture maker.
Krenov’s philosophy comes through strongly in his pieces. His emphasis on hand-work, proper proportion and letting the wood’s natural beauty shine through speak to his appreciation of the natural side of woodworking.
Krenov spelled out his thoughts on woodworking in his books A Cabinetmaker’s Notebook and The Impractical Cabinetmaker. Some of his viewpoints may come across as rather blunt, but there is no doubt that his method yields outstanding results.
Krenov ‘retired’ from professional woodworking back in 2002, but still builds recreationally in his private shop. There’s a link on his site showing what he’s building right now.

This was a project I was reluctant to start. After all, the top is a gorgeous slab of tiger maple, and the legs are some beautiful ribbon grain mahogany. How was I supposed to grind half of that away?
I built this bench with the assistance of the Wood Whisperer himself, Marc Spagnuolo. Once the wood was selected, the top was ripped into three pieces, the middle one trimmed down to form open slots on both ends and it was glued together. The tops of the legs were cut into beefy mortises and fitted into the slots.
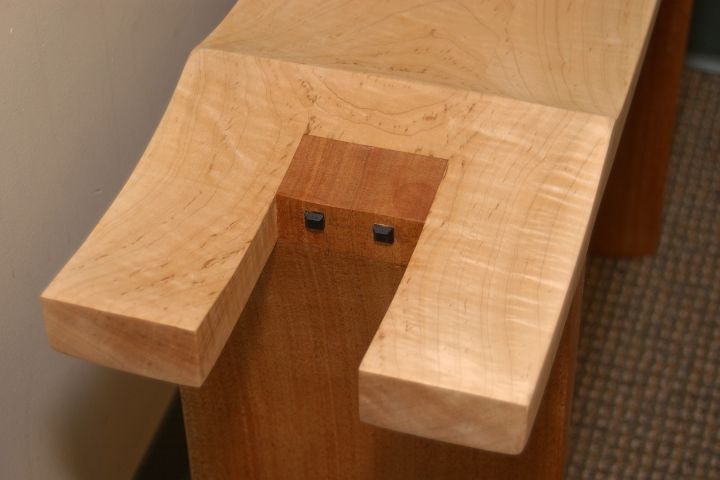 That’s when the fun really began. Using an angle grinder and an Arbortech carving wheel, I wasted out the necessary material to sculpt the graceful forms. Once the curves were finally cut and finessed, I used epoxy and screws to attach the legs to the seat, and plugged the screw holes with pyramid-shaped ebony plugs.
The finish was a 1# cut of dewaxed shellac sanded down with 320 grit paper once it dried. After dusting the piece down, I finished it with three coats of natural Watco Danish Oil and a coat of paste furniture wax.
This piece won best in its class in an art contest conducted by the National Arts Program, and it has an honored place in our living room, right under one of our large sunny front windows.
Now, all the neighbors want one…
My neighbor has this great story he likes to tell. He worked as a plant manager (read: Custodian) at a local elementary school. He was refitting a bathroom in a teacher’s lounge and had done a pretty decent job.
The principal, however, wasn’t as impressed. “My husband is a MASTER CRAFTSMAN, he will come in and build this piece.”
Well, when the principal’s husband finally came to the school to do the work, my neighbor noticed that he was missing a finger. Ouch. Turns out that he had lost the finger in a woodworking accident – a mishap on a table saw.
 I always take time to stop and think when I hear stories like this. Right now, I’m working on a sweet Krenov-style cabinet, and it’s coming along nicely. But, what would happen to my progress if I was hurt in a similar accident?
Granted, none of my woodshop accidents has been too severe. I can remember taking a sliver of aluminum in my left eye while cutting a screen door jamb. Then, I can remember slicing a chunk of skin off my left thumb when a spokeshave I was working with slipped and did its damage. I can remember being out of the shop for about a week each time I recuperated.
I also had a few close calls. The time I had a kickback when working with a powerful Unisaw that almost took off some fingers (Apparently, I had cleared the blade by a matter of an inch – or less). Or the time a 1/4″ straight cutting router bit snapped and embedded in a wall across the shop from me. Those could have been very serious injuries.
To help remind all woodworkers about the need for safety, the member blogs of The Wood Whisperer Network are taking the time to call attention to safety during Woodworker’s Safety Week – May 5 – 9.
Each day that week, I’ll focus on a specific area of safety concern – not a finger-wagging admonition, but some simple common-sense reminders that might help keep you out of the ER and in the shop. The slate for the week looks like this:
So, take some time with us this week to think about your shop safety practices. Who knows, if some of this stuff sinks in, we may have more future ‘master craftsmen’ who can count to ten without having to take off their shoes.
[poll id=”19″]
 So, you have to build yourself a workbench, but you don’t have the time, skill or money to construct one of those could- double – as- an- altar- in- some- minor- woodworking- religion workbenches you see in woodworking magazines.
Never fear. If you can cut some 2×4’s and drive screws, you can build yourself a very decent workbench for a small investment of time and money.
Simpson Strong Ties, the folks who make hurricane tie-downs and other metal construction connectors, have a line of hardware that can allow you to build shelves, bins and workbenches. Their DIY page has all the plans and cut lists you need to put together a shop full of storage and work surfaces in an afternoon.
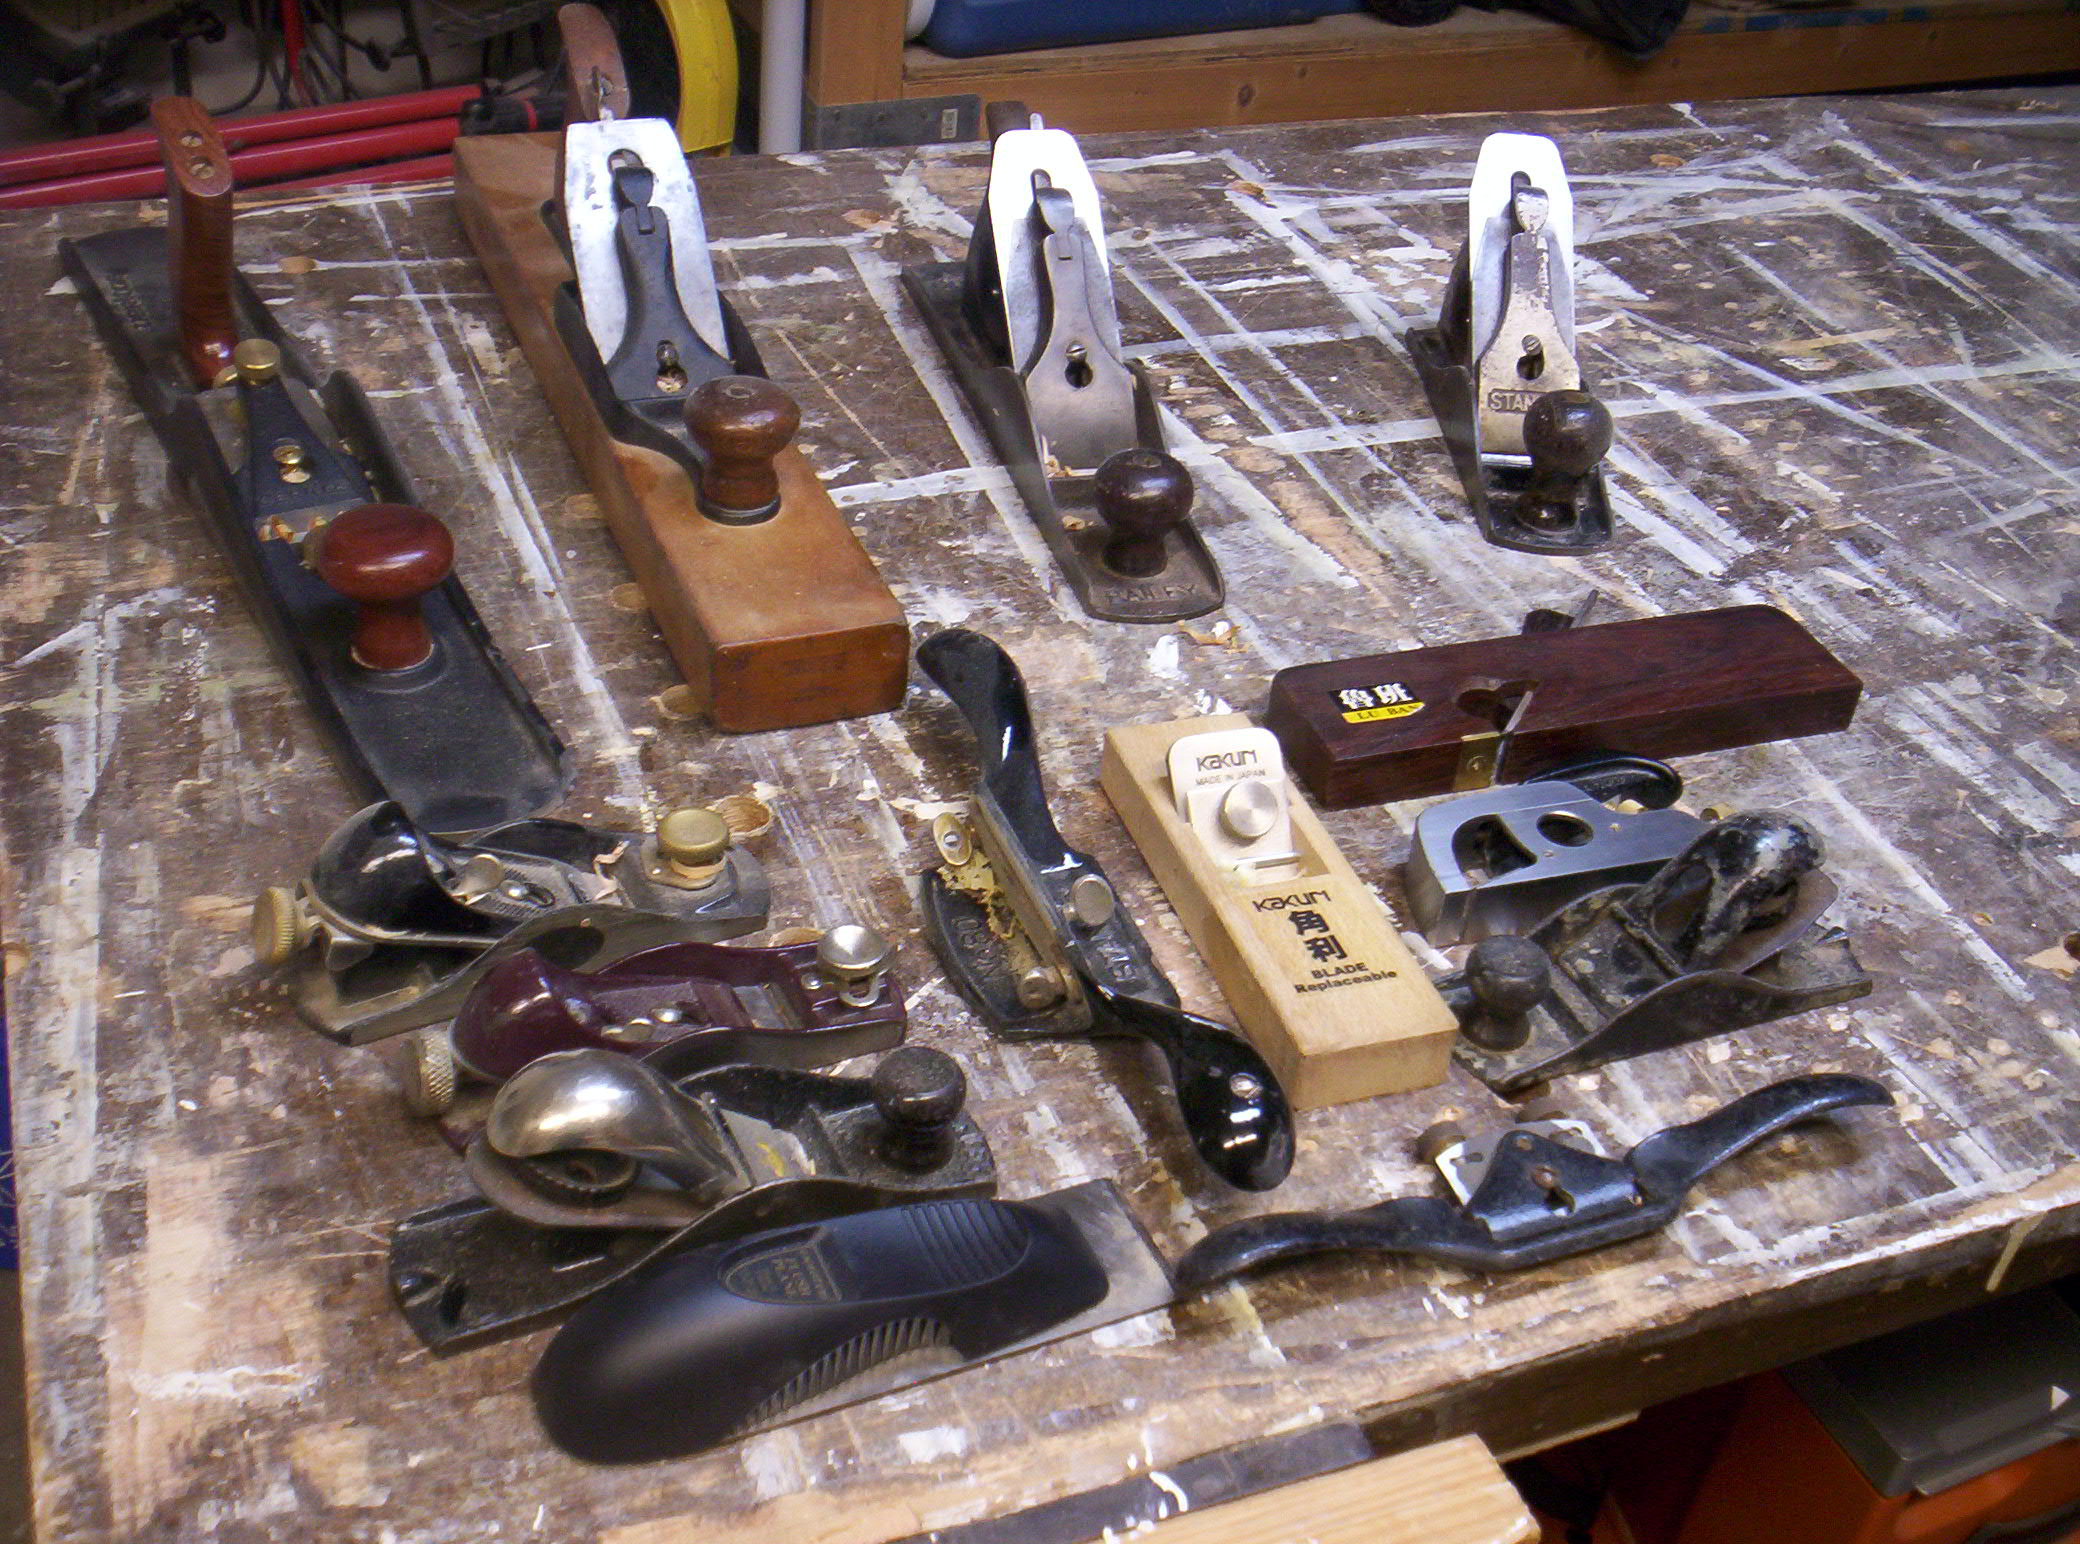
When it comes to working on my projects, I always seem to find myself reaching for a hand plane. Whether to flatten a board, true an edge or plane a bevel, my planes give me total control over whatever wood I am working with.
Since I’ve written a lot about my hand planes, it’s only fair that I show you the family photo so you see which ones I use.
Across the back row from left to right, I have:
On the left side, from back to front:
In the middle row from back to front:
And, the right side from back to front:
Over the next few months, I’ll keep on doing how-to articles on working with these planes to achieve excellent results on your projects. Until then, hey, since I have the planes on my workbench, maybe I should give them a good cleaning and hone the blades!