
After my recent article I wrote about the Kehoe Jig, I decided I would have to get my hands on one and give it a test.
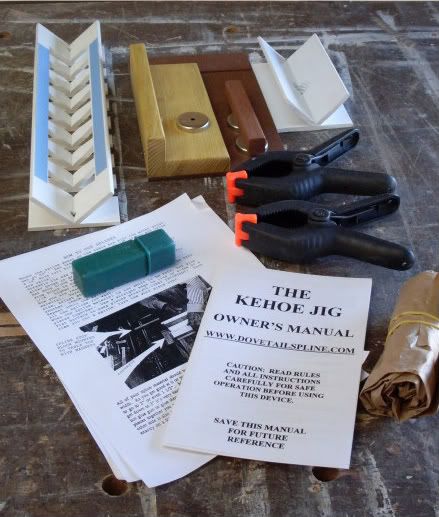 When the package arrived at my shop, I unpacked it and found it had quite a few pieces in it. Namely, the jig itself, the sled and magnetic stops used to make the splines, a corner inlay kit (I didn’t use it for this project), 14 degree dovetail router bit with a guide bushing, spring clamps, instructions and a paper bag containing some sample splines.
While reading the instruction manual, I discovered that – as with any other dovetail operation – there are two setups required. While traditional dovetail joints require you to change router setups for the pins and tails, the Kehoe requires one router setup for the grooves and one table saw setup for the splines. That’s convenient, because, unless you are lucky enough to be using two separate routers to cut your dovetails, you will have to change the router setup between the different cuts. By setting up two different tools, it helps eliminate errors and confusion.
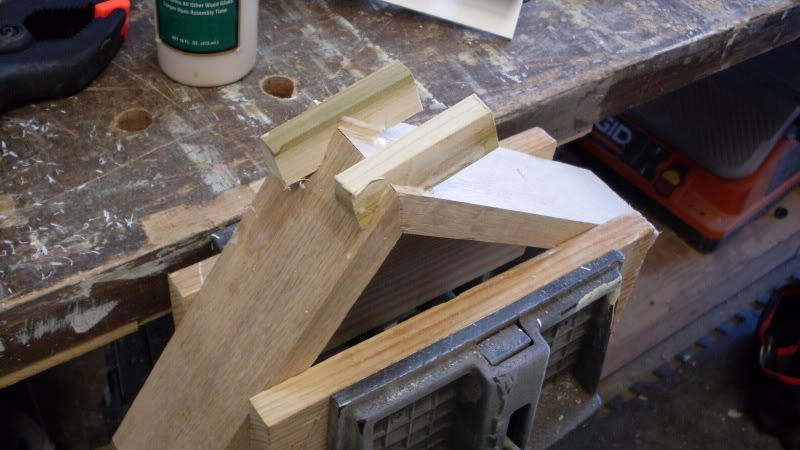
To try the jig out, I used it to assemble the base of a photo frame bookend. I cut my oak base and riser with a 45 degree miter joint and glued it up without any additional reinforcement. The dovetail splines will take care of that.
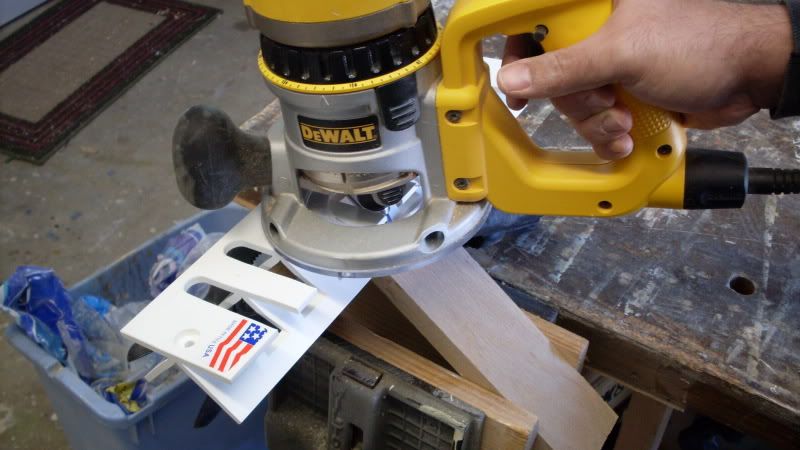 The next thing I had to do was to put the work piece into the vise and set the jig in place. This is made pretty easy, because the bottom of the jig is shaped at a 45 degree angle. This rides on the corner of the work, and the flat top gives your router plenty of support as you make the cuts.
Before you cut, lower the bit until the bearing rides on the edges of the groove template without breaking through the inside of the joint. As you might imagine, the most critical part of this operation is to keep the router absolutely flat on top of the jig. If you lift the router while cutting, you will spoil the cut.
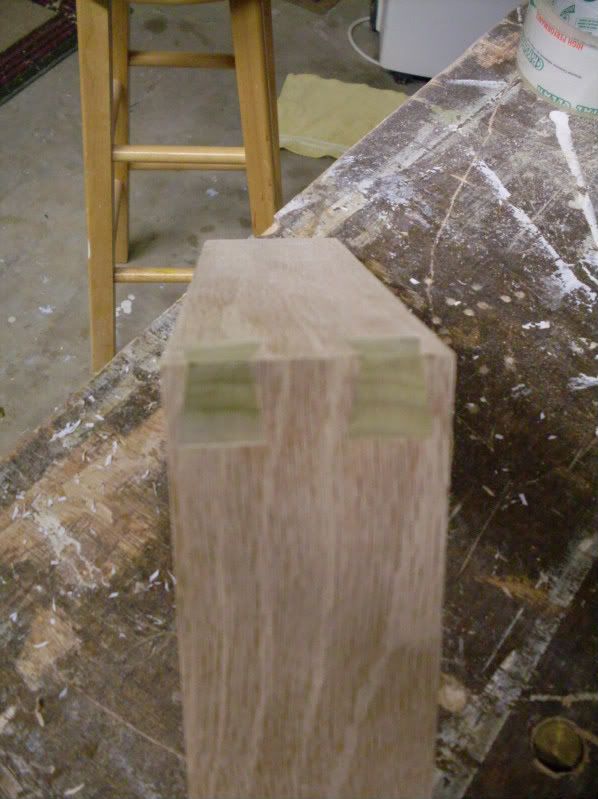
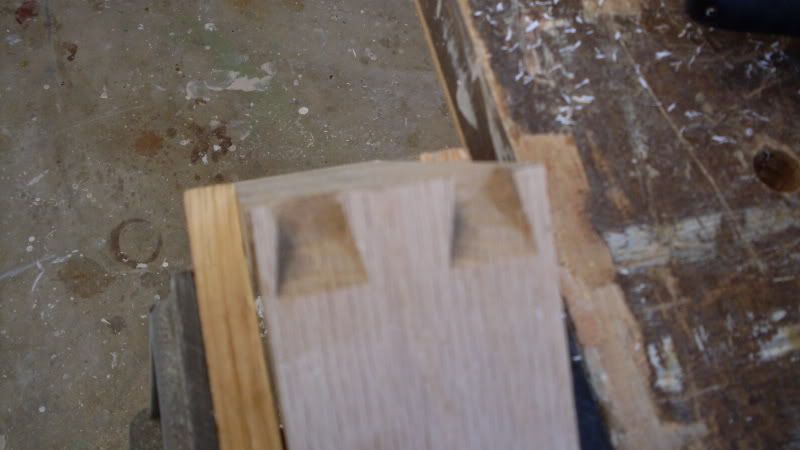 What you are left with is a dovetail-shaped groove in the work. Since the groove is relatively deep, you can now see why it is critical to not use metal fasteners. Biscuits and dowels might be OK, but, again, once the splines are driven home, they will do an excellent job in reinforcing the joint.
Next, you will have to move over to the table saw. First, a few notes about the splines. You want to make them by making rip cuts. You need the long grain to run the length of the splines or the joints you make will be very weak. Secondly, the spline sled gives the splines a o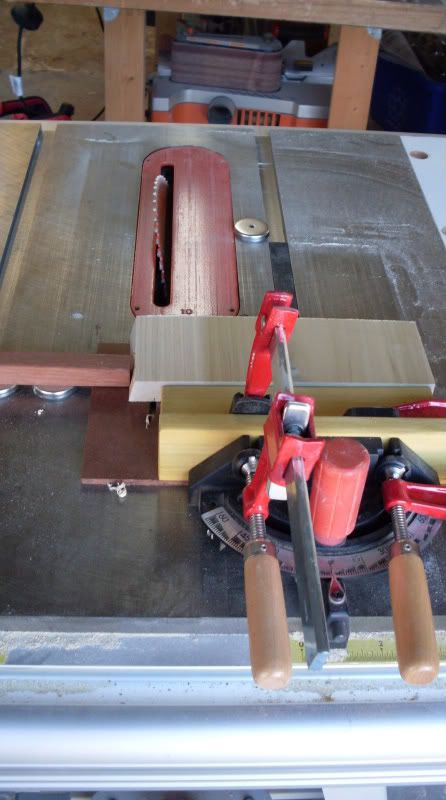 ne degree taper over their length, which means when properly cut, they will only fit one way.
The setup consists of the spline sled, which clamps to your miter gauge, a magnetic stop (The device to the left of the sled with two magnets) that sets your spline’s width and a magnet that serves as a stop for the miter sled. This stop keeps you from cutting all the way through the spline sled.
To get started, first, I would strongly recommend that you glue up some panels of the wood you want to use for splines in order to get about a 12 inch width. Remember, you want these splines to be long grain. Wide boards are great, but I wouldn’t want to use a wide walnut or cherry board for this kind of operation – it’s too valuable. Set your saw’s blade to the angle of the dovetail bit you use – in this case, 14 degrees.
First, cut off one edge of your spline stock. This gives you the necessary 14 degree shoulder on one side. Next, you want to get a rough measurement of the groove at it’s widest point. In this case, about 3/4″. Mark that measurement on the stock, and set the blade to leave the mark. Push the work through the saw blade carefully, all the time holding the piece tightly to the sled’s back fence.
Take the spline to your work and see how it fits. My first attempts were too narrow. To adjust the jig, you can gently tap the stop away from the sled to widen the spline or toward the sled to make them narrower. For your first attempt, plan on making several tests to get things dialed in.
Once you hit the butter zone (where the splines slide in about halfway and then stop), cut as many splines as you need for the project. It’s always a good idea to check the spline’s width just to make sure you have’t knocked anything out of whack.
 Once you get the splines ready, it’s a simple matter of gluing them up, orienting them narrow side in (remember, they have that one degree taper) and tapping them into the groove. Now, don’t club on them – you could run the risk of splitting your workpiece. Just make sure they go in tightly. Most of the glue will squeeze out of the joint as you do this, but, that’s to be expected. The very thin film of glue will hold the pieces in place very well.
 After the glue dries, you can cut the splines as flush as possible with a fine toothed hand saw (or maybe even a flush cut saw if you use a shim between the saw’s teeth and the work – you don’t want to scar the pieces) to get rid of the majority of the spline waste. From there, you can use a block plane or a belt sander to flush the splines with the work.
The result is a strong decorative joint that goes together faster than by using many other dovetail jigs.
Pros –
- Easy to use
- You don’t have to change router settings between tails and pins
- Ability to variably space
- Decorative
Cons –
- Takes time to zero in spline width
- Can drive joint apart if you are too aggressive with your hammer
All in all, I can recommend the Kehoe… You can find out more about the jig at their website:
http://www.dovetailspline.com/
 It never fails… you get to the end of that tough project, and you begin to scrape, sand and plane the wood to get ready for finishing.
 A few weeks ago, I posted a
  I woke up this morning. That’s always a good thing. It means I have another day to enjoy on the green side of the grass and do what I do.
 This is one of those projects I have always thought about, but never got around to building. That was until I had to build a box that had mitered corners. Trying to square those slippery joints and keep the joints aligned… well, that was tough.
 After I built this, I finished it with four coats of polyurethane to help prevent any glue from sticking to the jig.
 Now that we are in to holiday season, I’m sure visions of giving – and receiving – gifts are dancing in your head.
 Hey, we’re now deep into the holiday season. That means it’s not only time to deck the halls, donate to food pantries and make connections with friends and family – it’s time to think about gift giving and recieving!