Category Archives: Reviews

The sawblade parade

One day, I hope to have minions here at Tom’s Workbench.  You know, people to go out and do my bidding.

“Saw down that tree and bring me the choicest curly lumber from within!”

“Yes, my Svengali. Your wish is our command.”

Right now, I’ll settle for Iggy not kicking me in the forehead whenever I make a mistake on a cut. I think I may be getting a concussion.

Instead of minions, I have loyal Tom’s Workbench readers who pitch in from time to time.  You remember that guy Paul? The dude who we built the home office system for last year?   Paul has a neat new Bosch portable table saw that he’s fallen in love with.  We were talking about the blades he uses on the saw, and then the thought hit me – Why not do a test of some blades we’ve been using to see how well the cut on a saw with a small motor?  If a blade was going to cause a saw to bog down, this would be one of the saws you might expect to do that.

I loaned him a blade I had gotten from my friends at Infinity tools, he got a selection of blades he had acquired, and with his best tool evaluator’s hat on, filed this report.  Take it away Paul!

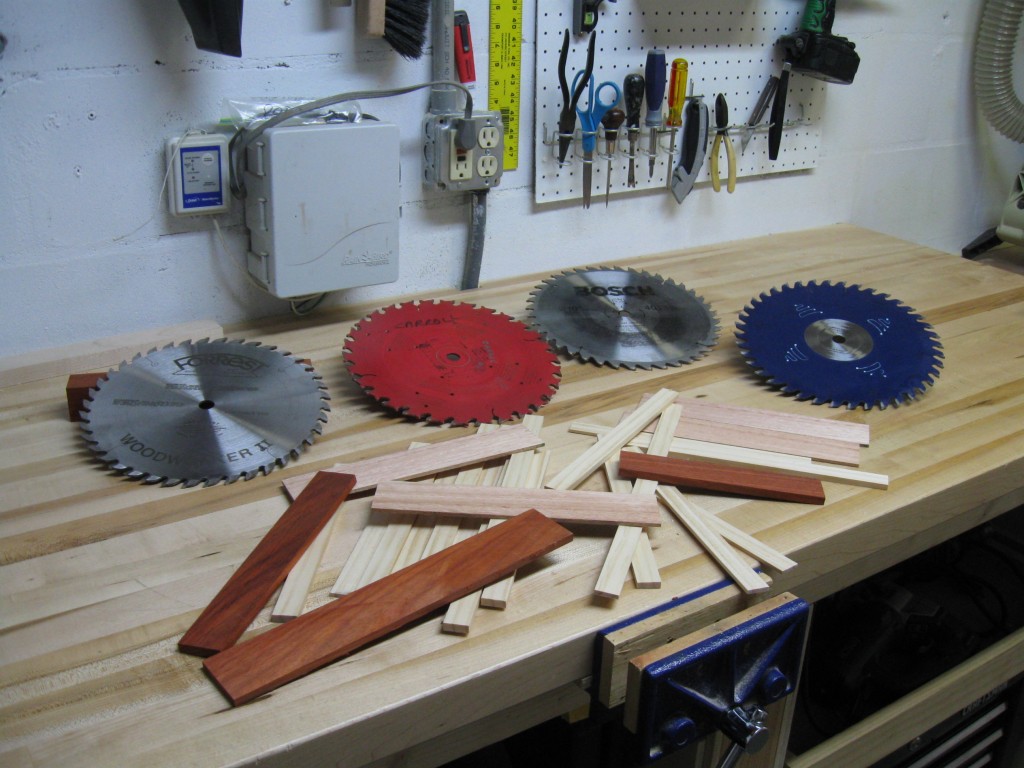
I was working on building a thin strip jig and I was doing a lot of ripping to dial it in. I had some time so I thought I would try out the blades. I tried 4 different models and ripped ¾” southern yellow pine as well as 8/4 Lyptus. All of it was done on my Bosch table saw. The blades used were:

  • Stock Bosch 40T thin kerf – To be fair, I only use this blade to cut plywood and pressure treated. It cut OK but left a lot of fuzz and was slow cutting especially on the Lyptus.
  • Freud 30T Glue Line Rip full kerf – This is a 4-year old blade that was sharpened about a month ago. It cuts better than the Bosch and leaves a clean edge but it left a bit of burn on the edges.
  • Forrest WW II full kerf – This is an almost new blade. It cut fast, clean, and mirror smooth on the edges. There’s a reason everyone says this is a great blade.
  • Infinity Super General thin kerf – This was new out of the box. It cut fast, smooth, and clean. The edges were slightly worse than the WWII but, frankly, the difference didn’t matter. This blade cuts really well. Since it fits my riving knife better, this is likely to become my “go to” blade.

The Forrest cuts better but the difference is in no way worth the money in my opinion. Wish I had known about Infinity when I bought my WWII.

There you have it, folks. Thanks for the review Paul. Oh, and he also reports that he now has an overabundance of paint stirrers, so if anyone wants to go to Paul’s house and become his painting minion for a weekend or two, I’m sure he can put you to work!


Book Review: Frontier Logs Play Set

There’s nothing quite like watching the imagination of kids at work. Pull up a chair and a cup of coffee with my mom one day. She’ll tell you about the Christmas when I was a toddler and spent most of the day playing with the handle of a toy. Neither my parents, grandparents or my older brother could convince me to play with something else. I can’t recall what I was playing with that handle, but it must have been awesome.

It wasn’t because I was a simple kid.. but the simpler the toy, the bigger the role my imagination played in making my own fun. That’s the appeal of wooden blocks, Lego blocks, and those frontier-style logs you can use to build all kinds of structures. They’ve been around for a long time and are very popular because they still hold their appeal.

Well, if there’s a special young someone in your life, AND you would like to build him or her a great holiday present, why not look to build a set of frontier logs? Sure, you could buy a set, but they wouldn’t be made by you, right? And, you would be surprised just how easy they are to build.

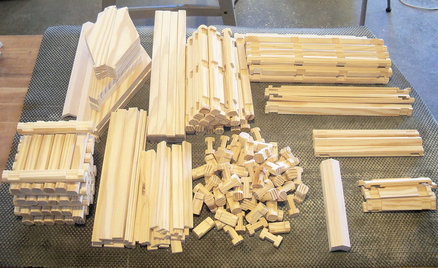
Ralph Bagnall strikes again, releasing his second book about how to build a frontier logs play set. And, just as with his sand shading veneer book, this one is crammed with straightforward, step by step instructions on how to build a set of your own.  Ralph made his set from a pile of southern yellow pine dimensional lumber scraps, a table saw with a combination blade and a dado blade, and a router table with a convex edge router bit.

The process is very simple and repetitive, and, remember, you are building a set of logs for a child’s play set – not machining parts for the International Space Station. So, cut yourself some slack if things aren’t down to the thousandth of an inch, OK?

The best part of the plans that Ralph lays out is that it includes plans to make roof gable ends, half logs to help you build foundations and how to cut roof staves. Ralph shows you how to cut roof caps and chimneys, to add some more realism to the build. He even recommends how many of each type of piece to build so you can ensure there are plenty of pieces to work with to build a variety of buildings.

Part two of the book shows pictures of some structures you may want to help your little buckaroo build with your new set of logs. You can choose from ranches with corrals, farms or frontier forts.

Now, if you are considering building a set of frontier logs for someone in your life, you might want a copy of this book. And, as we had done with the sand shading book, Ralph would like to give away a copy to one of our readers.

So, if you would like to get your own copy, answer this question. I’ll pick a winner Tuesday night from the correct answers submitted.  Ready? here goes…

What was the first wooden toy I built for my sons?

This one should be easy for y’all!

Hey, Roger Sullivan, you are our winner!  Look for your own copy of the book coming to a mailbox near you!

Book Review: Sand Shading

There are lots of ways you can make a project look good when finishing. You can stain, dye or oil the piece to give it depth or shimmer.

But, there’s a classic technique that uses veneer, sand and heat to add depth to inlays.  Woodworker Ralph Bagnall has written his first book on the subject of sand shading, entitled Sand Shading: Mastering the hot sand method for shading inlays.  It offers very simple step by step instructions on the process that should encourage even the beginner to try their hand.

Ralph lays out the process in clear, easy to follow steps. The first piece of ‘specialized’ equipment used to be a ubiquitous piece of kitchen cookware – an electric skillet.  By using the heat control on this appliance, you can get accurate temperature control in the sand, which gives you control over the shade you impart to your inlay pieces.  Ralph observed that while you can buy a new one of these skillets for about $30 in a local mega-mart, you can probably score one at a thrift store or yard sale for uber-cheap.

The next specialized component is sand… but not just any sand. You want to pick up sand with the finest grit possible to ensure a more even shading on the inlay pieces. Ralph suggests leveling sand, used to level patio pavers.  His suggestion to thoroughly dry the sand using the electric skillet is one of those a-ha tips that you expect from a well-conceived book about a challenging technique.

As you might imagine, the shading is achieved by burying the inlay material in the sand and scorching it slightly. During each step of the process, Ralph shows the tips and tricks for shading simple fan inlay pieces all the way to fancier shell designs.  He also goes into the material selection process, showing which species of wood works the best (Ralph loves holly for this), the best way to assemble the inlay for installation into the final piece and how to get creative in designing your own projects.

Ralph’s book brings to light in great detail this classic but seemingly lost technique. Given the clear step-by-step instructions and common equipment and materials, this is going to become one very popular read.

Congratulations to Douglas Bordner who won a copy of Ralph’s book! Thanks everyone for participating!

Now, here comes the fun part.  Ralph has offered me the opportunity for one of my readers to get a free copy of his book for his or her very own.  So, let’s break out a classic game played by radio stations. Send me an e-mail at tom@tomsworkbench.com with the answer to this question:

What was the first project I built  that I ever used veneer on, and what was the species of veneer I used?

I’ll take all the correct answers I receive until 8 p.m. Eastern time today and have one of my sons randomly select from the correct answers submitted.  Good luck!


Staying on track

There are few things as awkward as wrestling a sheet of 4 foot by 8 foot plywood onto a table saw.

OK, maybe there was the time I asked the cutest and most popular girl in middle school to go to a dance with me. And, after a long pause, she laughed. Loudly. Now, THAT was awkward …

But, think about it.  A sheet of 3/4″ ply tips the scales at about 80 pounds, has no easy way to grab and hold and is tough to balance on a table saw’s top while keeping one edge against the rip fence.  It’s not easy at all.

That’s why when Paul and I were just starting the cabinet project, we had a brief discussion about getting our hands on one of the ‘new’ track saws to help break the sheets into more manageable sections without the need to break someone’s back or damage their shoulders. Yes, that someone is me…

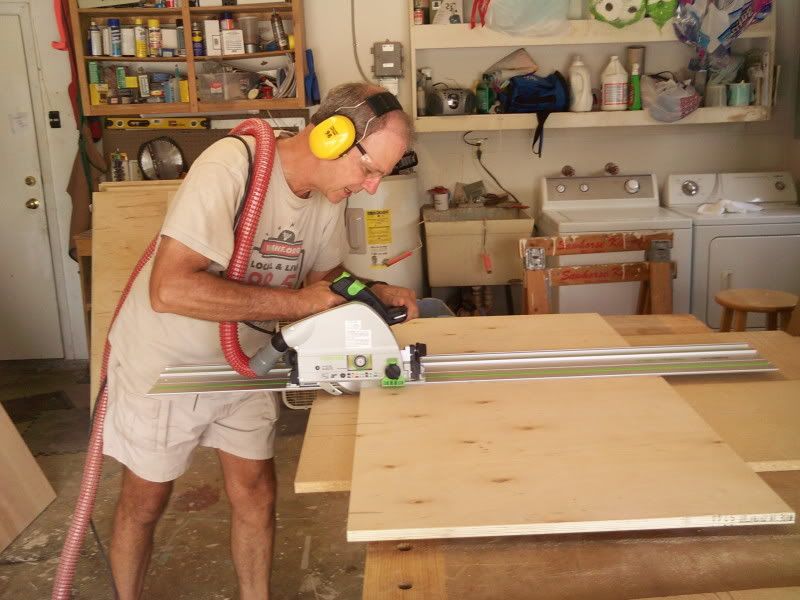
So, just as the plywood delivery came to the shop and the driver and I were unloading it, Paul walked in with a long, skinny box and a plastic container.  Paul had gone out and purchased a Festool TS 55 EQ plunge cut circular saw system for us to use on this project.

Now, Festool isn’t the only company with a dog in this hunt. DeWalt has a model they introduced about two years ago, and Makita also has a track saw system. I can’t really give a comparative review of these other models, but I can tell you that if they work as well at the one we are using, they are worth their weight in gold.

If you wanted to break down some sheets of plywood without one of these track saw systems, you could make yourself a sawboard and use your circular saw on the cut.  I’ve used the finest blades possible on my little Black and Decker saw, but still found the splintering on the piece to be unacceptable. This, of course, required me to go from the circular saw cut to the table saw in order to complete the cut.  This required that I remember to cut the piece strong and take that second step to get an acceptable edge.

Given the number of cuts on this case, the Festool saved a tremendous amount of time.  The cuts came from the saw cleaner than what I could accomplish with my Forrest Woodworker II blade on my table saw. Anything that eliminates a step in the process that doesn’t sacrifice quality is a winner in my book.

The saw is pretty sophisticated. The controls are clearly marked and easy to operate.  The saw does plunge to cut and also brings a riving knife down behind the blade.  If you have ever cut a board that pinched your saw’s blade during a cut, you know how frustrating and dangerous the situation could be.  This plunging action makes inside ‘pocket cuts’ a piece of cake, not a harrowing experience like plunging a traditional circular saw.

The Festool also has an anti-splinter ‘foot’ that presses down on the material just at the front of the blade to prevent splintering along the offcut side.

The track that the saw rides along is also very well thought out. Basically, the saw’s base plate has a square notch worked into its design.  This notch mates with a square track that rises from the track to guide the saw.  The base of this track has two rubber non-skid strips adhered to it, allowing you to place the guide down and not have to clamp it.  However, clamping isn’t the worst idea when cutting a lot of pieces.  It just helps to keep the saw track from shifting if you bump into it.

On the edge of this track that guides your cut, there is another anti-splinter device that keeps the keeper half of your board from splintering. Since this is exactly where your saw is cutting, you don’t have to move it into place… it’s always there.  The cuts off the track are perfectly straight and beautiful.

The saw also comes with a dust collection port.  I was using my shop vac instead of the company’s compatible dust collector, but noticed that the amount of dust generated by the cuts was very small.

The saw’s flexibility in cutting could also lead you to trouble. By not indexing off of a fixed rip fence, you have to be sure you carefully mark the pieces you are cutting.  If you mismark and cut on a diagonal, you will get a perfectly straight diagonal. You also have to remember which side is the keeper and ensure you don’t cut it one kerf too narrow by cutting on the wrong side of the  line.  Just sayin …

Yes, a track saw like the one we picked up is more expensive than just using a sawboard and your circular saw.  However, the time you save having to make two separate cuts could really be a difference maker on a large cabinet project. And, if that time savings also happens to lead to better quality cuts, well, sounds like a winner all around.

Book Review: Home Building and Woodworking in Colonial America

Since I’ve been on reduced duty this week recovering from my run in with the hedge trimmers, I’ve had a lot of time to watch movies, play games with the kids and read.  And, boy, have I read.  The librarians are getting tired of seeing me.

Libraries are great places to go.  There are tens of thousands of books on the shelves on all different kind of topics.  Wine. Travel. Woodworking. Music.  You can’t go wrong…

And, there are some of those books you want to borrow again and again.

C. Keith Wilbur’s Home Building and Woodworking in Colonial America (ISBN-13: 978-1564400192) is one of those books. Lavishly illustrated throughout, Wilbur takes readers through the process of home building from the selection and felling of trees for the timber frame to the plastering and white wash on the walls.  Each step is shown in the kind of detail that will leave the history minded woodworker intrigued for a good long while.

For instance, the action starts right on page one… Wilbur begins with a one page description of how the European settlers had over harvested the trees back in the homeland and the feeling of joy they experienced when they saw the enormous tree stands in North America.  The page also explains how the Royal Navy surveyors branded with the King’s broad arrow every single white pine with a diameter of two feet or greater for use as masts on new ships.

Later pages describe how the Colonists improved on the British trade axe to design a more efficient chopping design.  The proper way to select and fell a tree while using just an axe. The tools and processes used to buck the longer logs to more manageable sizes.  Hauling them out of the forest. Squaring the timbers.  Stacking and seasoning the timbers to get them ready for construction.

And, that’s all by page 15…

I was amazed by the way Wilbur constantly illustrated how conditions in the American Colonies dictated the construction techniques and designs in order to address local climactic conditions.  For example, homes built in New England were primarily built with a central chimney stack in order to retain as much heat as possible during the brutally cold winters.  In southern colonies, it was a better idea to move the chimney stack to the outside of the house in order to better control the heat gain in the milder winters and while cooking during the summer months.

As an unexpected bonus, Wilbur throws in a chapter dedicated to the evolution of common woodworking tools.  From prehistoric times through Egyptian, Greek, Roman and medieval times until the colonial American era. Axes, adzes, chisels, planes… they are in there.

I have only scratched the surface of what’s offered in this book. If you are a fan of old school woodworking, you can do a whole lot worse than picking up a copy of this book.  And, after I change my finger dressing this morning, I will be reading more during breakfast.

By the way… In case you are counting… this makes post number

Pretty cool, eh?  I had no idea back in 2007 that I was going to get this far.  I hope that during my run so far at Tom’s Workbench that I am able to provide you with a few laughs on our journey into woodworking.  Thanks for reading!

A new product: Prazi Groove Center

I’ve been told by many people that I need to take up meditation.  No, not some kind of mystic zen-like kinda thing, but just a few minutes every day to sit quietly, relax and do some deep breathing in order to take the edge off.  The benefits are that my blood pressure would drop, I would sleep better and it would help me find my ‘center’ of calm.

Well, at my house, with a busy job, two sons and all the other stuff that goes with being a dad, husband and homeowner, time to relax is at a premium.

Fortunately, the folks at Prazi USA have found an easier way for me to find my center.

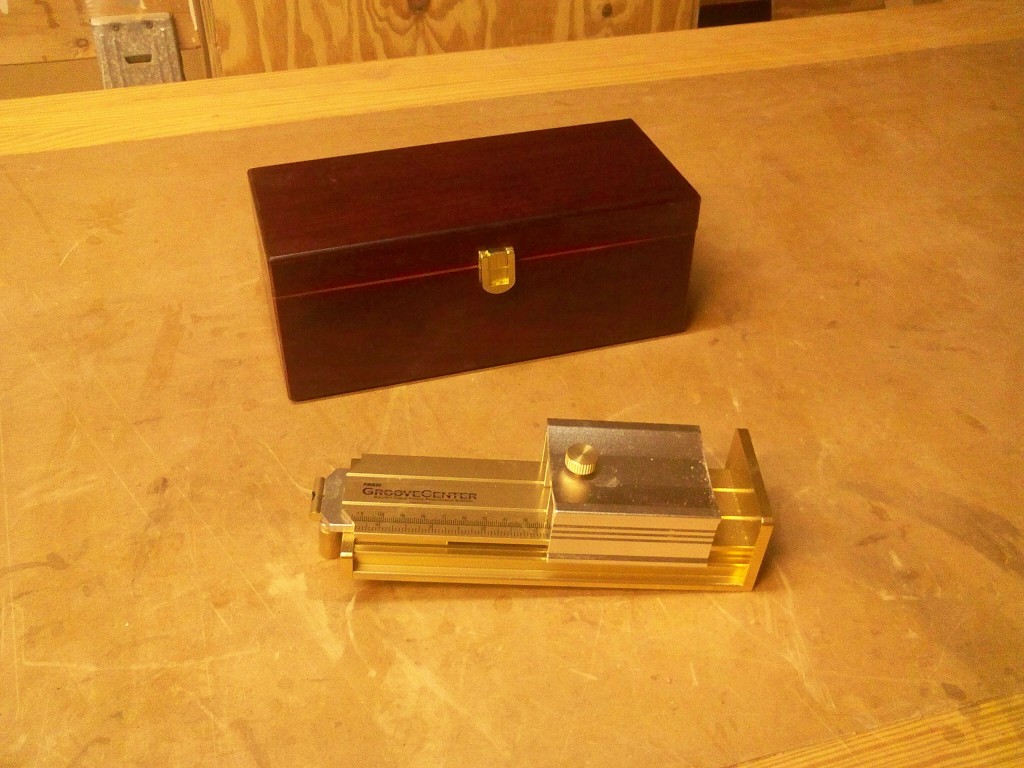
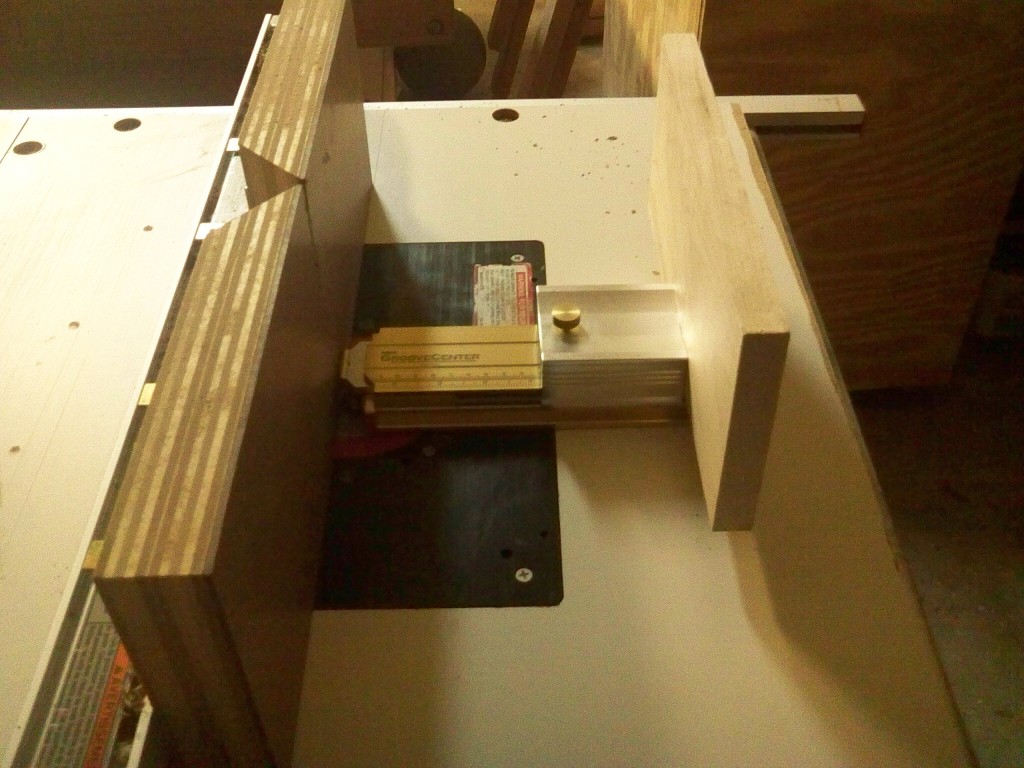
To be precise, they have created the Groove Center. This nifty device helps you find the middle of a board while routing grooves.  The first time.  Seriously.

What do you get?  Well, the tool comes packed in a beautiful box befitting a precisely-functioning tool. The tool its self is a gold anodized aluminum beauty. It consists of a flat base that allows the tool to sit securely on your router table, and a sliding ‘truck’  that rides in the slots of the base.  As you move the ‘truck’ along the base, you will notice the third piece which extends from the front of the piece.  You will notice that this piece moves exactly one half the distance you move the ‘truck’. This measuring tool is what allows you to set your router table’s fence perfectly the first time around.

To set up the tool, first, you have to make sure the device is zeroed out, with the ‘truck’ far over to the stop at the back of the track. Push your router’s fence back away from the bit, jack your table-mounted router with the collet as far up as it will go.  There’s a 1/2″ diameter pin at the front of the jig that you slip into the collet (the 1/4″ pin is coming soon) and tighten so it grips the pin.  This is a very important step, since you are precisely measuring where to set your fence.

Next, push the ‘truck’ toward the front of the jig and slip a piece of the stock you will be routing into the opening and close the ‘truck’ to capture the piece.  Gently tighten the knob that locks everything into place, and voila, you will see that the nose of the jig has extended half the distance of the workpiece thickness.  Bring your router table fence over until it touches the nose and bingo, you are set up good to go.

Just don’t move the router fence.  It’s set perfectly.  If you have to move the fence in order to get to your router bit, you can clamp some wood to your table as a stop to allow you to get the fence back into the right position after you set the bit up.

Loosen the collet and remove the jig.  Insert your router bit and tighten it in place. If you had to move your fence, return it to its original position and you are good to go.  The groove is centered on the first run – no fuss, no muss.  And, it’s not just for grooves – cutting mortises on the router table is a snap once you know that everything is lined up perfectly.

Is this all the Groove Center does?  Absolutely not.  It has another trick up its sleeve – setting up the tricky-to-master lock miter bit.  But, that’s another post for another day.

Right now, I have a quick 15 minutes to spend meditating.  Gotta find my center, ya know.

FYI – here’s a video of the Groove Center in action…

The Secret Manuals

The router.  The band saw.  The table saw.

These three tools are some of the most versatile tools in the shop… but you would never know it from reading the owners manuals.  Sure, they give information on how to change blades and bits,  use all of the adjustment controls and build essential safety items, but that’s about it.

To really crack the code on how to get the most out of  your tools, I’d strongly recommend that you get your hands on a few of the books that give you the tips and tricks that go way beyond what’s included in your owner’s manual.

For me, I picked up copies of the Cutting Edge books.  Kenneth Burton wrote Cutting Edge Band Saw Tips and Tricks and Cutting Edge Table Saw Tips and Tricks.  Jim Stack went rotary in Cutting Edge Router Tips and Tricks.

Each of these three books takes a much deeper look at these tools they address and provide a much more detailed picture of what is possible.  First, you can’t do good work without an accurately tuned tool.  While every manufacturer builds its tools with unique controls and adjustments, the books advise readers what the most critical areas of concern are to ensure accurate work. Getting the blade aligned properly. Ensuring the router bit is securely tightened and won’t fly out of the collet. Discovering the proper way to align the rip fence.  Stuff like that.

If you are looking to buy new blades or bits for your tools, readers can find sound advice on what to look for before they plunk down their hard-earned cash.  How to evaluate the quality.  Which ones are most essential And, since each blade or bit represents an investment, care and storage tips advise the best way to care for these to get the most from each. Proper cleaning instructions.  Careful storage techniques. How best to organize them so they are ready to go when you need them.

Jigs, jigs and more jigs.  From the most basic push stick to the far more elaborate and exotic, these books offer detailed construction plans and how-to instructions.  For example, did you ever want to cut dovetails, but never wanted to lay out the cash for a router jig or take the time to cut them by hand?  I discovered that a well-tuned band saw can do the deed admirably.  Want to make curved pieces for a project? How about using your straight-shooting table saw.? What about carving details in the face of a board?  You could invest in a set of carving tools and lessons, or you can build a simple face-routing jig and let your router do the work.

Finally, what good are all of these skills if you don’t have a project to use them on?  The books offer step-by-step plans to build such items as  a glorious showcase cabinet, intricate band sawn boxes or gracefully curved demilune tables.  Each of these projects uses the skills and jigs taught in the books, giving woodworkers the opportunity to try out their newly-discovered skills.

Let’s face it – money is tight these days.  Woodworking can potentially be a very expensive hobby to pursue.  Anything as inexpensive as a quality ‘how to’ book that helps me get the most out of my tools is certainly a welcome addition to my shop. I’d almost like to see some tool manufacturers partner with these publishing houses to bundle these books with the tools they sell.  It would certainly help out the budding woodworker with his or her new shop tools.  They are – in effect – the secret manuals you wish came with your purchase.

I chose to go with the Cutting Edge series of books, and they have served me well.  But, there are also many others out there well written by talented instructors.  My advice would be to check them out and pick up the ones that work for you.  You may never know just how much money you can save by learning all that your tools are capable of.