Category Archives: Reviews

Book Review: Shop Class as Soulcraft

Shop Class as Soulcraft

by Matthew B. Crawford

ISBN-13: 978-1594202230

I recently called my old middle school – Walter T. Bergen in Bloomingdale, New Jersey – and had a chance to speak with the secretary who answered the phone.  All the memories started flooding back. How were my old teachers?  When did the town’s fifth graders start attending the school?

And, most importantly for me, what ever happened to the wood shop?

The place where I and hundreds of other kids took our first tentative steps into the craft was shut down maybe 15 years ago or so. The room sat dark for a long time, then the tools were shoved to one side and class was held on the other.  A few years ago, all of the tools were moved to the school district’s storage, and a partition was built.  Today, one half of the space is for special education, the other half is a health classroom.

What a total bummer.

Unfortunately, Water T. Bergen was not the only school to do this to their vocational education program.  Many other schools across the nation shuttered their shop classes through the ’80s and ’90s, seeing more value and less risk in using those facilities for other instructional purpose. Gearing their students up for academic excellence and a future in college.

That’s where Crawford’s book Shop Class as Soulcraft starts to engage the discussion and offer some interesting insights.

Crawford’s premise is simple – why has education and society marginalized the value of vocational education?  How does society look down on skilled tradespeople in comparison to the highly educated, yet has no problem coughing up $250 an hour for a plumber to fix an emergency sewer back up on a Sunday afternoon?

I only made it halfway through the book so far, but it has so thoroughly engaged me that I was moved to write about it. The points he made about the amount of knowledge and intuitive thinking a tradesperson needs to properly complete the job brought back memories of my family growing up.

My older brother wasn’t much into school as a high schooler. He struggled through the academics and was very happy once they were complete.  I frequently thought of him as someone who was never going to reach his potential because  he loved auto shop much more than – say – English Literature.

He really began to shine when he started taking classes at a local technical school. The instructors were awed by his ability to learn and apply what he was taught. He later went on to become ASE master certified in just about every single aspect of working on cars. My brother never lacked one bit for intelligence – his intelligence just lay in another area where he excelled.

I think I may owe my brother an apology.

Crawford also points out that this devaluation is also affecting the well educated.  While many can point to the cost-conscious approach of employing a moderately-skilled labor force in some foreign factory as an evolutionary step in the development of blue collar employees, the same process is occurring in white color work force, only at a more rapid pace. Think about it – a tech support question can be easily answered over the phone in India, Singapore or China, but it will still take a skilled tradesperson to properly construct and install a set of kitchen cabinets in your home or to fix your transmission.

Crawford’s book is a well-written argument for the return of vocational education to school systems.  Not every student is cut out for a four year college degree or higher education. As long as legislatures across the country and around the world try to impose a ‘college for all’ mind set, many students will be left behind, never achieving their true fulfillment.

And that would be a tragedy.

Tools I use – my chisels

The chisel collection

There are just some times when the best tool for the job is a well-sharpened wood chisel. Whether cutting a joint, trimming a plug or doing any number of other tasks, these descendants of some of the most ancient woodworking tools can be some of the most versatile multitaskers in the shop.

Here’s my collection, spread out for your viewing pleasure. From the waaay back row:

A 2 1/2″ slick. This was an eBay score. The iron was found in a barn in upstate New York, so I had to fit a handle to it. I made this one out of maple in the shop. Once I figured out how to sharpen it the right way (It’s enormous), it can pare very fine shavings off of even the trickiest boards.

The middle pack, from left to right, includes:

A set of Pinnacle chisels from 1/4″ to 1 1/2″. I traded a drill press mortising attachment for these beauties. The handles are very comfortable, and I’m in the process of getting them honed for regular use. The only knock is that they are a little narrower than advertised… not critical unless I’m cutting joints.

A set of Marples Blue Chip chisels from 1/4″ to 1″. These are my work horses in the shop – the ones I reach for first. Got the 1″, 3/4″ and 1/2″ ones as a set, then added on the 3/8″ and 1/4″ later to round out the set.

The two on the extreme left of that middle row are a pair of ‘pound puppies’ I found at eBay. Dirt cheap, they are two old Buck Brothers chisels – 1 1/2″ and 1 1/4″ size. I sharpened them, and they work very well.

In the front row from left to right, I’ll start with the three Lee Valley Crank Neck chisels. Sometimes, you need that little offset bend to get a little bit of glue out of a corner. These chisels fill the bill. They are kinda small, but they work well. I have a left and right skew, as well as a square nosed one.

The middle chisels are my pride and joy. These are a set of Japanese chisels I got from a friend. They belonged to his dad, a respected architect in Osaka, Japan, and my buddy was keeping them in an old coffee can in his garage. I have them honed razor sharp, and use them for light chopping and some paring work.

The last two chisels were given to me as a birthday gift. They are a pair of right and left skew chisels from Lee Valley. For those really odd jobs, they work out well. I’m sure I’ll end up using them more and more as I continue to build.

Tools I use – My Keller Dovetail Jig

Keller 1500 Journeyman Dovetail Jig

Keller Journeyman 1500 jigWhether fair or not, dovetail joints are widely considered the mark of true craftsmanship when it comes to woodworking. While some find hand cutting dovetails with a saw and a sharp set of chisels a rewarding experience, others want to cut the joint with a minimum of fuss and a great deal faster.

Back in the 1970’s, David Keller perfected the through dovetail jig that bears his name – the Keller Dovetail Jig. Since those early days, a number of other manufacturers have introduced their jigs and other dovetailing systems. Some are relatively simple, while others have a rather steep learning curve.

When I went to Woodcraft a few years ago to buy a dovetail jig, the Keller Journeyman 1500 came highly recommended. An excellent balance of price, ease of use and flexibility, this jig has proven itself time and again in my shop.

Projector StandThe kit comes with special bearing guided bits (1/4″ shank) that work with the jig, the jig fixture itself and a clearly-written instruction manual. You have to secure the jig to a backer block made of wood or a stack of sheet goods that fit a particular measurement. To adjust the tightness of the joint’s fit, you adjust the jig forward or backwards on this backer block.

Since I had never used a dovetail jig before, it took some time to carefully go through the measurements, but it was worth it. The results were very good the first time out.

Variably spaced dovetails can be made easily by cutting the necessary tail slots in the pin board, and then cutting all of the pin slots on the tail board, then removing the unnecessary ones with a sharp chisel.

My first dovetails
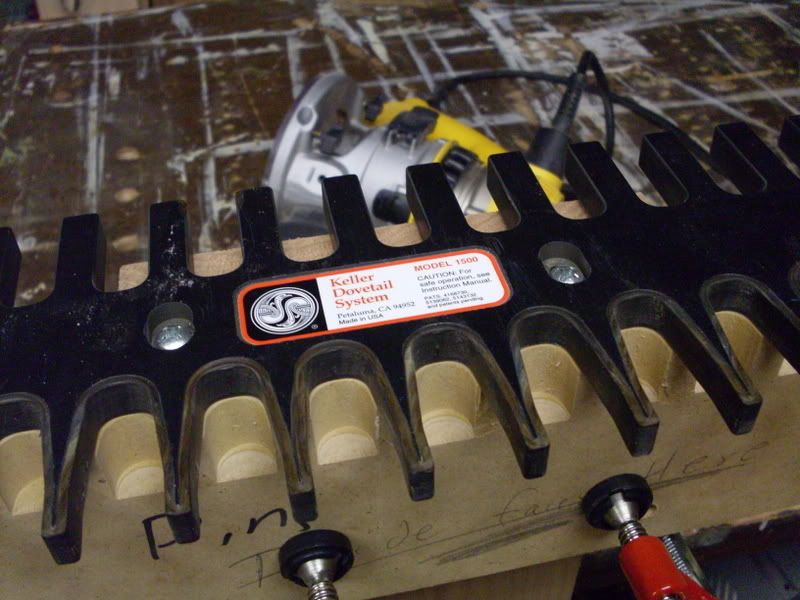
The one caveat with this jig – as with many others – is you have to carefully mark where the joints will align. This is a very important skill to master whether you cut the joints by hand or by machine. A striking knife – even a cheap Xacto knife from an office supply store – will work well.

Also, this jig only allows you to cut through dovetails. To make drawers which appear to have a half-blind dovetail, you can glue a thin piece of material to the drawer’s front. A simple and elegant solution that will allow you to stretch your showy wood supply.

An important tip – when you arrange the jig and the wood in your vise, be sure to put the backer block between you and the wood – this ensures the router cuts into the wood from the side opposite you, throwing the wood chips away from you while you are cutting.

While there are other jigs out there, I can see myself coming back to this jig time and time again. It’s really that easy. And, judging from what I saw on the Keller website, there are even more applications that can be mastered.

Book Review: Cabinet Doors and Drawers

Danny Proulx's Cabinet Doors and DrawersSo, you are building a set of cabinets or a piece of furniture and it needs doors and drawers. However, you haven’t ever built any. You could go out and buy what you need, but if you want to use some special wood or build a fancy design, you might be out of luck. Where should you look for some easy to follow plans and valuable techniques to get you started?

Danny Proulx’s book – Cabinet Doors and Drawers – is a perfect starting place.

Say you want to build some doors. This well-written guide goes into great detail about design and construction of a multitude of door designs. Simple slabs, mitered rail, groove and stub tenon or cope and stick, Danny shows the steps in great detail with step-by-step pictures.

But, it’s more than just how the doors are built. Danny shares some simple jigs that can make building the doors a snap. You will also find methods that describe how to cut arched and cathedral rails to add more interest to your project.

If you want to build raised panels for your doors, there are several options available to you. Danny covers the basics about using panel-raising router bits, and offers another technique for using a table saw to achieve the look you want.

And, when it comes to drawers, the section is quite comprehensive. Screwed butt joints, biscuits, box joints, hand-cut dovetails, pocket screws, locking rabbet joints… Danny covers the bases from the most basic to the most highly skilled. Tips on how to properly size drawers for a cabinet, what materials to use and how to attach drawer fronts and bottoms round out a very thorough chapter.

Since there is so much work with the router, Danny offers plans on how to build an effective router fence to make your work safer and easier.

Unlike his other books, you won’t find project plans in this one, but you will reach for it more often than you think as you put your projects together.

Book Review: Working Wood

Jim Tolpin's Working WOod Jim Tolpin’s Working Wood (ISBN: 978-0871923011) was the first reference book I ever bought for my shop – and I really haven’t needed any more since.

This book has nearly everything that the aspiring woodworker would want to know. Two extensive chapters go in to great detail about hand and power tools – complete with clear illustrations showing the major features of each tool – a HUGE plus. From the lowly sheet of sandpaper to the largest cabinet saw, Jim shows what the tool looks like, tells its purpose, offers safety suggestions and gives tips on how to get the most of the tool.

The wood section goes into great detail on each type’s properties (nailing, gluing, finishing, cutting, etc.), wood movement factors, crush strength, bending characteristics, etc. All of this information is provided in easy-to-read table formats, which allow for head-to-head comparisons of wood species (i.e. – what’s the difference between red oak and white oak? How much softer than hard maple is soft maple?)

Want to know how to cut the most commonly used joints? Jim offers a primer on how to hand cut dovetails, build a finger joint jig, use biscuits to make a strong connection in sheet goods, etc. For example, the section on cutting dovetail joints, it shows step by step how to lay out the depth line, the best way to lay out the angle to get maximum strength in the joint, how to cross-hatch the waste so you don’t accidentally remove the wrong part (a very common mistake among beginners) and how to remove the waste with a coping saw and chisel.

How do you build a door or drawer? Jim answers these questions and offers a host of options and how to build each one (Frame and panel doors, batten doors, slab doors, etc.) The drawer joinery options spelled out were very informative, and ran the gamut from simple rabbet drawer joints all the way to half blind dovetails. Very thorough.

Where should you put your jointer or band saw? Shop layout gets a section, and it goes in to great detail about the rationale for placing which tool where (for instance, grouping the planer, jointer and table saw to true a board and cut it to the proper length and width without hiking all over your shop).

Then, there is a whole chapter of tables which tell how tall to build a bar stool, how wide to build a desktop, where to put drawers and doors on kitchen cabinets, etc. There are also illustrations that clearly demonstrate the relationship of furniture parts to people parts (where will an average male’s knees fall in relation to a bar stool and the bar top). Very useful information when you get into the design phase.

What’s the best finish to use? Tolpin brings out all the stops to explain the difference between penetrating finishes and surface building ones. Stains and dyes get a strong mention and a description of which one is best to use in different situations. Ever wanted to learn how to mix your own milk paint? Tolpin gives his recipe so you can whip up a batch of your own home brew and give rustic pine pieces the old schoolhouse look.

Even more chapters on adhesives, fasteners, how boards are cut, and others round out a very full tome that fits into a very small footprint. Tolpin took the time to illustrate what the individual types of fasteners look like. Rather than explain what an oval head screw looks like – the book illustrates it! Just bring the guide to the local hardware shop and point at the drawing. It’s that useful!

The design of the book is even well thought out – it’s spiral bound so it will lay flat on your bench while you refer back to it. Beats having to find something heavy to lay across a saddle stitched or perfect bound book that wants to close itself. Little touches like this further increase the utility of this very important ‘power tool’ in any shop.