Ralph Bagnall of the Consulting Woodworkeris at it again! Back in 2011, he came out with a book teaching you how to make your own building log play kits. You know, just in case you wanted to hand craft your own fishing cabin or frontier fort – in very small scale.
Well, the kids do grow up, and maybe the other grown-ups in your house want to have their own rustic looking structure to – I dunno – house and feed birds. What are you to do?
Good thing Ralph came out with his new book about Log Cabin Bird House building. Ralph let me know that the original book was conceived with the idea that the logs and kits could be glued together and painted to make a bird house. But, how well would the paint hold up to the elements, and would the birds somehow be affected by the paint itself?
That’s when Ralph changed tack and opted for red cedar boards. Since red cedar shrugs off the elements and looks so darned good – plus, it’s dirt cheap and plentiful – it was a great option for the new plans.
The only problem? Red cedar comes rough one side and smooth the other. So, once you plane the rough side smooth, you end up with boards a mere 5/8″ thick, which changes the construction measurements considerably. Thus, the book has instructions on cutting for the new dimensions. Outside of that, the techniques are similar to the log cabin book, with interlocking notches cut in each of the boards to ensure a snug fit.
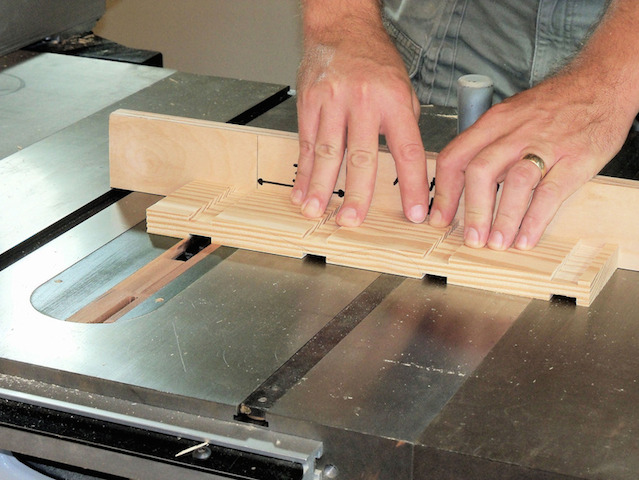
Because of the scale of the build, Ralph doesn’t understate the need for safety throughout the cutting process. Remember, those are mighty small pieces, so a reliance on jigs and push blocks helps to keep your hands far away from the blades while getting the utmost in accuracy.
And, when it comes to those jigs, Ralph goes into great detail about how to build them to ensure the best cuts. He also links to where you can get the router bits he uses and even has a handy chart of how large the access holes need to be bored for each species of bird you hope to attract.
While many people look down their noses at bird houses as ‘beginner’ projects, you just might be surprised how many budding woodworkers you can get started in the craft with these plans, or how many bird watchers you will please with a well-crafted model.
Oh, and the holidays are less than ten weeks away. Just in case you are counting.
Do you remember that scene in the movie Goodfellas? Robert DeNiro’s character (Jimmy the Gent) and Ray Liota’s character (Henry Hill) were meeting for breakfast, and Jimmy was very excited, because it was a big day for Joe Pesci’s character (Tommy). He was about to be made… become a full-fledged member of the Mafia. And, that was a big deal, especially for Jimmy.
As far as Jimmy was concerned with Tommy being made, it was like we were all being made. We would now have one of our own as a member.
In many ways, I feel the same way about my good friend and mentor Marc Spagunolo, and the great news that his book Hybrid Woodworking is now out for public consumption. He got his big break through hard work, consistent blogging and determination. I got my copy a few days ago, and I have got to tell you that I am impressed by what I have read.
The premise of the book is pretty simple… there are people who use only power tools, there are people who use only hand tools, and then there are the 90% of woodworkers who use whichever tool does the job most effectively. Marc covers the basic principles of how he handles this blending of tools in his shop.
The book starts off with him giving the basics about power tools and hand tools, and which ones he finds himself using for nearly just about every project. Table saws, routers and thickness planers share equal billing in this book with hand saws, rasps and planes. He has some surprising go-to hand tools in there – his Stanley No. 80 cabinet scraper and router plane get lots of face time in the book, not necessarily what you would expect to see in a shop in 2013.
After the basics are out of the way, Marc turns to his philosophy about blending these tools in the shop – the power tools are for the heavy duty grunt work, the hand tools are for the finessing and perfecting the pieces before the assembly goes together. Cutting dadoes and rabbets. making dovetail joints with a band saw and (I love) his method for making easy to set up half lap joints. Now I know to look for the sliver.
Tool maintenance is also a big part of the book, and surface preparation in preparation for a finish is covered in great detail, with plenty of options for those who want power or hand tools.
If there are any knocks on the book, there are but two trivial ones. First, at the end of the book, Marc features some of his Wood Whisperer Guild projects, but he didn’t include plans for those. I would have preferred to see maybe one or two projects with how-to steps included for the reader to build along with, and the other one would be a little instruction on how he gets his beautiful finishes.
The best thing about this book, however, isn’t necessarily the instruction. It’s the way Marc comes across in writing as friendly and encouraging as he is in person and on his videos.
I would strongly recommend this book. And, I hope that Marc, unlike Tommy in Goodellas, continues to have a great career producing even more books.
Abbot and Costello. Peanut butter and jelly. Rum and Coke.
Some things just go together beautifully. One complements the other so perfectly, it is like they were made for each other.
And, when tools complement each other, that makes things a whole lot more enjoyable.
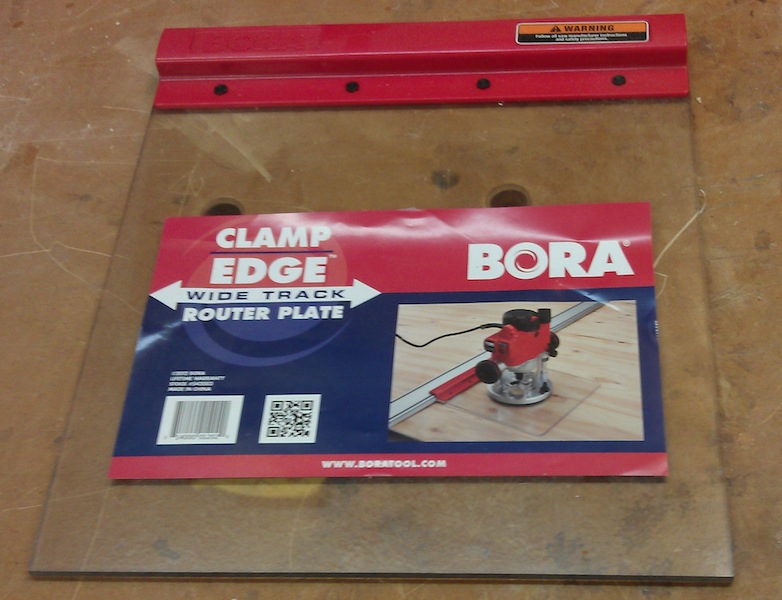
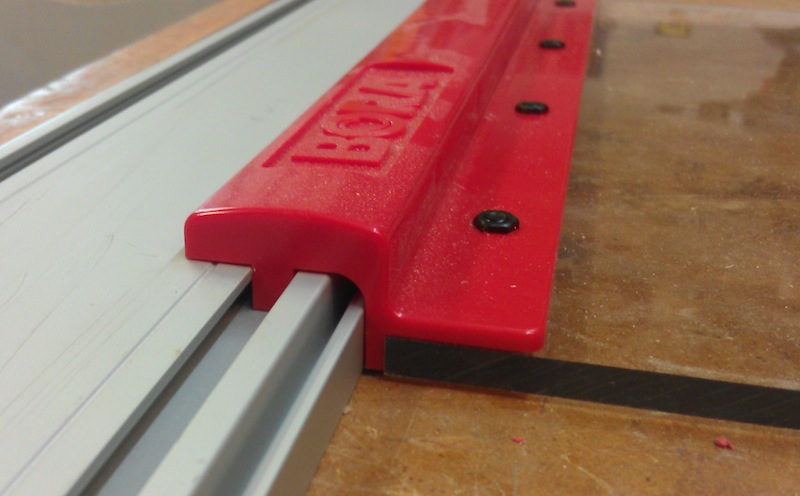
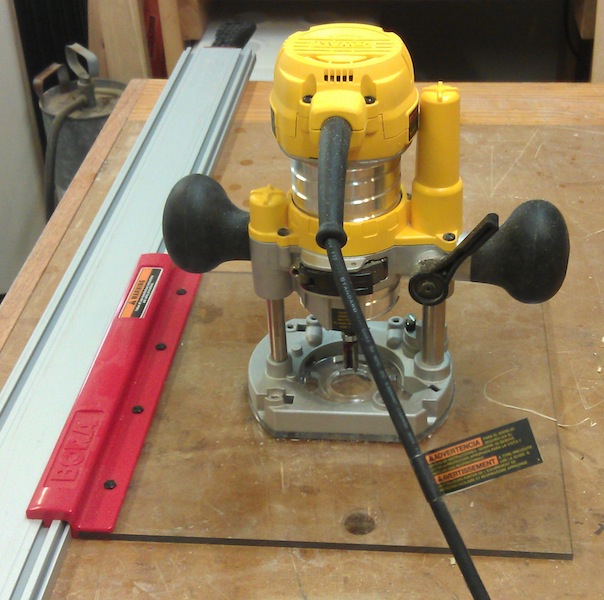
Case in point, the Bora wide-track router plate. My friends over at Bora sent me a copy to evaluate, and this thing is going to become a regular player in my shop. It is basically a thin plate of clear plastic that you custom mount your router to. The key to the system, though, is how they ride on the Bora Clamp Edge cutting guides. The cutting guides have this track on the edge that I have often wondered about, and it seems as if the clamp was just waiting for the right interlocking tool to make it complete.
The guide slides smoothly across the track back and forth. Now, imagine, you are building a bookshelf that needs dadoes and rabbets to hold shelves and a top. Simply clamp the two sides together, and clamp the wide edge clamp across both pieces. Simply plunge the router down and get accurate cuts across both pieces – without having to worry if you are drifting away from the cutting edge. Which is much easier to do than you might imagine, given the rotational cutting of the router bit. And, if you are looking to stop your rabbet – it’s easy to do with a plunge router.
If you can dedicate a fixed base on a multi-based router to this jig, imagine how quickly you can change your router to work with this plate – and you can also use the plate for times when you need a wider base to ensure the router doesn’t drop into an opening you may have cut on a jig.
I have a friend named Sjoerd who works for Valfor Tools. He sent over one of their tools recently, and he asked for my feedback on it.
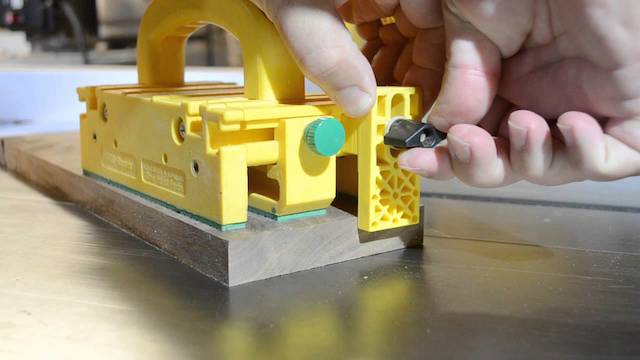
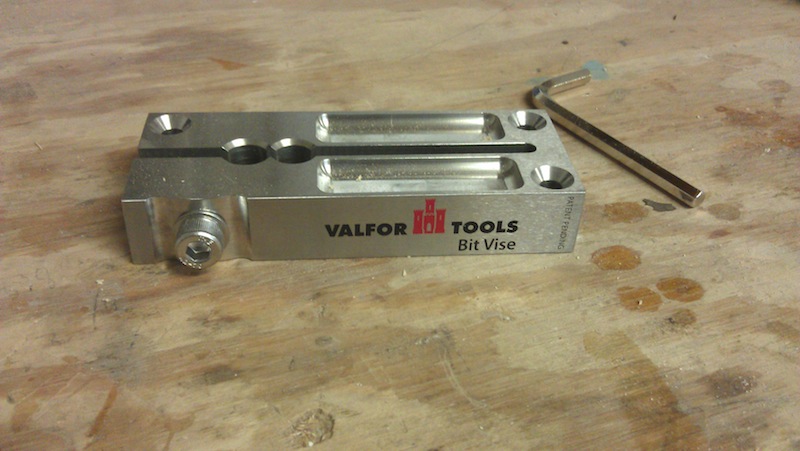
It’s a pretty simple looking device, but when it comes to working with router bits, it sure does come in handy. It’s called the BitVise, and it provides a very valuable third hand when it comes to router bit maintenance. Think about it – a rabbeting bit set may have multiple bearings to adjust the depth of cut. A reversible frame and panel door bit. A slot cutting set. How do you get a good grip on the shank to work with the bit while doing the delicate work of holding on to the bit, the screw and the washers that come with the set while you make the changes?
This tool just might be the answer.
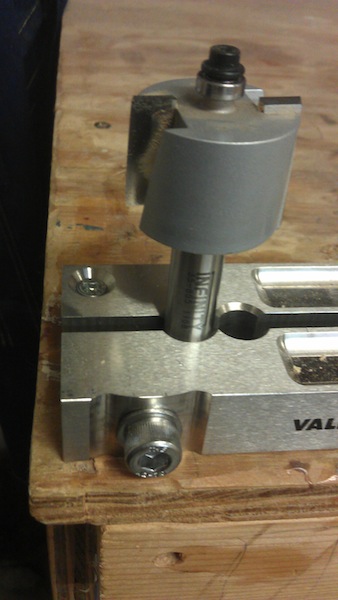
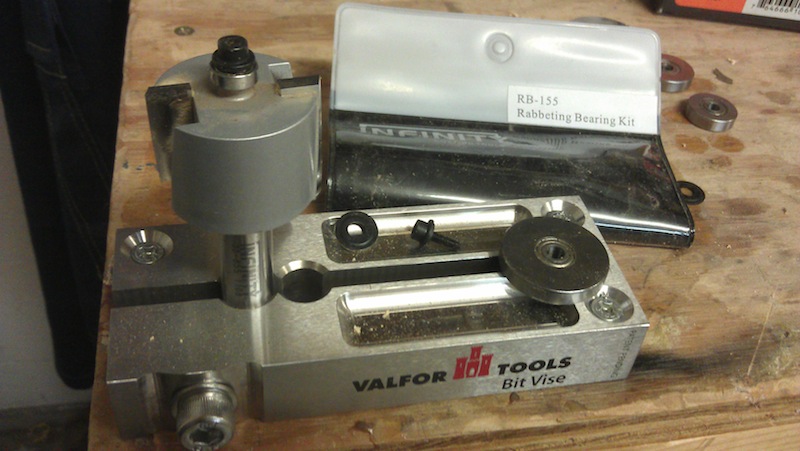
It’s a substantial piece of milled stainless steel with a slit milled into it with a pair of holes in that slit. One is for 1/2″ inch shank router bits, the other for 12 mm shanks. The slit in the block is opened and closed by a bolt, which allows the bit to be inserted and then tightened down on a shank. If you also work with 1/4 or 8 mm shank bits, you will need to use a reducer in those holes to get a grip on the shank.
The top has three holes for you to mount the vise on a bench, eliminating the possibility you may dump the entire setup onto the floor. There are also two milled channels on the top, where you can rest those small bits of hardware until you need them.
With a bit set firmly into place – like this mega rabbet kit I got from Infinity Tools, it’s now a simple task to break out the allen wrench to change the bearings. Since I don’t have to worry about the bit slipping out of a regular vise or hardware dropping into the cooling vents of the router, I can work with more confidence on the bit set up.
Now, imagine doing other tasks like cleaning pitch off the cutters, or passing a diamond hone over the carbide edges a few times to ensure they are sharp and ready to go for the next use. Sure, it may be a one-trick pony, but the one trick it does is pretty handy.
But, eventually I get things right. And, that’s due primarily to a lot of measuring aids that I turn to. I have a number of clamping squares that help get things at right angles during assemblies. And, then there is my little double square I like to pull out while I’m planing to ensure I’m not getting out of square while I true an edge.
But, the real multi-tool of them all is the combination square. That sucker is a real workhorse in most shops. It typically comes with a 12 inch rule and a head that measures 45 and 90 degree angles. There are other heads that can increase that versatility, including protractor heads and center-finding heads. You can check assemblies for square, measure bit or blade height above a table, use them to scribe a cut line … well, they are a tried-and-true multitasker in the shop.
You can go uber-cheap with them, picking up the big-box home improvement version, or you can drop some serious coin on a Starrett model. But, for the average woodworker who needs a great, reliable tool AND would like to have some money left over to buy some wood, there are some options available.
One that was sent to me by my new sponsor Bora Tools has an interesting feature I have never seen in a combination square. Most models use a ruler with a groove milled down the middle of one side. And, in the head, there is a nut that can be tightened down to lock the rule in place. The system works well, but if you ever pull the rule out to measure by itself, getting the parts all aligned can be a real pain in the posterior.
Bora’s combination square does away with all of that nonsense, relying instead on a set of rare-earth magnets to hold the rule in place. It holds securely enough to allow accurate measurements to be obtained, yet still allows for easy adjustment for changing measurements.
The rule that comes with this combination square is a substantial etched stainless model graduated coarsely on one side (in eighth-inch increments) and fine on the other (32nds). I have used this as a guide for my marking knife, and its thick edge is a sweet surface to reference the knife against.
The head of the tool is cast zinc, with all of the edges that contact the work surface milled well. It comes with a steel scribe for use when marking cut lines for joinery. And, it comes with the obligatory level vial to serve as a level or plumb reference.
When you throw in that Bora guarantees this tool for life, well, come on, what’s not to like?
Now, I just have to make sure I actually USE this thing when I woodwork, and stop trusting my poorly calibrated eyeballs.
Ahhh, dovetails. How can you go wrong with such a classic joint?
Oh, wait, never mind… My efforts to hand cut them have met with disaster, ridicule and – at last count – no fewer than 14 petition drives to get me to quit woodworking entirely.
So, when I need that tried-and-true joint in my work, I turn to the router and a jig. As I had written Monday, I’m a project kind of woodworker… not a process guy. I do pay close attention to how I woodwork, but I’m not about to take weeks during a project to hand-cut dovetails when I can blast ’em out on a jig.
For years, my go-to jig has been my Keller Journeyman. I love the heck out of it – and have abused the heck out of it as well. I’ve lifted the router out of the cut too many times, tearing up the phenolic body terribly.
My Kehoe jig is awesome, giving me great dovetail splines. Sometimes, though, they do look a little out of place on a more traditional piece, so I need another option.
That’s when David Venditto of Infinity Cutting Tools asked me if I wanted to try the new Leigh R9 jig. Always game for a challenge, I took him up on the offer. And, I have to say I was thoroughly impressed.
The jig comes flat packed with everything you need to get it working, except for the wood needed to create a beam for the jig to ride on. Accuracy when building this beam is critical. My beam has a piece of construction 2 x 6 southern yellow pine backing and an MDF two-part face. The bottom part is a permanent fixture to the piece, while the top part of the fence is a sacrificial fence for the router bit to ride into, preventing tear out.
The hardware with the kit is top-notch. It even comes with a pair of clamps you can use to secure your workpiece in place as you rout. The plate that guides the router is made of a heavy-duty aluminum etched with the necessary markings on top. It took a little time studying the manual to get an idea of what everything was used for, but, once I read up on it, things when smoothly.
Instead of a router bearing, the jig uses an eccentric guide bushing that allows you to really fine-tune the fit of your pins and tails. Those adjustments are in the order of thousandths of an inch… critical measurements when it comes to cutting this tightly-fitting joints.
Not only does the jig allow you to cut dovetails, it also comes completely equipped to cut box joints as well. All of the proper bits are included. Very handy stuff.
The manual is really where this baby shines. Leigh has spent a lot of time carefully laying out a well-written, fully-illustrated guide that will show you step-by-step how to assemble and cut with the jig. Believe me, if an ‘accuracy challenged’ guy like me can work with it, anyone can!
While I have always shied away from very expensive dovetailing jigs (some of Leigh’s offerings can really stretch the woodworking budget a lot farther than it can go), the R9 is a solid offering from Leigh that is available at a reasonable price point. And, given the cost of quality dovetail saws and chisels these days, you might just find it more economical to cut your dovetails this way instead of the old school method.
A router is the Swiss Army Knife of the workshop. It can cut dovetails and box joints. Dadoes and rabbets. It can excavate a mortise and cut the tenon to fit. And, that’s without even looking at decorative edges.
Some of these applications require a special bit. Others require the router to be mounted upside down in a table. Still others require you to remove the baseplate to replace it with another. That’s where I sometimes have issues.
You see, when I get into woodworking, I REALLY get into woodworking. Somewhere in the flurry of activity, it happens. I knock one of the router’s baseplate screws to the ground. This requires that I stop everything and sort through the dust on the shop floor to find the screw. That’s if I notice that it was knocked over. And, in order to fit the majority of routers out there for sale, these baseplate accessories either come pockmarked with dozens of holes, requiring you to spin the plate to try to get them to line up, or require you to drill your own holes and hope you get them right the first time.
But, this isn’t always the case for router accessories, David Venditto of Infinity Tools recently sent me one of mPower Tools new CRB7 router guides. After using this, I may take all of my old baseplate-swapping guides and throw them in the trash.
Unlike those others, this guide comes with a pair of guide bars that fit through the fence holes in your router’s base. These can be adjusted for any number of different router models. Now, instead of unscrewing the baseplate when you want to use it, you simply slip the guide bars through the holes and tighten them down. Easy as pie.
What can the guide do? There are seven functions you can use it for:
Offset Base Plate – Increases overall router stability and reduces errors when edge molding. The CRB also moves the pivot hand guiding the router toward the center of the panel smoothing out the router pass action, reducing the chance of burn marks.
Circle Cutting – Rout precision circles and holes that are smaller than the base of the router – The CRB can route circles and wheels from 1½” to 17½” in diameter (38 – 450mm) using a ¼” (6mm) straight router bit.
Mortising – Allows “Centered and Off Centered” mortises plus you can control the actual width of the mortise.
Stable Foot – Most of the router’s base remains unsupported when edge routing – The CRB anti-tilt leg eliminates router tilt which is especially important when routing work-pieces with a high aspect ratio.
Straight Edge Guide – Set the clamp guide once and adjust the position of the router via the CRB7’s Micro Adjuster. The CRB increases router to clamp guide surface contact area and reduces clamp guide set up time.
Indexing – The CRB provides a simple and exceptionally quick way of accurately repeating a molded dado for production batch quality faux or false paneling.
Flush Trim Edge / Edge Kit – With virtually no set up time – quick fit the Trim Jig riser pad to accurately machine trim hard wood and iron on edge molding flush with the core board in seconds.
Ralph Bagnall put together an awesome video showing the features. Check it out here:
At first, the jig seemed intimidating, with all of the accessory parts it came with. But, after a few minutes of reading the manual and watching a great video the company produced, I was able to start putting it to the test.
I got the jig lined up with my DeWalt 618 multi-base router. That took about ten minutes, and I was going slowly to ensure I had everything set up the right way. The router slid smoothly onto the guide rods and a few twists of the thumb screws on the base made short work of securing the router in place.
The first test – cutting circles. I have done this task before with a plywood base I cut on the band saw. This worked great, but I could never figure out how to get circles where the diameter was smaller than the diameter of the router base. The mPower jig came with a screw in pivot pin that dropped into a hole I drilled in the board. My first test cut was a larger diameter arc, which the router handled with no trouble. The pivoting action was very smooth, and I never wondered if I had control of the router. The next test was to cut a much smaller circle. With an adjustment to the router position, I was easily able to make the cut. No muss, no fuss.
The next test I wanted to do was to cut a mortise. I had a large, thick chunk of ash I had planed down from another project, and thought I could try my hand cutting a mortise into that. I swapped out the pivot pin from the last test and replaced it with two mortising pillars. These mounted again with screws through predrilled holes in the baseplate. I set the jig on the board and twisted it so the router trapped each side of the board against one of the pillars.
A simple adjustment of where the router rode on the guide bars, and I fired up the router and began to plunge. Again, the control of having two positive points of contact with the board was – well – empowering. I knew I had total command of the router, and the results were on the money.
I still have other features of the mPower base to try out, but even if they didn’t work at all, I would say that this jig belongs in my router collection. It’s a real winner in my book.