Category Archives: Projects

My first – err – project

OK, for anyone who followed my recent article about my first woodworking experience, you might have wondered how I could have gotten started again in woodworking.

I was looking for the perfect gift for my wife for her birthday. I looked at the pretty sparkly things in the jewelers case. But, she told me that she didn’t want any of that. Besides, we didn’t have the cash to buy anything really nice. Too expensive.

I looked in the department stores for clothes, a hand bag, shoes, anything that I thought she would need. She told me that she really only wanted a gift card. Too impersonal.

Perfume? She didn’t wear any. Too allergic.

My first *YUCK* projectI looked on the Internet to find a quaint bed and breakfast to take her on a vacation. Of course, we would have to get a sitter for our infant son. And, who could we really trust to care for him like we could? Too much of a bother.

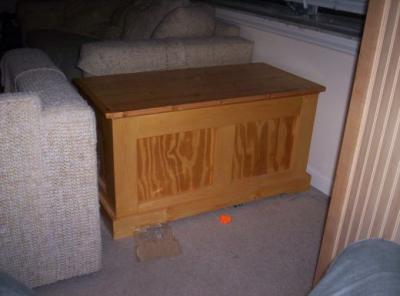
I was really getting dejected about these shopping trips when my wife uttered the words that would change my life. ‘I would really like a blanket chest for the foot of the bed.’

The flash of inspiration hit me as if someone had taken a flying roundhouse kick to my forehead. If I couldn’t find the right gift in a store for my wife, why shouldn’t I build the right gift?

The only problems I could identify in my plan were 1) I had no idea what to do and 2) I didn’t have the tools to make it happen. Hmmm. These were going to be some tough hurdles to overcome.

And, its not as if I was getting much encouragement. My coworkers basically told me I was crazy. Too much work. Too expensive to buy the necessary tools. Too complicated for me to figure out.

Fortunately, fate stepped in. A builders supply store was going out of business and had most of the tools I needed to get the job done right on clearance, including a doweling jig. They were also blowing out their lumber. I picked through the racks of No. 2 pine to find the ones with the straightest edges and yes, I even picked up a sheet of 1/4″ BC interior construction plywood for the box.

What was I thinking?

Are the construction plans orthodox for this project? Nope. No one but me would advocate you build this way – unless you are starting out. And you had no real tools. And, no one was going to look at it.

When I was finished, you thought I had painted the Mona Lisa. It wasn’t square. The finish was terrible. Heck, it didn’t even sit level on the floor.

But, my wife was pleased to see that I had actually finished a real project. And, it actually held blankets. She gave me a kiss and told me, “Good work. You might have a future in this…”

Too much fun!

Stuff I’ve built: Pagoda Box

May 2007

I built this box from a plan that was in the May 2007 Wood Magazine. What caught my attention was the graceful lines and the opportunity to use some highly figured woods in a showcase piece.

The box body is made of a scrap of mahogany that was lying around, an the lid was made out of a very showy piece of quartersawn sycamore. The handle is made of a few pieces of ebony.

I used the table saw to bevel the sides of the piece so they rise from the base up to the top of the box. Instead of using the bandsaw and spindle sander to shape the lid as the plans specified, I found it was easier to use a rasp and sandpaper.

I sanded the piece down to 320 grit and finished it with a 1# cut of shellac, sanded smooth, then three coats of natural Watco danish oil.

Stuff I’ve built: Power Carved Contemplation Bench

May, 2005

    This was a project I was reluctant to start. After all, the top is a gorgeous slab of tiger maple, and the legs are some beautiful ribbon grain mahogany. How was I supposed to grind half of that away?

    I built this bench with the assistance of the Wood Whisperer himself, Marc Spagnuolo. Once the wood was selected, the top was ripped into three pieces, the middle one trimmed down to form open slots on both ends and it was glued together. The tops of the legs were cut into beefy mortises and fitted into the slots.

    Bench detailThat’s when the fun really began. Using an angle grinder and an Arbortech carving wheel, I wasted out the necessary material to sculpt the graceful forms. Once the curves were finally cut and finessed, I used epoxy and screws to attach the legs to the seat, and plugged the screw holes with pyramid-shaped ebony plugs.

    The finish was a 1# cut of dewaxed shellac sanded down with 320 grit paper once it dried. After dusting the piece down, I finished it with three coats of natural Watco Danish Oil and a coat of paste furniture wax.

    This piece won best in its class in an art contest conducted by the National Arts Program, and it has an honored place in our living room, right under one of our large sunny front windows.

    Now, all the neighbors want one…

    Stuff I’ve Built: Breakfront Entertainment Center

    • March 2007

    This piece was an interesting one to build. In our family room, we used to have a 21″ TV in an el-cheapo particleboard entertainment center. But, for a holiday gift, we received a 32″ TV to replace the old one. Man, what an improvement! A nice, big picture, stereo sound and very high resolution.

    Only one problem – it didn’t fit the existing entertainment center anymore.

    We junked the entertainment center (thank goodness) and perched the TV on top of a blanket chest for a few months. That was OK, but it looked terrible. Since I had all those fancy tools in the shop, I went to the drawing board and designed something new.

    Here’s what I came up with. This entertainment center addressed a few issues that needed to be given some attention.

    The design for the piece was relatively simple. First, I built a base out of strips of 3/4″ plywood that would serve as a firm foundation. I brought that inside, cut the carpet out from under the unit so it sat level on the concrete floor.

    The piece itself was built in three sections – a large central unit flanked by two towers. The piece was built using through screws, dadoes, biscuits and pocket screws where necessary. I sanded and painted the piece with a coat of primer, sanded it, then rolled on two coats of latex enamel paint with a sponge rubber roller.

    I brought the piece inside and screwed it down to the base and into the wall studs. I also screwed the pieces together to ensure the most rigid piece possible.

    Once the pieces were mounted and unified, I trimmed them as one unit, which gives the impression the piece was built as one piece. The crown molding on the top consists of one 1×4 nailed over the top of the case, mitered at the corners. A 1×2 is nailed to the case face frame and butts up to the bottom of the top piece. A quarter round molding fills the intersection, making a nice built up molding.

    The doors are poplar, cope and stick cut on a router table. The solid panels are 1/2″ plywood rabbeted to fit the groove. The two glass doors were glazed by a guy who does stained glass work locally.

    Besides giving the TV a nice place to rest, the inside of the unit provides a great deal of storage space. This shot was taken before I built the doors, and you can see just how much storage space that’s built in. Now, we can hide all of the DVDs, books, tapes, toys and the other various and sundry items a family of four collects.

    The storage area under the TV is an excellent place for the VCR, DVD and PlayStation 2. The door that covers that gap actually flips up and is held in place with a lid support. We raise it when we need access to the components, and, when closed, it looks like a pull-out drawer.

    Just an aside, yes, that’s my wife and youngest son. Hey, fame is the price you have to pay when someone in your family runs a blog!

    Stuff I’ve Built: Draw Leaf Dining Room Table

    November, 2007

      Way back in 1994, my wife and I were living in a small apartment in St. Pete Beach on the lovely Gulf of Mexico. And, in that tiny apartment, all we had room for was a tiny dining room table.

      Well, that table served us well for 13 years, but our situation definitely changed. With two kids, a house of our own and relatives who like to come over for holidays, our dining needs have increased. What we needed was a table that could sit four of us for day-to-day family dining, but expand to fit a houseful of guests. And, since we didn’t want to give up any of our precious storage space, any table extension leaves had to be stored within the table itself.

      I pored over ideas for a project that would fill the bill, but was stuck. Finally, I remembered that in the house I grew up in, we had what is known as a draw-leaf table, with extensions that stored under the table. I had to look long and hard to find plans, but eventually discovered Tage Frid’s plan for a ‘Dutch Pullout’ table he had published in Fine Woodworking magazine. I found the plan in a book called Tage Frid Teaches Woodworking. You can also find the plans at Fine Woodworking’s website, but you will have to subscribe for the service.

      I built the table with a poplar base, since it was going to be painted. The stretchers are mortised into the tapered legs.

      The table running gear is pretty interesting. Basically, the leaves are attached to tapered runners. The taper rises 3/4″ – the same height as the table top’s thickness – as they are pulled out. This means that the leaves slide nicely under the main table top when not in use – saving valuable storage space in a house that’s already cramped with toys, books and the other stuff that goes along with being a homeowner.

      The main top indexes with 3/4″ dowels glued into the underside of the top. They go through a set of holes in the middle fixed sub-top. That allows the main table top to rise as the leaves are extended. A pretty clever design.

      The base was painted with a sponge-rubber roller – a coat of Kilz II. Sanded when dry. Two topcoats of a white latex enamel. The top was finished with a coat of 1# dewaxed shellac, sanded, then seven coats of Waterlox glossy. I had to tint coats three and four to achieve a darker tone on the table.

      I raced to get the table done in time for Thanskgiving… and moved it to the dining room the Tuesday of Thanksgiving week. Whew.

      For the big day, we were able to seat 10 around the table. Quite an improvement over using the card table.

      Stuff I’ve built: The office media center

      • January 2008

      In my real job, I work in a busy communications office where we frequently hold meetings about important happenings. In our conference room, we have a laptop computer and an LCD projector. We can tie into the Internet, play PowerPoint presentations, show video etc.

      But, yuck. The tangle of cables. The exposed computer. So, one day, my boss turned to me and asked, “Can you build us something?”

      Tabletop LCD projector stand

      Does that qualify as something?

      The design was one I had sketched up from scratch. It’s a mahogany box with a maple top hinged on. There’s a ‘garage’ where the computer can go in to hide, a hole in the bottom of the box for the power and internet connections and a cable hole for the data and power cords for the projector. I dovetailed the corner with the Keller dovetail jig.

      The finish was a 1# cut of dewaxed shellac, buffed out with #0000 steel wool after it had cured for four hours. Then, I used two coats of Watco natural Danish Oil. After that cured, I waxed the piece with Minwax furniture wax. It’s not a table top, but it should stand up nicely to the rigors of long meetings.

      Nice piece sez everyone.

      LCD projector box open

      And, if you have to work on the connections, the top lifts up for easy access to the works. This is a better set up than having a projector permanently mounted from the ceiling, because if we ever have to move the equipment to a new location, we can disconnect it and take it with us.

      So, what about you? Do you have a project you want to brag on? Be sure to e-mail me if you want to share.