Category Archives: Tools

A sharp pair

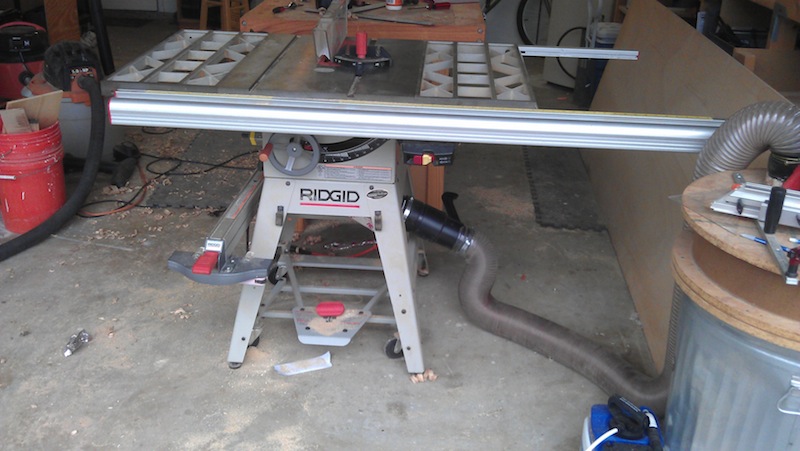
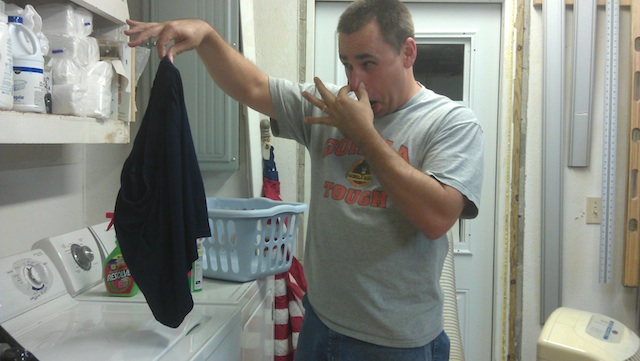
There are so many useful things in the shop that come in pairs. A pair of dividers. A pair of safety glasses. A pair of sturdy boots. A pair of stinky gym shorts?  Wait, the laundry is out in the shop, and that must be where I dropped those!

Phew.. that's what was stinking up the placeAnother useful tool in the shop is a solid pair of scissors. There are so many times they come in handy. Trimming some veneer. Cutting strips of tough double-sided tape for sticking on jigs. Opening packages. Name a task, and they are up to the challenge.

My shop scissorsBut, for them to work well, they need to be taken care of. After cutting enough tape – and collecting all of that nasty adhesive on the blades – and being dropped from the bench a few times, well my trusty pair needed a little TLC.

The wipe down
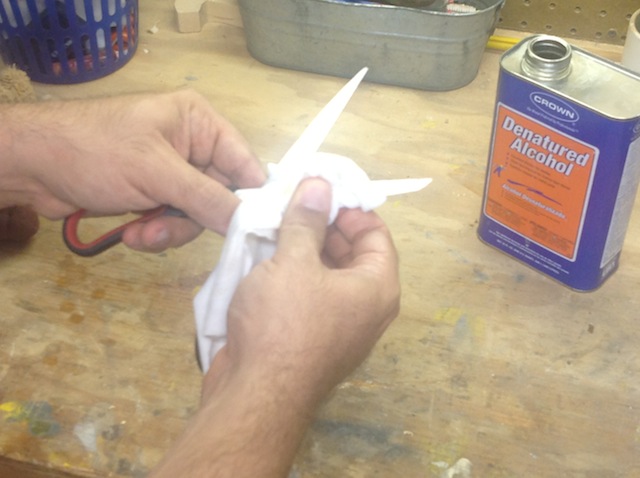
First things first, I had to wipe all of the accumulated gunk off the blades. This was a pretty simple task to tackle with some denatured alcohol and a rag. After a few minutes of wiping, the scissors blades were looking pretty darned sweet, if not still beat up.Using the stone grader
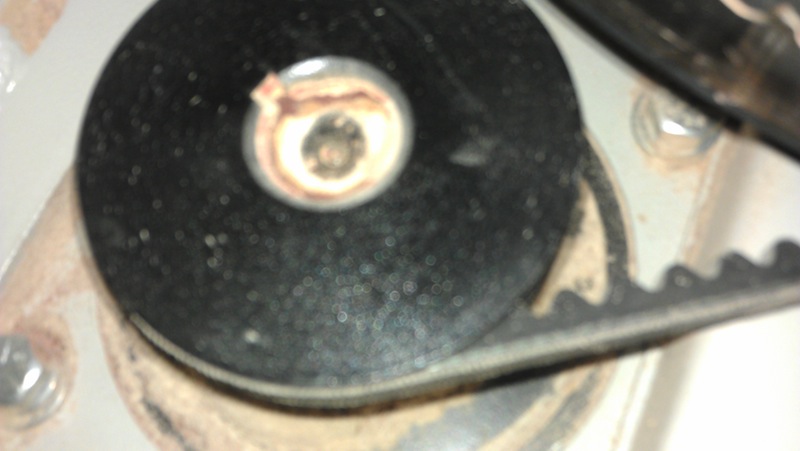
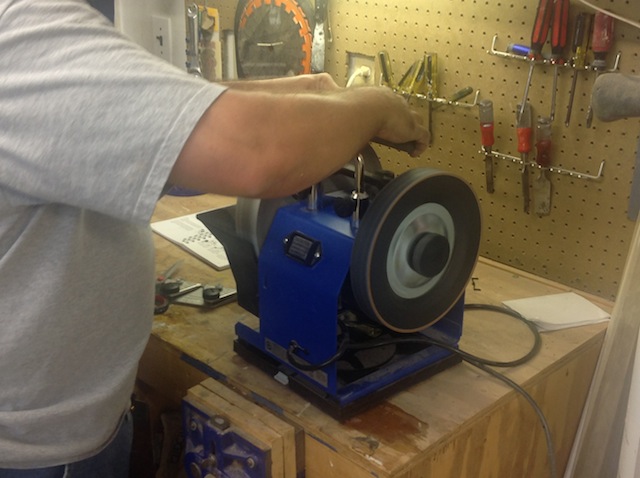
What was next was to give the blades a quick sharpening. Fortunately, my Tormek machine has a scissors jig, making sharpening these babies a piece of cake. First things first, I had to fill the stone reservoir with water, and use the rough side of the stone grading tool to put the 200 grit surface on the stone. This also stripped out any remaining metal filings from the last time I sharpened, getting a nice, fresh face to work with. It took all of 30 seconds to tackle this.

image_1

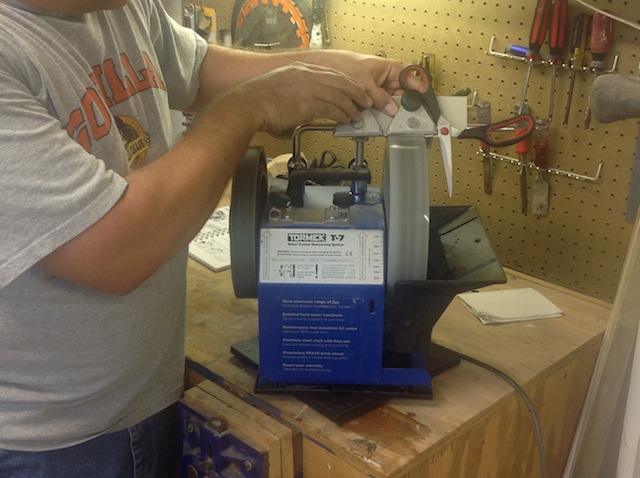
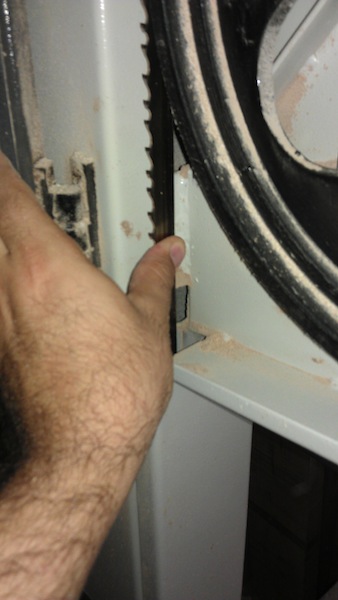
The jig itself is a two-part affair, with a clamp guide that grabs the individual blades of the scissors to hold them in place, and a backer plate that allows the clamping guide to slide back and forth. I clamped the first leg of the scissors into place, then guided it across the stone. The action was smooth, but the very high angle of the scissors created a squealing sound. Apparently, this is normal when sharpening at such a high angle.

I flipped the legs of the scissors and sharpened the other side. Once this was done, I used the fine side of the grading stone to bring the wheel to the 1000 grit feel, and sharpened both legs again. The blade looked nice and shiny. Now for a test.

image 
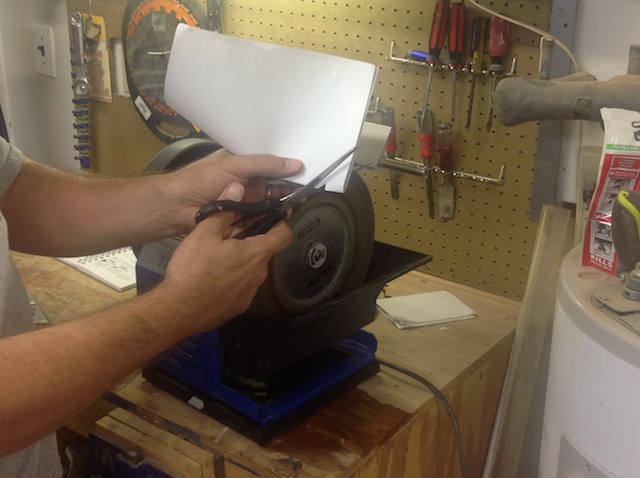
Sure, it’s not as easy to test the sharpness of a pair of scissors as opposed to a chisel or plane iron, but the test snips I made in paper were very crisp, gliding through with minimal pressure. They cut as well as the day I took them out of the package.

Now, I may need to use them to open the next package of laundry detergent so I can get those gym shorts back in to fighting shape…


They can help…

I have already alluded several times on this blog to my love of music from the 1970s. So, it should come as no surprise that on my iPod is a copy of Billy Swan’s I Can Help. This one-hit wonder was released in 1974, and it features some really cheesy-sounding early synthesizer work, a catchy hook and a round of applause at the end.  When I record my only chart-rated hit, I’m doing that, too.

Billy Swan's I Can HelpIf I may be so bold to suggest this, perhaps Laguna Tools should adopt this as their theme song. Maybe their on-hold music.

You see, I have this problem. The band saw they sent me is awesome. I have cut curves, ripped strips of thick wood for projects and done other tasks on the saw for nearly a year now, but the one thing I was never able to master was resawing wide boards. They just bedeviled me. Here is a shot of some wood I mangled a few nights ago. Avert your eyes if you are easily upset by wood abuse:

Oh, the HUMANITY!Oh, I watched the videos. Read the manuals. Visited the message boards.

Wanna know what I discovered? There are as many opinions on how to have success with resawing as there are woodworkers. Some say to crank the tension on the blade as high as it will go, while others advise keeping it as slack as possible. Some offer eloquent lessons on blade drift while others insist that your saw should cut straight as an arrow.

What’s a dope like me to do?

Well, I decided I would get in touch with the folks at Laguna. Why didn’t I do this earlier?  Within 24 hours, I was in touch with Brian Bennett, one of the company’s reps. He assured me that no, I’m not a dope, but there are some common things that could happen with the saw that could cause this. And, more importantly, they could be corrected in short order.

Test that tensionFirst, he told me to ensure the blade rested with the teeth at the front edge of the tire. Now, I know this is contrary to other bits of advice (center the blade, center the deepest part of the gullet on the wheel, etc.), but this is a Laguna, and I had the tech on the phone, so I’m listening to him.  He also told me to tension the blade until, while pressing on it with moderate pressure, I was able to deflect it no more than 1/4 of an inch.

The belt and drive pulleyWith that done, he told me to go below on the saw and check my old nemesis, the belt tension. You know my history with belt tension on band saws, don’t you?  He said with firm pressure, there should be no more than 1/4 inch of deflection on that either. Well, I had considerably more…so, that was an issue. Fortunately, these belts tend to stretch over time, needing adjustment from time to time. Whew, it wasn’t operator error!

The drift test

Now, for the first test.. the drift test. Brian told me to get the guides out of the way, draw a straight line on a board, then attempt to cut along that straight line. How much did the board have to twist to ride that line? For my saw, just a hair. That was good, because if I had to angle the board too much to stay on the line, the blade was surely dull or the teeth bent. This baby was working fine, so I knew that couldn’t be the problem.

Looking at the blade in the kerfThe next step was to set the fence about 3/4″ from the blade, ride a sample board against the fence for a few inches, then stop the saw dead and don’t move the board. Go around the back of the saw and see where the back of the blade is resting in the kerf. If it’s riding against one side or the other, you have to adjust your fence incrementally to get the blade back to ride in the middle.  Once you get there, you are pretty much spot on.

Resawn birchBrian and I stayed on the phone for close to an hour, and he thought I was doing well enough to give it a whirl. OK, so I grabbed a birch board and got to work. The results?  Well, I could certainly do some more tweaking, but I’d have to say that the results are considerably better than anything I could have gotten before.

So, as I move ahead on this project (still with lots more wood to resaw), I feel a whole lot more confident in my abilities and the tool to get the job done.


Scrollin’ for ideas

There are lots of different types of woodworking out there. Cabinetmaking. Furniture making. Turning.

And then there is scroll saw woodworking. I mean, it seems like magic watching a talented scroll saw operator (Verna Schulz and Bill Murphy are two friends who are very talented with these saws) take plain old pieces of wood and turn them into gorgeous works of art with impossibly small, fine details.

Verna working with Iggy at her scroll saw

Well, with my new project, there will be a deal of scroll work. I am planning on cutting out Sydney’s (yes, I spelled the name wrong in my sketch) name and other decorative details on a piece of contrasting wood to glue to the face of the medal rack.

The only problem is that I don’t have a scroll saw.

Should have thought this out before I came up with the idea, right?

A scroll saw doing its thingOK, I’m looking over my options on how to make this happen.  The first thought would be to stroll down to the nearest purveyor of tools and land myself a new model. From what I have heard, the new scroll saws on the market are tricked out babies, with air vents to blow the sawdust out of your way, easy blade change features and a wild assortment of blades.

The problem with this idea, though, is that from what I have been told, a quality scroll saw that is a joy to work with could easily run me in excess of $500. There are a bunch of scroll saws available for $200 or less, but they are sorely lacking in the power and precision department.

Fine bandsaw cuttingWell, I do have a sweet Laguna band saw. Equipped with a narrow blade, the band saw is an excellent tool for doing scroll cutting – on the exterior of a project. Unlike a scroll saw, the blade can’t be threaded through a starter hole, meaning that interior cuts are a big no-go.  However, I will be using the band saw for the exterior shapes for sure.

Jig Saw ScrollingA jigsaw can do that kind of work. Some jig saw blades are made narrow enough to fit into starter holes and maneuver pretty deftly, and high-quality blades can make very clean cuts. It’s just that the jigsaw’s reciprocating action can shake thinner pieces of wood to the point where they break apart, and I plan on doing the scroll work on a piece of wood probably no thicker than 3/16″.

A fret saw can do the job...Another option that would be open to me would be to get my hands on a fret saw. These saws look like coping saws with a very wide frame. Their blades are held in quick-release holders, which allow them to be unhooked from the frame, threaded through a starter hole and then reconnected to do the inside cuts. Many of the newer saw frames actually use scroll saw blades, giving you all of the options that scroll saw operators have available to them.

A router with a milescraft design kit can cut scrollworkOne other thought that I could use would be my small trim router. The DeWalt I bought earlier this year is very small, maneuverable and I have a 1/8″ down spiral router bit. That should be able to do the job for this design. Paired with a Milescraft router design kit, a router can cut some fretwork-looking projects… Of course, since the bit is round, I won’t be able to get sharp corners, but I would hope I could do a little bit of hand filing with some tiny needle files to sharpen up any points that I miss.

Of course, that design cutting part is still a little ways off. But, it pays to start thinking about this in advance, and, of course, if you had any suggestions, I’m all ears.


The space-time continuum…

There are times when I believe that Albert Einstein was a woodworker. Seriously. I mean, this guy knew about the space-time continuum… which basically means that the less space a woodworker has, the longer it seems to take to get anything done…

How ya doin, Al?At least I think that’s what he meant. After all, there are lots of times when I am working on a project when I run out of space on my workbench. That’s a bad thing, because I will be attempting to do too many thing on my poor overworked workbench. So, say, I’m trying to mark out the rough boards, juggle my plans, keep handy tools in easy reach… and try to keep something like my thickness planer there so I can do all of the work of getting the boards down to the right size for the project.

What I really need is more surface area, but I couldn’t fathom where I would build more bench area. After last year’s miter bench update, I’m pretty much out of room. No, what I need is some kind of portable work area I could set up, then tear down again after I am done with it.

The power tool workcenterGood thing my friends at Porta Mate sent me one of their Power Tool Workcenters. Of the work stands I have used (and, believe me, I have used lots of them), this one is the most tricked out I have ever seen. For starters, it has a stable base that supports a very generously-sized tool stand. The whole shebang supports nearly 200 pounds, so most portable power tools will easily be supported. That top is also adjustable for height, so you can jack it up for work where you need to have it closer to your eyes, or drop it for larger power tools.
The tool trayThe base also boasts a nicely sized tool tray. So, if you need to keep some tools handy to adjust your power tool, or you need some clamps to secure it to the stand, this is a pretty handy place to stash them.With a planerThe real fun comes in with the adjustable roller supports. You can mount a ladder-type support with telescoping arms that hold the roller assemblies in place. This allows you to get more work support for items such as your thickness planer, so the boards won’t be flopping about on the infeed or outfeed side of the tool. Pretty handy things to have for this tool, a portable drill press, a miter saw.. the works. Broken down for storageThe best part of this baby is that it takes less than five minutes to break down for storage. Bolts are tightened using plastic handled knobs, and by removing six of them, you can have it folded flat and ready for storage in a jif. If you are a woodworker with tons of space, maybe this isn’t the tool for you. But, if you are like the rest of us mortals who struggle to find a space for every operations, the power tool workcenter might be worth the investment.

And, you don’t have to be a genius.


A dust gulper

Dust. Ugh. Sawdust is one of those things you have to deal with in a woodworking shop. One of the biggest contributors to the sawdust load is my contractor’s saw. I bought it about a decade ago, back in the days of open stand contractor’s saws with splitters. It’s been a good performer, but the dust that pours out of the bottom of the saw has always bothered me.

A Dust Cutter canvas bag

To help curb this problem, I have turned to several different types of solutions. A plastic plate that sat on top of the saw’s stand. It was a pain in the rear to get the dust collector hose to it. I went with the canvas bag type of setup, but that never held in place.

No, what I wanted was a hopper. With a dust fitting I could plug the hose into. That was sloped so the dust would migrate down to the outlet. But, how to make one?

I fished around on the Internet and saw lots of crazy complicated plans, but none of them did it for me. I broke out a sheet of graph paper and started figuring out an idea.  It wasn’t as tough as I thought it was going to be.

Taping the inside of the hopper

What I drew up was a five-part hopper. The first part was a plywood deck that had a hole cut into it. This serves as a frame for the rest of the hopper to fit onto. These pieces were complicated, but pretty simple to cut. The wall that holds the dust flange is attached to is 9 inches tall by 12 inches wide where it attaches to the top at a right angle.  This tapers down to 6 inches at the bottom. Before I cut everything out to size, I used a fly cutter on my drill press to cut a 4 inch diameter hole on this piece of the screw on dust flange.

A look into the mouth of the collector

The sloped piece that connects the deck to the flange piece took some finagling, but by using a little bit of scrap wood, I was able to determine the angles that both ends needed to be beveled at. Once I had them all cut to size, I simply glued and bradded into place.

The sides were cut out of some scrap 1/4″ plywood, and were very easy to cut by simply holding them up to sides and tracing them. More glue and brads, and they were ready.

Foil tape seals it up

The fun came in when I started using foil duct tape to make everything airtight. That stuff is sweet. If my car’s bumper gets damaged, I’ll just use this metal on a roll to make the whole thing look good again. The beauty about this stuff is that it sticks like nobody’s business, and really seals the thing up well.

I was able to hold it against the bottom of the saw’s stand, and then screw it through four conveniently placed holes at the top of the legs. I used some shop made wooden washers to bridge the width of the hole so the screw heads don’t slip through the hole.

The saw with the flange

As you can see, I have the dust flange facing the right side of the saw as you face it. This keeps it out of the way of the rip fence and miter fence storage, and out of the way of the foot pedal for the lift. It also happens to be the side that the dust collector is stationed to in my shop, so I don’t have to step over the hose.

By the time that I got this done, I was too tired to try it out. But, judging from some tests I have done, it should serve me well for a while.


Shankapotomus

Summertime, and the living is easy. Everyone is headed outside to take in some glorious sunshine and enjoy the outdoor activities we look forward to. A trip to the mountains. Sand between your toes on the beach. Picnics in the park.

Getting into the swing

Oh, and some folks like to go out and enjoy a round or two of golf. While I have only ever played golf once (no, you don’t want to know what my handicap is), there are lots of people who play a whole lot more frequently. From what I understand, it’s a great way to get outdoors, be social, and spend hours looking for a tiny white ball you just smacked with a club.

Every player is looking for the perfect shot, but I’m pretty sure I have never hit one. My mantra on that warm spring day was that if it went left, it was a hook; if it went right, it was a slice; and if it went straight, it was a miracle. The other shot I made a lot was the shank.

Shank happens

I’m not sure why it was called a shank, but it didn’t look anything like the shanks I see on my router bits. Now, those babies are sweet looking – precision ground, perfectly round and made of sturdy steel. Sure, the cutters of the bit get all the glory, but the shank is equally as important to the health and well being of your router bit, and deserves a little bit of love from time to time.

A router shank

That’s what Kurt Raschke – the craftsman in residence at Infinity Cutting Tools – told me at a recent router basics class. The key thing to remember is that the shank is precision milled to hit an exact dimension. Yes, a 1/2″ shank is 1/2″ diameter, and a 1/4″ is a 1/4″.

The reason they have to be so precise is that the sit in a collet, not a chuck, as you would see in a drill press. The collet can be smaller and lighter than a geared chuck, has tremendous holding power and is automatically self-centering. The downside is – of course – the collet can’t really adjust to different sized bit shanks. Keeping those tolerances tight is critical to getting a good fit.

A router collet

Fortunately, keeping router shanks – and collets – in good shape is a simple matter of maintenance. First of all, every so often, you should inspect your bits. Is there any sign of wear? Burrs and grooves worn into router shanks could be a sign that the collet on your router may need to be replaced. Try not to sand them out, because that will affect the dimension of your shank, which can lead to pretty disastrous results. Can you say ‘bit slippage’?

You may want to wipe down the shanks from time to time with whatever you are using to clean pitch build up off the cutters to ensure debris or residues are cleaned off the shanks. Be sure to avoid using anything slippery on the bit, for obvious reasons.

It’s also a good idea to check your collet from time to time. After numerous bit changes, metal fatigue can begin to settle in, making it more difficult to tighten down your collet on the bit. Your first reaction will be to crank down heavily on the collet to get things snug, but that just compounds the problem you had in the first place. Spare collets for popular router brands can be found easily online. Some less-expensive routers may have a permanently attached collet on their models. In this case, a new router may be in your future.

brushing out a collet

Also, be sure to give the collet a good wipe out on occasion. This helps remove any residue that gets in there, extending the life of the collet a bit. A great tool to clean out the bits can be found at a gun shop. Pick up a .25 brush for your quarter inch collets and a .50 for your half inch ones. The soft metal of the brush is designed to be gentle on the rifling of a weapon, and it will also do a good job on a collet.

When you insert the bit into the collet, push it in until at least 2/3 of the shank is inside, or push the shank until it bottoms out, and then pull it up a fraction of an inch – maybe 1/16 or 1/8, to give the bit some room to move as the collet is tightened. You don’t want to leave the bit bottomed out as you tighten things up, because the tightening action will pull the bit closer to the router.

tighten that bit

Also, just be sure to snug the bit up until it’s hand tight. If you have to crank down on the collet to get it to tighten up, you are looking at a replacement,, and you are making bit removal a nightmare later.

While they aren’t the prettiest or highest-tech part of the router bit, treating their shanks with some respect will keep your cuts true things of beauty.


Back where we started

I bought my current table saw back in 2001 – April, I believe. When I got my hands on it, wow, it was just love at first flip of the switch. The thing surged to life – a whole lot more quietly than the universal drive benchtop table saw I used to have. That baby was a dream.

The table saw with the wing mounted router table

And, after a short while, I had heard that I could add a router table to one of the wings of the saw to open up some space in the shop. I was sold!  So, I cobbled together a little something – a sheet of melamine covered particle board, some bolts, a little bit of aluminum angle and I had myself a plan. So, I took out the right most extension wing and put my shop-made model in there. And it was good.

That’s when the one shortfall of this plan hit me. If I had to use both the router and the table saw – for something like shaping some molding on an oversized piece of wood and cutting the molding free – I had to move the rip fence between acts. Which meant I was never going to get my measurements exactly right. And, once the folks at Infinity Cutting Tools set me up with a new router table, well, this wing-mounted router table was unnecessary.

Fortunately, I had saved the original cast iron wing (even though I hadn’t saved the original bolts…), so all I had to do was break out the owner’s manual, buy some new bolts, washers and lock nuts and hook everything up again.

IMAG0318

Getting to the table was going to be easy. The saw rolls nicely on the caster system, so I was able to spin it around to get lots of well-lit working space.  As you can see, it fits between the front and back rails, and has a diagonal brace to help support the weight of the router, table and work on it. The brace was going to have to go first.

The support

Since I had no earthly idea how I was going to get a diagonal brace into the space, I mounted it with a pair of T-hinges between the stand and a support block I had glued to the bottom side of the table with epoxy. Sure, it’s probably not the best idea, but it worked for nearly a decade.  That was just a simple matter of unbolting it from the stand and unscrewing from the bottom of the support block.

The steel bar glints beside the table

From there, I had to remove a round steel spreader bar that adds support to the rails. This was easy to do with an allen wrench. I was very careful to not lose the clips that held the bar in the tracks of the front and back fences.  Then, it was a simple job to unbolt the carriage bolts that held the table to the rails and the table to the saw, and slide the whole assembly off the rails. It took a little jiggling, but it worked.

While I was in there, I took the opportunity to replace a broken wire tie that allowed the power and motor cables to hang loose in the back of the saw. A wire zip tie was all that was required.  I also gave the retaining screws on the two hand wheels a quick turn to tighten them while I was there. I then installed the bolts into the wing and slid the assembly into the rails until it was snug to the saw’s body.

Clamped into place

The instructions in the manual said to use a set of clamps to hold the wing flush to the saw table, which I did. I put the lock nuts on the back of the bolts and tightened everything into place. This was much easier than I had imagined. I slid the steel spreader bar into place and put the end caps back on the front and back rail. There, good as new…

The wing, back like before

While I was down there, I noticed that the velcro strip for the  canvas dust collector bag I had put on the saw failed to hold in the dusty environment. I am thinking about finding a new way to hold that bag onto the saw to help contain the dust it generates. But, that’s another post for an other day…