December, 2004
 This is the project that made me a ‘made man,’ according to some folks over at the Woodworkers’ Website Association. This was my first big commission, and it fell into my lap. Looking back, however, I can see so many better ways I could have built it. Different construction methods. Different materials. Ultimately, the customer was happy, and that’s all that mattered!
It all started when I was shopping for a desk for my oldest son, who was in first grade at the time. My wife and I went to the nearest unfinished furniture store to look for something, and boy, was I dismayed. Everything was made out of pine, and the joinery methods left something to be desired. Of course, I exclaimed several times, “I could build something better than this for less money!”
After my third pronouncement, a gentleman tapped me on the shoulder. At first, I thought I was busted by the store staff for scaring off customers, but it was another customer who asked if I was a woodworker. After telling him yes, he asked me to look at something for him. He wanted a low oak credenza-style entertainment center for his big screen TV, and all the store had was a short pine unit. “Can you build something like this?” he asked as he pulled out a drawing of a Craftsman style unit.
Sure I could.
Before we agreed on a price, we exchanged info and I said I would draw up a plan. Once I e-mailed a drawing and told him of the construction details, he gave me the go ahead, and I agreed to build the piece for a $1,000 commission. I asked for half the funds up front to buy materials, and was off to the races.
Now, I have to confess, at this time, I had never built anything like this. There were many firsts for me. My first glass doors. My first inset doors. My first big casework.
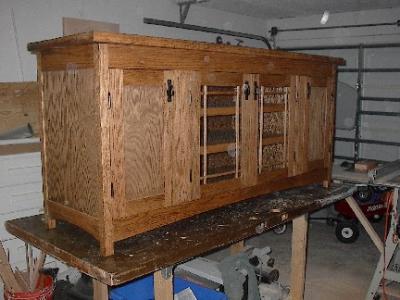
The cabinet is built frame and stile with 1/4″ oak plywood panels. The door on the left had shelves for storage, and the door on the right had two pull-out trays for DVD storage and the like. The center doors had shelves for electronic components.
I went to a local stained glass shop and had the owner inset the glass for the two doors. It was an antique-style seedy glass, which lent some character to the piece. The wooden grille on the front was made of half-lapped oak pieces glued together and inserted as a tight friction fit with clear silicone adhesive caulk on the back to help stick it in place.
The top is a solid piece of 6/4 oak I sanded the heck out of. Sure, I didn’t have to build it like that, but I didn’t know any better.
I finished the piece with Watco dark walnut danish oil to give the darker Mission-style finish to the piece, and topcoated the top with two coats of wipe-on poly to give it more durability. The hardware was from the Craftsman collection over at Lee Valley.
When it was ready, I gave the gentleman a call and asked him to bring a truck and three of his biggest friends – once the piece was assembled on my bench, I wasn’t about to move it.
The reaction when he saw it was priceless. I opened the garage door, and he and his three buddies said, “Woah.” They rubbed their hands over it like the monkeys did to the monolith in 2001: A Space Odyssey.
The owner took a shot of it with his cell phone and sent it to his wife. Within a minute, she called back and said, “I love it! Tell Joe to ride in the back of the truck with it and make sure NOTHING happens to it!”
With a little grunting and groaning, the four gents were able to hoist the piece into the back of the truck, and the guy’s poor friend Joe had to ride in the bed of the truck on a chilly night with the piece until it was delivered.
Every so often, I think back to building that piece and wonder how I managed to build it. However, it was an experience I will never trade. My first real commission!

 The pocket screw has proven to be a fast and convenient way to build case construction. From face frames to box assembly, this system gives very good results in short order.
 New York City is known as the City that Never Sleeps. The incessant lights, activity and electronic chatter could lead one to believe that NYC is constantly on the move, flying away from tradition at warp speed.
 For a guy who started woodworking at the local ‘Y’ back when he was seven, Joel has a keen eye toward the history, design and function of classic hand tools. In 1996, he and a partner founded the online Museum of Woodworking Tools, an online showcase of old woodworking tools from shops across the country and the world. “I love the way these old tools look, feel in the hand and function. In many ways, they can work just as fast – or even faster – than power tools and give the user more connection with the wood.”
 While these works of art are appreciated by such notable woodworkers as Frank Klausz, the clientele doesn’t just contain the luminaries of the woodworking world. “You might be surprised with the range of woodworkers we work with. Sure, we have the masters who need a specific tool, but we also get lots of beginners just starting out and some average professionals who need high-quality tools to get stuff done fast.”
 However, when you get into entertainment centers, kitchen cabinets and other projects, doors become important design elements. I was terrified when I had to build my first doors, but that was the easy part. Selecting the hinge hardware was actually one of the tougher decisions I had to make.
 As building techniques progressed, more sophisticated hinge designs came into play. The technology to forge bronze, then iron, gave builders a wider selection from which to choose. The hinges forged by these smiths were both beautiful and durable, and can serve archaeologists well in helping to identify the date a particular structure was built.
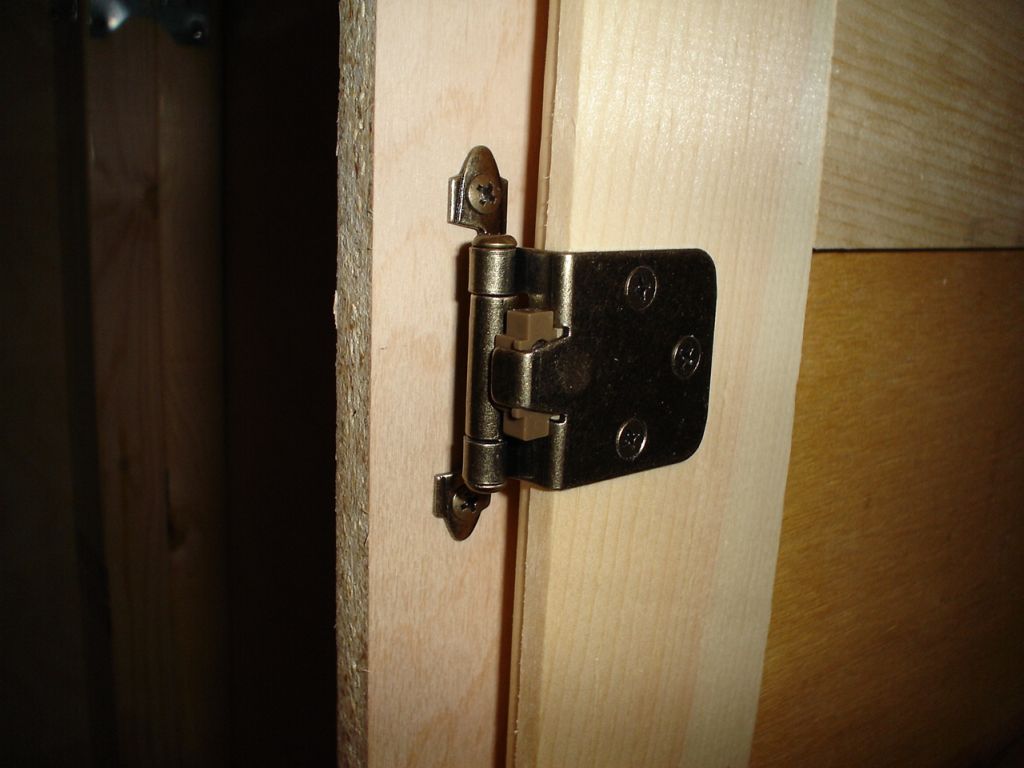 Whatever style of hinges you decide to go with, you will want to follow the instructions very carefully. Each has its own unique layout concerns and issues. And, it doesn’t take much for the hinges to get out of line and cause binding. And, believe me, you can spend a day and a half trying to correct incorrectly installed hinges. Been there. Done that. Got the T-Shirt.
 Some are huge. Cavernous. You may need a road map and a GPS device to find your way around in them.
 Exotic woods are some of the most beautiful timbers in the world. There presence in a woodworking project can take the most ordinary piece and turn it into a work of art.
 This is a