The holidays are rushing up fast!

Wow. I just mean wow. With my deployment to New York, a bunch of things to do around the house, the Modern Woodworkers Association, the Wooodworkers guild, gosh, it seems like the holidays are racing up behind me, ready to capture both me and Iggy…

That’s why we are both working like crazy to get some stuff done. The manger for the nativity sets are done, so they are off the list.

Next up, I have to finish the hope chest for my niece. To refresh your memory, I have four nieces, and I am building a hope chest for each of them for their 16th birthday. My eldest niece, Carolina, got hers a few years back, and now it’s time for my niece Lauren’s. Her birthday was in mid-November, so – as you can imagine – this one is already late.

The main part of the chest, with some work left to do.

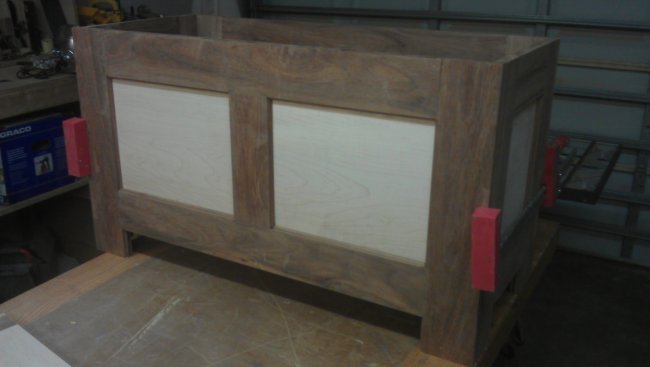
I needed it to be able to be packed flat for shipping up to where she lives, so I opted for frame and panel construction. Basically, this baby will pack into a top, two sides, a front, a back and a bottom. My brother-in-law is a pretty handy dude, so he can glue them together when he receives it. The piece is looking good so far, made of maple and Mayan walnut.

Loves me this lid

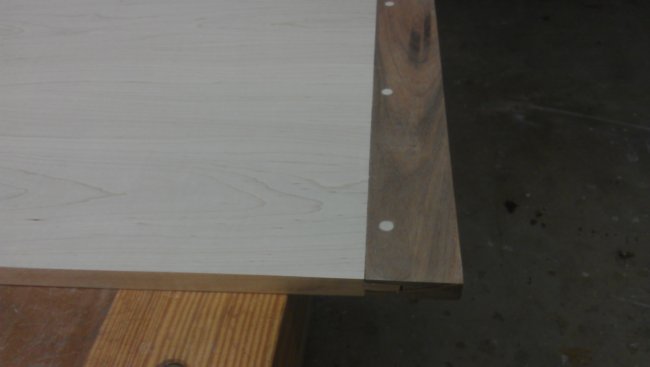
I’m particularly proud of how well the lid is coming out. I made the main part of it maple, and made the breadboard ends out of Mayan Walnut. I attached them by cutting a groove in the edges and a tongue on each end of the lid, boring some pins for dowels, enlarging the outside two dowel holes in the tongue and then gluing the middle into place before driving the dowels home. I like the look of the exposed tongue on the edges, and the contrasting dowels.

I will leave clear instructions for how the piece goes together.. she should like it!

The two veneered panels for the next project

I also have some pieces for a project I wanted to build for someone special in my family. I veneered a few beautiful pieces onto an MDF substrate using hot hide glue, but haven’t really gotten into production yet. I don’t want to tell you who it’s for or what it’s going to be, but I can tell you, I’m excited about this piece.

And, I know that at some time during the next few weeks, I’m going to have to start thinking about building something for the upcoming art show held at the county courthouse. I’m thinking of a safe project I can bang out in a few hours, and a more advanced piece that may take longer…  I’m still sketching out a few ideas.

But, there are only so many hours in a day, and so many days before Christmas. I guess I had also better plan in some time to spend with my family to just relax and enjoy the season…

I wish for each of you to find some peace and quiet with the ones you love during this hectic season. Oh, and some enjoyable shop time!

Quick Poll

OK, you have built the gifts in your shop. Maybe a cutting board for Aunt Edna or a vase for Uncle Bill.  The finish is dry, and it’s read to go…

Oh, yeah… Getting those gifts there. Some of us are lucky – we’ll be handing gifts to lucky recipients on the holiday. For others,well, those gifts are going to have to travel a great distance to get there. And, with shipping come those pesky shipping deadlines – many of them arriving this week.  Blech…

The USPS can deliver quickly with some optoins

While your local post office and other carriers such as FedEx and UPS can get things where they need to go in a hurry, they haven’t yet created time travel – allowing you the flexibility to ship things to arrive in the past.

So, this week, let us know if you are going to make those shipping deadlines, or if you are going to be sending apologies for a late arriving gift!

Link of the week

The Bois Shop

While many people see woodworking as a project pursued by older gentlemen who acquired the skill under the training of masters, or who have had the benefit of wood shop, there’s a young gun up in Newton, Massachusetts who is doing some incredible woodworking using a blend of old-fashioned and new-fangled methods.

Rob Bois in front of one of his pieces

Rob Bois has been blogging for a few years now, and he has been building some great stuff in his shop. Step stools with bold curves. Classic chests of drawers. Screen doors!  Yeah, sometimes you gotta build those, but Rob made a point of putting some classical embellishments to turn a utilitarian piece into a work of art.

Rob crates videos to help readers follow along with his builds, and his easy style makes following along a breeze.

Rob Bois won a Bad Axe tenon saw

Oh, and rumor has it that Rob won a Bad Axe tenon saw at Woodworking in America in 2011… be sure to ask him about it!

Stuff I’ve built (with some help!): The Nativity Sets

Last weekend, I was able to get those mangers finally done… and that was a good thing, because last night was the big holiday party for the St. Petersburg Woodcrafters Guild. Again, the mangers were part of the nativity sets that we were putting on some of the tables as centerpieces and door prizes for our guests.  And, boy, did they look great!

The manger set up on my bench Centered... with all of the pieces

Again, the plans came from Steve Good, and since I didn’t have a scroll saw, I was put in charge of building the mangers and the bases. After everything was glued together, I sanded the mangers down to 150 grit paper, brushed them off and sprayed three coats of dewaxed shellac. You didn’t know I has a sprayer, did you?  Well, that’s grist for another post. After spraying and drying, I sanded them down with some 320 grit and hit them with a little paste wax.

The figures and the icicles were cut by fellow guild members Ted Bateman and Bill Murhpy, who are both talented scroll saw woodworkers.  And, boy howdy, did the both do a great job!  I’m not sure of the finish they used, but they looked great. Bill used a grab-bag of wood scraps (I’m not sure of the species) and Ted did the roof decorations out of 1/4″ Baltic birch plywood.

A cute little maple and walnut snowman

When Rhonda and I got to the party, we quickly grabbed our seat. I was staring straight at a gorgeous little snowmen one of the group’s turners had made. It was fun to see such a well made piece joining the party.

After we ate, we got down to some quick guild business. It was at that point… well… OK, I have to admit it now… a new slate of board members was officially sworn in for 2013.  And, yes, yours truly was sworn in as Vice President for the guild. Incoming President Dale Neff gave me a quick wink when we got the news. It was grand!

President Dale Neff gives me a wink

As Rhonda and I drove home, we were happy with the outcome of the night. We had a chance to pal around with some local woodworkers, I was able to get two of the mangers to our visitors (we held one, and Ted and Bill got the other two) who were thrilled to have them, and we are just that much closer to Christmas, my annual break from work and some quality shop time for some upcoming projects.

A little less than two weeks now!


Table this discussion

I have been talking about the upgrades at my shop for a while now. The miter bench. The rolling cart that holds the drill press. The rearranging to get more usable space.

There’s something else I had to add to the shop – a far more capable router table. Years ago, I had built a router table into my table saw’s top, and it was good. For a while. Until I first had to rout a nice molding profile and then rip it off a wider piece…  that just became a real mess. I also desperately needed to get a far more precise setup. I mean, I have been using a cobbled-together router fence that I wasn’t 100% sure was square to the table…

That’s when David Venditto of Infinity Cutting Tools stepped in to fix my issue. He had already sent me home with a new Triton router and router plate, and this past week, he finished me off with a router table, fence and stand.

The fence is a sweet Jessem Mast-R-Fence 2. This baby comes complete with dust collection, a built-in scale, sliding fence faces to let you control the opening for the router bit and secure clamping to ensure it holds a measurement.  Everything you would want a router fence to do.

The stand was sort of like an erector set.. lots of steel legs and plenty of bolts. And bolts. And, some more bolts. I had no idea how many bolts it would take to assemble the stand, but I did have my set of wrenches and sockets, so that helped.

Once I had it put together, I had to top the stand with a VERY cool top. David gave me one of his brand new black microdot router tables. Turns out, they are milled right near my house. The edges are wrapped with a tough edging and a miter channel that accepts both mini and miter T-track accessories. The best feature?  The top is a black microdot laminate that is very hard, and reduces the friction on the wood that you push over the table.  I’ve played with it a little bit this weekend, and boy, has it been fun!

Once I got it all assembled, I had to put it into its place of honor in the shop, next to the drill press. I’m looking forward to putting this router table through its paces, and eventually doing a shop 2.0 tour for you folks to enjoy.


Quick Poll

Last week’s quick poll started an interesting conversation. I had intended it to be about what kind of footwear you wear in the shop to prevent injury if something fell onto your foot from your workbench. But, what folks read was how do you keep comfortable while standing in your shop for hours on end.

It’s more than just a matter of comfort. In fact, some readers commented that they had issues ranging all the way up to joint replacement surgery.

For most garage or basement woodworkers, concrete is the default flooring.. and that’s where a lot of the problems begin. It’s an unforgiving surface that can leave you feeling footsore before you know it.

This week, tell us how you combat this standing fatigue and issues that could possibly plague you years down the road.


part of the Wood Talk Online community