Get my drift?

As I have said before, band saws kind of have a mind of their own. And, when the blade you are using starts to get dull, it’s time to shell out a little bit of dough and pick up a new one.

Since every blade is a little bit different, setting up your fence for drift is something that you have to do when changing the blade. It takes a little time, but it’s not an impossible task. It uses a few materials and takes a little bit of time. This is the process I followed on my Laguna.

A straight line

The first thing I had to do was to mark a straight line down the face of a board parallel with one of the edges. I did this on a piece of southern yellow pine using a combination square and a pencil. This is going to be your reference line to work from.

Rip that board!

Push your fence away from the board, and freehand that board through, following the line carefully. Because the bandsaw pulls down toward the table, there’s very little chance of a  kickback, unlike at a table saw. Once you get about halfway down the edge, stop the saw, and do not move the board. That’s important, because that’s the angle your blade wants to drift, or cut off of square. I have seen some bandsaw pros – like Michael Fortune – advise that drift can be eliminated. And, when Michael wants to come to my shop and show me how that process works, I’ll make him dinner and give him plenty of beers. Until then…

Now, loosen your bandsaw fence’s contact at the point where it rides on the front rail. The Laguna uses an allen wrench for this purpose, but you should check your manufacturer’s guidelines to find out how to do that on your saw.

The pine cut

Once I got that locked in, I decided to test on the board I was working on. The results were pretty darned spectacular. But, that’s pine. What about something harder, like this block of Ash I had sitting around?

Nice ash!

Wow. That’s a clean cut that will require very little sanding. Hmm, I have a few boards that I need to cut up for some projects… with the new blade on the saw, I think it will be easy to tackle.

What an open house

This past Friday, I took off work a little early to do something really enjoyable.

No, I didn’t take off to take in a mid-day Rays game, although a day at the ballpark would have been fun. And, no, I didn’t take off early to hit the beach, although the weather was absolutely gorgeous.

The Infinity booth

No, I took off early to head up to the Infinity Cutting Tools open house. That’s right, they opened the doors and invited everyone to come on over to check out the deals and get their hands on the tools.

David Venditto offered a great spread of food, reps from the companies Infinity carries were on hand, and even Andy Gibson, a big-time hand tool enthusiast, was showing off some of his decidedly less than modern tools.

Andy showing off his tools

Oh, Andy’s tool chest is certainly something to drool over.

Andy's tool chest

The real fun happened when Ben Farrell of Nova Teknatool brought out his lathe and started doing some demonstrations. Boy, was he a busy guy, helping people come out to turn their first bowls.

Ben the Bowl Man

Ben is a skilled turner, and he was getting total noobs out to do some turning. For instance, Jessica Venditto, David’s sister, did her first bowl, and she wasn’t ashamed to show it off…

Jessica shows off the bowl

Now, silly me, I didn’t get any shots of myself doing the deed, but I did end up turning a bowl out of a very Florida wood – grapefruit. Yes, citrus trees are pretty cool to work with, and this little bowl is a honey.

The grapefruit bowl

That actually ended up being the second bowl I turned. The first one? Well, it looks like this…

Crash boom bam

I guess that’s why folks are so adamant that you wear a face shield when you turn…

All in all, it was a pretty cool day, and it was fun to be a part of it.

The weekly plan

Fine Woodworking’s Shaker Rocker

Darn those Shakers!  They were a community of such industrious, clever and creative folks that their furniture style lives on longer than they did.

I guess maybe that strict no-kids policy must have been their downfall.

Now that's a rocker!

Anyway, today’s weekly plan comes from our friends at Fine Woodworking. Ernie Conover drew up some sweet, easy-to-follow plans for how to build a tape back and seat Shaker rocker. In addition to the plan, there are also online lessons for steam bending, spindle turning and tape weaving.

If you are looking to build a comfortable place to rest your bones after a hard day at the shop, this may be what the doctor ordered.

Link of the week

Wikipedia’s entry on laser engraving

Sure, there are lots of ways you can sign a project. Maybe you want to study pyrography or get your hands on a brand.

But, if you really want to get fancy for a special piece, why not consider laser etching on your wooden project?

What etching looks like on different species

This Wikipedia entry gives the basics on how laser etching works, what material can be etched and the different technologies that are used to do the etching.

Most trophy shops offer this type of service, so be sure to call locally to find out where it can be done.

Good joints: The sliding dovetail

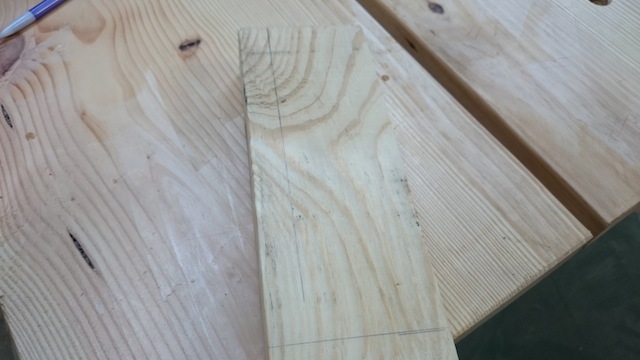
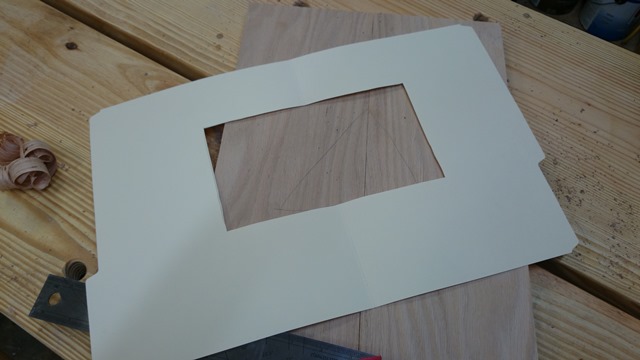
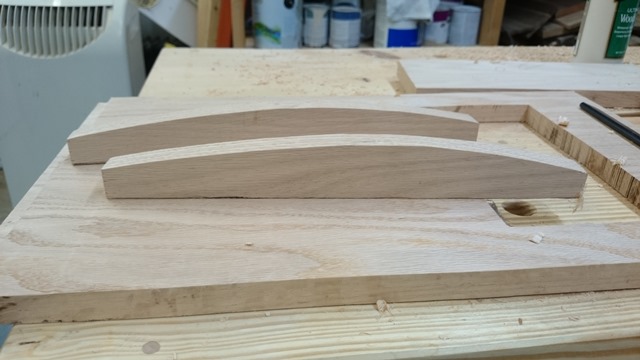
So, on this project I’m building, I have a shelf that will hold a special memento But, the shelf isn’t only to hold this item, I also need it to help hold the final piece – together with the breadboard ends – flat in an area of the building where it goes that is right by an exterior door. My concern is that with the opening and closing, there will be tremendous fluctuations in humidity, possibly making this piece warp without support.

The project is coming along nicely

Plus, since this is a cross-grain situation, I didn’t want to lock the shelf in place, possibly leading to cracks.

The best option I can see is to use is a sliding dovetail joint.

The sliding dovetail. It’s a member of the dovetail family that often gets overlooked. And, that’s a shame, because it’s a great joint, giving lots of flexibility. The only problem is that it can be very fussy to cut.

The dovetail bit in the table

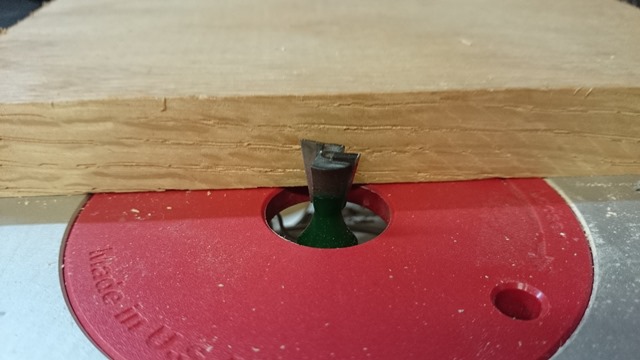
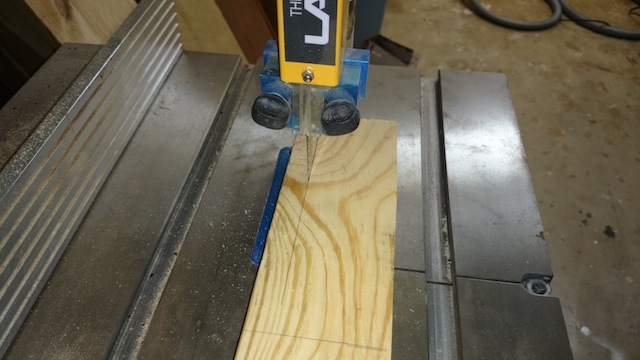
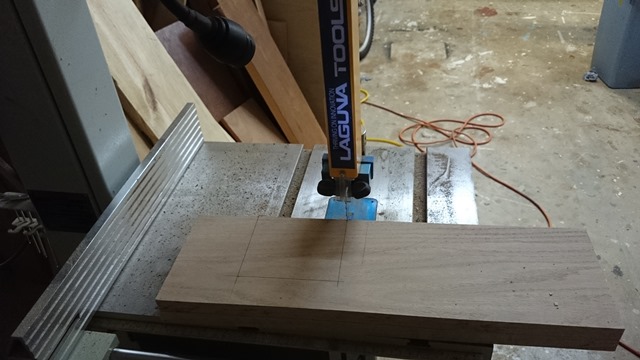
This is the method I used, and it worked well for me. The whole joint revolves around a standard dovetail bit. The total angle of the sides really isn’t important. I am using one with a 14 degree slope. This method requires a router table to make it work well,.

Once I put the bit into the collet, I lowered it into place – about one third to one half the thickness of the board I was working on.

My Osborne miter gauge

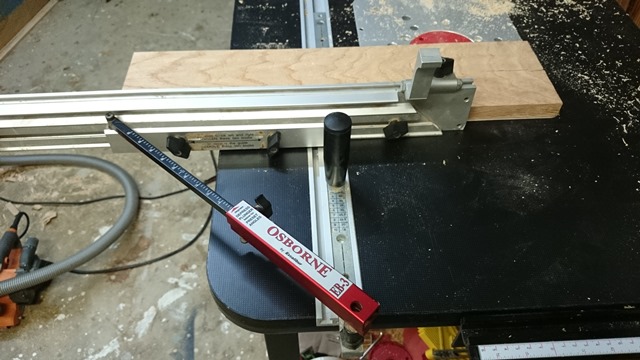
To ensure the piece wouldn’t move on me when I routed it, I used my Osborne EB-3 miter gauge from my table saw. It has a nice wide fence, covered in sandpaper to ensure a great grip.

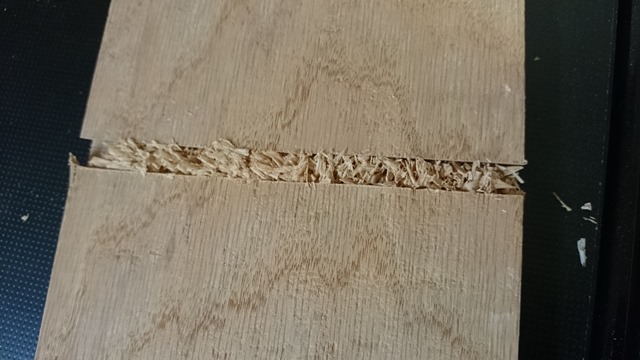
Before you just go and push the work through willy-nilly, do yourself a favor. Cut some kind of relief groove where you plan on plowing this dovetail shaped dado. This will remove a chunk of the waste, helping your dovetail but cut more effectively. Some people will swap router bits to do this; I just ran to the table saw and cut a pair of saw kerfs.

A real choke job

OK, back to the router table. with a careful push through the bit – ensuring that the work is held tightly against the fence. Believe me, the spinning bit will want to make your work move.

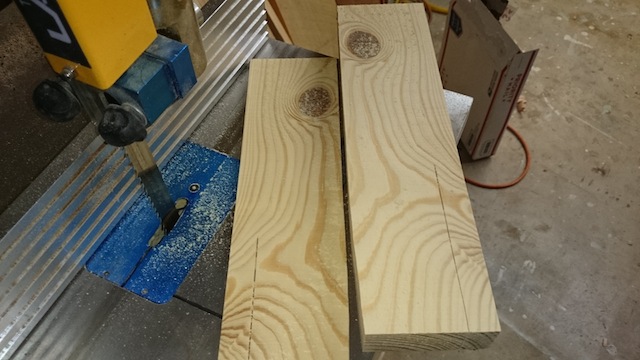
After you push the work through the bit, flip the board over and take a look. Odds are pretty good that the dado will be packed with sawdust. That’s normal. Remember, the bit cuts wider at the bottom of the cut than at the surface of the board. Once you vacuum the chips out of the dado, it’s all good.

Now, if you would like to waste shop time and pull most of your hair out, feel free to mess with the height of the bit at this point. If this is how you have fun in your shop, be sure to seek professional help. If you would rather just build, then don’t touch the bit height. At all. You have it set perfectly.

The bit is ready to cut

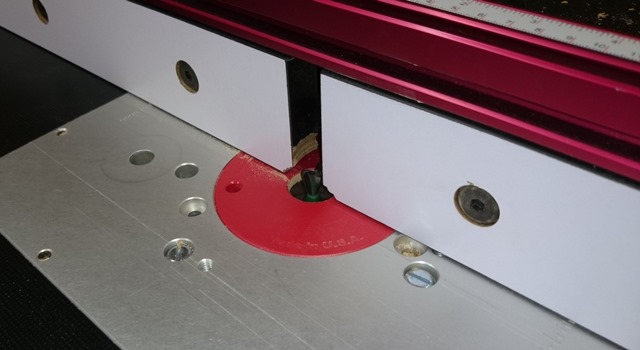
Now, you have to get your fence ready. WITHOUT TOUCHING THE HEIGHT OF THE BIT (did I mention this before?), put the fence on your router table and bury most of the bit behind the face of the fence. This part of the joint is trial and error, and it’s very easy to make errors. Believe me.

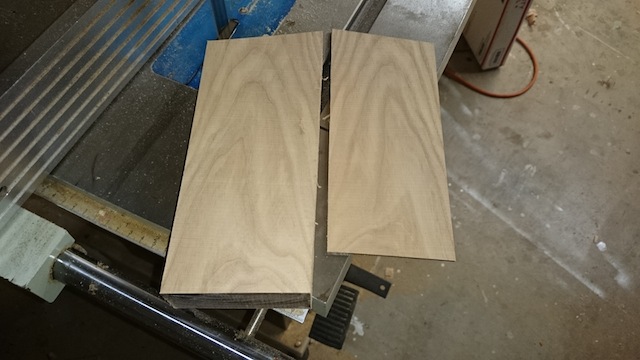
With the majority of the bit behind the face of the fence, put the mating piece edge down, riding along the face of the fence. Now is also a great time to break out your featherboard to ensure that the piece is pressed tightly to the fence as you push it past.

Light as a feather

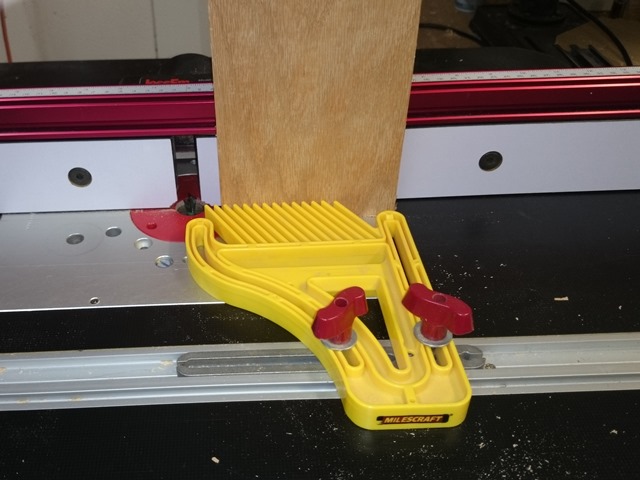
Now, push the board through, then flip it over and rout the second side. This will give you the proper profile for the joint. It’s during this time that I subscribe to the mantra that it’s easier to take more wood off the joint than to add it back. Your first pass will probably leave your mating piece too wide to fit. Adjust our fence backwards by very small increments and test fit. Remember, since you are removing material from both sides of the joint, you are doubling the corrections you make.

Slippity de do da

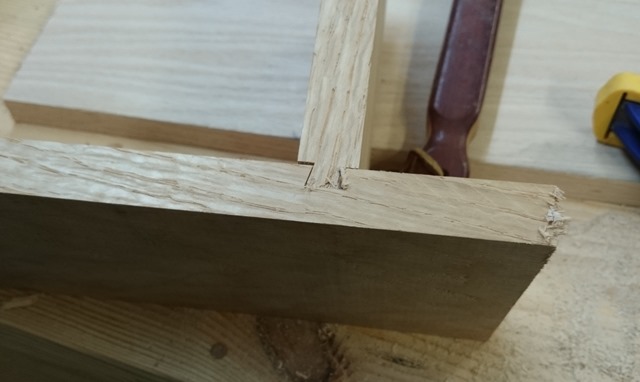
You will know when the joint fits perfectly when the mating piece slides into the groove and goes about 2/3 the way into the groove before it binds up. There is a lot of friction working on this joint, so you will probably need to tap it into place with a mallet to get it to seat all the way in.

The fun thing about this joint is what you can do with it. If you want to affix it permanently into place, put a dab of glue at the outside edge of the joint. This way, that section will stick fast, while the rest of the joint can slide freely as the board expands and contracts with changes in humidity.

Or, if you are feeling froggy and you want your joint to be able to be disassembled, try a little wax on the joint. This way, when you are ready to knock the piece down, it will take just a few taps with a mallet to free the joint. I have seen this on bookshelves, and it’s the handiest portable design.

Sure, it takes a little it of practice, but once you try the joint, I think you will be happy with the results, and you will want to use it more often than you think you will.

We interrupt this project…

I have a confession to make. This past weekend, I made no progress on the projects for my nephews. I did, however, have a very important project I had to start.

But, I can’t tell you what it is or who it’s for, because it’s going to be a surprise.

For this one, my choice of woods was already made for me. It has to be oak, and it’s final finish is going to be that golden oak color you see on kitchen cabinets. Hey, it’s not my first choice, but it will certainly work for this project.

The layout

The first thing I had to do was sort through the racks of hardwood at my local home improvement center. No, I don’t relish the idea of buying expensive oak from there, but for this project, I have a very hard deadline, and I can’t quibble with the cost.

After selecting the board – a 1 x 8 flat sawn red oak board – I chose the best looking grain arrangement and matched a pair of boards. These will do the trick for what I need to do.

The file folder template

From there, I had to cut a hole in the middle of the piece. To make this happen, I first cut out a template in an old file folder to match the size that I needed. After carefully marking the size of the cutout, I stacked the two pieces together with some template tape, so I could cut both pieces at once.

Laguna makes the cut

From there, it was a short hop over to the Laguna bandsaw for the cutting. This was a simple notch that had to be made, and the blade just sliced cleanly through the two boards, making a perfectly centered hole once I pulled them apart and matched them.

I wanted some breadboard ends for the top and bottom, because this piece is going to be in a place where the humidity could be an issue. So, onto the router table with the tongue and groove bit sets, where I grooved the ends and ran a tongue on the top and bottom of the main piece. They fit together beautifully.

DSC_0066

I cut a nice sweeping arc on the outsides of the breadboard ends, and once I had them all faired up, I attached them to the top and bottom tongues with a dab of glue smack in the middle of the piece. I like that look.

The next step was to cut a sliding dovetail for a shelf. That was a simple joint to cut, and I promise I will be showing how to cut that in a later post. Now, once I get the committee reviewing the piece, I will also shape the shelf and attach it with just a dab of glue at the end, further allowing the piece to expand and contract.


Peek a booNow, I have to bring the piece to where it will eventually end up to ensure it fits where it needs to, check out how it will work with the final accessories, and to design the final engraving.

I hope when it is unveiled, that it looks as good as possible and impresses the final recipient…

The weekly plan

Jeff Branch’s Queen Sized bed plan

So, I got maybe a few hours into my new weekly woodworking plan idea for the blog, and Jeff Branch contacted me. It seem he had a plan he designed that he wanted me to feature… and the story behind it is pretty cool. I’ll let Jeff explain its origin:

Jeff Branch's bed

I built this bed as a small part of the relief effort after a massive tornado outbreak in northern Alabama on April 27, 2011. Sixty-three tornadoes touched-down in our state that day killing 247 people – a very traumatic day for sure.

The bed was designed to be simple so it could be built quickly, but I also wanted it to be more than just a basic bed. I added a paneled headboard and unique finials to the posts. The joinery is mortise and tenon and stub tenon.

It was a fun and meaningful project. The bed was donated to a family who lived about 75 miles from my home.

If you are looking to build a bed, it’s a pretty cool – and totally FREE – plan.

part of the Wood Talk Online community