Category Archives: Shop Talk

Tools I Use – My Thickness Planer

Delta 12″ Portable Planer 22-540

As with just about every woodworker, all of my first projects were built of 3/4″ material. The plywood, the lumber – everything was exactly as thick as it had come from the home center.

My thckness Planer
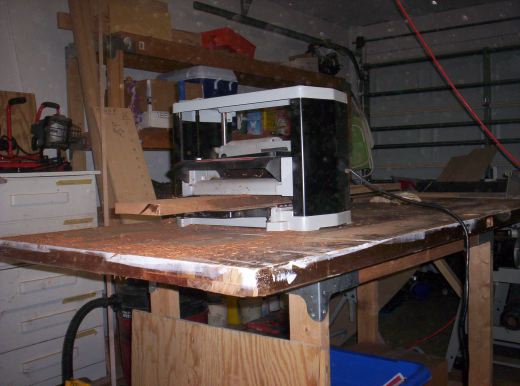
One day, I was holding some sweet wood that was given to me by a local hardwood supplier, and I thought to myself, “There has got to be an easier way to get all of these boards the same thickness without using a belt sander.”

That’s when I went out and got a portable thickness planer.

Sure, I considered some very expensive models. But, since I thought I was only going to need it for a few projects and money was tight, I went with the ‘entry level’ Delta.

When I unpacked the unit, it looked very solid and straightforward. A simple crank handle to adjust depth, two sturdy tables for infeed and outfeed, a cord wrap. Even better was an access port to remove and replace the motor brushes to help with future maintenance. Obviously, Delta didn’t plan on this to be a disposable piece of equipment.

The first project I ‘fed’ this planer was a laminated picture frame stile – strips of walnut, mahogany and maple. The planer’s depth was easy to set, and it made short work of evening out the irregularities. I was stunned how quickly I could produce a really nice surface that only needed some sanding to perfect.

Unfortunately, there was quite a bit of snipe on the ends of the board. I planned for this and made my glue ups longer than I needed, so I was able to cut off the sniped ends and build around it. Since the project was made of free scrap, it didn’t affect me much.

Now that I’m building with more expensive wood, I’ve had to create a work around to reduce the amount of snipe I get. The solution was use a piece of melamine shelving with two cleats screwed to the underside to register it to the infeed and outfeed tables. I also lift up on the edge of the board as it comes out of the planer. These workarounds do OK for now.

I’ve reversed and changed the blades, and the process is relatively simple. It involves unscrewing two allen bolts from each end of the disposable blades. They were also easy to remove and replace. One word of caution, however. Planer blades – even dull ones – can cut you badly if you make contact with them. Always be careful when handling them!

Since this is the first planer I have ever bought or used, I’m sure my review isn’t as valuable as those who have used many others. But, hey, it works for me, and I’m really in no hurry to go out and replace it. My plan is to use it until the thing falls apart. Or, at least, until I hit the lottery!

Tools I use: My hand planes

My hand planes…

When it comes to working on my projects, I always seem to find myself reaching for a hand plane. Whether to flatten a board, true an edge or plane a bevel, my planes give me total control over whatever wood I am working with.

Since I’ve written a lot about my hand planes, it’s only fair that I show you the family photo so you see which ones I use.

Across the back row from left to right, I have:

  • A Veritas bevel up jointer plane. This baby gets the most work by far when I’m in the shop, especially when I’m making boards square and flat.
  • A Union No. 28 transitional fore plane. This plane dates back to the mid 1890’s and I love it. The beech sole rides beautifully over whatever wood I’m planing. I have this plane set up almost like a scrub plane, and it takes pretty thick shavings as I level out the boards.
  • A Stanley Bailey No. 5 jack plane. This one dates back to the early 1900’s, and I replaced the iron with a Lee Valley O1 model. This plane is great to work with, giving me consistent results whenever I need to reach for it.
  • A Stanley Bailey No. 4 smoother plane. I got this one from a friend who bought a ‘bag o’ planes’ for me at a flea market for $10. Another plane I fitted with a Lee Valley replacement iron. This plane has pushed sandpaper down the importance list and really made finishing projects a whole lot more fun.

On the left side, from back to front:

  • A newer Stanley block plane. This was my first real block plane, and it works really well.
  • An older Stanley low-angle block plane. This honey is a gem. The low-angle action slices through end grain like nobody’s business.
  • Older Staney No. 100 block plane. A relatively new acquisition that I’m growing to love more every time I use it.
  • Veritas Flush Plane. Wow, an interesting tool that can handle all manner of tasks. Got some glue stuck in an inside corner? This baby can clean it out with no problem.

In the middle row from back to front:

  • Stanley No. 80 cabinet scraper. OK, it’s not technically a plane, but it does the work a scraper plane could do. It took some time to properly sharpen and adjust this one, but it’s really nice that it works now!
  • Kakuri Japanese smooth plane. This plane is a champ. It doesn’t have an adjustment mechanism – you use a mallet. Properly set (it takes some practice), I can plane translucent shavings from a board, leaving an an absolutely smooth surface. You pull this plane toward you – different feel, but boy, does it ever work.
  • Stanley No. 92 Spoke Shave: Again, not technically a plane, but until I can buy a compass plane, this tool is the one I reach for when I fair up curves. Spokeshaves have very small blades – sharpen with care!

And, the right side from back to front:

  • A Lu Ban Asian-style shoulder plane. Another wood plane that takes some time and care to set, but once it’s in the sweet zone, it’s all butter. I routinely cut my rabbets a little thicker than needed and use this plane to make a perfect fit.
  • A Veritas bullnose plane. A great value from Veritas. This plane can function as a small shoulder plane (I wouldn’t do a lot of work with it), and the nose comes off for the work as a chisel plane. Again, great for reaching into those corners.
  • Another old Stanley No. 100 block plane. Again, a nice plane to work with.

Over the next few months, I’ll keep on doing how-to articles on working with these planes to achieve excellent results on your projects. Until then, hey, since I have the planes on my workbench, maybe I should give them a good cleaning and hone the blades!

Tools I use: my table saw

Ridgid model 3612

My Ridgid Table Saw
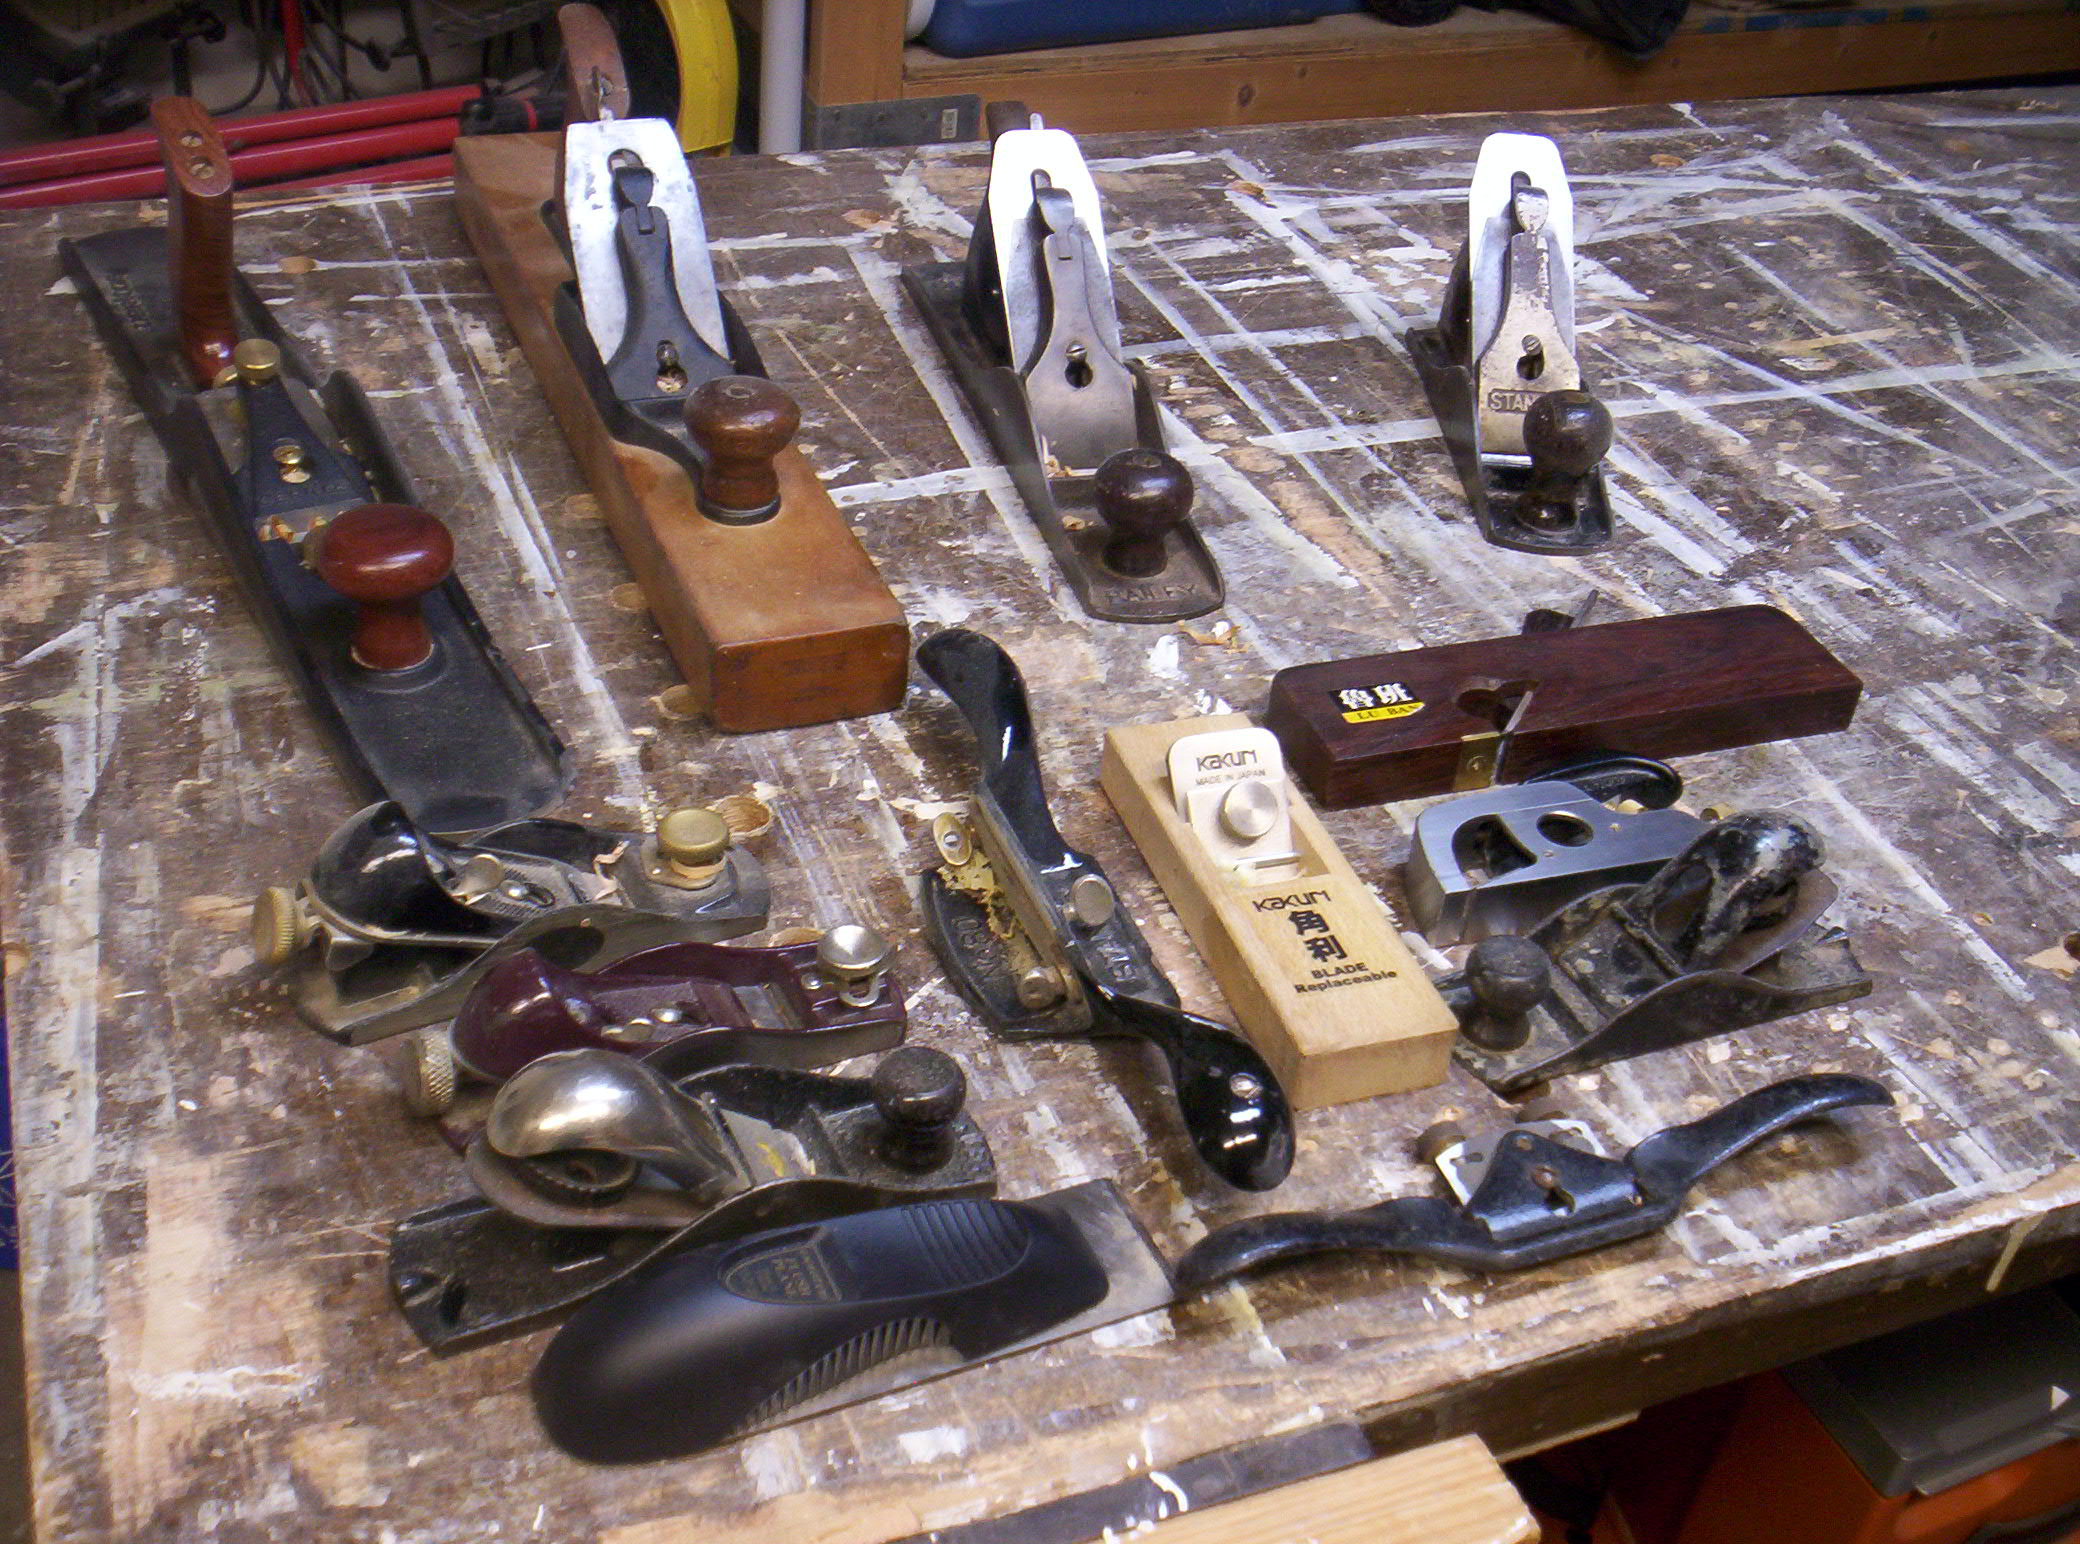
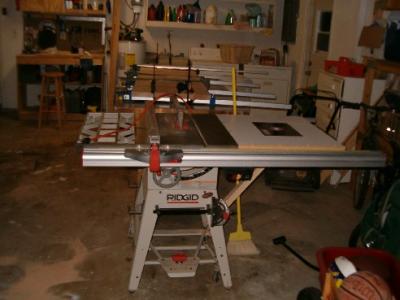
My first table saw was a Delta benchtop model. It worked OK for a year and a half, but, as I quickly discovered, a 12″ rip capacity is really too puny to get serious work done. So, back in 2001, I upgraded to the Ridgid table saw I had been drooling over at the Home Depot. Some of the features that caught my attention were:

  • A 36″ rip capacity – larger than most contractor saws.
  • A beefy rip fence with t-track built in.
  • The saw came with with the Herc-u-lift caster system. I work in a two car garage and have to move the saw frequently to get it out of the way. Without a caster system, I couldn’t easily use such a big saw in my small shop.
  • The Ridgid uses a very easy-on, easy-off blade guard and splitter. This is a VERY IMPORTANT feature of the saw. Obviously, you can’t use a splitter when you dado or rabbet, so it has to be removed for these operations. I can have it off in about five seconds, and right back on again – perfectly aligned – in the same amount of time.
  • The saw has micro-adjustments for blade alignment. Rather than unbolting the entire trunnion assembly and wrenching it the very small distance to get the blade parallel with the fence, you simply loosen a bolt where the manual tells you to, and you can inch everything into alignment – no fuss, no muss.
  • The saw came with a lifetime warranty.
  • The saw’s motor is built by Emerson Electric who used to build Craftsman motors back in the day.
  • The saw easily handles a 8″ stacked dado blade.
  • The saw always seems to rate well in magazine reviews.

There are a few downsides to the saw.

  • It is a contractor’s saw with the motor hanging out the back and the cabinet open, so dust collection can be a problem. In fact, my most effective dust control scheme is to open the garage door when I cut and blow a fan outside…
  • The saw can bog down on rip cuts in thick hardwoods due to it’s 1.5 horsepower motor. I have overcome most of the problems by using a 24 tooth rip blade, dialing in the blade parallelism and feeding the stock carefully while listening to how the saw is performing.
  • It does take quite a few turns of the handwheel to raise the blade. This is great if you are trying to nudge the blade up to make a slight adjustment, but it takes more time to get the blade to the right height for other cuts.

Of course I have tricked out my saw. Besides building many panel cutting, tapering and other shop-made jigs, I added an Osborne EB-3 miter gauge. That sucker really cuts spot-on angles, has a flip-down stop to allow consistent cut lengths and allows a lot of support for stock while cutting.

The built in router table
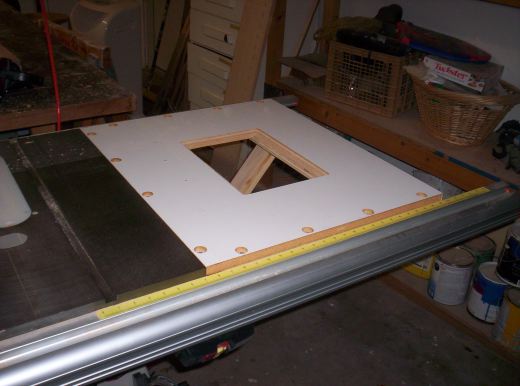
I also replaced the left cast iron wing with a home-built router table. I routed it out to accept a Rousseau router plate (which supports a Freud FT 2000 router). I can use the saw’s rip fence as a fence for the router table, which allows me the same micro-adjustability that benefits me using the saw blade.

Since I may have to rout and rip moldings, I also have an auxiliary router table top that I can set up on a Black and Decker Workmate so I can dedicate a station to each task.

While you can no longer buy the saw brand new from Home Depot, you can get the follow on model – the 3650 – which has many of the same rock solid features found on my saw. While I do dream about upgrading to a high-performance cabinet saw, I have found my saw to be an effective performer that has yet to let me down.

Woodworking Around the world

So, you think you are a pretty decent woodworker? Do you think you need more tools to get the job done? If so, check out this video from Basit Design Furniture.

The company is based in Colorado, and their manufacturing facilities are in India, Pakistan and Indonesia. These craftsmen can turn out beautiful furniture using mostly hand tools. The work is exquisite, to say the least.


Makes you want to do more work with hand tools, doesn’t it?

Miracles we have seen…

Prediction is very difficult, especially if it’s about the future. – Niels Bohr

Y2K for everyone!Ahh, who can forget the heady days of late 1999? The dire predictions of mass hysteria as computer systems crashed around the world. Cults foreseeing the end of civilization and the beginning of the ‘end times.’ Economists hedging their bets on an economic collapse the world hadn’t seen since the Great Depression.

Imagine everyone’s relief when January 1, 2000 rolled around and the world didn’t go into the tank.

If you think the people in the late 1990’s were the first to make predictions of what the new millennium was going to look like, you’d be wrong. People have always looked ahead, based on their observations, and tried to foresee just what the future would be like.

Jetting off to work!I recently came across a .PDF of an article written in a 1950 edition of Popular Mechanics called Miracles You Will See in the Next 50 Years. Wow. This was some real Buck Rodgers kinda stuff. Rocket planes that scoot people across country in less that two hours. Shopping by video phone. Solar energy providing cheap, reliable electricity. A veritable bonanza of clean, efficient life in a technological wonderland…

Who am I kidding? The description of life in the year 2000 sounded soulless, sterile and – in many ways – frightening. Here are some of the predictions that made me stop and say, “huh?”

  • Cooking as an art is only a memory in the minds of old people. A few die-hards still broil a chicken or roast a leg of lamb, but the experts have developed ways of deep-freezing partially baked cuts of meat.
  • There are no dish-washing machines, for example, because dishes are thrown away after they have been used once, or rather put into a sink where they are dissolved by superheated water.
  • Discarded paper table ‘linen’ and rayon underwear are bought by chemical factories to be converted into candy. Yuck.

Doesn’t sound like a place where anything is too terribly permanent or personal. That carries through to the home and furniture as well:

  • Though (the house) is galeproof and weathterproof, it is built to last only about 25 years. Nobody in 2000 sees any sense in building a house that will last a century.

Hosing down the furnitureLater in the article, we see a cheery Mrs. Dobson hosing out the inside of her home – furniture included -to get that nasty dirt and ground-in grime out. The water and detergent disappear into the main central drain, a blast of hot air dries everything and the home is once again sparkling new.

Of course, none of these predictions have come to pass. However, in the 1950’s, we were sure that science would solve all of our problems. Plastics, mass production and advances in technology were supposed to eliminate all of the toil and hard work from our daily lives.

If that’s the case, why did woodworking survive, and why is it a thriving hobby for hundreds of thousands?

It turns out that we can find a historical analog. In the late 1800’s, the Industrial Revolution was changing the landscape everywhere. Mass production of everything was becoming the norm, and that included furniture. Factories could spit out ornate spindles and table legs at alarmingly fast rates, catering to the Victorian fashion sense of the day. Layers of ornamentation could hide shoddy or underbuilt joinery.

But, there were those who didn’t want to go along with the mechanized flow. InStickley Design Elements England and the United States, such notables as William Morris, Gustav Stickley and Edwin Lutyens were driving furniture design into a more craft, hand made aesthetic. Even though they used machinery for some tasks, the furniture spoke boldly to strong lines and the skill of the craftsman. Frilly ornamentation was abandoned nearly altogether in the Arts and Crafts movement, with the new style playing on exposed joinery as a design element.

These pioneers saw a different future than was being offered, and, today, their work is prized for its clean lines and bold showcasing of structure.

In the late 1960’s and early 1970’s, there was a similar renaissance in woodworking. The counter culture movement was rejecting all things technological, and some very creative minds, such as Sam Maloof, James Krenov, Tage Frid , George Nakashima, Wharton Esherick and Art Carpenter came into their own. Magazines such as Fine Woodworking encouraged the average homeowner to try his or her hand in this time-honored craft.

Sam Maloof in his shopThis handbuilt school of design brought with it increased innovation to allow the inexperienced craftsperson to build custom furniture. David Keller perfecting the first through dovetail jig. Delta pushing innovation in table saws. The adaptation of new industrial joinery technology into the home workshop with such items as the biscuit jointer, pocket hole jigs and the Domino.

Not all of these innovations had shown themselves in high-tech tools. Companies such as Stanley and Record, who used to make the hand tools craftsmen relied on, were replaced by forward-thinking outfits such as Veritas and Lie Nielsen. The hand tools built there are, in many cases, an evolutionary leap above the old styles, and will serve their owners for generations to come.

This new rise of woodworking timed perfectly with the advent of the Internet. Today, many techniques, tools and materials are just a click away, and dozens of lively woodworking forums allow a free exchange of information to even the most far-away places.

So, technology has definitely provided a miracle of some sorts, even if it wasn’t exactly as envisioned back in the 1950.

Space – the Final Frontier

The Holy Trinity of Star TrekEvery weekday morning, my alarm clock goes off at 6 a.m. After I grab a cup of joe, I head to the living room and turn on TV Land to catch an episode of Star Trek. Yes, that classic, campy 1960’s gem of television goodness. As I sip my coffee, I wonder what adventures await the USS Enterprise as she continues on her mission to explore space.

We know a lot about the universe – namely, it’s a really big place. I mean, HUGE. We’re talking about more space than can normally be found between my ears. Which may be difficult to believe.

If this is the case, why is it that no matter where the crew of the Enterprise heads, they run into unknown planets with populations that have to be in the millions? I mean, come on – they go to an uncharted section of the galaxy, and it’s more crowded than a Starbucks during the morning rush hour.

Fascinating.

Building the shedIn much the same way, you’d expect that a two car garage measuring 24 feet by 26 feet would be more than adequate to meet all of my woodworking needs and still provide plenty of space for the storage of other family items. Not so.

Recently, my wife and I got into some rather protracted negotiations about space. My two sons are very active little guys, so they have lots of things they have accumulated over the years. Each had more than one bike. A scooter. A wagon. A bucket of toys for the yard. Basketballs, footballs and soccer balls.

You also have to add on the family stuff. Picnic coolers. A tent we never use. Paint cans from previous home remodels.

The shed at nightIt got so bad that I couldn’t get to my band saw, clamp rack or dust collector, and if I wanted to use the table saw, I had to spend about 20 minutes moving bikes and other items to the driveway. We couldn’t walk out of our double-width garage door without tripping over something!

I, as Lt. Commander Spock, would reason logically that all of the woodworking tools that I could use to build projects were collecting dust and cobwebs, wasting away in unaccessible corners. My wife, as Doctor McCoy, argued passionately that our kids were still children, dammit, and they had the right to have their toys wherever they wanted. Unfortunately, we didn’t have a Captain James T. Kirk nearby to break the stalemate with his wisdom, charm and unassailable leadership ability.

The shed contentsI did the next best thing. I went to the local home improvement center one morning and bought a brand-new storage shed for the side of the house. I didn’t build it. And, at 7 feet wide and 3.5 feet deep, it isn’t the huge, cavernous facility I had envisioned.

At last there is a place to store our stuff out of the path of woodworking progress.

The move, coupled with a controlled purge of items the kids had outgrown (Come on, honey, this doesn’t even FIT the kids anymore!), opened up space that I hadn’t seen in years. Not only is it easier to get around, but the clean up has inspired me to rethink my shop storage practices and plan a few long overdue projects to help beat the clutter.

Peace has returned to our corner of the galaxy. For today, at least.

A woodworking funny…

A chimpanzee walked into a bar, jumped up on a stool and ordered a beer.

“You’re a talking chimp!” the bartender exclaimed.

“Right,” the chimp replied, “I’m working in construction across the street for a week, then I’m laid off, now where is my beer?”

Each day the chimp came in for a beer, and he was getting more and more depressed about being laid off. Meanwhile a circus came to town, the bartender mentioned the talking chimp to the owner.

” I’ve got great news, you can get a job with the circus.” he informed the chimp.

” This circus, it’s in a big canvas tent?” the chimp inquired.

” Well yes,” replied the bartender.

” Wonder what they need a finishing carpenter for?” mused the chimp.

Courtesy of Robinson’s Woodcrafts