At the recent Woodworking Show, one of the highlights was to get reacquainted with Jim Heavey. Jim is the Contributing Craftsman with Wood Magazine, and, just as last year, he brought his funny approach and common sense tips to his seminars.
This year, Jim’s talks were based on building and using jigs and fixtures. For those who get to see this presentation, Jim doesn’t disappoint. His first supposedly 45 minute presentation stretched to nearly an hour and a half, and the audience sat spellbound, hanging on every tip he presented.
In this first presentation, Jim flatly told the audience that in these tough economic times, we all have to get the most out of our tools. Jigs and fixtures not only make tools like a table saw multi-taskers, they also increase the accuracy and safety of the tool as well.
Never was this more evident than in the first fixture he built – the zero clearance insert. With a scrap of ½” multiply or baltic birch plywood, you can pump out a dozen or so blank inserts for your table saw. You can make them so cheaply, that Jim advised that you make them for your commonly used blade setups – one for a regular kerf blade, one for a thin kerf, a separate one for different common dado set ups… and you can still have a few blanks laying around for specialized setups with bevels.
The sacrificial fence he made was a little more complicated than the average board-clamped-to-the-fence. It was built like a torsion box with two sides of MDF and some middle ribs. With glue and screws on all but the middle ribs, even the slightest potential movement of the other face is prevented. Also, even after the first face is chewed up, you can still set the amount of blade buried in the fence by flipping the jig over and referencing off the good back side. Jim advised that woodworkers should built two versions – one that is the length of the fence and another that is about six feet long. The longer fence can trail behind the rip fence and gives a broad reference fence for a long sheet of plywood to rest against while doing rips.
Jim also showed that by flipping the ‘fence’ of a sliding cut off jig to the front of the sled, you can keep it from tipping off the table saw. A marked improvement over ones built with a trailing fence.
As the jig projects were rolled out one after another, Jim acknowledged that the jigs were plans which appeared in Wood magazine. However, he was quick to point out, “Hey, this stuff isn’t rocket science. If you look at the jig and come up to play with it after the presentation, you should be able to go back to your shop and build something similar.”
In his second presentation, Jim could have billed himself as a magician. In the front of the audience, he showed a beautiful mission style night stand with through mortises and exposed tenons made of quarter sawn white oak. The joinery looked very complex and appeared to take an entire arsenal of tools to craft, but, as he said, “Everything – including the mortises and tenons – was cut on a table saw.”
As he described the methods he used, it became clear how it was done. The capital letter I shaped cutout was done by ripping the board in half, cutting the decorative cutouts with a scroll saw and then gluing back a ½” spacer. The mortises were cut by slicing out a ¾” stick strip, crosscutting that strip and then gluing it back together spaced far enough apart to allow a corresponding tenon to fit inside. Even the tenons were inlaid strips.
“Really, it’s THAT easy,” he kept saying as he explained his techniques. When he was done, the audience members came forward to inspect the work, and were able to find where the cuts were made only after careful inspection of the piece. “Oh, and when someone tells you how good your project looks… SHUT UP and take the compliment. They will only see it if you point it out.”
I’m sure I’ll be working with a few of these techniques in some upcoming projects.
Again, while most – if not all – of these techniques were described in the pages of Wood Magazine, having a professional – and quite talented – craftsman there to explain each of the operations was valuable.
A workbench or solid work table is a joy to use in a workshop. Being able to plunk a heavy board down on that work surface and cut, plane, drill, rout or do any other kind of work on it breeds confidence in even the novice woodworker. Adding a vise to a workbench only helps expand its usefulness. Whether a fast-acting metal model or a traditional wooden face vise you craft by hand, it’s the icing on the cake.
A bench and a vise are an excellent combination, but it you stop there, you aren’t using all of your bench’s potential. In fact, there are some common time-tested devices and strategies that can help complete your bench and make your woodworking more enjoyable.
The hole truth
Look at just about any workbench, and you’ll find holes it its top. No, those aren’t the handiwork of an eager drill operator with bad aim – they are called dog holes. These holes open an incredible array of opportunities to the woodworker through using some simple tools – dogs and hold downs. More on those tools in a minute…
In traditional workbenches, dog holes are square. They aren’t typically chiseled that way, they are built into the workbench top as it is being constructed by running dadoes across the boards before they are glued up. They are always directly in line with a vise – either a front or an end version, and are slightly angled back toward the bench’s tail vise so as the work is clamped in, the dogs don’t get pushed back beyond 90 degrees, which would make it easier for the work to slip.
If you didn’t build dog holes into your bench, you still have an opportunity to add them. By drilling holes into your bench, you can create round dog holes that can serve just as well. The typical diameter for these round holes is ¾”, and since they can be retrofitted, you can place them just about anywhere on your bench, but, it’s best to plan to line them up with your vises just as with the square versions. Just remember to drill the holes perfectly perpendicular or your dogs may have issues. You can use a plunge router with a ¾” bit to start the holes or build a jig that will allow you to drill them. I’ve used forstner and spade bits to drill holes in the past, but auger bits work beautifully for this task.
Your faithful companions
Bench dogs have been found on the workbenches for generations of craftsmen, and can serve many purposes in today’s modern shop. They are equally at ease for securing boards to the workbench for traditional chores such as hand planing or more modern work such as routing mortises or edges.
The dogs can be made of metal, wood or even plastic, and have some means to prevent them from sliding through the dog hole onto the floor below. Wooden or metal springs can be used, or the top can be made larger than the hole.
They can be used by themselves as a stop to plane against or – even better – in conjunction with a vise to hold a board. In fact, many metal vises come equipped with an integral dog that can be raised to clamp work above the vise jaws.
Two dogs by themselves can be used to clamp work in place. Simply put two dogs far apart enough to allow the work to sit between them and use opposing wedges to lock the work in place.
Companies such as Veritas have made dogs even more useful through innovation. The Wonder Dog (or Wonder Pup – a shorter and smaller version) is a round metal dog with a threaded cross piece that passes through the dog body. By placing one of these dogs in a dog hole, you can create your own vise setup.
Hold that work!
Vises and dogs are great for securing work that needs to be supported for uninterrupted work to take place on the face or edge of a piece. However, if your are doing something like chiseling for hand cut dovetails, you will need a way to secure the work that allows you to move the work as you progress. That’s where hold downs come in, and they are a time saver.
The traditional hold downs are called holdfasts. They are made from forged iron and are very simple to use. By inserting the long shaft into the dog hole, setting the holdfasts’ pad down on the work and giving the top a good whack, it will lock down on the work. When you need to release the grip, tapping the back with a mallet will unseat the holdfast, getting it ready to work again.
More modern holdfasts made of plastic or metal improve upon this devise by offering threaded fittings to make adjusting them easier. Some of these newer models, however, require the shaft to penetrate to the bottom of the bench in order to secure them. This may limit the thickness of the work you can clamp down.
If you have a trigger clamp (Irwin’s Quick Grips type) where the head can be removed to turn the clamp into a spreader, you have a hold down just waiting to happen. I have found that by removing the head, inserting the bar through the dog hole and reattaching it below the bench, I now have a very handy hold down. The trigger gives me very good control, and it’s easy to release when I need to shift the work. For larger pieces, you may want to use two of these clamps to further ensure that the work doesn’t shift. Plus, you have now made these useful clamps even more versatile.
While dogs and hold downs are simple tools, they can make your bench a more versatile and useful asset in your shop. And, they can do so for a fraction of the cost of sophisticated new vises or rebuilding your bench from scratch.
I am pleased to announce that Eagle America tools has just come on board as an advertiser for Tom’s Workbench.
Look for their advertisements on the sidebar of my blog. This month, they have a pretty darned good deal on their three-piece glue joint router bit set.
I would like to welcome the folks over at Eagle America aboard!
When I’m not woodworking, writing about woodworking, raising kids, teaching people about hurricanes, fixing problems around the house, doing laundry… wow, I really am a busy guy… I like to do some home brewing using my Mr. Beer system.
Ahh, yes, after a hard day of doing what I do, I love nothing more than to crack open a cold brew that I made myself and decompress. There’s nothing quite like sampling what I have had to wait a few weeks to become the final product. The anticipation kills me, but it makes that first sip so much sweeter.
Ya know, beer is pretty amazing stuff. You take four ingredients – malted barley, water, hops and yeast – and you can create hundreds of different beer varieties. Rich, malty Octoberfests, clear refreshing pilsners, dark and brooding stouts. Roast the malt a little longer, use different hops and try a different strain of yeast, and suddenly you are looking at a totally different style of beer. The varieties go well beyond what you can find in a convenience store. In fact, the proliferation of microbreweries has shown your average beer consumer about the incredible selection of styles from around the world.
What’s this got to do with woodworking? Plenty. No, I don’t want you to drink and go into the shop to work. Maybe you can handle a broom, but that’s it. No more.
However, by manipulating the basic elements of woodworking – wood choice, joinery techniques, hardware choices, finishing decisions – you can take a mundane project and do some interesting things with it.
Here’s exhibit ‘A’. This is a basic architectural clock design that came from Wood magazine. It can be built in an afternoon or two with a small pile of scrap wood and a battery operated clock movement. Ho hum, right?
Simply changing the wood I used to build the project changed the entire appearance of what is essentially an identical piece.
Yes, both clocks are identical. The same amount of wood. The same clock movements. The same joinery methods. However, you would be hard pressed to call the finished products identical. In fact, I call these clocks fraternal twins – alike but different. The light one is maple with a cherry face, and the other one is the opposite.
The key here is to take your time when choosing the wood for your next project. It can have a dramatic effect on the final outcome. Whether you want to showcase a particularly handsome piece of wood or you want the item to blend in with the background, your decision on what you choose to build will play dramatically in the end.
The house I grew up at in New Jersey had a fireplace. I remember my dad and uncles building it late in the year – sometime around a Christmas in the early 1970s when I was just a little tyke. It quickly became the social center of our home. When my brothers and I were really young, my dad lit the fires on the cold winter nights. The job later fell to my older brother and then eventually to me.
Now that I live in Florida, the need for a genuine fireplace isn’t as urgent. Oh, sure, there are fireplaces in some homes in Florida. I have been in my share of them on a warm winter afternoon where the fire was lit and the air conditioner was on to offset the heat gain.
In our home, my wife and I have discussed the possibility of adding an electric fireplace insert to give us the ‘ambiance’ of a fireplace without the hassle and expense of building a real one. This way, we can get the glow whenever we wanted, and could turn the heat on for just the chilliest January mornings. Whenever I see ads for these ‘realistic’ fireplace inserts, I stop and pay attention.
One ad I recently saw on TV was for an electric fireplace insert called the Heat Surge. What set this particular unit apart? It wasn’t the realistic flames – although they did look convincing. It wasn’t the extra heat it could provide for the room it was located in – although there were plenty of satisfied customers who touted that feature. It wasn’t even the fact that it could save money on your heating bill – even though there was a graphic which showed money flowing back into a typical homeowner’s pocket.
No, what sets this unit apart is the fact that the wooden case and mantle built around the electric fireplace unit is hand crafted by the Amish.
For those of you who aren’t familiar with the Amish, their communities can be found scattered across Pennsylvania and the Midwest, with other communities in Canada. These devout people choose a simpler, more secluded life to prevent the influence of the ‘English’ world – mainstream America – from affecting their membership. Their dress, mannerisms and even their language – a Germanic dialect – make them easy to recognize when they are in the ‘mainstream’ world.
Since the Amish first established their communities, they have tried to remain as self-reliant as possible. Many homes are not connected to the power grid and have no phones. However, in today’s day and age, the Amish leaders in many communities realize that there is much benefit to be gained in interactions with the ‘English’ world. Amish agricultural products and crafts are eagerly sought out and recognized as high quality by consumers. As with the Shaker communities in the 19th and 20th centuries, the Amish view hard work as a form of worship, and one way they express their prayer and devotion is through producing understated high-quality goods.
Now, this isn’t to say that the Amish haven’t had to adapt their ways while interacting with the outside world. For instance, all Amish dairies are required by law to follow the same sanitary and production practices for their product as any other commercial dairy in their state. Foodborne illnesses are no laughing matter, and tracing an outbreak of salmonella back to an Amish community would inspire suspicion, anger and lawsuits. This may require the installation of generators to provide the necessary power to be in compliance with local laws and ordinances.
Their other practices have had to be modified some to meet the demands for their labor. Early one spring, I flew to see my mom who lived in a new subdivision in south east Pennsylvania. “Thomas,” she said, “you’ll never believe this. The craftsmen working on the homes in my neighborhood are Amish! You have to see them work…”
So, very early one morning, I poured myself a cup of coffee and stepped outside, fully expecting to see a horse-drawn carriage arrive and discharge Amish craftsmen armed with hand saws, bit braces and other classic hand tools to craft the structure. Much to my surprise, the Amish workers arrived in a Chevy truck, took their power tools out and started working on the home.
On this infomercial for the Heat Surge, the hosts were standing inside a large barn-type structure. They were surrounded by the assembled units and were extolling their virtues. In the background, there were maybe a dozen or so Amish workers – both men and women – busily working on the wooden cases. I had seen this infomercial so many times, the activity just blended into the background.
Before I hit the remote control button to change the channel, something caught my eye. There, behind the female host was an Amish woman. She was holding something in her hand and moving it back and forth, sort of like you would expect to see a person use a clothes iron. She wasn’t holding an iron – she was holding a wooden jointer plane – maybe 24″ long with a solid looking tote and square cheeks. The tool looked immaculate and, I would imagine, be a pleasure to use.
As she moved this massive plane back and forth, I noticed that she was holding it with only one hand, there was no iron on the plane and there was nary a curl or shaving anywhere in sight. Looking even more closely, she was running the plane over a totally finished panel! Wow, that was very interesting…
Looking at the other workers in the background, other oddities really jumped to the fore. A worker holding a chisel up to a finished piece, pressing it into the underside of the top and placing it back down on the bench. There’s the guy checking the top of the unit with a level – not checking the assembly for square as is the norm with case goods. While the entire half-hour infomercial isn’t available online, if you look very carefully at the first few seconds of this abbreviated version, you’ll clearly see an Amish worker holding what appears to be a No. 4 or No. 5 bench plane at eye level, rubbing it over the top of a finished piece. Again, not a single curl or shaving is detectable.
Nobody uses a plane like that. Period. Especially someone who is familiar and experienced with one. It would be used with two hands at a bench about waist high to get maximum leverage and make the work easier and more accurate. He did rub his hand over the surface, but nothing is there to wipe away.
This little charade continued in the background every time the shot went back to the hosts in the barn. After a few minutes, I called my wife over and started pointing out everything that was out of the ordinary. Sort of like a game of “Where’s Waldo”for woodworkers.
The script writers, director and producers of this infomercial must have spent a tremendous amount of time staging this shot. I can see what the day on the set must have looked like. “OK, you over there, take that big wooden thing you push around and rub it over the board. You guys over there, pick up those chisels and look busy. You, ma’am, rub that finished top down with this rag to make it look like you are working. Remember – the viewers want to see ‘hand made’ – give it to ’em! Places, everybody! Let’s make video magic!”
In this commercial, the sizzle isn’t comfort, energy savings, quality of the electronics or ease of use… I’m positive that every electric fireplace insert on the market can trumpet those features for each of their models. Instead, it’s the fact that the Amish hand craft each surround and mantle. Even if back at the real shops they are using generator-powered table saws, routers, planers and jointers, the hand crafting with old fashioned hand tools by the Amish is the only thing that truly sets these units apart. Even if these pieces have never seen a hand tool…
And, that got me thinking. I’m sure the folks who make and market the Heat Surge spent a tremendous amount of time and money to research what consumers want, evaluated the strengths and weaknesses of the product and crafted a marketing plan.
What that tells me is that the hand-made aesthetic is worth quite a bit. I guess the upshot of this rambling post is that when you build something at your shop, understand that the simple fact that you have built the piece adds intrinsically to its value. Hey, you may never sell a single piece you build, but understand that people are (or will be when the world’s economic crisis turns around) looking for that in products they seek to buy.
Either that, or you can throw what you built into your fireplace and stay warm on a cold winter’s eve.
Screws play such a vital role in woodworking, it’s only fitting that they get some discussion. I mean, think about all of the different uses there are for screws in your shop. You might find that my experience alone might be typical…
I use screws to hold plywood projects together. Sure, I could cut dovetails or other joints in the plywood, but I’d be hard pressed to find another cabinetry joint that works as well or is as easy to cut as a dado or rabbet reinforced with glue and screws.
Pocket hole joinery has made it easier to assemble cabinets and other projects without visible fasteners – if you plan and drill your holes properly.
And, the aren’t only for plywood projects. I screwed together several solid wood projects when I first started, and used wood plugs to hide the evidence. The result was very neat and tidy with tight joints all around. Even masters such as Sam Maloof will use screws to reinforce the joint between the back posts of his chairs and the seat.
What about hinges? Even the European cup hinges rely on screws to make a permanent connection to the project. Unless you build your own drawer runners out of wood, you will probably use metal ones joined with – yup- screws to the drawer and the cabinet.
Some of the things I have learned about screws over the past decade of woodworking include:
* Always predrill your holes. Sure, you can muscle your screws in with your drill, but you run the chance of splitting the pieces you are driving into. A combination drill/countersink and driver is an inexpensive way to handle the predrilling and countersinking in one step, and then driving the screw by simply flipping the tip of the tool around. These are sold at just about every home improvement or hardware store, and I have yet to see one cost more than $10.
* Stop the wobble. Driving long screws with a power driver can really be frustrating. Watching the screw gyrate during driving while holding the drill with one hand and the work with the other is entertaining for observers, but can lead to some very choice words by the woodworker. I have found that inexpensive screw guides, which fit into your drill’s chuck and feature magnetic tips and a sleeve that helps hold the screw straight – are worth their weight in gold.
* Drywall screws are for drywall. Sure, every woodworker starts off with a box of black drywall screws to start. And, they tend to drive in pretty well in pine projects. If you give some premium screws a chance, you might be surprised with the difference. I have purchased screws from McFeely’s in the past, and these babies can bring you to tears. They never snap and drive like a dream.
* Watch for bridging. Screws threaded along their entire shanks (from tip to head) have a nasty habit of forcing the two workpieces apart as they are driven home. That’s called bridging, and it can be a big issue. Three ways to counter this include tightly clamping the pieces you are screwing together, drilling a larger countersink hole in the top board so the threads won’t bite into the wood or using screws that aren’t threaded all the way to the head. This is a common feature found on premium wood screws.
* Let it slide. Sometimes, especially on longer screws, the amount of friction you build in the driving process can stop the screw dead in its tracks. A little candle wax or the goop found in a toilet wax ring (please use a fresh clean one) can lube the screws and make them drive easier. I’ve been told to avoid soap, because soap does attract moisture from the atmosphere, potentially leading to rust issues.
* Watch your material. Screws are made out of several different metals. While steel screws are definitely the easiest to find, brass and bronze screws are also available, and these more delicate materials need extra care while driving. I have had a great deal of success with driving brass screws if I drive an identically sized steel screw into the hole first to cut the threads. After removing the steel screw, the brass screw goes in with little hassle.
* Use the clutch. There’s a reason why your cordless drill has a clutch setting. It senses when the torque rises to a high level and then allows the drive to slip, preventing overdriving of the screws, stripped heads and broken shanks. Learn how to use the clutch and you’ll be a happy camper.
Are screws appropriate for every project? Heck no. Sometimes, there’s nothing quite like that wood-to-wood connection. The feel of tight joinery and the pride of saying, “Hey, look what I built.”
However, it’s difficut to argue with the speed, strength and convenicence of screws in the shop. They will always have a place.
Think about the shelving and storage projects you have built. How many were built to remain as open shelves? Sure, lots of bookcases are open. And some curio shelves.
However, when you get into entertainment centers, kitchen cabinets and other projects, doors become important design elements. I was terrified when I had to build my first doors, but that was the easy part. Selecting the hinge hardware was actually one of the tougher decisions I had to make.
Hinges have been around since the earliest structures were built. Tired of having to push and drag a cover to protect an entryway, early builders struck on the idea of attaching the door to one side of the entryway and having it pivot. Some stone pivot hinges can still be found – fully operational – in ancient stone structures.
As building techniques progressed, more sophisticated hinge designs came into play. The technology to forge bronze, then iron, gave builders a wider selection from which to choose. The hinges forged by these smiths were both beautiful and durable, and can serve archaeologists well in helping to identify the date a particular structure was built.
Today, forged and stamped hinges come in a bewildering number of styles for many applications. And, while there are thousands – or tens of thousands – of different looks, they break down into three broad families:
Mortised: These hinges require that part of the hinge body be mortised into the project to get better support. Butt hinges and European cup hinges are two of the more popular varieties of this style hinge. Regardless of what tool is required to cut the mortise – chisel, router, hollow-chisel mortiser, biscuit joiner… they all fit in this family.
Non-Mortised: Obviously, this family doesn’t require mortising – they gain all of their strength from either screws, spikes or some other metal-to-wood connection. Sophisticated non-mortising hinges, cranked leaf hinges found on kitchen cabinet doors and old time H and strap hinges show up here.
Non-Metallic: This category is a bit of a catch-all for the different styles of hinges that can be crafted by a woodworker. Wooden knuckle joints, leather straps or the like can serve as outstanding and decorative joints, showing off the skill of the woodworker.
Whatever style of hinges you decide to go with, you will want to follow the instructions very carefully. Each has its own unique layout concerns and issues. And, it doesn’t take much for the hinges to get out of line and cause binding. And, believe me, you can spend a day and a half trying to correct incorrectly installed hinges. Been there. Done that. Got the T-Shirt.
What kinds of hinges do I use? Well, I have a few favorites I tend to go to time and again:
Blum Concealed Hinges: When you don’t want the hinge to show, it’s hard to go wrong with these hinges. They do take some getting used to if you have never installed them before, but WOW, do they ever work smoothly. Installation does involve a 35 mm diameter forstner bit, so you will have to lay out some money to get that. But, that cup that is drilled works as a mortise for the door, giving outstanding support. Have your project plans handy, because you can buy these hinges in many different flavors – face frame vs. frameless, inset vs. overlay, etc. – and you want to order them properly.
Overlay Door Hinges: I love these hinges to death. The cranked leaf that mounts to the face frame of the door has a preset overlay amount. So, if you have hinges with a 1/2″ offset, just build your door an inch wider than the opening and you will have a perfectly fitting overlay door. I have used these hinges for years and they tend to be my ‘go to’ style for lots of projects.
No-Mortise Hinges: Very easy to work with – and very similar to the overlay hinges mentioned above. These work for inset doors and are very easy to install.
Pin Hinges: If I am building a small box and need an unobtrusive hinge, this is what I choose. Easily installed with a drill and a dowel center, these babies function easily and have never failed me.
The best advice for hinge selection is to do your homework. Go through a home-improvement center’s kitchen cabinet display and open the doors. Go to a furniture showroom and see how their doors are hung. Read up on Internet reviews of different hinge styles and see what is out there.

 At the recent Woodworking Show, one of the highlights was to get reacquainted with Jim Heavey. Jim is the Contributing Craftsman with Wood Magazine, and, just as last year, he brought his funny approach and common sense tips to his seminars.
 Never was this more evident than in the first fixture he built – the zero clearance insert. With a scrap of ½” multiply or baltic birch plywood, you can pump out a dozen or so blank inserts for your table saw. You can make them so cheaply, that Jim advised that you make them for your commonly used blade setups – one for a regular kerf blade, one for a thin kerf, a separate one for different common dado set ups… and you can still have a few blanks laying around for specialized setups with bevels.
 Jim also showed that by flipping the ‘fence’ of a sliding cut off jig to the front of the sled, you can keep it from tipping off the table saw. A marked improvement over ones built with a trailing fence.
 Bench dogs have been found on the workbenches for generations of craftsmen, and can serve many purposes in today’s modern shop. They are equally at ease for securing boards to the workbench for traditional chores such as hand planing or more modern work such as routing mortises or edges.
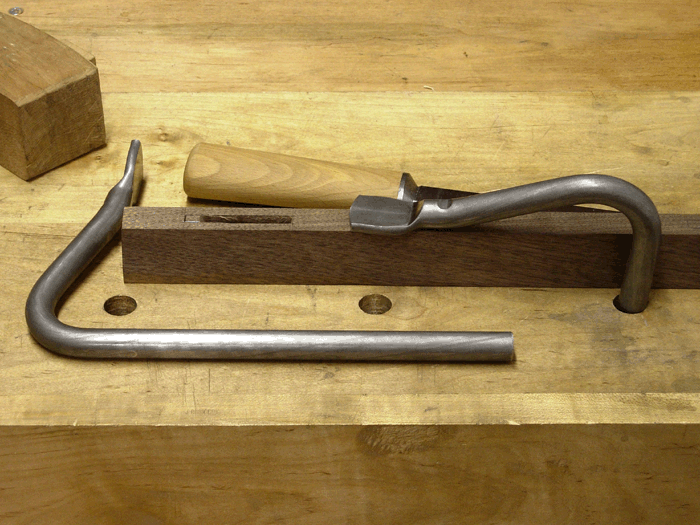 Vises and dogs are great for securing work that needs to be supported for uninterrupted work to take place on the face or edge of a piece. However, if your are doing something like chiseling for hand cut dovetails, you will need a way to secure the work that allows you to move the work as you progress. That’s where hold downs come in, and they are a time saver.
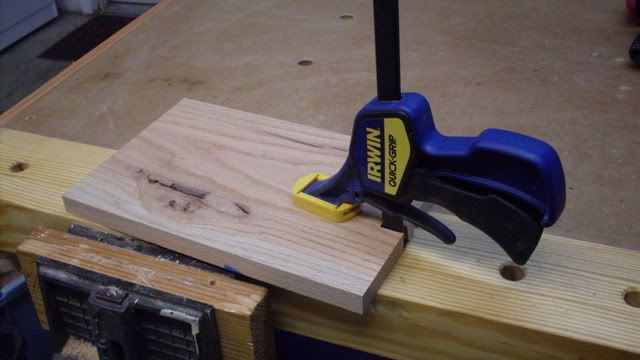 If you have a trigger clamp (Irwin’s Quick Grips type) where the head can be removed to turn the clamp into a spreader, you have a hold down just waiting to happen. I have found that by removing the head, inserting the bar through the dog hole and reattaching it below the bench, I now have a very handy hold down. The trigger gives me very good control, and it’s easy to release when I need to shift the work. For larger pieces, you may want to use two of these clamps to further ensure that the work doesn’t shift. Plus, you have now made these useful clamps even more versatile.
 I am pleased to announce that
  When I’m not woodworking, writing about woodworking, raising kids, teaching people about hurricanes, fixing problems around the house, doing laundry… wow, I really am a busy guy… I like to do some home brewing using my
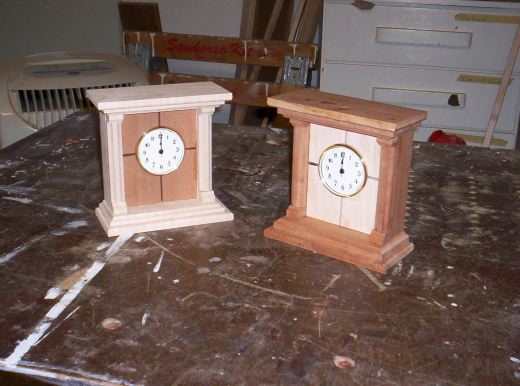
 In our home, my wife and I have discussed the possibility of adding an electric fireplace insert to give us the ‘ambiance’ of a fireplace without the hassle and expense of building a real one. This way, we can get the glow whenever we wanted, and could turn the heat on for just the chilliest January mornings. Whenever I see ads for these ‘realistic’ fireplace inserts, I stop and pay attention.
 For those of you who aren’t familiar with the Amish, their communities can be found scattered across Pennsylvania and the Midwest, with other communities in Canada. These devout people choose a simpler, more secluded life to prevent the influence of the ‘English’ world – mainstream America – from affecting their membership. Their dress, mannerisms and even their language – a Germanic dialect – make them easy to recognize when they are in the ‘mainstream’ world.
 So, very early one morning, I poured myself a cup of coffee and stepped outside, fully expecting to see a horse-drawn carriage arrive and discharge Amish craftsmen armed with hand saws, bit braces and other classic hand tools to craft the structure. Much to my surprise, the Amish workers arrived in a Chevy truck, took their power tools out and started working on the home.
 Screws play such a vital role in woodworking, it’s only fitting that they get some discussion. I mean, think about all of the different uses there are for screws in your shop. You might find that my experience alone might be typical…
 * Always predrill your holes. Sure, you can muscle your screws in with your drill, but you run the chance of splitting the pieces you are driving into. A combination drill/countersink and driver is an inexpensive way to handle the predrilling and countersinking in one step, and then driving the screw by simply flipping the tip of the tool around. These are sold at just about every home improvement or hardware store, and I have yet to see one cost more than $10.
 * Stop the wobble. Driving long screws with a power driver can really be frustrating. Watching the screw gyrate during driving while holding the drill with one hand and the work with the other is entertaining for observers, but can lead to some very choice words by the woodworker. I have found that inexpensive screw guides, which fit into your drill’s chuck and feature magnetic tips and a sleeve that helps hold the screw straight – are worth their weight in gold.
 * Watch for bridging. Screws threaded along their entire shanks (from tip to head) have a nasty habit of forcing the two workpieces apart as they are driven home. That’s called bridging, and it can be a big issue. Three ways to counter this include tightly clamping the pieces you are screwing together, drilling a larger countersink hole in the top board so the threads won’t bite into the wood or using screws that aren’t threaded all the way to the head. This is a common feature found on premium wood screws.
 * Watch your material. Screws are made out of several different metals. While steel screws are definitely the easiest to find, brass and bronze screws are also available, and these more delicate materials need extra care while driving. I have had a great deal of success with driving brass screws if I drive an identically sized steel screw into the hole first to cut the threads. After removing the steel screw, the brass screw goes in with little hassle.
 However, when you get into entertainment centers, kitchen cabinets and other projects, doors become important design elements. I was terrified when I had to build my first doors, but that was the easy part. Selecting the hinge hardware was actually one of the tougher decisions I had to make.
 As building techniques progressed, more sophisticated hinge designs came into play. The technology to forge bronze, then iron, gave builders a wider selection from which to choose. The hinges forged by these smiths were both beautiful and durable, and can serve archaeologists well in helping to identify the date a particular structure was built.
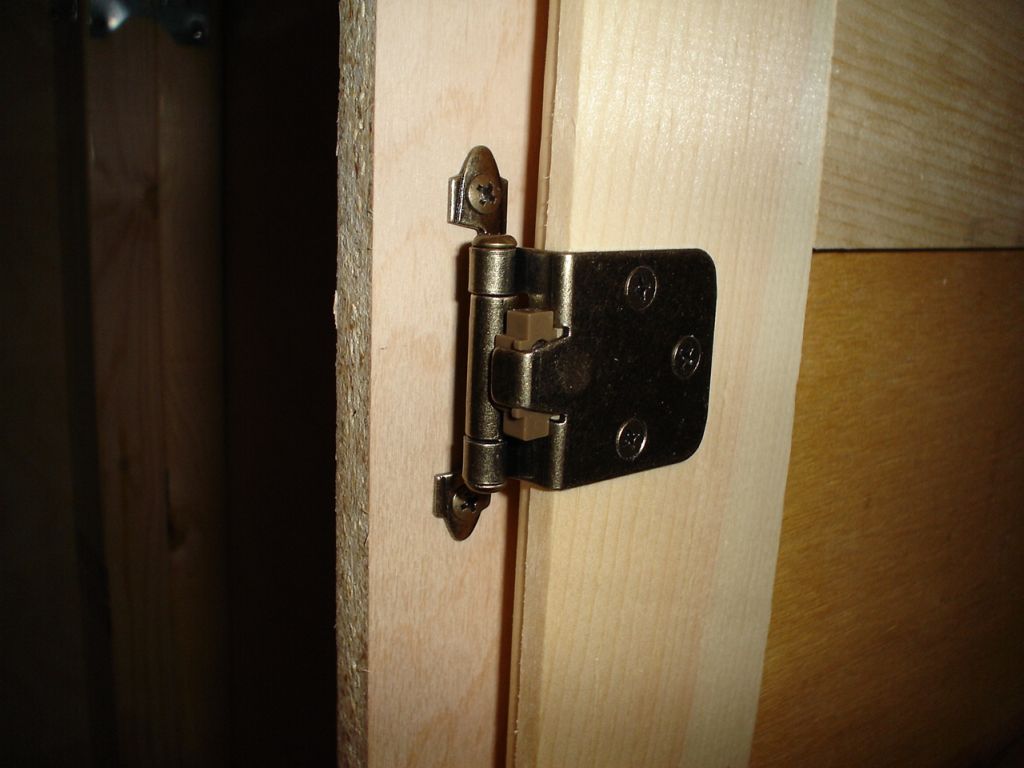 Whatever style of hinges you decide to go with, you will want to follow the instructions very carefully. Each has its own unique layout concerns and issues. And, it doesn’t take much for the hinges to get out of line and cause binding. And, believe me, you can spend a day and a half trying to correct incorrectly installed hinges. Been there. Done that. Got the T-Shirt.