All posts by Tom

I'm the guy who writes the blog...

The design evolution

So, a few weeks ago I mentioned that I was asked to build a little bit of a trophy case for a friend’s daughter. And, the original design I came up with was pretty simple – a bookshelf looking contrivance that would hold both trophies and ribbons…

But, a funny thing happened on the way to building that project…

Kevin's Daugher is in the orange cap

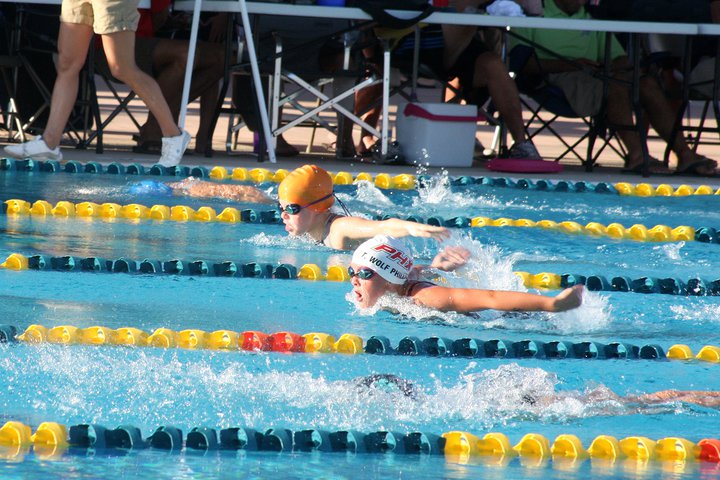
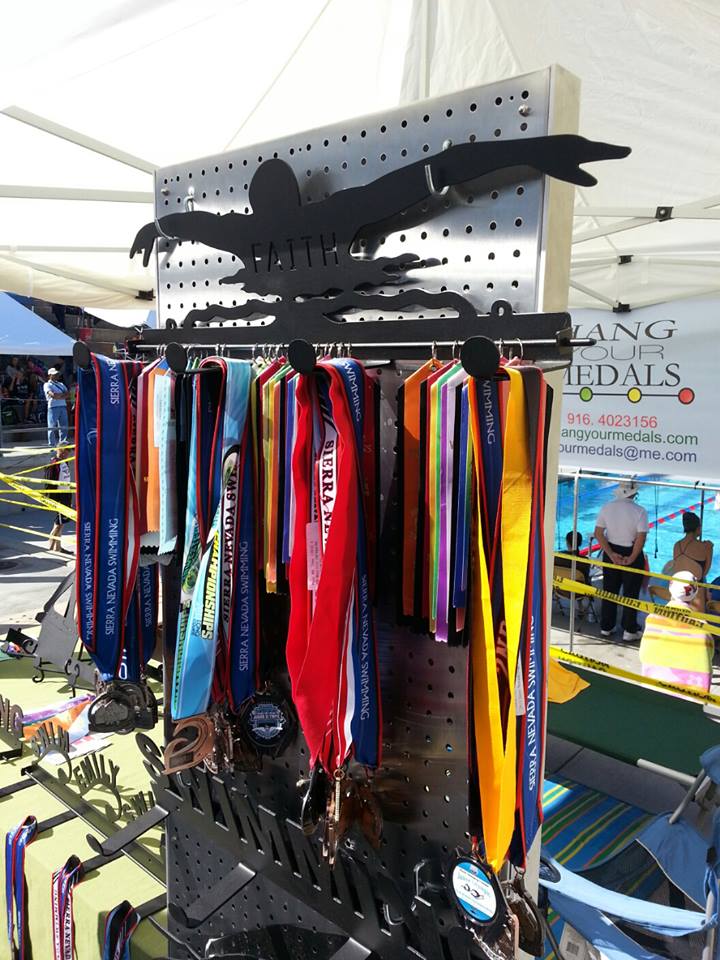
You see, Kevin’s daughter swam in a big meet. International competition at the pool. It was a HUGE deal. That’s where he saw one of these things:


The metal ribbon holderSo, we had a little change in plans – we were doing more of a ribbon-based hanging system, and I was back to the drawing board.

Now, Kevin’s the kind of guy who knows what he likes. That’s a good thing, because I don’t have to pry it out of him. With graph paper and pencil in hand (no Sketchup for me… I have GOT to learn that sometime in the not too distant future) I set about designing a wooden case for the medals.

The first Ribbon holder design 
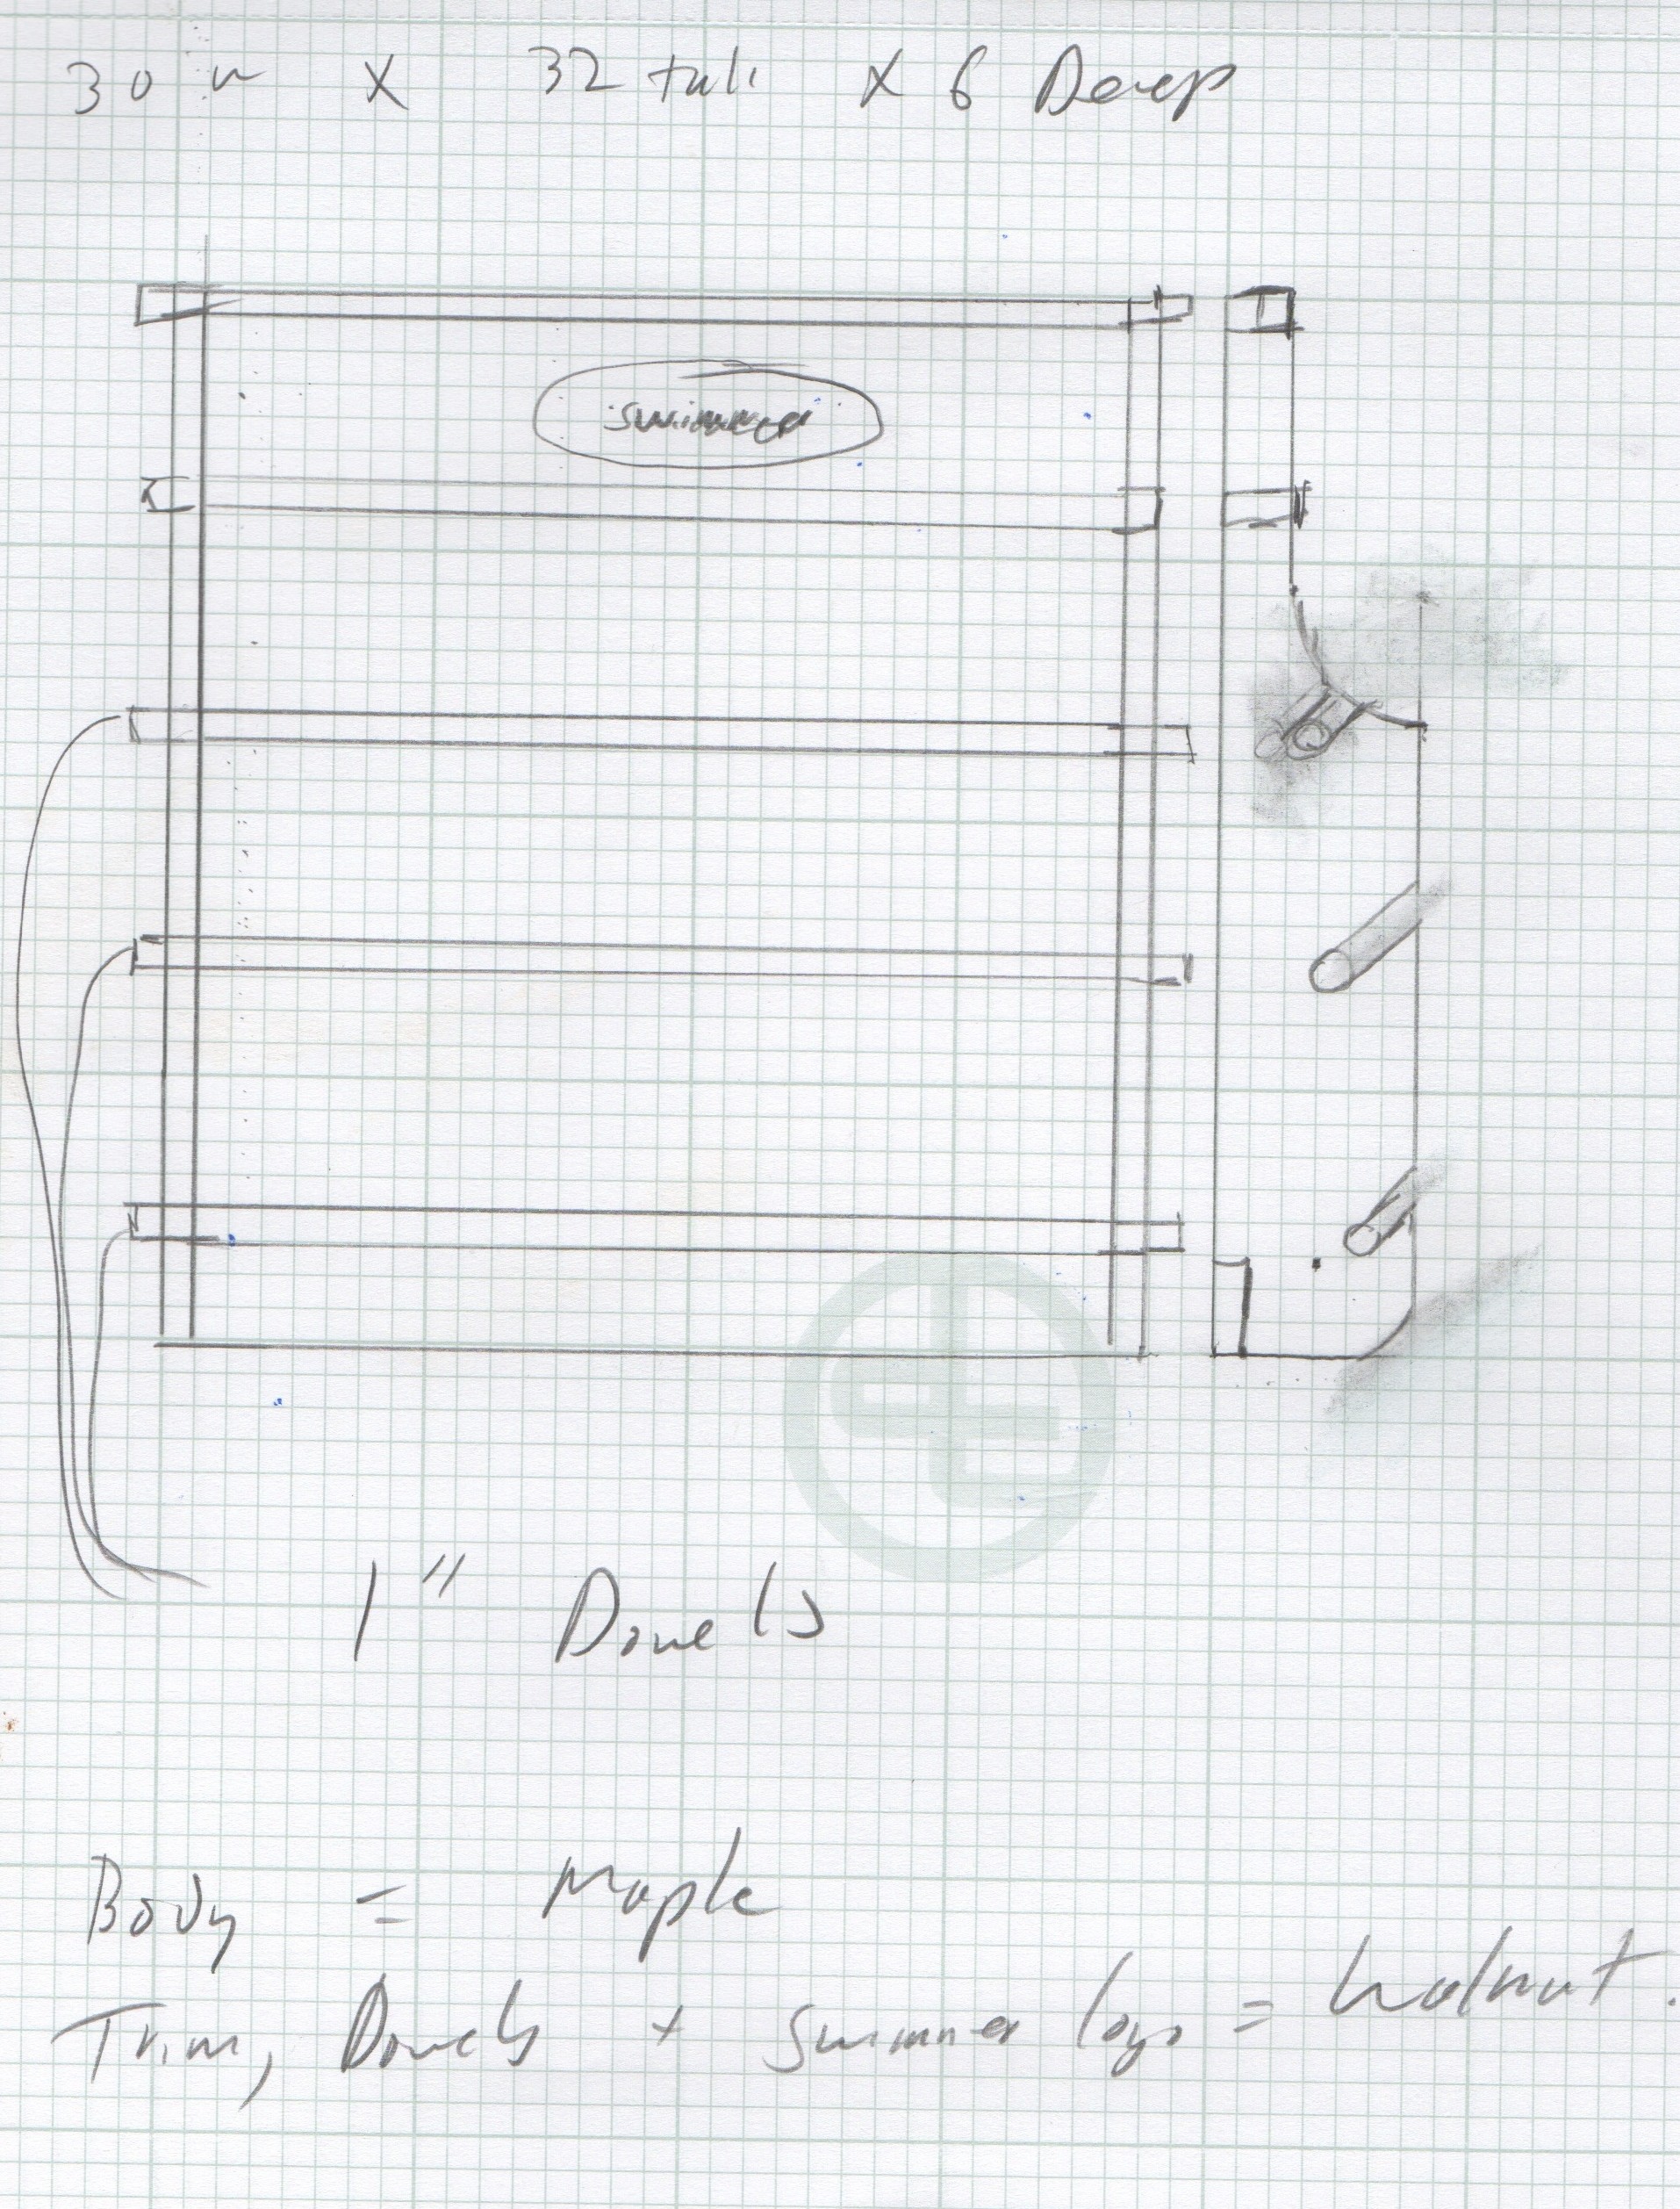
I was busy patting myself on the back with this one. I mean, it was COOL, right? I was going to cut a logo of a swimmer for the top of the piece, it was going to have cut out slots for dowels to set into and, well, it was going to be cool.

But, it was missing something… first, his daughter’s name. And, I don’t think that the slots were going to work out that well… remember, this is going to Yuma, so all of those cuts were going to make things a little hinky when it came to wood movement.

So, it was back to the drawing board.  And, with some adjustment, I came up with this:

The Ribbon Holder, V.2
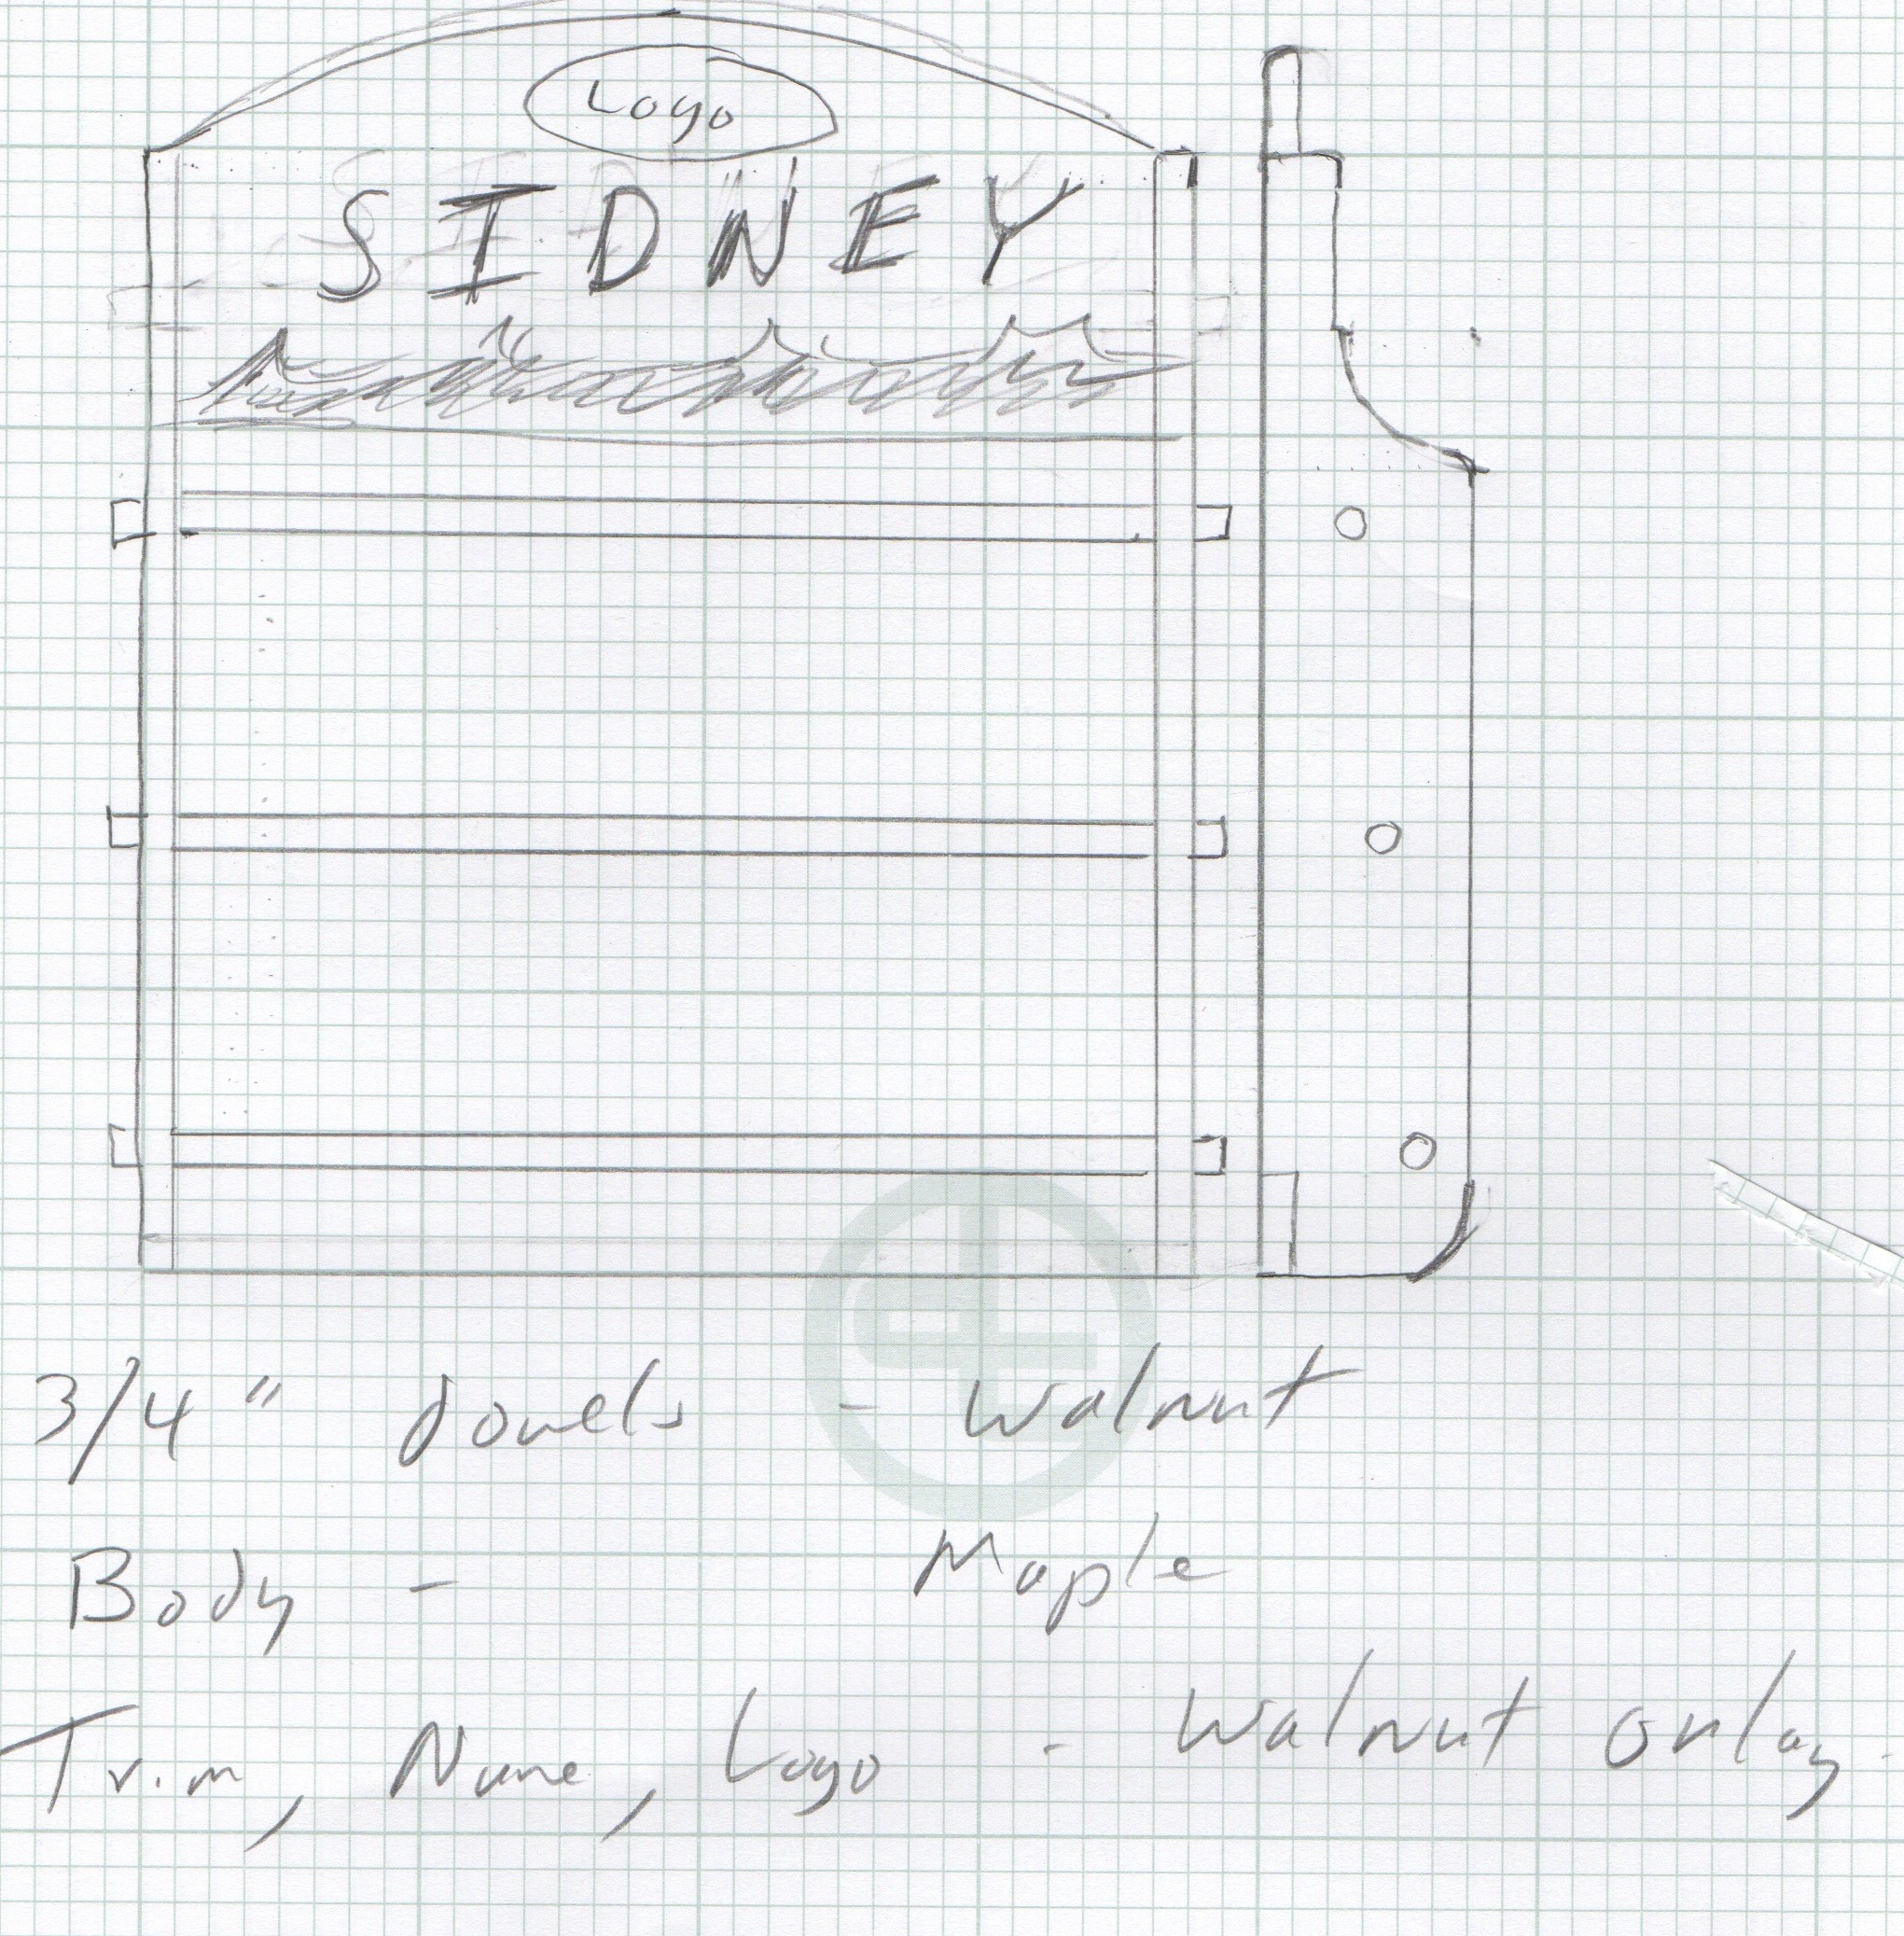
A little better. In this version, I put the logo up at the top and put her name up there as well. And, I put a band of walnut cut in the form of waves under her name.  I scratched the notches in exchange for pairs of matched holes where the dowel could be slid it. To add more ribbons (a real probability with her), Kevin simply has to slide the dowel out, add them on, then return it to the hole.

Now, I just have to wait for Kevin to weigh in for this design. I’m hoping that we can get the design nailed down soon so I can get to work.

After all, I have another client (Rhonda) who is looking to get a job in the queue…


The space-time continuum…

There are times when I believe that Albert Einstein was a woodworker. Seriously. I mean, this guy knew about the space-time continuum… which basically means that the less space a woodworker has, the longer it seems to take to get anything done…

How ya doin, Al?At least I think that’s what he meant. After all, there are lots of times when I am working on a project when I run out of space on my workbench. That’s a bad thing, because I will be attempting to do too many thing on my poor overworked workbench. So, say, I’m trying to mark out the rough boards, juggle my plans, keep handy tools in easy reach… and try to keep something like my thickness planer there so I can do all of the work of getting the boards down to the right size for the project.

What I really need is more surface area, but I couldn’t fathom where I would build more bench area. After last year’s miter bench update, I’m pretty much out of room. No, what I need is some kind of portable work area I could set up, then tear down again after I am done with it.

The power tool workcenterGood thing my friends at Porta Mate sent me one of their Power Tool Workcenters. Of the work stands I have used (and, believe me, I have used lots of them), this one is the most tricked out I have ever seen. For starters, it has a stable base that supports a very generously-sized tool stand. The whole shebang supports nearly 200 pounds, so most portable power tools will easily be supported. That top is also adjustable for height, so you can jack it up for work where you need to have it closer to your eyes, or drop it for larger power tools.
The tool trayThe base also boasts a nicely sized tool tray. So, if you need to keep some tools handy to adjust your power tool, or you need some clamps to secure it to the stand, this is a pretty handy place to stash them.With a planerThe real fun comes in with the adjustable roller supports. You can mount a ladder-type support with telescoping arms that hold the roller assemblies in place. This allows you to get more work support for items such as your thickness planer, so the boards won’t be flopping about on the infeed or outfeed side of the tool. Pretty handy things to have for this tool, a portable drill press, a miter saw.. the works. Broken down for storageThe best part of this baby is that it takes less than five minutes to break down for storage. Bolts are tightened using plastic handled knobs, and by removing six of them, you can have it folded flat and ready for storage in a jif. If you are a woodworker with tons of space, maybe this isn’t the tool for you. But, if you are like the rest of us mortals who struggle to find a space for every operations, the power tool workcenter might be worth the investment.

And, you don’t have to be a genius.


Quick Poll

Everything in woodworking has a cost.  It costs to buy wood.  It costs to buy glue.  It costs to buy fasteners, jigs, electricity for the lights…

And, most importantly, it costs to buy tools.

A powerful Unisaw could set you back a few dollars

Whether you have a massive, professional shop full of state-of-the-art monster tools or you have scoured the classified ads looking for ultra bargains, there is little doubt that you have made an outlay of cash to get what you need.

This week, I want to know what was the most you ever spent on ONE single tool.  Maybe it was that large cabinet saw, the hand-made infill plane you had commissioned or the large cyclone dust collector to keep your shop neat.  Just give us the price range you were operating in. Thanks for voting!

[For my international viewers, the values are in U.S. Dollars.  To convert your currency to USD, visit this Universal Currency Converter. Thanks!]


Link of the week

Wood Magazine’s onlay accents made easy

When most woodworkers think about accentuating their work, they think about carving or inlays. But, did you know that you could apply decoratively cut wood onto the surface of your project and get good looking results?

The onlay being glued in placeThat process is known as onlay, and Wood Magazine has a great how-to page on the process. From cutting the designs to attaching them to the project to accentuating the look, the process is described in detail. The page even offers a design for use on your next project.


Species Spotlight: Honduran Rosewood

“A rose by any other name would smell as sweet” –

William Shakespeare

Roses are red...When it comes to flowers, few have the beauty and smell of roses. That’s why people spend hours tending to them in their gardens, and why we spend lots of money on Valentine’s Day and anniversaries buying bouquets of them for that special someone in our lives.

And, when it comes to wood, few species stand out as beautifully as the rosewoods. Rich in color and possessing a handsome grain structure, these woods have been used for centuries for articles as mundane as plane handles all the way to expertly crafted symphony violins.

Honduran RosewoodOne of the most favorite of the many different rosewoods is Honduran Rosewood. This tropical hardwood grows primarily on the southern coast of Belize, formerly British Honduras, which is where the tree gets its name. Mature specimens of the tree can grow to 90 feet tall, with a slender diameter of about three feet.

The wood inside is dense, oily and has a Janka test score considerably higher than sugar maple, but not quite as hard as mesquite. This hardness gives the wood a tremendous tonal quality, making it ideal as tonewood for musical instruments from guitars to xylophones.

A bookmatched Honduran Mahogany guitar by Lichy GuitarsHeartwood of Honduran Rosewood ranges in color from a light brown to a deep brownish-purple. The majority of heartwood will appear almost brownish-mauve. Sapwood is clearly delineated and is a pale yellow. This can make for some dramatic book matches, especially on the backs of guitars.

Because it is so tough, the wood can really do a number on cutting edges, so be prepared to do more sharpening than you planned for during your project. Its grain is also frequently interlocked, so expect that your planes and planer knives to almost ‘ride over’ the wood in these cases.

turned Honduran Rosewood BowlWhere this wood excels is in turning. With a steady hand, a turner can sculpt some incredible looking bowls, vessels and other goodies. What’s even better, once the turning is done and the piece is sanded, the work can be burnished, using the natural oils inside to build a soft luster.

These oils, of course, can cause some issues. Topcoats can frequently fail on this wood, and there have been problems reported with glue ups. Cleaning the wood well with solvent can temporarily clear the surface enough for the finish or glue to cure. And, as with other tropical hardwoods, the oils in the sawdust can cause issues with those who are allergic to them, so dust collection and dust masks are a must.

solvent wiping

Since the wood grows in such a small area, and it is a popular wood to work with, the Convention on International Trade in Endangered Species of Wild Fauna and Flora (CITES) has moved the wood from appendix III to Appendix II. This means that it can no longer be imported or exported without special paperwork. “This beautiful wood has been overharvested,” said Eric Poirier of Bell Forest Products. “That’s why we in the wood industry and the home woodworker needs to appreciate these precious species or they will no longer exist – and no one wants that to happen.”


The wood jumble solved

I just discovered that it was about four years ago when I left you hanging.  Yeah, sorry about that.

Back in August of 2009, I wrote about my wood jumble. It was in an area of my shop where I stacked wood with little organization, which made finding a particular board for a project a nightmare.

The original wood jumble

Fortunately, my wood storage has evolved to a little better arrangement. I found an area that was between my band saw and the standing storage tower that was open and would serve as a great place for some vertical storage for my boards.

The lumber storage now

I spent this past weekend arranging the boards in my shop, creating this area to store all of my lumber. It was a pretty simple system, involving some Tapcon screws, a few 2 x 4 scraps that I picked up out of the scrap bin over at the local home improvement center and a few lengths of electric conduit.  All I did was bore some holes into the 2 x 4s to hold the conduit, and then mounted those 2 x 4 cleats into the wall.

The cleat arrangementI put three lengths of conduit into each of the cleats, using these as dividers to help control the stacks of wood so they don’t flop around. It’s not the most perfect arrangement – the boards seem as if they can push on the conduit, levering the cleats from the wall. I may have to go back to the drawing board on that one…

Anyway, i was able to get the boards in there.  Now, when I need to reach for a board, there’s no issue with finding my choice boards. I simply can look into there and find the rough or previously-milled pieces of wood to find the one I want for a new project.

A look down into the stackDang, I have a lot of boards in there… Maybe I should build a few new projects!


Quick Poll

Woodworking has been practiced in one form or another for the past hundreds of thousands of years. Throughout the ages, there have been many important inventions and discoveries that have helped to make the craft what it is today.

I wonder what gadget I can invent today?

Lately, the pace of these inventions seems to be accelerating. In the secret testing rooms and laboratories, companies are inventing devices that can help you do everything from ensuring your bead of glue is laid dead center on a board you are working with to bench dogs with sophisticated pop-up mechanisms to innovative devices to lift your work off the surface of your bench while gripping it tightly.

In this week’s poll, let us know what you think about these devices. Must-have tools for your shop, or gadgets that leave you scratching your head wondering what they would be used for…