All posts by Tom

I'm the guy who writes the blog...

Link of the week

360 Woodworking

Have you ever been to a big unveiling event? You know, someplace where they make you wait outside until you can be let in to see something, or there’s some kind of object covered with a drape, ready to be shown on the count of three?

360 Woodworking

Well, you are invited to something like this with a new online woodworking project. Chuck Bender, Glen Huey and Bob Lang have teamed up and are preparing to roll out (in the very near future) a new woodworking experience.  We had them on the Modern Wodworkers Association podcast earlier this week to talk about the new endeavor, and it sounds exciting.

Right now, it’s just a construction page, but you can sign up for updates for when the site does go live and when content will be posted.

Book Review: Log Cabin Bird House Kit

Ralph Bagnall of the Consulting Woodworker is at it again!  Back in 2011, he came out with a book teaching you how to make your own building log play kits. You know, just in case you wanted to hand craft your own fishing cabin or frontier fort – in very small scale.

Look at that wee fort!

Well, the kids do grow up, and maybe the other grown-ups in your house want to have their own rustic looking structure to – I dunno – house and feed birds. What are you to do?

Ralph's bird house building kit

Good thing Ralph came out with his new book about Log Cabin Bird House building. Ralph let me know that the original book was conceived with the idea that the logs and kits could be glued together and painted to make a bird house. But, how well would the paint hold up to the elements, and would the birds somehow be affected by the paint itself?

Red Cedar Boards

That’s when Ralph changed tack and opted for red cedar boards. Since red cedar shrugs off the elements and looks so darned good – plus, it’s dirt cheap and plentiful – it was a great option for the new plans.

The only problem? Red cedar comes rough one side and smooth the other. So, once you plane the rough side smooth, you end up with boards a mere 5/8″ thick, which changes the construction measurements considerably. Thus, the book has instructions on cutting for the new dimensions. Outside of that, the techniques are similar to the log cabin book, with interlocking notches cut in each of the boards to ensure a snug fit.

Notch notch notch your boards

Because of the scale of the build, Ralph doesn’t understate the need for safety throughout the cutting process. Remember, those are mighty small pieces, so a reliance on jigs and push blocks helps to keep your hands far away from the blades while getting the utmost in accuracy.

Safety first

And, when it comes to those jigs, Ralph goes into great detail about how to build them to ensure the best cuts. He also links to where you can get the router bits he uses and even has a handy chart of how large the access holes need to be bored for each species of bird you hope to attract.

One of Ralph's feeders

While many people look down their noses at bird houses as ‘beginner’ projects, you just might be surprised how many budding woodworkers you can get started in the craft with these plans, or how many bird watchers you will please with a well-crafted model.

Oh, and the holidays are less than ten weeks away. Just in case you are counting.

Stuff I’ve built: My shoe rack

What has gotten into me? I spent most of the summer kind of lazing around, barely able to get out into the shop. Now, you can’t keep me out!  I’ve been bitten by the bug.

Nice shine, Steve

So, last week, I built a shoe shine box. And, on Friday, I came home from work to shine my shoes (actually, I had Steven shine them, but that’s a whole other story…) So, they were looking good, but the problem was that I was just throwing them onto the floor of my closet. Now, how the heck were they going to stay nice and shiny?  It was time for me to get off my behind and add to the organization… by building a shoe rack.

The former shelf

It was insanely easy to build, and while it didn’t involve a lot of fancy joinery, it is serving its purpose well. I started with a Douglas fir board that a friend gave to me when she was having work done at her house. It had been finished with some varnish, but that was easy for me to peel off using my thickness planer. Fortunately, the board had little twist in it, and it was beautifully clear. I planed it down until I had a nice uniform thickness – approximately 1 1/4 inches thick. I then straight line ripped both board edges until I had a piece that was four-square.

Thin strip ripping jig

Since the idea I had worked on separate slats, I set up my table saw using my Infinity thin strip ripping jig to ensure I was going to get consistent strips for the piece. I used a spacer to get 1/2″ thick strips for the cross slats, and set up for 3/4″ strips for the end pieces.

Crosscut

With the strips ripped, I turned to my Osborne EB-3 gauge to cut my strips for the end pieces to the right size – four 9 inches long, and three 7 inches long. That was a piece of cake.

GlueupI turned next to my square assembly jig for the glue ups. I laid out the pieces, alternating the long and short ones. I used some 3/4″ spacers to set the short pieces at the right height. Once I had those suckers lined up, I turned to the glueup.

Feel the pressure

It took some juggling, but I was able to get all of the pieces lined up, glued up and clamped up. As you can see, I glued up both sides at once, making this run a little faster. Of course, I had to remember to not glue the two middle pieces together…

After I got these babies out of the clamps, I ran both assembled sides through my thickness planer again to clean them up. That went faster than sanding, and it gave me a very good look. Remember, you just want to skim them, not remove a ton of material.

Assembled.

After that I cut the cross pieces that were 1/2″ thick to 26 inches wide. They fit perfectly into the slots formed by the short pieces. It was a snug fit, and that was good. I dabbed some glue onto the upright pieces and used my brad nailer to tack one brad into every intersection. Were the brads overkill? Who cares… they worked!

Now with shoes!

I sanded, paying special attention to round over the corners of all the boards. Douglas fir can be very splintery… Once I dusted the piece off, I could have finished it, but I just opted to set it on the floor of the closet and start stacking my shoes onto it. I might finish it later, but who knows, maybe there will be another project I want to start!

Link of the week

Build a Tansu Chest

As I have probably mentioned, I live in Florida. This means I have no basement, which eliminates a ton of potential storage area at my house. That’s why most of my projects incorporate storage in them – it’s just too important to not miss an opportunity to add more.

Tansu plan

Today’s plan is one that just doesn’t provide storage – it does so with style. The Canadian Home Workshop magazine has an awesome plan for a traditional stepped Tansu chest (also known as a kaidan tansu) using gorgeous maple. Not only does it provide tons of storage, it does so with some serious elegance.

Link of the week

Scott Shuttleman Phillips

This article, which appeared in Woodworker’s Journal magazine, features an aerospace employee who worked on the Space Shuttle program for nearly 30 years. And, what does this have to do with woodworking?

Scott's unbelievable work

Would you believe me if I told you that Scott built a wooden shuttle replica for EACH of the missions the fleet of space shuttles flew?  Using domestics and exotics, Scott’s work isn’t a series of replicas – it’s more of an artistic representation of each of the missions, made with care and wood grown all around the world.

As a self-confessed space nerd, this is the kind of stuff that just trips my trigger. Let’s light this candle!

Stuff I’ve built: The shine box

So, at work, my bosses asked me to dress up a little bit more, which means no more work boots for me – unless, of course, I’m working on conditions like these:

Heavy weather

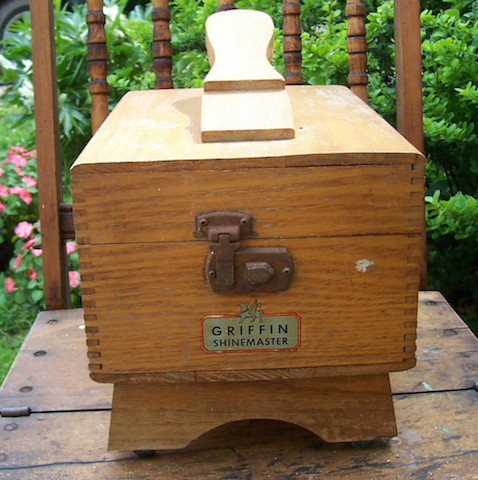
This now means that I’m going to be wearing more dress shoes. With dress shoes comes the inevitable chore of shining those dress shoes. Now, my dad served in the Marine Corps, and he is a whiz at shining shoes. He keeps his kit in an old Griffin Shinemaster box. It’s a classic.

Griffin Shinemaster

While it’s a neat, self contained design, a different shine kit caught my attention – the Esquire Footman Deluxe. (Dang, I need a hobby).

Esquire Footman

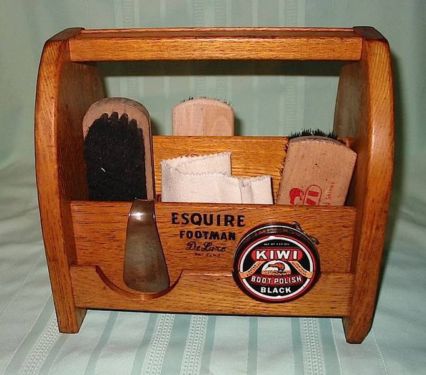
There’s something about this design that I really like. For instance, I can get at the items in the kit mid-shine with the open design, instead of having to take all the stuff out and lay the items on the floor, or ask the shoe shinee (is that a real term?) to move his or her foot to get that forgotten item.

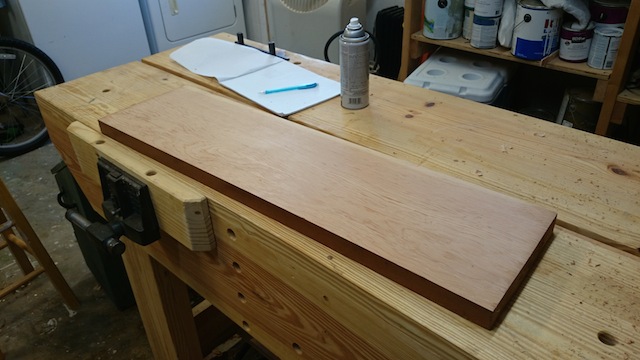
Fortunately, there are TONS of these babies for sale on eBay, and the sellers all provide measurements, so I knew the kit would have to come in at about 11 inches from end to end, stand about 10 inches tall and be about 7 inches across. I had a board of some unknown wood (maybe one of you species types can help me out) that had been in my shop for the better part of ten years. Once I planed it down, it was the right width and looked handsome.

Plane down the edge

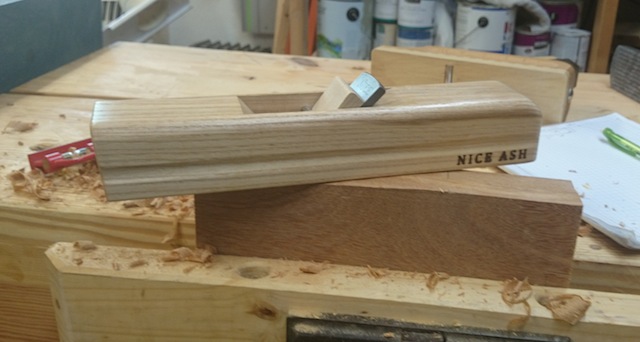
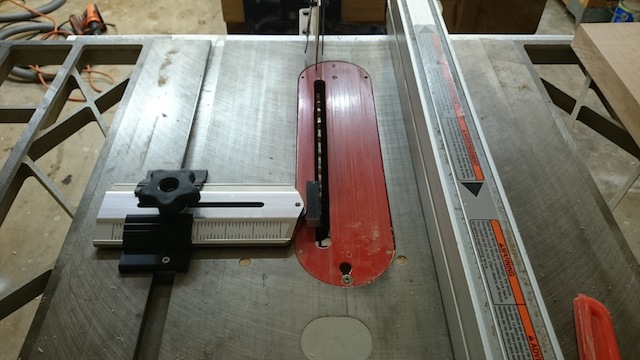
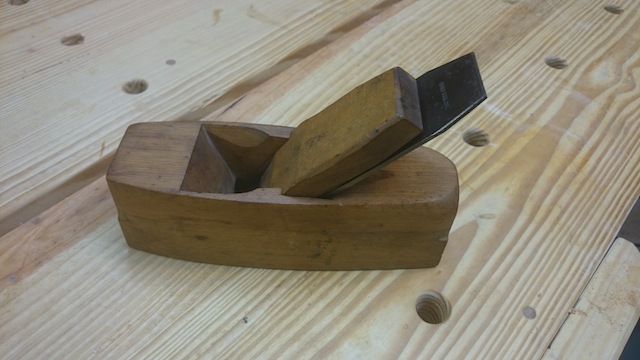
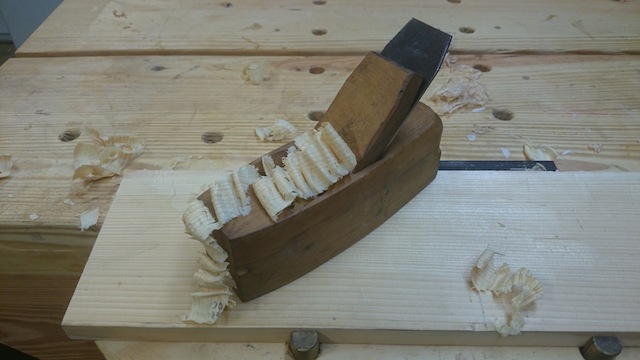
I started by cutting the two end pieces, and shaping a taper on the bottom halves of the boards, This is a very minor design feature, but I think it makes the piece look a little more graceful. I could have tried to taper in on the band saw or table saw, but a hand plane did the job in no time flat.

Getting groovy

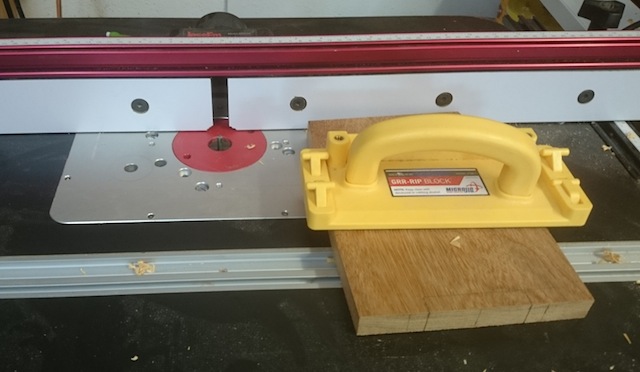
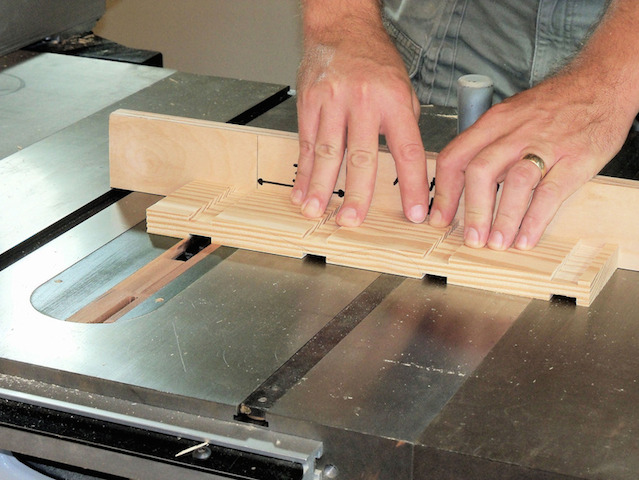
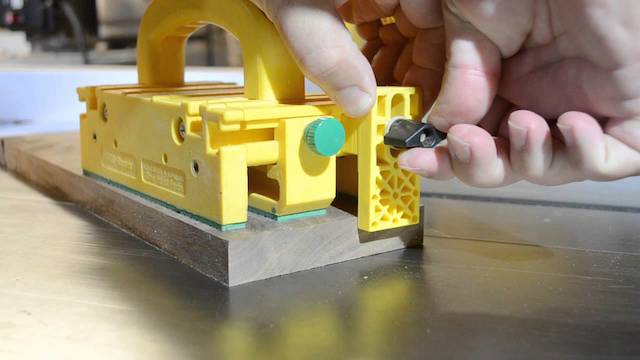
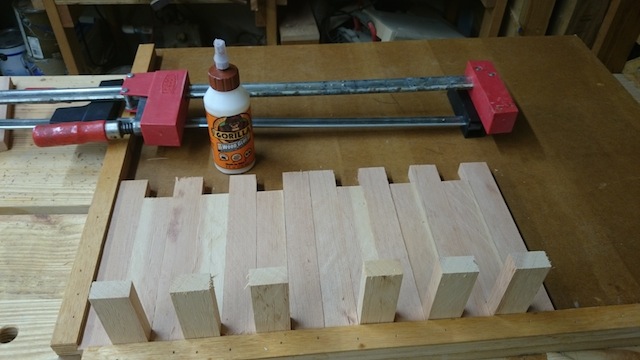
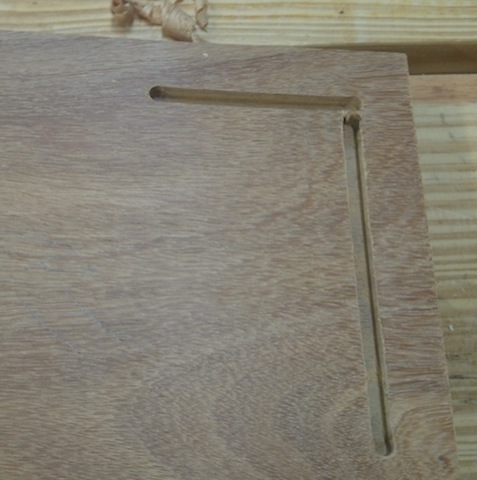
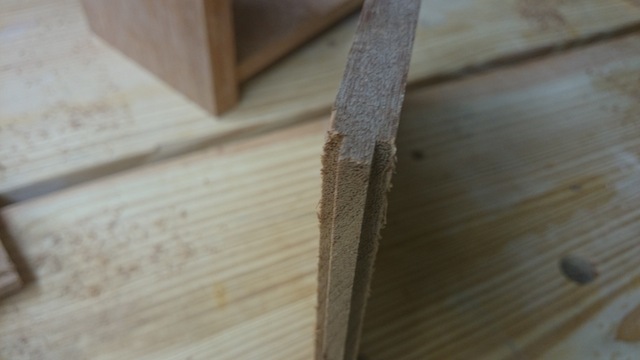
After that, I used a 1/4″ router bit to rout a series of grooves into each of the side pieces. Since my plan was to capture the 1/2″ thick dividers in these grooves with 1/4″ tabs, I knew I had to make mirror images of each side so they would fit into the grooves. It took some mental gymnastics, but the grooves came out looking pretty sweet, with just a minimum amount of chisel work to make things perfect. And, yes, I did bevel the edges of the piece before I grooved it to ensure that the grooves would parallel the outside of the box profile.

Now, that's pretty groovy

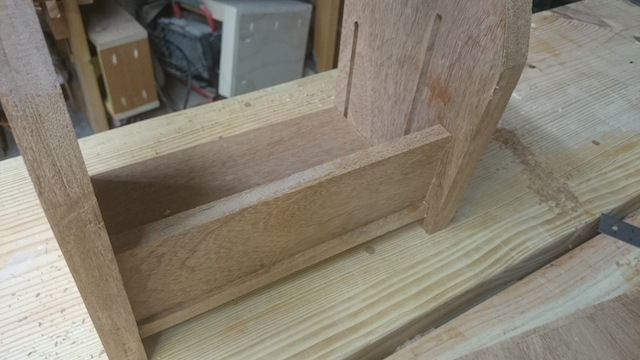
Some quick work with a rasp helped curve the top of the box sides, making it look a little more elegant.

Feeling raspy

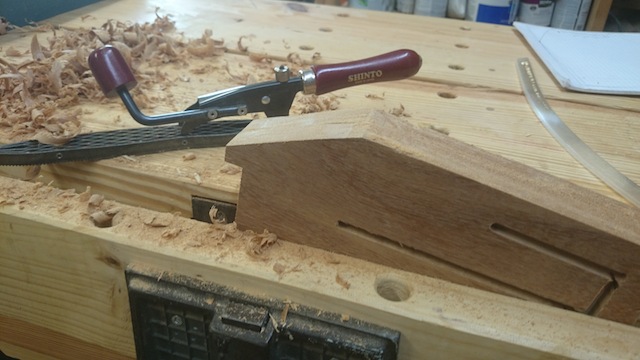
From there, I marked out where I wanted the top handle/step to live. I kept that piece at 3 inches wide to allow for a secure step, so I mated the two end pieces together and notched out the 3 inch wide by half inch deep recess for the board to sit in.

Make the notch

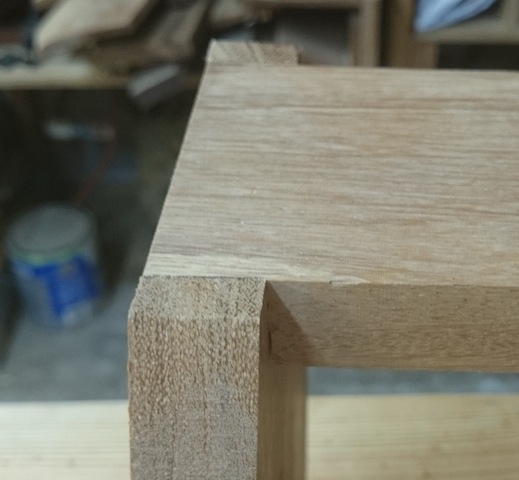
Once I did this, I cut the top piece to size, and made a rabbet on the end, ensuring the 3/4″ thick top piece could fit snugly into the 1/2″ deep notch, making a great fit that registered against the side of the box.

Snug in the notch

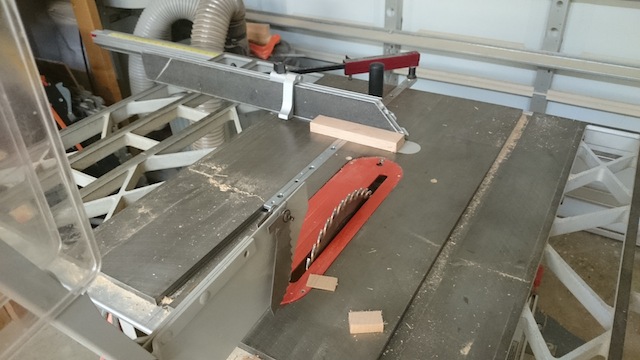
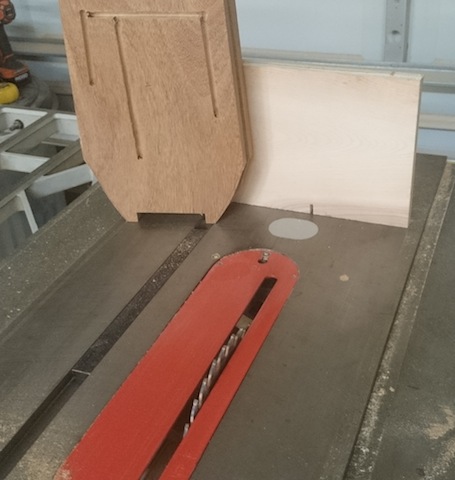
From there, I milled down the side pieces to 1/2″ thick, then using a rabbeting bit in my router table, gave each piece a 1/4″ thick by 1/4″ long ‘tab’ that would fit into the grooves.

Don't stick your tongue out at me!

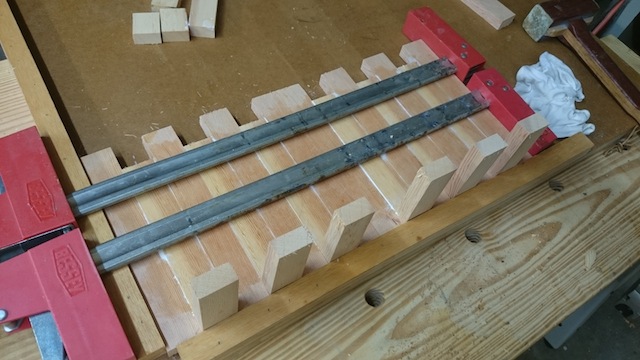
I knew that only the bottom board would be glued in place, as it wouldn’t have a cross-grain situation. The dividers that break the piece into compartments just float freely. Assembly took a little bit of time to get everything into its respective groove, but it worked out great. I just took my time, glued the bottom board, slid the bottom and dividers in, then tapped the handle/foot rest into place, and clamped everything up.

Assembly detaisAfter the glue dried, I sanded everything down, then opted for several coats of lacquer for the finish. First, because it’s an easy, quick finish to apply that gives great results. But, also because it’s a spray, which can get down into the assembled compartments, saving me the work of having to reach in there with a rag or brush.

Assembled and lacquered

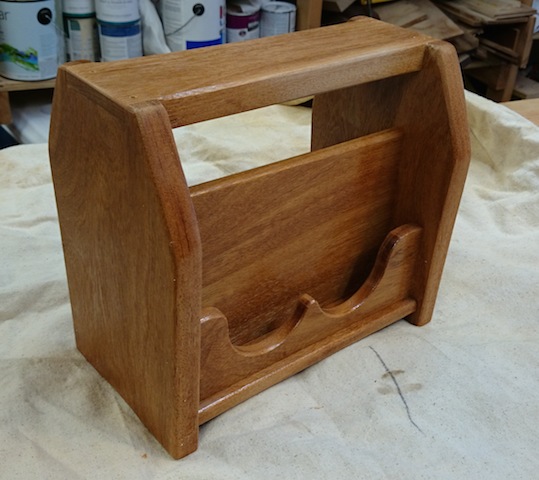
I really dig the front compartment with the cutouts that holds the cans of wax. The large compartment is easy to reach for the brush, applicators and shine rag. It’s solid as a rock, and just the right size for me to stash in the closet for when I need it. And, the beauty of it all – this truly was a one-weekend project, with the work being done in about four hours.

Nice shine, Steve

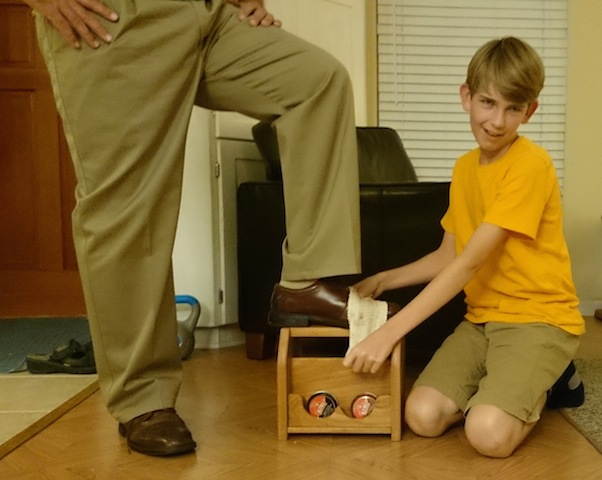
How well does it work? Well, I may need to make another one soon to give my son Steven, so he can start building his college fund. Hey, son, I have a nickel with your name on it!

Old fashioned cutting edge

I have a few old hand planes that were given to me by friends. A few of them serve as desk ornaments at my office, while others are in bins, waiting for me to refurbish them. This is one that I had in the refurbish bin – an old Ohio Tools coffin smoother. I just love the way these old planes look, and I wondered if I could make this one work.

The old planeSo, I knew I had to break it down to get to the pieces I had to tend to… basically, the iron so I could sharpen it.

The plane broken down

Using a small warrington hammer, I tapped everything apart.  There was the wedge, the iron, the chipbreaker and the body. They are all in very good shape, with no cracks in the body and plenty of steel to work with with the iron. The plane looked nice, but there was one problem…

Super dull

The iron was as dull as a butter knife. I mean, I could press my finger onto the edge of it, and there was absolutely no chance of me hurting myself.

Flatten out the back

So, I broke out my Tormek and got to work on it. The first thing I had to do was to flatten the back of the iron. Concentrating mostly on the last inch of the bottom, I held the plane iron’s back to the side of the wheel. Unlike high-speed grinders with narrow wheels, this is perfectly safe. The water in the reservoir keeps the blade cool, and the nearly two and a half inch thick wheel has plenty of mass to allow you to really flatten things out.

Confirm the angle

From there, I had to make sure I had the angle right. This iron was ground to 30 degrees, which I confirmed using my angle gauge.  After that, it was easy to grind the bevel coarse, then fine, then hone it on the leather wheel. I put the plane back together, gently seating the wedge in place with a few taps of the hammer.

Shavings!

Sure, it took a little fussing (remember, you aren’t using a depth adjustment knob, but taps with a hammer), but I was able to get this baby making some sweet shavings in short order.

I’m not sure how old the plane is, but I hope it will continue to work for me for years to come.