If you have been to a home construction site over the past few decades, you have seen a forest of standard dimensional lumber being assembled with pneumatic nail guns. The predominant building practice today is to build these homes with platform framing using standard sizes of lumber.
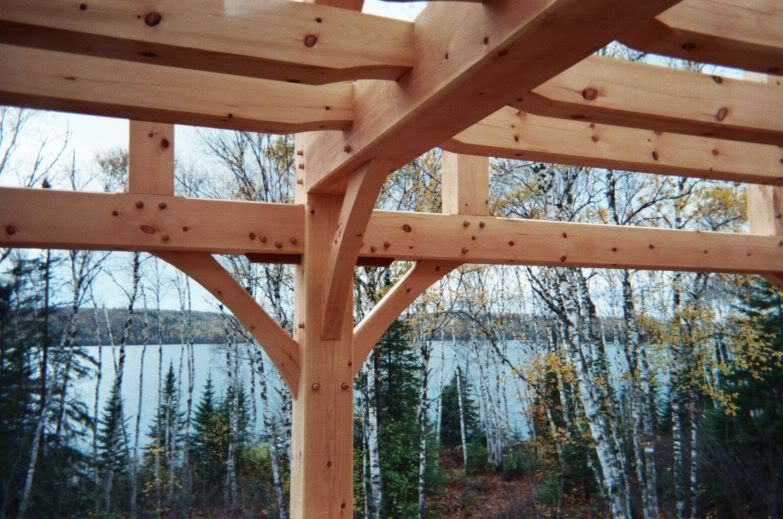
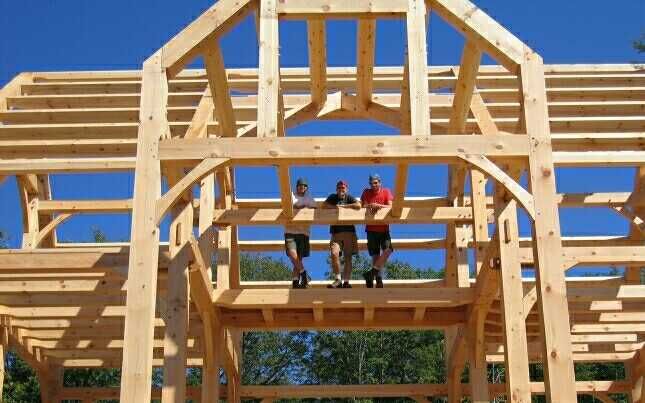
 But, then you may come across an exception to the rule. There are homes out there being assembled out of large timbers. These buildings have soaring, graceful hand-carved timbers from the floor to the roof line defining an open, comfortable living area. Traditional timber framing, while not the most common construction method, is alive and well and being taught to a new generation of woodworkers.
 Clark Bremer, the owner of Northern Lights Timber Framing and a timber frame instructor, fell in love with the craft quite by accident. “I’m a timber framer because I’m not a very good painter! Seriously, my wife wanted to paint the window trim of our lake cabin, and to keep me out of her hair, she enrolled me in a woodworking class at North House Folk School in Grand Marais, Minnesota. The only woodworking class that was offered that weekend was an introduction to Timber Framing. That was 12 years ago. I then built several small frames for myself, took more classes, joined the Timber Framers Guild of North America and left my job as a researcher for Bell Labs, and started timber framing full time. So far, no regrets!”
But, what is the attraction of building with this time-honored yet labor intensive method? “Generally, a timber frame home will be more expensive than a stick framed home. But a timber frame home always has an open floor plan with no need for load bearing walls vaulted ceilings because the trusses are too pretty to hide, and lots of beautiful woodwork. If you ask a conventional builder for those things, you’ve now moved up to a higher price point, and timber framing becomes very competitive.”
 Not only competitive, but green as well. “Modern timber frames are often enclosed with structural insulated panels, which are applied to the outside of the frame. This creates an unbroken blanket of insulation around the house, which is extremely energy efficient. And like the timber frame itself, the panels are pre-cut in the shop before being brought to the site, making installation very easy for a trained timber framer to install. In a moderate sized home, the frame can be erected and enclosed in panels in 1-2 weeks, minimizing the risk of a weather delay.”
When he’s not building timber framed homes, Clark is busy instructing students in the craft and the newest techniques which make this venerable construction method even more enjoyable. “We hold workshops here in our Minneapolis shop, and I also teach at North House Folk School in Grand Marais, Minnesota. I’m also a proud member of the Timber Framer’s Guild of North America, where I teach 3D CAD software to professional timber framers.”
 It’s true that timber framing looks complex and on a massive scale, but once the individual elements are broken down, it’s not that difficult for any woodworker to master. “This is mortise and tenon joinery, after all, and woodworkers all know the precision required to make that look good.”
Wood selection is another area of emphasis in these classes. Clark likes to work with eastern white pine and Douglas fir, but he’s also worked in white oak and white cedar. These woods are very well behaved, but they do have their moments. “One of the biggest challenges is coping with the imperfect nature of the timbers. Often the timbers are not very dry and are susceptible to movement. Sometimes we reclaim timbers from a previous structure, and there can be lots of issues with those. It’s a lot more difficult to lay out and execute the joinery on imperfect material that’s often twisted and bowed.”
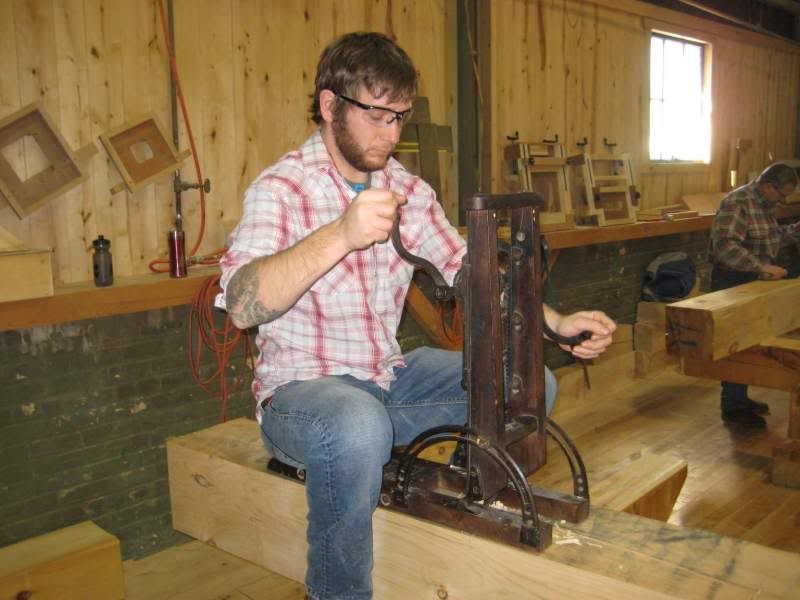 And then there are the tools. At Clark’s shop, he and his crew work extensively with hand tools. This carries through to his teaching methods as well. “Sure, there are CNC machines that can cut entire timbers, but these machines are very expensive, and they do not have the hands and eyes of a craftsman, who can read the grain, avoid tear out, and feel pride in the quality of their work. That’s why we love antique tools, and take the time to send them through “rehab” and get them back into a productive life. We use chisels, hand planes, slicks and draw knives every day. I also have an old hand-crank boring machine that we bring out for classes and demonstrations.”
While working with the wood is a pleasure, it’s the people he meets that provide Clark most of his enjoyable surprises. “I do enjoy teaching, and it’s also a way of giving back. Many of my students are amateur woodworkers who have a particular project they want to tackle. I also get professional carpenters looking to expand their skills. And sometimes just folks who are curious and looking to try something completely different, just like I did.”
For people who are interested in learning more about this venerable craft, Clark strongly recommends checking out the Timber Framer’s Guild. There, you can be linked to timber framers around the country and learn who is offering classes and demonstrations. “Who knows,” mused Clark, “You just might find yourself building something that can be passed down for generations.”

 So, you want to learn a new and interesting woodworking skill beyond furniture making? Something maybe a little more challenging and ornamental?


 There is little doubt that a properly functioning dust collector can make cleaning up at the end of a woodworking session a breeze. Just a little sweeping and vacuuming can turn a difficult chore into a quick and easy exercise.
 So, you can’t get enough of woodworking videos? Do you want to see more – MANY more?
 It may seem tough to believe, but I actually have two consuming passions in my life. (Well, three if you count my wife – I don’t think she’d ever forgive me for NOT counting her on the list!)
 Woodworking is of course one of my favorite things. The other is the weather – especially hurricanes. That’s why my office sent me to the National Hurricane Conference taking place this week at the Austin Convention Center.
 I met Craig Andrews while at a woodworking school up in Indiana. We have kept in touch, and he is hosting me at his house. Besides the great Tex-Mex food, we’ve been doing a little work in his shop.
 Before the trip, Craig promised me that he would show me a technique he picked up on how to hand cut a haunched tenon. Armed with a Veritas dovetail saw, a few chisels and some hand planes, we made a sample tenon to fit into a pre-milled mortise. Since all I had was the camera on my cell phone, I couldn’t get good shots. However, I will write that technique up once I get back to my shop.
 According to Derek, “The tool has made woodworking a whole lot easier for beginning and advanced woodworkers alike. Sure, there may be some who prefer more traditional joints, but for building fast,strong, and easy, pocket screws are a great choice.”
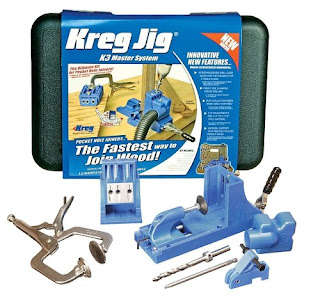 The variety of pocket hole cutting jigs offered by Kreg is pretty staggering. There are pneumatic, high-volume set ups for furniture factories all the way to the simplest single hole jigs offered for the handy DIYer. By far, their most popular model is the Kreg Jig Master System (model K3), the system favored by most woodworkers. Complete with set ups for semi-production and portable bases, the Master System is an improvement over the K2000, the former sales leader. “Even something as simple and elementary as moving the clamp handle to the front of the jig was a huge convenience for woodworkers. Now, instead of having to reach around the back of a large panel to secure the work piece, they can do it all from the front.”
 And it’s not only pocket screws when it comes to Kreg. In 2003, the company started building a line of highly accurate (and well reviewed) fences and guides for band saws, router tables, miter saws, table saws and other shop tools. “So far, all of our precision guides, fences and jigs have all been met with broad support, and our customers have been very happy with what we’ve come up with.” Even more recently, Kreg has announced an entire line of Klamp System™ components designed to improve clamping around anyone’s shop and a family of Precision Routing products including the new Precision Router Table which includes a table saw style fence which self squares with the table’s miter slot.