Get Woodworking Week 2014 – Thursday

I have a friend who is a Civil War Reenactor.

There, I said it. It’s almost like admitting I am in a rehab program. “Hi, my name is Tom, and I have a total addiction to Tic Tacs.”

Huzzah!

Well, anyway, my friend derives tremendous enjoyment from getting all gussied up in his scratchy wool suit, sleeping on the hard ground and eating hardtack. To me, this sounds like doing hard time at some correctional institution, but, hey, that’s just me.

This hobby is a good one for him to have, because he is also a history teacher at a local high school. He once worked at my office helping us with some emergency management work, and we frequently got into long discussions about Civil War era politics, personalities and tactical matters.

And, while my friend wears blue, he is a native Mississippian, so does have a soft place in his heart for Dixieland.

Stonewall JacksonOne of the most intriguing personalities we discussed was Thomas “Stonewall” Jackson. This famous southern general was a tactical and strategic genius, often leading terribly outnumbered forces against well-equipped Union troops and achieving startling victories.

He was well known for being able to determine where smaller divisions of the much larger Union army were located, and attacking each of them in turn, moving from smaller victory to smaller victory until he was able to totally unnerve Union generals sent to confront him.

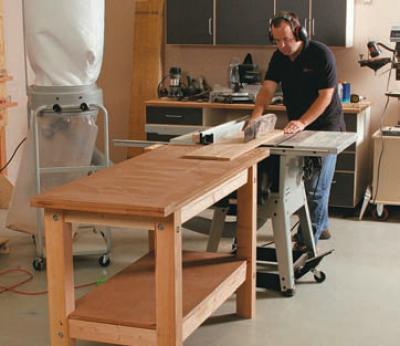
You know, when we start woodworking, there are many times that there are projects that look too difficult to overcome. For me, the first time I remember that happening was when someone asked me to build an entertainment center for them. They were going to pay for a low Craftsman-style piece, and they were pretty specific on what they wanted.

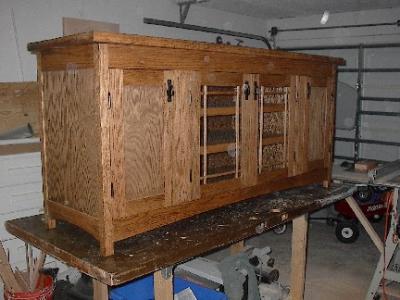
Had I ever built doors before? Nope. How about glass doors with an applied grill? Nope. Cut a curved bottom apron? Never.

But, I wasn’t about to let that get to me. Oh, wait, I was. I was nervous as heck. How on earth was I going to do this? It was a complicated project, and I was overwhelmed.

That’s when I decided to go all Stonewall Jackson on it. The folks over at the Woodworker’s Website Association told me that things would be easier if I broke each of the components down into smaller sub assemblies.

So, I tackled the panels, and how I was going to join them to the square legs. How I was going to do frame and panel construction. How I was going to rout out for the glass inserts into the middle doors. How I was going to do the doors on the side compartments. How I was going to joint and glue up the top slab.

Are there things I would have done differently?  You bet. Was the client happy? Absolutely. Did the client pay for the project? Indeed he did.

Remember, as a woodworker, nothing is really outside of your abilities. Sure, it may take longer, and you may need some practice cuts, but by taking each step one at a time and asking for help if you need it, you will find that the project that left you sweating in anxiety is something you will master.

And, at that point, you can declare victory.

Now, for today’s haul of awesome articles:


Get Woodworking Week 2014 – Wednesday

I have a couple of friends who are looking to buy new houses. And, it seems as if every day, I get an update on how the house hunting is going. They talk about the beautiful, large rooms. The big yards. The big windows that let in lots of Florida sunlight.

When it comes to house shopping those are – of course – some of the things that people look for. But, there are other things that aren’t seen, but also need attention. What kind of wires are behind those walls? Is there lead paint or asbestos in the house? Most importantly, how strong is the foundation?

A strong Slab foundation

Sure, it’s not the sexiest part of a house, but a strong foundation gives all of the other stuff in the house the right place to live. It gives you the piece of mind to paint and decorate the heck out of that house, the assurance that your walls won’t buckle, crack or sag and the peace of mind that the entire structure won’t fall over in the first big blow.

The same thing goes on with woodworking. Oh, sure, I think everyone wants to start off building heirloom quality furniture right off the bat, and it can happen. But, building successfully is much easier if you have a strong set of foundation-level skills to build your woodworking future on. I have identified my top three here, and I would love to hear your ideas…

Operating safely1) Safety. A table saw blade can rip through hard maple with ease. A finely honed chisel can take paper-thin parings off of a piece of white oak. A router can cut a beautiful profile on the edge of a bubinga board. If these tough woods can be cut with ease, what do you think they can do to flesh and bone? When anyone starts woodworking, they should always keep safety top of mind. This includes knowing how to safely operate power tools, wearing eye and hearing protection and understanding that well-maintained tools are less likely to hurt you. Remember, it’s difficult to do woodworking if you have a dozen stitches in your hand because you weren’t careful.

2) Sharpening. Sharp tools are a pleasure to work with. Dull tools can mar your work, potentially hurt you and make a pleasant day in the shop a real pain in the patootie. That’s why you want to stack the odds of building a great project in your favor. Sharp tools can do that. Learning how to sharpen can seem like scrubbing the floor, but you will love the results. Besides, some of my best shop ideas come when I am working at my Tormek, thinking about how I am going to take my project to the next step. Cleaning your bits and blades is just as important.

A precise cut

3) Precision. Knowing how to measure properly is awesome. Sometimes, you don’t even need a tape measure or other device to know how long to cut a piece, because you can measure it exactly from the project, eliminating a potential error. Knowing how to cut, pare or plane to a marked line also ensures that the pieces you cut will fit just as you want them to. Believe me, remilling parts and starting from scratch are things that take a lot of time and always prove frustrating…

Developing these foundation skills may seem like hard work and drudgery, but believe me, if I hadn’t glossed over these three steps while starting back in 1998, I would have been a much better woodworker in considerably less time.

And, if you do make a mistake, just remember; if you aren’t making mistakes, you aren’t really learning. Believe me, we all make them.

Now, for my favorite part of Get Woodworking Week – today’s bounty of articles from other talented woodworking bloggers:


Get Woodworking Week 2014 – Tuesday

So, we’re a few days into Get Woodworking Week, and I had an interesting question sent my way.

It comes from Neil Zenuk – better known as TwoWheelNeil on Twitter – in response to yesterday’s post about inviting someone into your shop to teach them about woodworking, Neil wrote, “Any tips if you don’t know anyone who is interested?”

Hmmm… Neil seems like a pretty social guy, but maybe he is secretly a little bashful. That assumption flew out the window when he said he was taking out a personal ad reading “Woodworker seeking new friend willing to explore new joinery.”

OK, that would be kind of an unorthodox approach to the week’s mission, but hey, if it floats your boat.

Back to the question at hand. Not everyone knows someone who is interested in coming into your shop to learn the basics. But, that doesn’t mean you can’t play along. In fact, here are some ideas on how you can participate without inviting anyone into your shop:

Groaning with woodworking books

Spread the wealth. Most woodworkers have that special bookshelf in their homes… Someplace where their collection of woodworking magazines runs back to – I dunno – 1984. While it’s great to stroll down memory lane to see how to build a great typewriter stand, your shelves might appreciate if you went through the collection and donate the ones you may never read again to the local library. Future woodworkers would get a kick out of reading the collected knowledge.

Sneak it in. One of the members of the St. Petersburg Woodcrafters Guild took several of his old woodworking magazines and left them a doctors offices, gyms and other places he frequented. Not only did he do that, he also attached stickers to them inviting the reader to the guild’s next meeting. Pretty resourceful.

Some servicemen who appreciate woodworking

Send to a solider. Or airman, or Marine, or sailor. Many of the brave men and women deployed overseas are woodworkers, and while they are on base, they may be looking for a distraction from the day-to-day grind – or the dangerous missions they undertake. Get in touch with a local chapter of the USO, the Veterans of Foreign Wars, American Legion or other organization to see if you can donate some woodworking books, magazines, tools or wood to the troops. You might be surprised how appreciated those gifts are.

Talk it up. Libraries aren’t just for books anymore. Many libraries offer an extensive speaker’s bureau where professionals come in to talk tax preparation, what the local government is up to, how to write a novel… the works. Talk to your local library’s manager and see if they might be interested in hosting a talk where you let people see some of your tools and finished projects.

Kids LOVE woodworking

The ABC’s and 123’s of woodworking. Where will the future woodworkers come from? The grade schools, scouting groups and other youth organizations. Find out where these groups meet, make an introduction to the leaders and see if you can’t schedule a talk there. You just might be the spark that ignites a new woodworker’s career.

Start a blog. Hey, come on in. The water’s fine. Google and WordPress are two easy places to start blogging. Just set up an account, and let us know what is going on in your shop!

You can see, there are plenty of things you can do if you can’t invite someone into your shop. Just give it a little thought, and you’d be surprised just how cool it can be…

And, here are some links to some great articles written for Get Woodworking Week. Remember, send me links to your articles so I can link to them:


Get Woodworking Week 2014 – Monday

What a way to kick off Get Woodworking Week 2014 – by missing the Sunday post!

But, hey, that’s not too bad. Didn’t we spend hours yesterday making plans for big parties, tasty food and copious libations, only to watch that stinker of a game? I mean, the Super Bowl ended up being the SubPar Bowl, with little to hold your attention, unless you were a Seattle Seahawks fan.

Then, it couldn’t have been any better.

The Seahawks Defense was impressive

But, that’s not to say that the game yesterday couldn’t be linked to woodworking.  (Oh, yes, I’m going there…)

Think about it for a minute.  No one on Seattle’s team had a Super Bowl Ring before last night. Today, everyone has one.  Now, what do you think holds people who have never been in a woodworking shop back from trying it for the first time?  A lack of experience?  No tradition in doing woodworking?

The Seahawks beat up the Denver Broncos...

Well, no experience in the Super Bowl and a lack of a winning tradition in Seattle didn’t seem to stop that team from getting out on the nation’s biggest stage and having the best game of their season.

This week, find someone who has mentioned to you that they have wanted to try woodworking, but never took the opportunity to do so. You might just find a new shop MVP that way.

Pete Carroll coaches up  Russell Wilson

And, how did those talented Seahawks players get to where they are today?  Certainly, they didn’t pick up playing football this year. Many of them have been in the league for several years – on several other team’s rosters – before they got to the pinnacle last night.  They honed their skills in college and established the fundamentals in high school. The team’s coaches kept introducing new skills to them throughout the season during numerous practices.

The person stepping into your shop for the first time also needs to know that he or she isn’t going to be playing at world-championship level for some time to come, but, instead, they will be getting the basics down, learning about what the tools do, how they are maintained and what kind of functions they do in the shop. With a grasp of the basics, the rest will come naturally.

Hoisting the Vince Lombardi trophy

And, finally, as the Seahawks players hold the Vince Lombardi Trophy over their heads in triumph, they will be hosting the physical representation of their victory in their hands. It will serve for years to come as a reminder of the hard work that went into getting to this point.

Now, that's a happy wooworkerMuch like their first successfully completed woodworking project…

So, the game plan for this week is to get some new folks into your shop or to get them started in woodworking somehow. You may never know who goes on to build world-class furniture.

Remember: This week, if you plan on writing some articles about Get Woodworking Week, be sure to send them my way. I will link to them here to make sure we spread the word.


Link of the week

Sears’ Essential Woodworking Tools

There was once a time when Craftsman tools – the line carried by Sears – was the gold standard in workshops. As the years passed, some of the brand’s luster was allowed to wear off. However, recently the brand has made huge steps to improve its offerings, and now they are working to improve their education as well.

CraftsmanSears recently asked nearly 40 woodworkers from many different disciplines (they also asked me) about the most important tools they have in their arsenals. The results are on this interactive page, which can provide a little guidance on which tools might be the best place to start.


Unraveling mysteries

As I have mentioned before, our friends Bob and Pam hold an annual event known at Timpano Night. In the late winter or early spring (the date changes to ensure maximum participation), a number of us get together to collaboratively build something known as a Timpano – an Italian dish consisting of all kinds of goodies married together inside a rolled crust and baked until done to perfection.

The one down side about Timpano Night is that the dish is hardly what you would consider fast food. The baking alone takes a little more than an hour, and unless you want to eat some type of steamy Timpano soup, the final product has to rest for at least another hour to firm up.

But, leave it to Bob and Pam to come up with the ultimate solution to pass the time. Each year, they hire a magician to come to their house to perform some up-close magic tricks during the cooking and cooling phase of the dinner.

It's Kentastic!Kentastic isn’t just a magician – he has become an integral part of the entire event. And, while the kitchen crew toils away, Ken wows the crowd with his prestigidation.  Believe me, he’s good. And he is also a great showman, keeping the table in stitches as he goes from trick to trick.

There is one person, though, who sits very close to Ken while he is performing his feats, and she gets very involved in the act. Our friend peers closely at his hands, trying to find the secret of his act. She gets as many – if not more – laughs than Ken as she gives him grief and tries to figure out just how Ken does his thing.

There has been many times during my past 14 years as a woodworker where I have found myself looking at a piece of furniture or some other project and thought to myself, “Dang! How did this woodworker do that?”

The Maloof Joint

Sometimes, it can be examining a challenging joint on a beautiful project. I have seen the famous joint that woodworking legend Sam Maloof used to connect the legs and backrest of his sculpted chairs to the seats. I have had woodworking notables such as Andy Chidwick, Kurt Rashke and Charles Brock explain – and SHOW me – the joint, and I still have trouble wrapping my mind around just how the joint works, and how to cut it.

Inlaid dovetailsI have seen beautiful inlaid dovetails cut with some router based jig and wondered just how the heck those babies were cut, when – with a little bit of prompting – I probably could figure out that the proper application of a dovetail router jig could bang those babies out lickety split.

A large slab tableAnd, more than once, I have wondered just how people work with tremendously large slabs of gorgeously figured woods to build dining tables that are both flat and smooth, yet allow the natural beauty of the wood to shine through.

You know what? As a woodworker who wants to stretch his abilities and try new things, I don’t think I could find anything as exciting as experiencing that feeling. That is what makes me happy – to try new things. To see techniques I have never tried before and to succeed – or to learn from the mistakes to become a more accomplished craftsman.

That, my friends, is why next week, we will be celebrating Get Woodworking Week. Let’s give that feeling to someone in our lives…let’s make them curious and want to find out just how it is built and how it goes together.

Ken and his wife Melissa always stay after the magic to eat with us, and it’s interesting asking him some questions about the art of magic. Sure, Ken will tell us that magic is all about practice and showmanship, but he always adds that it’s the fun he has learning new tricks and watching people like my friend try to figure out how those tricks work that really makes his job fun.


Slip and slide

One of the things I love about the new front entertainment center I am building is that I convinced Rhonda to keep the stereo on top of the cabinets. Instead of having it tucked away, this little bookshelf sized unit will be out in the open, easy for me to attach my iPod, play a CD or add some extra oomph to the movies we are showing on the new TV set.

My stereo, dude...The other thing I am liking is the idea of sliding doors. Because each of the three cabinets are four feet wide, that would mean two foot wide doors that would have to swing out into the room. That would take up a lot of room that – quite frankly – I don’t want to give up in the living room.

An old console TV/Hi-Fi cabinetThe sliding door idea is hardly a new one. At one point, my parents owned a console-style TV. It came with a record player and tuner, built in speakers and a pair of sliding doors that covered the color TV that took forever to warm up.  Those doors helped to make the piece furniture, able to be totally hidden when you wanted to make everything disappear. What a clever idea…

Rockler's sliding door hardwareNot wanting to invest in an expensive track system, I needed an easy way to make a set of sliding doors, and wouldn’t you know it, Rockler had the answer.  They have some sliding door hardware that are simply small rectangular pieces of steel with a set of screws. These pieces are simply screwed to the back of the doors – mine are simple pieces of 1/2″ plywood cut 1/4″ less than the top to bottom measurement and each cut with 2 inches wider than half the overall measurement to allow for some overlap – and ride in saw kerfs in a piece of wood. Because you can loosen them and slide them out of the way, you don’t have to remove the entire track to get the doors out. Very handy.

Kerfing setupI made those kerfs in a piece of oak (it’s a hard-wearing hard wood) using my table saw blade. I had to remove the splitter and guard because it wasn’t a through cut, and I used my Grip Tite 2000 to hold the wood down to the table and in to the fence. I spaced the first kerf the thickness of the plywood door back from the blade, and put the second back a little further than two thicknesses to allow for some space for the hardware.

Track screwed in

As you can see, looking down at the bottom rack, you can see the two kerfs with the inside door mounted in the rear-most kerf. I just screwed the track to the cabinet, in case I do have to remove it. Installing the doors is easy – just set the fully-extended hardware into the bottom kerf, then tip the door in and extend the upper hardware into the upper track, and bingo, you have a sliding door.

The center doors in place

To make it easier to move the doors, I drilled some 3/4″ holes into the doors, and will later insert cup handles into the holes to dress it up. Believe me, you need the handles – trying to open these suckers without being able to get a finger hold is a pain in the butt…

Once I build the other two sets of doors, I will have to sand and paint them, and put some low-friction tape on the bottoms of the doors to help ensure some good sliding. Then some oak tops for each of the three cabinets.

We’re definitely making some progress.

part of the Wood Talk Online community