Link of the week

USDA Wood Handbook

So, how well does wood work as an engineering product? What should builders and architects know about this natural product as they design their projects?

USDA's Wood Handbook

This handbook, produced by the United States Department of Agriculture, answers these questions and more as it gives the tale of the tape on the mechanical properties of wood, plywood and other wood based products.

Definitely worth a read, and the price is right!

Stuff I’ve built: The dresser top valet

As with all summer projects over the past few years, this one took forever to finish. But, I’m very happy with the way that things worked out.

The dresser top valet

To recap, this plan came from Wood Magazine, and it is the proof of concept for building others for my nephews. The project didn’t take a lot of walnut, and I did make sure to grab a 2′ x 4′ sheet of high quality 1/4″ plywood for the drawer bottom and the substrate for the anigree veneer top.

Once the final sanding was done, I started the finish by spraying on some dewaxed shellac. Because there were so many cubbies in this piece, I thought spraying would work better than wiping on, and my suspicions were confirmed. After a sanding with some 320 grit paper, I decided to press my luck and spray on a few coats of lacquer, which came out looking really nice.

The drawer

The drawer has some great storage capacity. The original plan called for dividers, but I decided to go without, figuring later I could build or get some small containers to store items in there. The drawer runs beautifully on the two runners on the sides, and I was sure to wax up both the runners and the sides of the drawers.

For the handle, I picked up a simple pull from the local home improvement center. I think the antique brass look matched the walnut well, and I like the look a little better than a simple knob.

Loaded up

Once I got the piece into place, it was fun to load it up with stuff. The top is a great place to drop the watch, keys, iPod and other goodies, and the cubbies in the back hold the wallet, work ID, my multi-tool and other goodies. I took the time to drill out the back side of the middle cubby so I can eventually thread a USB charger cable through and move my phone there, but that would involve me moving the dresser… and right now, that sounds like too much work.

A beer sounds much better.

Now, time to clean up the shop and start planning the next adventure!

Superheroes never take a day off

Here in the United States, today is Labor Day. Most of us are relaxing, enjoying barbecues and contemplating the end of the summer and the beginning of the – gasp – blizzard season.

But, that doesn’t mean that everyone is off. I mean, police, fire and emergency medical types are on the job today. Reporters, videographers and news producers are on the job. And, as we all know, even superheroes are on the job.

What you might envision a superhero looking like

Do you really think that if the bat signal is given that Batman would neglect the call?  That Spiderman would let Doc Oc run amok while he sat at the beach? That Wonder Woman wouldn’t spring into action if Cheetah was out causing issues?

Well, here in Florida, another superhero is hard at work… Handyman!

Handyman

Fighter of grime.  Tamer of wild lawns and landscaping. Fixer of broken items. Yes, there’s nothing this brave mutant wouldn’t do around the house given enough time off from his day job.

Cheap chair

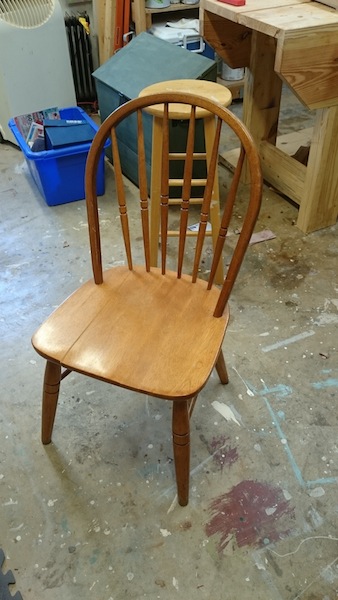
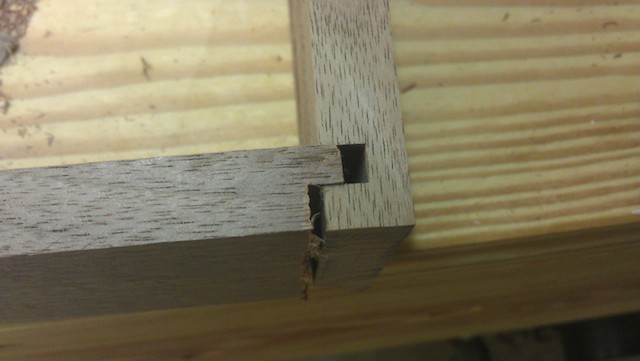
Why, recently, his arch-nemesis, Old Cheap Dining Room Chair came to visit, splitting along a poorly constructed glue joint.

Nice crack

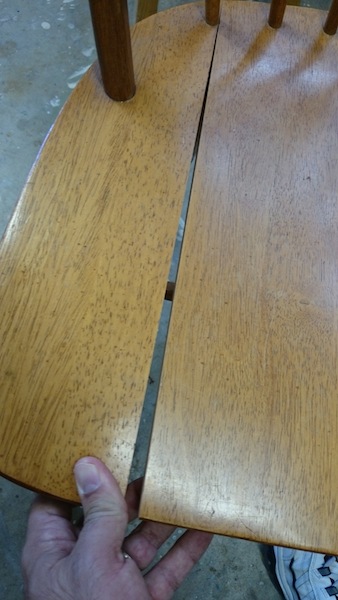
Just look at that!  A potential posterior pincher if there ever was one. This had the potential to endanger all of the residents of Chez Iovino.

The tools

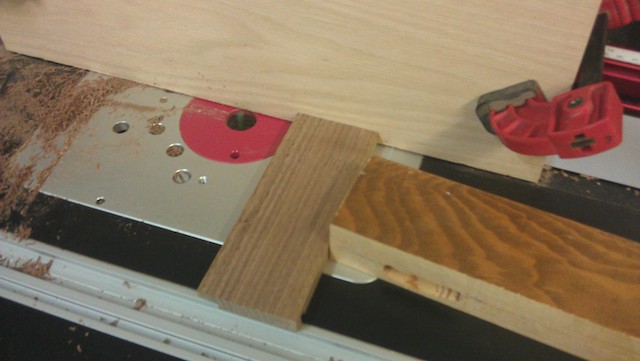
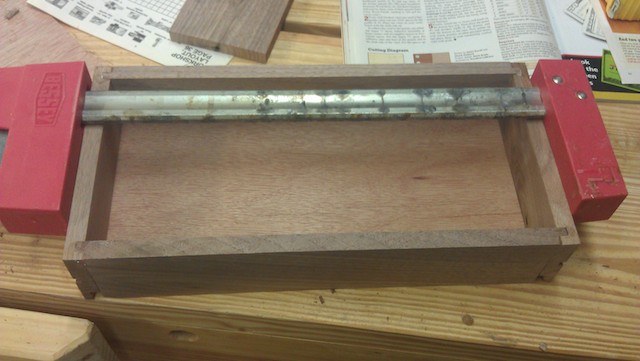
Fortunately, the call went out to Handyman, and, faster than paint can dry, he was on the scene with his necessary equipment. Just as important as the Lariat of Truth or the Batarang, Handyman reached into his bag of tricks to find the Gorilla Glue of strength and the Bessey Clamps of power!

Glue him up

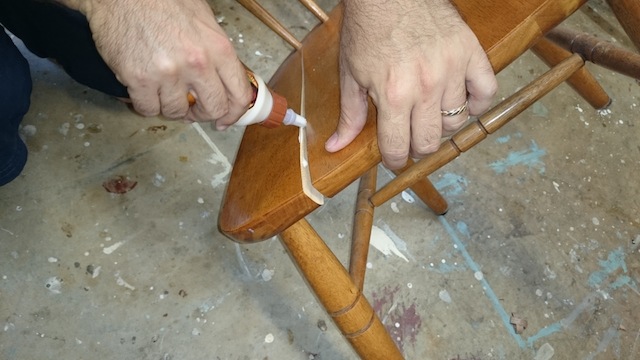
Pow! Bang!  Ooof!  Before Cheap Chair knew what hit him, Handyman had squeezed a bead of glue into the split and spread it with a shim, evenly coating both sides of the seat. Knowing that the end was near, Cheap Chair tried to spit out all of the glue that Handyman used, but to no avail.

Clamps of power

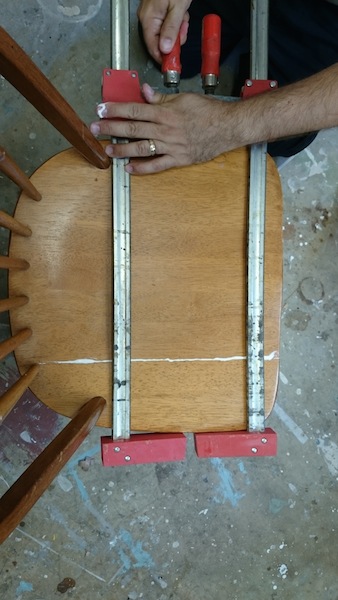
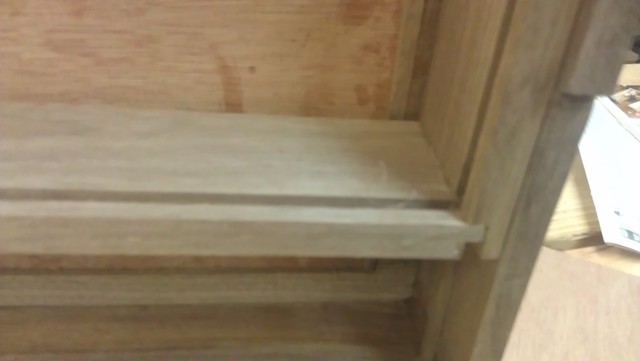
Once the Clamps of Power were applied, it was all over but the crying. Cheap Chair caved under the pressure, and the split was fixed, promising pinch-free sitting for years to come.

While citizens were able to see Handyman in action, he disappeared shortly afterward, unavailable for comment. Funny, that’s when my family found me, asleep on the couch… I had missed the whole thing…

But, I know, somewhere out there, Handyman waits for the next call, tools at the ready, when trouble rears its ugly head.

Link of the week

Thermo-Treated Wood

There are lots of options when it comes to working with wood outside. Some species are naturally rot resistant, while other chemical treatments can help extend the life of the wood.

A thermo-treated sink base

But, there is a process by which wood is treated with heat – much higher than experienced in a drying kiln – that changes the wood’s structure, making it exceptionally rot-resistant.

So, if you are looking to build an outdoor project, the folks at Thermo-Treated Wood have this information page on their product and where it can be purchased.

Sanding senses

Today, I begin sanding my dresser top valet. Yay…

You tell 'em, Brad

Oh, sanding is such a joy. I mean, who doesn’t enjoy rubbing rough paper over their project for hours until it is good enough for finish? I mean, what else could you be doing with your time? Watching grass grow? Checking in on drying paint?

Yeah, even though it’s an essential step in the process, I don’t think anyone really wants to sand. Ever. If someone could invent a device where you put your assembled project in one end, and it came out smooth, blemish free and touchably rounded over, we’d cough up huge bucks for it. But, until then, we have to do it the old fashioned way with sand paper, hand planes, scrapers and elbow grease.

Fortunately, I also like to employ one of the most sophisticated devices known to humankind to determine when I have sanded enough…

The fickle finger

Yup, I’m a touchy-feely kind of guy. I like to feel how I progress while I sand, and that starts with the edges of the boards. Now, when I cut those suckers, I was looking for a sweet 90 degree angle, straight, square and true as the boards came off the table saw. Now, not so much.

Potential ouch zone

Those sharp edges can be very uncomfortable to bump against, and can easily cause a splinter if I rubbed my hand against them. So, a little bit of 120 grit sandpaper, some work on the corners, and bingo, I’ve put myself into a much more comfortable situation.

Sandy SandyOnce I have the edges broken, that’s when I turn to the random orbit sander to do the majority of the bulk work. Some joints need a little leveling, and some mill marks need to need to disappear. That’s when I start to look for a way to gauge that I am sanding evenly.

Ooooh!  Pretty pencil

My dad taught me this trick, and I still do it today. I take a pencil and run a squiggly line down the face of the piece I want to sand. Once I have this on the board, I take up the random orbit sander with a 120 grit pad, and get to it. With the sander hooked to my dust collector – and on a project this small – it’s a pretty easy task to get an even sanding on the piece in very short time.

Line be gone!

Once that line is all gone, I know I have done a decent job getting a good sanding on the piece, I will also look at the project face with a raking light to see if I have gotten rid of all the milling marks and other imperfections. When I don’t see any more, I switch to a 150 grit pad, and give everything a once-over to refine the piece a little more. Of course, anything that’s tough to get to with the pad needs some more hand work, but that’s not too bad.

Next step, a little finish, attach the handle, then start cleaning off my dresser top.

Drawn in…

I have come to an important realization in the process of building this prototype dresser top valet. It’s really just a project in three steps.  The body, the top and the drawer.

Had I thought this out a while back, I might have completed this job – I dunno – four months ago. Instead, it all seemed so amorphous back then, but, now it’s so simple, even a trained shop monkey could do it.

Iggy doing his research

Sorry, Iggy. I didn’t intend to disparage you.

Where were we … ah, yes, the drawer. The plan in Wood Magazine called for a very simple drawer design with all of the joinery done on the router table. First, I cut the two sides, front and back to size. That was easy on the table saw.

Some routing on the sides

Using a large board as a backer, I cross dadoed the ends of the drawer sides to accept some stub tennons cut on the ends of the front and back.

Corner joinery

As you can see, the joinery is insanely simple and took only a few minutes to set up on the router table.  Easy peasey.

Drawer on the runner

I also used the same setup to cut a groove to capture the drawer bottom and some grooves on the outside of the drawer, which would allow the drawer to ride on a set of runners I had glued to the side of the case. This photo doesn’t do it justice, but you can see the drawer runner peeking out at the bottom right of the photo. The drawer grooves ride on that.

Glue it up

With a little bit of glue in the grooves and a plywood panel cut to size, I clamped the drawer assembly together, ensuring that the assembly stayed square through the process. This took all of maybe half an hour worth of work, and most of that was ensuring that the set ups were spot on.

Nearly there

The next step was to attach a false front to the drawer to hide the grooves that peeked out from the sides. That was an easy task with a little glue and some clamps once I had everything centered. I have also drilled the 3″ centered holes for the drawer pull, and now I have to start sanding the piece to get it ready for finishing.

I’m hoping that once this is done, I will be able to make a few templates to speed up the building process, and when the temperature drops a bit, to get out into the shop and batch a few of these babies out …

The weekly plan

The one and two sheet plywood bookcases

The students are back – or will be getting back – to school, and they need someplace to put their reference books, text books, yearbooks and other various assorted items. Sure, you could build an impressive solid wood bookcase, or – heavens forbid – buy one for your star pupil, but why not consider building an easy, simple version using only one or two sheets of plywood?

two-sheet-bookcase

The Wood Whisperer’s guild has a sweet looking plan to build a bookshelf in either a one or two sheet configuration. While they are simple to build, they look awesome, and you may very well want to keep them around long after the kids graduate and move out.

The cost for these plans is $30, but you not only get eight detailed videos that walk you through the process step by step as well as measured drawings.

part of the Wood Talk Online community