Tools I Use – My Thickness Planer

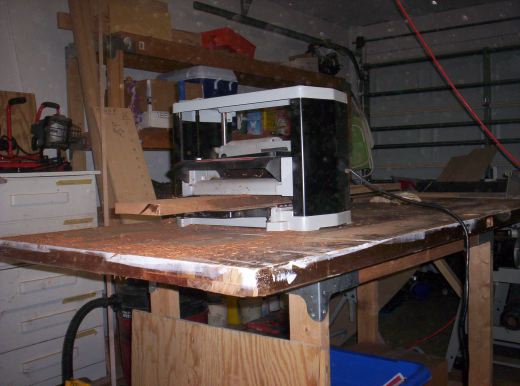
Delta 12″ Portable Planer 22-540

As with just about every woodworker, all of my first projects were built of 3/4″ material. The plywood, the lumber – everything was exactly as thick as it had come from the home center.

My thckness PlanerOne day, I was holding some sweet wood that was given to me by a local hardwood supplier, and I thought to myself, “There has got to be an easier way to get all of these boards the same thickness without using a belt sander.”

That’s when I went out and got a portable thickness planer.

Sure, I considered some very expensive models. But, since I thought I was only going to need it for a few projects and money was tight, I went with the ‘entry level’ Delta.

When I unpacked the unit, it looked very solid and straightforward. A simple crank handle to adjust depth, two sturdy tables for infeed and outfeed, a cord wrap. Even better was an access port to remove and replace the motor brushes to help with future maintenance. Obviously, Delta didn’t plan on this to be a disposable piece of equipment.

The first project I ‘fed’ this planer was a laminated picture frame stile – strips of walnut, mahogany and maple. The planer’s depth was easy to set, and it made short work of evening out the irregularities. I was stunned how quickly I could produce a really nice surface that only needed some sanding to perfect.

Unfortunately, there was quite a bit of snipe on the ends of the board. I planned for this and made my glue ups longer than I needed, so I was able to cut off the sniped ends and build around it. Since the project was made of free scrap, it didn’t affect me much.

Now that I’m building with more expensive wood, I’ve had to create a work around to reduce the amount of snipe I get. The solution was use a piece of melamine shelving with two cleats screwed to the underside to register it to the infeed and outfeed tables. I also lift up on the edge of the board as it comes out of the planer. These workarounds do OK for now.

I’ve reversed and changed the blades, and the process is relatively simple. It involves unscrewing two allen bolts from each end of the disposable blades. They were also easy to remove and replace. One word of caution, however. Planer blades – even dull ones – can cut you badly if you make contact with them. Always be careful when handling them!

Since this is the first planer I have ever bought or used, I’m sure my review isn’t as valuable as those who have used many others. But, hey, it works for me, and I’m really in no hurry to go out and replace it. My plan is to use it until the thing falls apart. Or, at least, until I hit the lottery!

Link of the week

How to set up and use a shooting board

Shooting boardHand planes are very useful tools for flattening a board’s face, truing an edge or planing a bevel.  However, if you really want to move your hand planing to a new level, consider using a shooting board.

Shooting boards give you the control you need to accurately plane end grain or miters to absolute precision.   They are easy to build, and the technique to use them is very easy to master.

This site, sponsored by White Mountain Designs, offers step-by-step instructions for building the basic shooting board, add-ons that allow you to plane spot on miters and bevels and tips on how to use the jig with different types of planes.

Even if your power tools are tuned accurately, a shooting board can refine your work to near surgical accuracy.  Take your plane craft to the next level with a shooting board.

Stuff I’ve Built: The Weather Station

September, 2007

    I love weather.  I also love woodworking.

    Weather Station
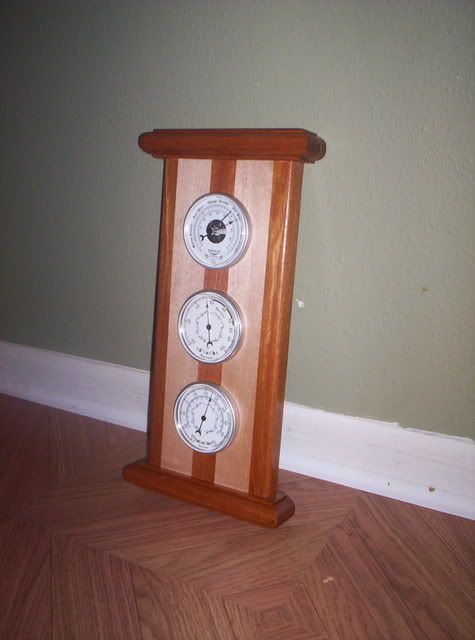
What better way is there to satisfy both of my passions than by building a wooden weather station?

    This was one of those projects I really enjoyed building because it was built with free scraps.  The Brazilian cherry and maple were cast offs from a neighbor’s shop that I was able to put to work.

    For the body of the station, I laminated strips of maple and Brazilian cherry, then bored the holes for each of the instruments.  The top and bottom of the station are moldings I shaped on the router table.  I shaped a rectangle of wood and then ripped the pieces from the larger piece, making for a much safer operation.

    I used glue and pocket screws to attach the top and bottom, and discovered just how easy it was to split the wood.  There are two small splits where even the finest pocket screws were too much.

    I sanded the piece down to 220 grit, and finished it with the Rude and Crude method – 1# cut of dewaxed shellac, sand with 400 grit, then apply two coats of Danish Oil.

    The instruments were purchased from Lee Valley, and they include a thermometer, barometer for measuring atmospheric pressure and a hygrometer, which gives a fairly accurate reading of the relative humidity.  Unfortunately, because I have the  station indoors, I’m reading the temperature and humidity inside my office.

    Link of the week

    Cape May Winery

    Sure, it’s not strictly woodworking, but, hey, I’m on vacation, so you get this.

    Cape May WineryBelieve it or not, in touristy Cape May County, New Jersey, there’s a little bit of a wine renaissance taking place. About 18 years ago, students with Rutgers University planted a sample vineyard in a sleepy little corner of the county, away from the beaches, t-shirt shops and sunburned vacationers.

    With Delaware Bay to the west, the Atlantic to the east and some very well-drained soils, classic wine grapes are being harvested and turned into really nice wines. Pino Grigio, Chardonnay and Cabernet Franc are growing well, and the county is quick becoming a wine destination.

    Now, what about that woodworking? Well, the vines, winery and tasting room stand on what used to be the estate of one Isaac Smith, the local coffin maker. In fact, the Isaac Smith label is in the shape of – you guessed it – a coffin.

    I just had to work some woodworking in on this trip!

    My first – err – project

    OK, for anyone who followed my recent article about my first woodworking experience, you might have wondered how I could have gotten started again in woodworking.

    I was looking for the perfect gift for my wife for her birthday. I looked at the pretty sparkly things in the jewelers case. But, she told me that she didn’t want any of that. Besides, we didn’t have the cash to buy anything really nice. Too expensive.

    I looked in the department stores for clothes, a hand bag, shoes, anything that I thought she would need. She told me that she really only wanted a gift card. Too impersonal.

    Perfume? She didn’t wear any. Too allergic.

    My first *YUCK* projectI looked on the Internet to find a quaint bed and breakfast to take her on a vacation. Of course, we would have to get a sitter for our infant son. And, who could we really trust to care for him like we could? Too much of a bother.

    I was really getting dejected about these shopping trips when my wife uttered the words that would change my life. ‘I would really like a blanket chest for the foot of the bed.’

    The flash of inspiration hit me as if someone had taken a flying roundhouse kick to my forehead. If I couldn’t find the right gift in a store for my wife, why shouldn’t I build the right gift?

    The only problems I could identify in my plan were 1) I had no idea what to do and 2) I didn’t have the tools to make it happen. Hmmm. These were going to be some tough hurdles to overcome.

    And, its not as if I was getting much encouragement. My coworkers basically told me I was crazy. Too much work. Too expensive to buy the necessary tools. Too complicated for me to figure out.

    Fortunately, fate stepped in. A builders supply store was going out of business and had most of the tools I needed to get the job done right on clearance, including a doweling jig. They were also blowing out their lumber. I picked through the racks of No. 2 pine to find the ones with the straightest edges and yes, I even picked up a sheet of 1/4″ BC interior construction plywood for the box.

    What was I thinking?

    Are the construction plans orthodox for this project? Nope. No one but me would advocate you build this way – unless you are starting out. And you had no real tools. And, no one was going to look at it.

    When I was finished, you thought I had painted the Mona Lisa. It wasn’t square. The finish was terrible. Heck, it didn’t even sit level on the floor.

    But, my wife was pleased to see that I had actually finished a real project. And, it actually held blankets. She gave me a kiss and told me, “Good work. You might have a future in this…”

    Too much fun!

    part of the Wood Talk Online community