Has this ever happened to you? When you get your project mostly complete, you move it to the spot where you want to finally place it and – dang – it doesn’t seem ‘right’ to your eyes. Or, while building, you cut a series of joints on a project, but they don’t seem to add anything to the overall appearance of the project.
Wouldn’t it be great to see what your project will really look like BEFORE you commit to building it?
That’s why woodworkers will sometimes build prototypes of their projects. They’ll mock up a piece in inexpensive No. 2 pine instead of their prized cherry, maple and walnut boards to get an accurate representation of what the project will really look like in its final form.
Of course, building prototypes does consume a few resources along the way – namely wood, time and money – some things that woodworkers often find in short supply.
This week, I want to know if you go through the process of building prototypes for your projects, and how the process works for you.
Where should you put your table saw? Would the band saw work better in one corner of your shop or another? Do you have enough room to build that miter saw bench along the back wall?
Setting up your shop can be a royal pain in the rear. Discovering the ideal layout without dragging your tools back and forth is almost enough to make you want to just chuck them in the middle of the floor and be done with them.
You wanna know a secret? The people over at Grizzly Industrial feel your pain. To help save your backs, they have developed their free workshop planner feature at their website.
After you enter the size of your shop, you can use the sample templates for doors, windows, benches, tools and other items you might find in a typical woodshop. By dragging them around, you can see what works best where and how you can develop a good flow of work.
Granted, the tool templates are the footprints of the Grizzly tool line. Hey, their site, their rules. But, I think that you will still find this feature handy regardless of whose tools you purchase.
When I’m not woodworking, writing about woodworking, raising kids, teaching people about hurricanes, fixing problems around the house, doing laundry… wow, I really am a busy guy… I like to do some home brewing using my Mr. Beer system.
Ahh, yes, after a hard day of doing what I do, I love nothing more than to crack open a cold brew that I made myself and decompress. There’s nothing quite like sampling what I have had to wait a few weeks to become the final product. The anticipation kills me, but it makes that first sip so much sweeter.
Ya know, beer is pretty amazing stuff. You take four ingredients – malted barley, water, hops and yeast – and you can create hundreds of different beer varieties. Rich, malty Octoberfests, clear refreshing pilsners, dark and brooding stouts. Roast the malt a little longer, use different hops and try a different strain of yeast, and suddenly you are looking at a totally different style of beer. The varieties go well beyond what you can find in a convenience store. In fact, the proliferation of microbreweries has shown your average beer consumer about the incredible selection of styles from around the world.
What’s this got to do with woodworking? Plenty. No, I don’t want you to drink and go into the shop to work. Maybe you can handle a broom, but that’s it. No more.
However, by manipulating the basic elements of woodworking – wood choice, joinery techniques, hardware choices, finishing decisions – you can take a mundane project and do some interesting things with it.
Here’s exhibit ‘A’. This is a basic architectural clock design that came from Wood magazine. It can be built in an afternoon or two with a small pile of scrap wood and a battery operated clock movement. Ho hum, right?
Simply changing the wood I used to build the project changed the entire appearance of what is essentially an identical piece.
Yes, both clocks are identical. The same amount of wood. The same clock movements. The same joinery methods. However, you would be hard pressed to call the finished products identical. In fact, I call these clocks fraternal twins – alike but different. The light one is maple with a cherry face, and the other one is the opposite.
The key here is to take your time when choosing the wood for your next project. It can have a dramatic effect on the final outcome. Whether you want to showcase a particularly handsome piece of wood or you want the item to blend in with the background, your decision on what you choose to build will play dramatically in the end.
The house I grew up at in New Jersey had a fireplace. I remember my dad and uncles building it late in the year – sometime around a Christmas in the early 1970s when I was just a little tyke. It quickly became the social center of our home. When my brothers and I were really young, my dad lit the fires on the cold winter nights. The job later fell to my older brother and then eventually to me.
Now that I live in Florida, the need for a genuine fireplace isn’t as urgent. Oh, sure, there are fireplaces in some homes in Florida. I have been in my share of them on a warm winter afternoon where the fire was lit and the air conditioner was on to offset the heat gain.
In our home, my wife and I have discussed the possibility of adding an electric fireplace insert to give us the ‘ambiance’ of a fireplace without the hassle and expense of building a real one. This way, we can get the glow whenever we wanted, and could turn the heat on for just the chilliest January mornings. Whenever I see ads for these ‘realistic’ fireplace inserts, I stop and pay attention.
One ad I recently saw on TV was for an electric fireplace insert called the Heat Surge. What set this particular unit apart? It wasn’t the realistic flames – although they did look convincing. It wasn’t the extra heat it could provide for the room it was located in – although there were plenty of satisfied customers who touted that feature. It wasn’t even the fact that it could save money on your heating bill – even though there was a graphic which showed money flowing back into a typical homeowner’s pocket.
No, what sets this unit apart is the fact that the wooden case and mantle built around the electric fireplace unit is hand crafted by the Amish.
For those of you who aren’t familiar with the Amish, their communities can be found scattered across Pennsylvania and the Midwest, with other communities in Canada. These devout people choose a simpler, more secluded life to prevent the influence of the ‘English’ world – mainstream America – from affecting their membership. Their dress, mannerisms and even their language – a Germanic dialect – make them easy to recognize when they are in the ‘mainstream’ world.
Since the Amish first established their communities, they have tried to remain as self-reliant as possible. Many homes are not connected to the power grid and have no phones. However, in today’s day and age, the Amish leaders in many communities realize that there is much benefit to be gained in interactions with the ‘English’ world. Amish agricultural products and crafts are eagerly sought out and recognized as high quality by consumers. As with the Shaker communities in the 19th and 20th centuries, the Amish view hard work as a form of worship, and one way they express their prayer and devotion is through producing understated high-quality goods.
Now, this isn’t to say that the Amish haven’t had to adapt their ways while interacting with the outside world. For instance, all Amish dairies are required by law to follow the same sanitary and production practices for their product as any other commercial dairy in their state. Foodborne illnesses are no laughing matter, and tracing an outbreak of salmonella back to an Amish community would inspire suspicion, anger and lawsuits. This may require the installation of generators to provide the necessary power to be in compliance with local laws and ordinances.
Their other practices have had to be modified some to meet the demands for their labor. Early one spring, I flew to see my mom who lived in a new subdivision in south east Pennsylvania. “Thomas,” she said, “you’ll never believe this. The craftsmen working on the homes in my neighborhood are Amish! You have to see them work…”
So, very early one morning, I poured myself a cup of coffee and stepped outside, fully expecting to see a horse-drawn carriage arrive and discharge Amish craftsmen armed with hand saws, bit braces and other classic hand tools to craft the structure. Much to my surprise, the Amish workers arrived in a Chevy truck, took their power tools out and started working on the home.
On this infomercial for the Heat Surge, the hosts were standing inside a large barn-type structure. They were surrounded by the assembled units and were extolling their virtues. In the background, there were maybe a dozen or so Amish workers – both men and women – busily working on the wooden cases. I had seen this infomercial so many times, the activity just blended into the background.
Before I hit the remote control button to change the channel, something caught my eye. There, behind the female host was an Amish woman. She was holding something in her hand and moving it back and forth, sort of like you would expect to see a person use a clothes iron. She wasn’t holding an iron – she was holding a wooden jointer plane – maybe 24″ long with a solid looking tote and square cheeks. The tool looked immaculate and, I would imagine, be a pleasure to use.
As she moved this massive plane back and forth, I noticed that she was holding it with only one hand, there was no iron on the plane and there was nary a curl or shaving anywhere in sight. Looking even more closely, she was running the plane over a totally finished panel! Wow, that was very interesting…
Looking at the other workers in the background, other oddities really jumped to the fore. A worker holding a chisel up to a finished piece, pressing it into the underside of the top and placing it back down on the bench. There’s the guy checking the top of the unit with a level – not checking the assembly for square as is the norm with case goods. While the entire half-hour infomercial isn’t available online, if you look very carefully at the first few seconds of this abbreviated version, you’ll clearly see an Amish worker holding what appears to be a No. 4 or No. 5 bench plane at eye level, rubbing it over the top of a finished piece. Again, not a single curl or shaving is detectable.
Nobody uses a plane like that. Period. Especially someone who is familiar and experienced with one. It would be used with two hands at a bench about waist high to get maximum leverage and make the work easier and more accurate. He did rub his hand over the surface, but nothing is there to wipe away.
This little charade continued in the background every time the shot went back to the hosts in the barn. After a few minutes, I called my wife over and started pointing out everything that was out of the ordinary. Sort of like a game of “Where’s Waldo”for woodworkers.
The script writers, director and producers of this infomercial must have spent a tremendous amount of time staging this shot. I can see what the day on the set must have looked like. “OK, you over there, take that big wooden thing you push around and rub it over the board. You guys over there, pick up those chisels and look busy. You, ma’am, rub that finished top down with this rag to make it look like you are working. Remember – the viewers want to see ‘hand made’ – give it to ’em! Places, everybody! Let’s make video magic!”
In this commercial, the sizzle isn’t comfort, energy savings, quality of the electronics or ease of use… I’m positive that every electric fireplace insert on the market can trumpet those features for each of their models. Instead, it’s the fact that the Amish hand craft each surround and mantle. Even if back at the real shops they are using generator-powered table saws, routers, planers and jointers, the hand crafting with old fashioned hand tools by the Amish is the only thing that truly sets these units apart. Even if these pieces have never seen a hand tool…
And, that got me thinking. I’m sure the folks who make and market the Heat Surge spent a tremendous amount of time and money to research what consumers want, evaluated the strengths and weaknesses of the product and crafted a marketing plan.
What that tells me is that the hand-made aesthetic is worth quite a bit. I guess the upshot of this rambling post is that when you build something at your shop, understand that the simple fact that you have built the piece adds intrinsically to its value. Hey, you may never sell a single piece you build, but understand that people are (or will be when the world’s economic crisis turns around) looking for that in products they seek to buy.
Either that, or you can throw what you built into your fireplace and stay warm on a cold winter’s eve.
Nails have been an important part of woodworking for centuries. Originally hand wrought one by one, they were so valuable that old structures needing to be demolished used to be burned to the ground and the ashes sifted thorough to recover every usable nail.
Today, factories spit out nails at a staggering rate. And, rather than using hand-forged iron, today’s nail manufacturers use enormous coils of steel wire to make millions of these ubiquitous fasteners.
While brads, pins and nails do have a place in today’s workshop (attaching moldings and solid backs to casework), many woodworkers cringe at the idea of using these metallic fasteners in their casework.
This week, I want to know what your thoughts are on nails in case construction. Now, exclude the nails or pins you would use to do things like attach molding to a project – I want to know if you use these fasteners to hold the actual casework together.
The Gamble House in Pasadena, California, is an outstanding example of American Arts and Crafts style architecture. The house and furnishings were designed by Charles and Henry Greene in 1908 for David and Mary Gamble of the Procter and Gamble Company. The house, a National Historic Landmark, is owned by the City of Pasadena and operated by the University of Southern California and is open for public tours.
The home is an exquisite example of the Greene and Greene style withing the Craftsman aestheitc.
While I haven’t been there yet, this is high on my list of woodworking places to see before I die.
Screws play such a vital role in woodworking, it’s only fitting that they get some discussion. I mean, think about all of the different uses there are for screws in your shop. You might find that my experience alone might be typical…
I use screws to hold plywood projects together. Sure, I could cut dovetails or other joints in the plywood, but I’d be hard pressed to find another cabinetry joint that works as well or is as easy to cut as a dado or rabbet reinforced with glue and screws.
Pocket hole joinery has made it easier to assemble cabinets and other projects without visible fasteners – if you plan and drill your holes properly.
And, the aren’t only for plywood projects. I screwed together several solid wood projects when I first started, and used wood plugs to hide the evidence. The result was very neat and tidy with tight joints all around. Even masters such as Sam Maloof will use screws to reinforce the joint between the back posts of his chairs and the seat.
What about hinges? Even the European cup hinges rely on screws to make a permanent connection to the project. Unless you build your own drawer runners out of wood, you will probably use metal ones joined with – yup- screws to the drawer and the cabinet.
Some of the things I have learned about screws over the past decade of woodworking include:
* Always predrill your holes. Sure, you can muscle your screws in with your drill, but you run the chance of splitting the pieces you are driving into. A combination drill/countersink and driver is an inexpensive way to handle the predrilling and countersinking in one step, and then driving the screw by simply flipping the tip of the tool around. These are sold at just about every home improvement or hardware store, and I have yet to see one cost more than $10.
* Stop the wobble. Driving long screws with a power driver can really be frustrating. Watching the screw gyrate during driving while holding the drill with one hand and the work with the other is entertaining for observers, but can lead to some very choice words by the woodworker. I have found that inexpensive screw guides, which fit into your drill’s chuck and feature magnetic tips and a sleeve that helps hold the screw straight – are worth their weight in gold.
* Drywall screws are for drywall. Sure, every woodworker starts off with a box of black drywall screws to start. And, they tend to drive in pretty well in pine projects. If you give some premium screws a chance, you might be surprised with the difference. I have purchased screws from McFeely’s in the past, and these babies can bring you to tears. They never snap and drive like a dream.
* Watch for bridging. Screws threaded along their entire shanks (from tip to head) have a nasty habit of forcing the two workpieces apart as they are driven home. That’s called bridging, and it can be a big issue. Three ways to counter this include tightly clamping the pieces you are screwing together, drilling a larger countersink hole in the top board so the threads won’t bite into the wood or using screws that aren’t threaded all the way to the head. This is a common feature found on premium wood screws.
* Let it slide. Sometimes, especially on longer screws, the amount of friction you build in the driving process can stop the screw dead in its tracks. A little candle wax or the goop found in a toilet wax ring (please use a fresh clean one) can lube the screws and make them drive easier. I’ve been told to avoid soap, because soap does attract moisture from the atmosphere, potentially leading to rust issues.
* Watch your material. Screws are made out of several different metals. While steel screws are definitely the easiest to find, brass and bronze screws are also available, and these more delicate materials need extra care while driving. I have had a great deal of success with driving brass screws if I drive an identically sized steel screw into the hole first to cut the threads. After removing the steel screw, the brass screw goes in with little hassle.
* Use the clutch. There’s a reason why your cordless drill has a clutch setting. It senses when the torque rises to a high level and then allows the drive to slip, preventing overdriving of the screws, stripped heads and broken shanks. Learn how to use the clutch and you’ll be a happy camper.
Are screws appropriate for every project? Heck no. Sometimes, there’s nothing quite like that wood-to-wood connection. The feel of tight joinery and the pride of saying, “Hey, look what I built.”
However, it’s difficut to argue with the speed, strength and convenicence of screws in the shop. They will always have a place.

 Has this ever happened to you? When you get your project mostly complete, you move it to the spot where you want to finally place it and – dang – it doesn’t seem ‘right’ to your eyes. Or, while building, you cut a series of joints on a project, but they don’t seem to add anything to the overall appearance of the project.
 Where should you put your table saw? Would the band saw work better in one corner of your shop or another? Do you have enough room to build that miter saw bench along the back wall?
 When I’m not woodworking, writing about woodworking, raising kids, teaching people about hurricanes, fixing problems around the house, doing laundry… wow, I really am a busy guy… I like to do some home brewing using my
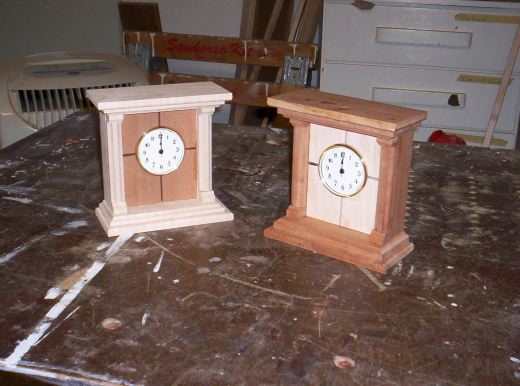
 In our home, my wife and I have discussed the possibility of adding an electric fireplace insert to give us the ‘ambiance’ of a fireplace without the hassle and expense of building a real one. This way, we can get the glow whenever we wanted, and could turn the heat on for just the chilliest January mornings. Whenever I see ads for these ‘realistic’ fireplace inserts, I stop and pay attention.
 For those of you who aren’t familiar with the Amish, their communities can be found scattered across Pennsylvania and the Midwest, with other communities in Canada. These devout people choose a simpler, more secluded life to prevent the influence of the ‘English’ world – mainstream America – from affecting their membership. Their dress, mannerisms and even their language – a Germanic dialect – make them easy to recognize when they are in the ‘mainstream’ world.
 So, very early one morning, I poured myself a cup of coffee and stepped outside, fully expecting to see a horse-drawn carriage arrive and discharge Amish craftsmen armed with hand saws, bit braces and other classic hand tools to craft the structure. Much to my surprise, the Amish workers arrived in a Chevy truck, took their power tools out and started working on the home.
 Nails have been an important part of woodworking for centuries. Originally hand wrought one by one, they were so valuable that old structures needing to be demolished used to be burned to the ground and the ashes sifted thorough to recover every usable nail.
 Screws play such a vital role in woodworking, it’s only fitting that they get some discussion. I mean, think about all of the different uses there are for screws in your shop. You might find that my experience alone might be typical…
 * Always predrill your holes. Sure, you can muscle your screws in with your drill, but you run the chance of splitting the pieces you are driving into. A combination drill/countersink and driver is an inexpensive way to handle the predrilling and countersinking in one step, and then driving the screw by simply flipping the tip of the tool around. These are sold at just about every home improvement or hardware store, and I have yet to see one cost more than $10.
 * Stop the wobble. Driving long screws with a power driver can really be frustrating. Watching the screw gyrate during driving while holding the drill with one hand and the work with the other is entertaining for observers, but can lead to some very choice words by the woodworker. I have found that inexpensive screw guides, which fit into your drill’s chuck and feature magnetic tips and a sleeve that helps hold the screw straight – are worth their weight in gold.
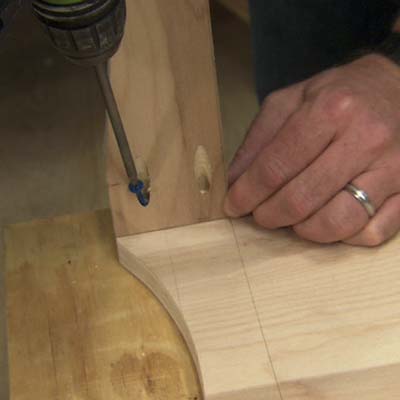 * Watch for bridging. Screws threaded along their entire shanks (from tip to head) have a nasty habit of forcing the two workpieces apart as they are driven home. That’s called bridging, and it can be a big issue. Three ways to counter this include tightly clamping the pieces you are screwing together, drilling a larger countersink hole in the top board so the threads won’t bite into the wood or using screws that aren’t threaded all the way to the head. This is a common feature found on premium wood screws.
 * Watch your material. Screws are made out of several different metals. While steel screws are definitely the easiest to find, brass and bronze screws are also available, and these more delicate materials need extra care while driving. I have had a great deal of success with driving brass screws if I drive an identically sized steel screw into the hole first to cut the threads. After removing the steel screw, the brass screw goes in with little hassle.