
 Don Vito Corleone lay in a hospital bed clinging dearly to life after an attempt on his life by the the Turk, Sollozzo. Vito’s son, Santino, paced angrily, demanding vengeance for this act. Family Consigliare Tom Hagen urged patience, asking Santino to get control of his anger.
Finally, after much heated debate, the Don’s youngest son Michael spoke up. Someone who had been formerly shielded from the family ‘business’, Michael offers to take matters into his hands and ‘take care’ of Sollozzo. When asked by Santino if this was in response to being slapped around by a crooked cop on Sollozzo’s payroll, Michael responded by saying, “It’s not personal, Sonny. It’s strictly business.”
Of course, I am referring to one of the most remembered scenes of was has been argued to be one of the greatest movies of all time, The Godfather.
Now, what does this have to do with woodworking – besides all of that gorgeous dark woodworking and paneling found in Don Vito’s office?
 Well, plenty. This scene flashed into my mind several times while I was reading Dan Ramsey’s book The Woodworker’s Guide to Pricing Your Work. Dan’s book goes into great detail about how to figure your shop costs, how to track your expenses and how to increase your profits. By following the recommendations in his book, you can learn how to turn your hobby into a paying business that can let you buy new tools, enjoy some extra night life or even quit your job.
The book is extremely clinical and unimpassioned. This is a very good thing, because running a business needs to be looked at in the cold light of reason and analysis. By getting emotionally involved in the process, you might make bad decisions which can derail your success.
But, I don’t think Dan addressed one of the most important aspects of running a woodworking business – pulling yourself out of the work. Let me explain…
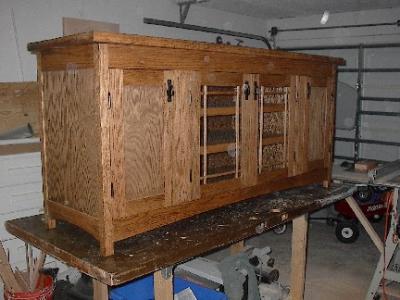
When I build woodworking projects, I typically build for one of three ‘audiences’. First, there’s me and my family. Projects such as the draw leaf table, entertainment center or my kitchen’s pantry were built with a specific purpose in mind – to fill a particular need. Our family needed a place to sit and eat dinner. Bam. And, it was built. The only person who has to be made happy is my wife – and she’s pretty understanding.
The other purpose I build for are items to be given as a gift. Small gift crosses, desktop boxes and cradles have all progressed out of my shop to the hands of grateful recipients. These too are easy to make and give, because the recipient of such a gift of time and effort always appreciated.
But, the third and most challenging purpose are items built for sale. Whether a commission for a customer or a piece built on spec and later sold, this is where things get a little dicey. After all, you are building something in exchange for cash or some other commodity (Hey, Bob, you are plumber… how about I build you something in exchange for installing my sink…), and these folks can make things a bit more difficult.
 So far, I have lucked out. The people who have bought my stuff have appreciated the value of hand-crafted work and have trusted me to do what I do best.
I have also heard about nightmare clients. People who change their minds on wood stain color after the piece is already stained. People who ask if the size or the complexity of the piece can be changed after materials are purchased and work has started. And, people who will carefully examine every detail of the final piece looking for what they consider major flaws in order to haggle down the agreed price.
That might make you uncomfortable. After all, haven’t you poured your time and creativity into the project? Didn’t you agonize over grain matching and panel colors? Isn’t it your baby? HOW DARE THOSE PEOPLE!
Deep breath. Have a cannoli. Serenity now….
Hey, to each or her own. And, if this is how folks like this want to conduct business… well, that says something about them.
However, as a woodworker selling your products, you have to remember the line delivered by Michael Corleone in the Don’s office… it’s only business. Nothing personal. Even though you’d like to roll your eyes and call your client an idiot, you have to fight the urge and realize that you are conducting a business transaction.
Some of the things I know professional woodworkers do to help prevent issues with their clients is to first spell out the agreement in some form of a contract. No, you don’t have to hire an attorney, but even a letter noting the date construction will commence, approximately how long the project will take, which key milestones you will have contact with the client, the payment schedule (half down on agreement, the other half on delivery) and the final price of the piece.
Another way to prevent issues with your client is to show scale drawings or computer renderings so the client will understand what the finished piece will look like. This is a great time to get feedback before construction starts and materials are purchased.
Showing sample boards with finish examples will certainly go a long way toward showing the client what the finished product will be, as well as demonstrating your finishing skills.
Finally, and most importantly, it’s important to stick to your deadlines, communicate with your clients and deliver the best product you can. By taking these simple steps, you can make the entire experience a pleasant one for everyone.
While slight mistakes are almost inevitable in large projects, your pride in craftsmanship will always come through. Someone who is coming to you and not headed to a large box mega-retailer is especially sensitive and appreciative of quality personalized craftsmanship. Besides, aren’t those ‘mistakes’ really design features?
And remember, once they get hooked on your work, you’ll then be able to make them an offer they can’t refuse – to build more stuff!
 Before screws and nails were common, adding dowels to joints was one of the first ways ancient woodworkers reinforced the joints they were working on. Since then, dowel reinforced joints for furniture construction, face frames and other applicaitons has been used in furniture factories and by hobby woodworkers as a fast and easy way to build projects.
 So, you want to learn a new and interesting woodworking skill beyond furniture making? Something maybe a little more challenging and ornamental?
 But, then you may come across an exception to the rule. There are homes out there being assembled out of large timbers. These buildings have soaring, graceful hand-carved timbers from the floor to the roof line defining an open, comfortable living area. Traditional timber framing, while not the most common construction method, is alive and well and being taught to a new generation of woodworkers.
 Clark Bremer, the owner of
 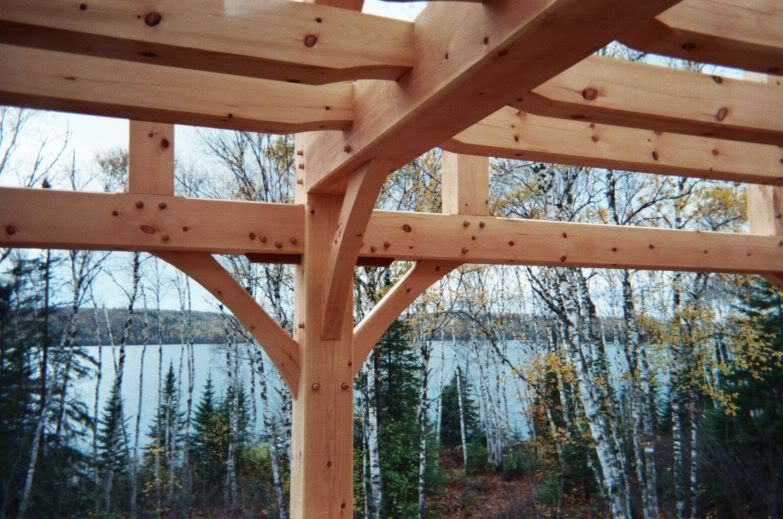 Not only competitive, but green as well. “Modern timber frames are often enclosed with structural insulated panels, which are applied to the outside of the frame. This creates an unbroken blanket of insulation around the house, which is extremely energy efficient. And like the timber frame itself, the panels are pre-cut in the shop before being brought to the site, making installation very easy for a trained timber framer to install. In a moderate sized home, the frame can be erected and enclosed in panels in 1-2 weeks, minimizing the risk of a weather delay.”
 It’s true that timber framing looks complex and on a massive scale, but once the individual elements are broken down, it’s not that difficult for any woodworker to master. “This is mortise and tenon joinery, after all, and woodworkers all know the precision required to make that look good.”
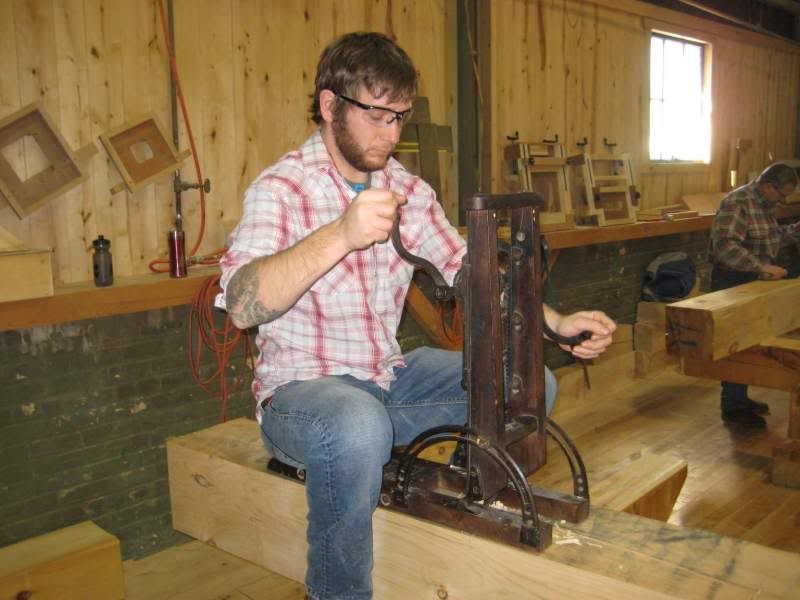 And then there are the tools. At Clark’s shop, he and his crew work extensively with hand tools. This carries through to his teaching methods as well. “Sure, there are CNC machines that can cut entire timbers, but these machines are very expensive, and they do not have the hands and eyes of a craftsman, who can read the grain, avoid tear out, and feel pride in the quality of their work. That’s why we love antique tools, and take the time to send them through “rehab” and get them back into a productive life. We use chisels, hand planes, slicks and draw knives every day. I also have an old hand-crank boring machine that we bring out for classes and demonstrations.”


 There is little doubt that a properly functioning dust collector can make cleaning up at the end of a woodworking session a breeze. Just a little sweeping and vacuuming can turn a difficult chore into a quick and easy exercise.
 So, you can’t get enough of woodworking videos? Do you want to see more – MANY more?