Category Archives: Tools

Power up my tool chest

So, this past Saturday, I joined other members of the St. Petersburg Woodcrafters Guild at the Heritage Village Country Jubilee doing a little hand tool demonstration. Since I live closest to the historical park, I was the first on the scene, setting up the tool chest in the demonstration barn.

The set up at the demonstration barn

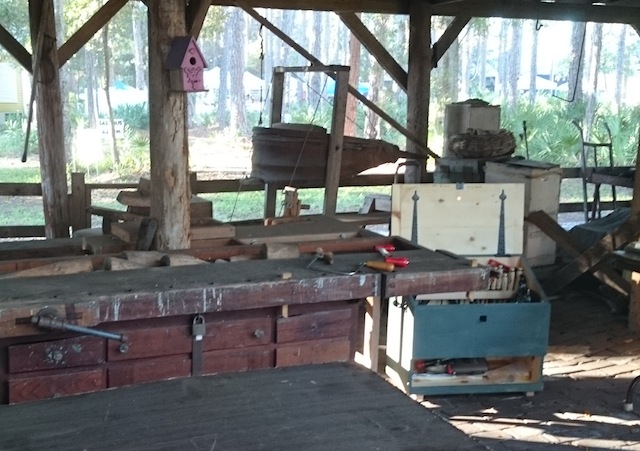
As I sat sipping my coffee in the very early, cool fall air, I had to remind myself that it has nearly been one year since I finished big green. I can remember the day when I finished it, parking it on the top of my old work bench – the last project that I finished on that bench.

The chest on bench

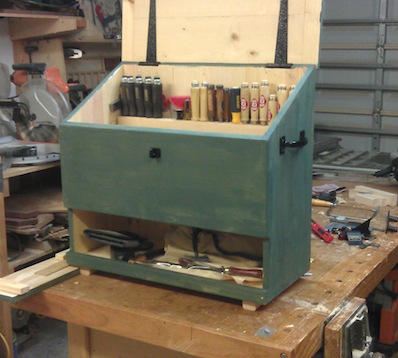
I never thought I was going to get a ton of use out of the tool chest. I mean, I use hand tools for some of my projects, and I thought for sure that it would be a great place to stash my tools for the times when I would need them. I have to admit that I am amazed at just how many times I have used it. I have modified the chest, recycled items (like an old bucket tool caddy) to hold more tools and even changed the tool load several times.

No, I promise I’m no Chris Schwarz, Roy Underhill or Shannon Rogers, but I am getting better and more adept at using my hand tools, and I really have the tool chest to thank.

The hand truck

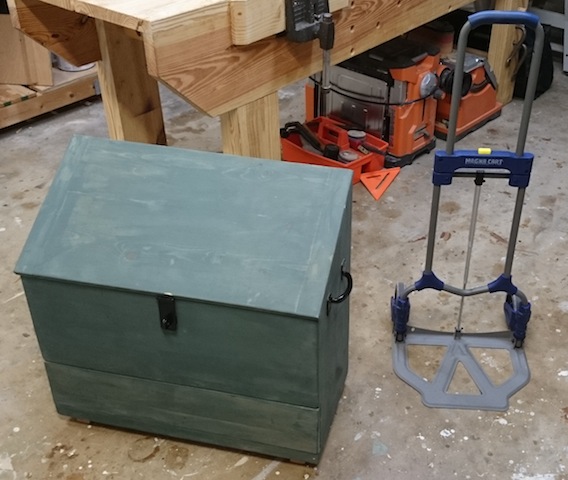
Now, how to improve on it? I know, I just can’t leave well enough alone. I do, however, want to make the chest a little easier to move around. That’s why I sprung for a $20 collapsable hand truck. Surprisingly, the tool chest – even fully stocked with tools – is not all that heavy. Even though this sucker has a capacity of 150 pounds, the tool chest is no where near heavy enough to challenge its limit. It works great with the tool chest, because the chest sits up on a pair of wooden skids screwed to the bottom. Because of that, I can simply slide the tongue under the body of the chest, tilt back and wheel it wherever I need to. That’s how I managed to schlep it from my car to the demonstration barn by myself – one hand solidly on my morning coffee while the other guided the chest along the paths at the park.

Chris Schwarz's original Dutch tool chest

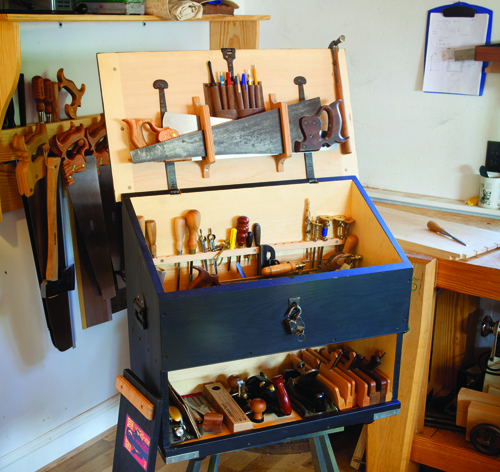
Another thing I know I am missing is at least one hand saw do to some crosscutting – if not a second one to do a little ripping as well. No, I’m not planning on throwing out my table saw or band saw, but if I am on site at Heritage Village or want to do a little hand work in the shop, it would be nice to have a few hand saws. As you can see from Chris Schwarz’s original, he has a pair of hand saws tucked up into the lid of the box, standing at the ready.

The 22 inch Pax Crosscut

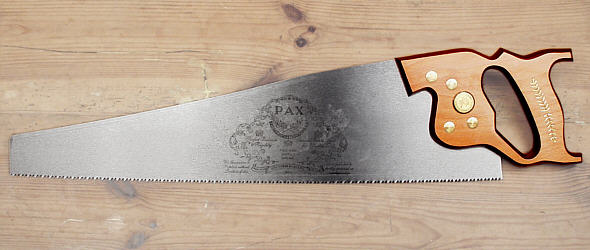
Our illustrious guild president, Dale Neff, picked up a small tool box saw at the local home improvement center, and it was nice and short, and did a kick-butt job cutting some pine down to size, but I was thinking maybe something a little more elegant. I have my eye on a 22 inch Pax crosscut saw that looks pretty sweet. The shorter size would allow it to ride on the lid of the box, making it easy to grab when the moment calls for more hefty work than my backsaw and dovetail saw can handle.

Well the holidays are coming, and it looks like I have something to add to my wish list!

The straight slice

I really do love my Laguna band saw. That sucker has been a true performer in my shop, helping me cut curves and slice boards like crazy. Or, maybe my son Dominic rip those boards…

So, when David Venditto of Infinity Cutting Tools asked me to come to his shop – and that I should bring my band saw – I told him he was out of his mind. That sucker weighs a ton, and I would bring myself instead.

Good thing I did, because he had a surprise for me. Infinity now has its own line of rip band saw blades – the Infinity Rip. These suckers are the real deal when it comes to band saw blades. Andy Gibson over at Infinity will introduce you to the blade here:

You can tell that a lot of care went into making these blades. I mean, holy smokes, look at the weld on that sucker!  I’ve seen plenty of clunky welds on bandsaw blades, but this one is ground so fine, you really have to look for it.

The weld

So, how does it work? After all, the proof is in the cutting. So, I put the blade on the band saw, over the top and bottom wheels, after backing the guides way off. To set the proper tension, I tighten the blade until a forceful push from my index finger can move the blade about 1/4″.  So far, it’s easy peasey…

DeflectionI adjusted the guide blocks until they were close to the blade without touching it and put the guards back on the saw. After that, it was a simple matter to adjust the fence for the blade’s drift – something I have covered before in this article. 

With this step taken, it was time for the moment of truth. I grabbed a piece of hard maple – notorious for giving me fits – I got from my friends at Bell Forest Products and put it up on the saw. I was careful to use my full face shield and my MicroJig push blocks – safety first.

Cut that wood!

I am always amazed at how easily that saw pours out the power, and the new blade bit into the wood, slicing cleanly and dead straight. It was a real joy to hear that wood cutting.

The result

So, how’d I do?  There is it the slightest vertical scoring with the blade, but again, this was the first test cut on the blade. I’m sure I could fine-tune by technique and setup, but wow, I am sold. That’s one nice blade, David.

The GRR-Reat GRR-Ripper give away

Last Monday, I asked each of you to tell me what you thought safety and accuracy meant to you in exchange for the possibility of winning a GRR-Ripper 100. And, I have got to tell you, there were some thoughtful and well-written responses. And, as promised, I had Iggy take a look at the entries that came in.

Iggy evaluates the entries

He seemed puzzled at first, but I think he came up with the three best ones!

First, thanks to Matt Swier. For him, the safety part of the equation means the world to him:

Safety to me means that I will have all 10 fingers, 2 eyes, 1 nose, and 2 ears ready to use to serve my wife and my son in my other full time job: being a husband and a dad! It’s also very important for me to pass safety knowledge on to my 4 yr old son when he’s down in the workshop working with me. He may not be the best ball thrower out there, but he sure knows that when he’s in daddy’s workshop, he has to have shoes on and walk directly to the hook that holds his ear and eye protectors before he does anything else. Some of the sweetest words ever heard for me are “Daddy, can I please drill some holes?”

Kyle Veatch had a great perspective on the meaning of these two words from the point of view of a brand new woodworker. His input:

Safety in my shop means more to learn! I am a beginning wood worker and can’t get enough videos and articles about wood working safety. I have learned so much from sites like yours finding out better and correct techniques for things I have been doing wrong in my shop.

As far as accuracy, in my shop that is a goal that I often try but fail to achieve. Being a beginner I often find accuracy is lacking in many projects and not only do I learn a good lesson, but I get to learn how to hide or fix my mistake.

And, when it comes to accuracy, Michael Boulant weighed in from the perspective that many of us, who don’t have a giant pile of money to throw at expensive hardwoods:

Woodworking is simply a hobby of mine. I do not use it to supplement my income in any way. Therefore, I must be very careful with the material that I purchase for a project. I typically buy just enough to complete the project that I am working on. If I mess up on a cut, I may have to go purchase more wood. There are projects that I have had to put on hold until I got paid again so that I could go buy more wood. It can really stifle the momentum that you can build while doing a project.

Congratulations to each of our three winners, and I hope you enjoy your new GRR-Rippers!

As for everyone else, remember that safety and accuracy are important. Now, let’s get out there and make some sawdust!

Safety and accuracy

I live in Florida, which means I’m close to the Central Florida mountain range… the Florida Alps. You heard that right. The three tallest peaks? Space Mountain, Thunder Mountain and Splash Mountain.

Space Mountain

While I have been to the land of the Mouse, I have one other tourist destination that I like a whole lot more… the Kennedy Space Center Visitor’s Complex. Did you really expect anything different from me? There is where real history was made. Whether it was Alan Shepherd’s first Mercury flight, the Apollo 11 mission to land on the Moon or the Space Shuttle boosting into orbit to build the International Space Station, many of our country’s crowning achievements started right here in the Sunshine State.

Saturn V/Apollo Rocket at KSC

What impressed me the most – whether it’s standing under the massive Saturn V rocket or next to the miniature Mercury capsule – is how much safety played a part in the missions. Yes, you are basically putting people on top of a controlled explosion. The weight of the Saturn V rocket at launch time was nearly 92% fuel or explosives. So, to rate these launch systems for human use, NASA had to perform extensive tests to ensure that multiply-redundant systems were in place. And, when shortcuts were taken, we saw the tragedy that resulted.

Gemini 6 and 7

Accuracy is also a huge concern. Just getting Gemini 6 and 7 to rendezvous in orbit took incredible calculations (in a day with very underpowered computers) and linking up with the Hubble Space Telescope to service the delicate instrument took incredible skill and dexterity.

When it comes to woodworking, safety and accuracy are no less important. When you are investing a lot of your hard-earned money in high quality wood for great projects, you want to get the best cuts, and you want to ensure that your hobby won’t leave you injured.

MicroJig Header

That’s why I am very happy to announce today that I am partnering with another Florida based company that believes strongly in accuracy and safety – MicroJig. This company is the brains behind such ubiquitous products as the GRR-Ripper push block system, the MJ Splitter system and MircoDial tapering jig.

After speaking with Bruce Wang from the company on several occasions, I have come away thoroughly impressed with the company’s laser-sharp focus on both safety and accuracy. I have been a loyal user of their products for years, and I have got to tell you that they have gotten great results. As with many woodworkers, I’m probably only scratching the surface of what’s possible with these guides. For instance, I know that I can use them to help me joint using my table saw – something I do on a regular basis without a powered jointer in my shop.

The GRR-RIppers in action

As I discover more about these tools, I will share what I learn with you. If it helps you get more safety and accuracy in your shop, that’s a win for all of us.

There are plenty of places you can find MicroJig products online, and now you can pick them up at your local Lowe’s home improvement centers, making it easy to get your hands on these suckers for your shop.

The GR-100

But, let’s start things off right – on this coming Monday – October 20 – I will be giving away a GRR-RIPPER 100 to three separate winners. Basically, here’s how you enter:

Tell me what safety and accuracy means to you in your shop. No, you don’t have to write War and Peace – just give me what those words mean to you. I will have my simian friend Iggy read the entries and choose the best ones. Just post them in the comments below the article.

Now, let’s get out there and make some sawdust!

Spiraling in – and out

When it comes to most carbide router bits, you typically have a body and a pair of cutters that mimic the shape of the body of the bit. From a basic straight cutting bit to the most elaborate molding bit, it’s easy to see what I mean. The cutter does the cutting, while the body backs up the cut and prevents the board from overfeeding. For some bits, you can throw in a bearing guide and you are in business.

Spiral router bit

But, there is a class of bits that break this mold, and they have a ton of different uses. These bits look a lot like drill bits, but, believe me, they are entirely different animals that you won’t want to use in your drill press!

Spiral bits, as the name says, are indeed shaped like stubby drill bits. Unlike drill bits, which do their cutting at the tip, the leading edges of the flutes do the cutting, which means that the router bit will cut as you move it along the workpiece side to side.

These bits basically cut the same type of profile that a straight bit can make, but that’s like saying that a tricked out Ducati motorcycle is the same as a rusty, single speed beach cruising bike… Sure, they do, but the spirals can do so much more – with so much more style.

Up vs. Down Spiral Bits

For instance, spiral bits can direct the cutting action and the resulting chips exactly where you want them to go. Think about cutting a mortise with a straight cutting bit. Sure, when you plunge the bit into the hole, it will bore in. But, the shavings that the bit makes can get packed into the hole, creating friction that can break down that carbide edge. An up-spiral bit, on the other hand, not only plows the hole, but it directs the chips out of the hole, clearing a path and preventing that packed-in feel.

The jig becomes the base

Now, if you wanted trim the edge of a board with a straight cutter, you might get some splintering and tearout on the top of the board, but with a down-spiral bit, it pushes the fibers down toward the surface of the board, preventing that fraying on top.

Flush Trim Router Bit in action

So, you say you need BOTH faces to be clean? No problem, there are even combination up/down-spiral bits that can make both faces look their best. These are awesome when paired with a bearing guide for pattern routing… Perfect edges every time.

And, how about those edges? While straight bits can do a great job routing along edges, they can leave small scallops, similar to the milling marks you would see on the face of a board after it goes through a planer. Because the spiral bits cut with a shearing action, the surface is super smooth.

Hey, I love my straight cutting bits as much as the next guy, but when the situation is right, my head totally spins for a spiral bit!

My Mortise Pal

I have cut mortises a few different ways over the years, but I think I may have found my new favorite way. You see, about a year ago, I got a gift card and decided I would purchase a Mortise Pal jig. I had read a lot of good reviews about it, and short of shelling out the cash for a Festool Domino, it seemed like it would be a fast and repeatable way of making mortises.

The Mortise Pal kit

The kit comes with the jig itself, an end stop, a bushing for the router base and several replaceable plastic bases that are gauged to allow you to cut a variety of mortise sizes.

Draw your line

Using the jig is pretty simple – first you draw a line about where you want the mortise to fall. You can center that line, or you can vary the setback from either face… the jig is adjustable.

Jig clamping

Once you get the line drawn, you clamp the jig to the board you want to cut the mortise in. As you can see with this piece of inch and a half thick fir, there is plenty of room for a considerably wider board in this setup.

Line up the jig

Using the line where you want the mortise centered, you can line up the center mark on the guide block. As you can see, it’s a pretty simple adjustment to make, and you can lock down the guide block with a cam lever. Pretty easy stuff.

BushingThe system works well because it is geared around a guide bushing for a router base that ensures the router can’t move the wrong direction. It fits a standard router baseplate, and works best when used with a plunge router.

The jig becomes the baseUsing an upcut spiral bit, simply set the router bushing into the plastic guide and get ready to cut. As you can see, the jig itself provides a stable platform for the router to ride on, preventing the router from tipping over and ruining the cut. Pretty clever.

The mortise

As with all router bit cut mortises, you will end up with rounded ends. That’s cool. You can either round over the edges of your tenon, cut your tenon a little shorter than the mortise or – if you are feeling froggy – you can square up the ends with a chisel.

Stock

Or, you can go even a totally different route. The company also sells loose tenon stock, which allows you to cut matching mortises into the different components and join them that way. You can even cut your own loose tenon stock and keep it on hand if you want to do that. This way, one machine setup can answer your joinery needs.

Now, all I need is a project that requires some mortise and tenon joinery…

Souping up my ride…

OK, I’m no motor head. Neither my wife nor I own a high-performance sports car or huge engined muscle cars.

Quite the muscle car

No, we own two pretty pedestrian vehicles. But, that doesn’t mean that people don’t enjoy the hobby of restoring and modifying classic cars to run fast and look sharp.

A boy and his saw

And, while I do woodwork, my table saw isn’t as pimped out as the table saw of one Marc Spagnuolo…  I do have to admit, that’s one sweet custom paint job!

No, my modest Ridgid table saw has served me well for more than a decade now, and, as equipped, it has been one of the best performers in the shop. But, that doesn’t mean I didn’t make a few modifications to it. For instance, there was the time I built a dust collection system for it. That has helped. And, there are a bunch of jigs I have built for it, and those are nice as well.

The Osborne

But, the best thing I have ever purchased for the saw was my Osborne EB-3 miter gauge. I picked this up about ten years ago after watching his Normness use one on the New Yankee Workshop. It looked like a good design, and it came at a fair price point for significant upgrade over the standard miter gauge.

Standard Miter Gauge

Don’t get me wrong, the standard miter gauge is OK for a lot of tasks. I can attach sacrificial fences to it, and it does a decent job with other jigs. The problem is that the head on it is small, and it’s tough to get exact angles.

The Osborne, Extended

The Osborne not only has a nice wide non-slip fence, it also extends out to nearly 40 inches of width, giving me plenty of support for wide boards when crosscutting them. Plus, with that flip-down stop, I can make repeatable cuts time and time again.

Angle setting

The real strength of the guide, though, is how easy it is to set angles. Unlike protractor-type heads, the guide relies on an extending leg of a triangle to measure out the angles. There are plenty of detents to help you set common angles for different numbers of sides, or you can go freehand to match whatever angle setting you need.

DSC_0287

There’s even a quick reference guide printed on the handle, so those hexagons are easy to set and cut …  without breaking out the calculator… right?

The entire guide can swing to work on either side of the blade, so left and right handed woodworkers should be happy with it.

Sure, it’s not gonna help my saw run a faster quarter mile, but at least it helps it be a better performer… isn’t that what it’s all about?