Quick Poll

In last week’s poll, we had a lot of feedback on red oak and your opinions about it. Somewhere in the comments, a woodworker mentioned that at least red oak had a little more respect than poplar.  Which brings up a very interesting point…

A well executed poplar kitchen table

Poplar is (in many places) inexpensive, readily available and  exceptionally easy to work with. It was the first hardwood I had ever worked with in my shop class in middle school. It comes highly recommended for beginning woodworkers – and those with more experience – to practice different woodworking skills (it shines for dovetail cutting).

But, wow, you don’t typically see a bunch of folks raving about their fine clear-coated poplar cabinets.  Or, do they?

This week, tell us what you think about poplar…


Link of the week

Flair Woodworks

British Columbia, Canada is known for its beautiful vistas, friendly folks and stately trees. It’s also known as the home of Flair Woodworks, run by Chris Wong. If you haven’t seen any of his work, you are in for a real treat, because his work is nothing short of amazing.

Chris Wong working in his shop

Chris has a very skilled eye for design and incorporating bold, natural shapes in his woodworking projects. Besides making gorgeous tables, benches and the like using wood’s natural character, he also builds planes, writes for woodworking magazines and even instructs for Lee Valley Tools. As if that isn’t enough to keep him busy, he also is one of the prime movers in Time Warp Tools, a great site for hand made planes and some awesome bench dogs.

Swing on by his site, but – be warned – you are going to find yourself very impressed by his work.

Pinch the wheel

My new Laguna band saw is awesome.  It has plenty of power, a huge table and lots of other features that make it a dream to work with.

My Laguna Band Saw

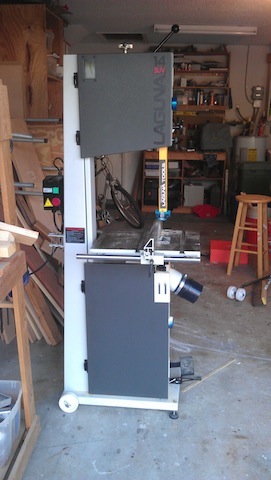
The only problem? It’s a band saw, and that means you just can’t throw a blade on the sucker and start cutting. There are adjustments that have to be made in order to get the saw to work properly.  And, that’s OK with me, it just becomes a little tedious.

One of the most important adjustments on the saw is to get the blade to track right in the middle of the upper and lower wheels. If the blade is to far forward or too far back, it will tend to drift – or start cutting out of square in relation to the rip fence. Some drift is OK, but if the drift seems totally out of whack – like you have to angle the workpiece excessively in order to cut a straight line – you are going to have issues ever trying to get a decent cut.

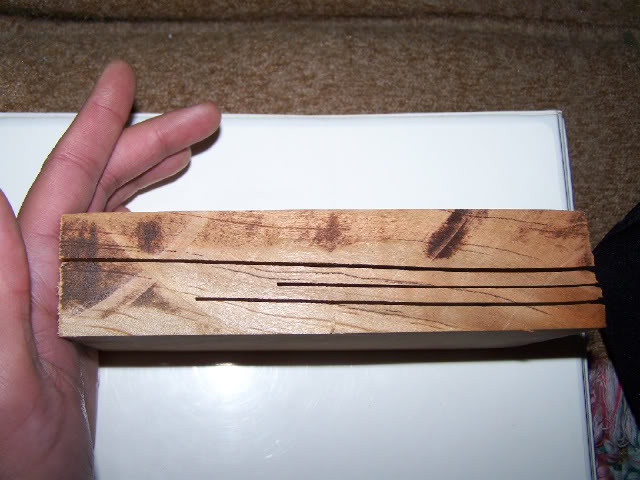
The recommended method to check for blade drift is to get a piece of wood, mark a straight line on the piece, feed it through freehand until you get about halfway through the cut, stop the saw and then mark that angle so you can adjust the fence to make up for the drift. This drift can be reduced, again, by getting the blade to track on the center of the wheel.

Bandsaw drift is an ugly thing

And, that’s where my trouble begins. I would eyeball the blade on the wheel to see if it was centered on the wheel. And, that worked OK, but I was never really jazzed with my eyeballing. What I needed to do was to get the blade in the middle of the wheel for certain.  But, how was I going to get that accuracy?

That’s when I stumbled across this method on the Lumberjocks site. User Stefang used an interesting tool to get the blade centered – his calipers. It’s a very simple method that is so elementary, you will end up slapping your forehead in one of those ‘duh’ moments.

Measuring the wheel width

First, you use your caliper to measure the width of the the upper wheel. From hub to hub, my band saw wheel is 1.2 inches wide. That is verified by my decimal calipers.

math is scary for me

In this case, I know my resaw blade is .75 inches wide. Now, let’s do some simple math (oh, man, you are going to make this English major do math?):

1.2 inches (wheel width) – .75 inches (blade width) = .45 inches

This .45 inches is what remains from front face to back face of the wheel that isn’t covered by blade. From there, if I want to make this blade centered on the wheel, I have to divide that in half. So…

.45 inches / 2 = .225 inches

Now, this means if I have .225 inches from the front hub of the wheel to the front teeth on the saw blade, bingo bango, chimi chang chango, I’m right on the middle.  By adjusting the tracking wheel on the saw and rotating the upper wheel by hand, I was able to get the blade right in the middle. No fuss, no muss.

A small resaw job

When I made my cut with the saw, it wasn’t 100% on the money. There was still a drift. But, wow, did that drift nearly disappear. And, when I popped a piece up on the saw to resaw it, the saw behaved beautifully.

OK, maybe math isn’t my strong suit, but using a little bit of it, I might be able to make my woodworking just a little better.


More friends to help us Get Woodworking

Get Woodworking Week 2013

You know, last year as I approached my thousandth post, I was totally bowled over by the generosity of folks who wanted to offer prizes for you guys. Now, for Get Woodworking Week 2013, well, they aren’t letting up one bit!

The Router Essentials kit from Infinity

I would like to thank David Venditto of Infinity Cutting Tools for stepping to the plate to offer a most generous gift – a kit of the six most essential router bits as recommended by Wood Magazine in issue #151.  Two round overs, a rabbeting bit with seven different diameters of bearings, a flush trim bit, a chamfer bit and a 1/2″ straight cutting bit. With these babies, your router can go from an expensive electric paperweight to a true heavyweight in your shop. They are a mix of 1/2″ and 1/4″ shanks, so keep that in mind.

Highland Woodworking's Kids Toolbox

Another offer that came in was from Highland Woodworking. This prize is going to be done a little differently, because it is definitely geared towards the younger woodworker.  They are offering four of their Kid’s Toolbox Sets, each featuring a smaller sized hand saw, hammer, screwdriver, tool belt and the ever-important safety glasses.  Additionally, they are also throwing in eight of their kids catapult woodworking kits, where young woodworkers (and those very young at heart) will end up with a great project that can fling items across the room.

For this part of the give away, I am going to call an audible here.  If you know of a group that does – or is looking to do – woodworking for kids between the ages of 6 to 12, submit their information my way, and I’ll have a random drawing for the lucky group to get the entire shebang.  It doesn’t matter if it’s a scout troop, church group, school program… as long as it gets kids involved in woodworking, I’m in.

When added to the prizes being offered for new woodworkers, hey, we’re creating quite an exciting event here!


Quick Poll

According to the American Hardwood Information Center, red oak is by far the most commonly used North American hardwood. Four out of every ten North American hardwood boards sold are red oak.  It’s the state tree of my former home state, New Jersey, where it grows just about everywhere you look.  It’s one of the most common woods used in kitchen cabinet construction. It’s an extremely common flooring material. Entire bedroom suites are made out of the stuff…

Yawn.. another red oak kitchen

And, sometimes, all that familiarity breeds contempt. I’ve spoken with woodworkers who have flat out said, “Boy, that would have been a great project, except for the fact that they built it out of red oak…”

So, in this week’s poll, I wanna know exactly what you think about red oak and its place in your shop.


Link of the week

Cash from Craft

While this week’s link may not seem like it goes to a blog, trust me, this is one you want to visit. Ralph Bagnall, the Consulting Woodworker himself, runs this interesting blog which gives some interesting insights into how craftspeople can approach their woodworking, and eventually turn their passion into a few bucks to help buy more wood or tools.

Ralph Bagnall - looking rather dapper!

The blog features an interesting mix of technique, philosophy and work method articles that can provide some valuable insight into how you can improve your shop experience.  And, Ralph has done me the honor of jumping to the front of the line with a great article for Get Woodworking Week. Way to go, Ralph!


Stuff I’ve Built: The plywood bandsawn box

It’s that time of the year again!  This past Monday was the deadline to turn in projects for Pinellas County’s art contest, and I was not about to be denied the opportunity to be in it again. I mean, there’s always a chance I may finish in the top ranks… right….

As you can remember, I was building a bandsawn box which featured edge grain plywood as a design element. The idea came from David Picciuto – a.k.a. the Drunken Woodworker – and boy, are his  designs real show stoppers. Building the box took a little longer than I expected (I had a few work commitments to tend to, and I am now coaching my youngest son’s basketball team), but I think the results were something pretty darned spectacular.

The plywood bandsawn box

As you can see, the edge grain of the stacked plywood box really provides an interesting effect. Sure, this stuff was cabinet grade ply, and it looked nice, but there were a few issues (voids, knots, discolorations) on the inside plies. At first, I was kind of put off by it, but the more I looked, the more it grew on me. The front  and back are that really sweet leopardwood that my friends at Bell Forest Products sent to me, and the pull is a tiny scrap of ebony I have been hoarding for about nine years.  This looked like the project for it!

The drawer inside

The drawer turned out really nice. The inside curve that forms the drawer ‘pocket’ had some pretty bad burning on it from me being a bonehead and trying to make too tight of a turn, but that quickly sanded out on my spindle sander, leaving a really cool drawer inside to work with.

Each year, the best part of the contest is the feeling I get when I walk across the street to where the art is being collected for the display. The folks working the event always look forward to what I bring over. In years past, I have even had offers to buy the piece outright when I walked through the door. This year, there were more than a few “oooooh!s) when I walked in with the piece. Everyone had to take a turn pulling out the drawer and asking how one goes about building such an intricate box.

The box front and center in the contest...

This year, the box impressed the staff so much, they placed it  in its own display case and positioned it right out in front of the other pieces, just as soon as you walk into the courthouse lobby. That’s pretty sweet!

Now, I just have to wait for the judges to come in and vote. Shortly after that, we will know the results.


part of the Wood Talk Online community