Bits ‘N Pieces

You can learn a lot about people when you are shopping for a home.  While it’s been about a dozen years since my wife and I bought our house, the memories of walking into people’s homes on our short list still live vividly in my mind.

There was the smell of the home of an avid cat lover, the sight of burnt orange and avocado appliances of people who chose not to update their 1970’s kitchens and the strange perceptions of being in a home where the owner had hung several overhead lights for decoration.  Yes, that’s right. Several of these light fixtures were just screwed to the ceiling, not even wired to the home’s power system.

The home we eventually bought was owned by an avid shot glass collector.  She had big shot glasses, small ones, ones printed with logos from big cities and small towns. Colleges.  Hospitals.  Even a sheriff’s office. She must have had three hundred, all on display around the home.  It was quite the impressive display.

I wonder when my wife and I eventually put our home up for sale if people will have an opinion about my router bit collection…

Routers are extremely versatile tools.  They can cut joinery or profiles.  They can help you joint a board’s edge or trim a shelf edging flush. They are useless paper weights without bits.

My mom gave me my first router for my birthday many years ago.  It was a fixed base Craftsman light duty model.  She asked me what I needed to go along with the tool, and I told her I needed some router bits.  She was stunned to see the vast array of bits available – and the variety of price points.  Eventually, she settled on a small starter kit that served me very well for the first few years.

A quick perusal through a woodworking catalog will show scores of profiles available for sale – from the plain straight bit to the most exotic multi-profile bit.  They are sold individually or in large all-encompassing sets. Do you need all of them to woodwork?

Hardly.  However, you do need some basics to get the ball rolling.  A set of straight cutting bits.  A flush trim bit with a follower bearing mounted at the bottom.  A chamfer bit.  A few different styles of round over bits.  Maybe an ogee profile to put a decorative edge.  That should get you started.

For me, I bought a set of 20 bits to start – the green ones in the wooden box.  Some conventional wisdom says that buying sets of bits is a waste of time.  You will use a few bits a lot and most of them very rarely.  My experience has been a little different.  The set I bought actually has several bits I love to use, and the entire kit does get a workout.

After I purchased my kit, you can see I got my hands on a few other individual models and sets.  I have two rabbeting sets – one does larger rabbets, the other smaller.  I have a set of slightly undersized plywood bits to cut slots to fit modern cabinet grade plywood.  Dovetail bits to work on different jigs.  Cope and stick bits to create frame and panel doors…

Wow, that’s quite a collection…  I had no idea I had added so many bits.

When you do buy your bits, look for carbide models.  Sure, you can modify your high speed steel bits’ profiles to make custom models, but carbide cuts so much more nicely without the need for frequent resharpening.  Also, don’t be afraid to pay some money for quality router bits.  Sure, you could go to eBay and buy a set of 100 bits for $39, but what are you getting for your money?  You will probably be disappointed with the results.

And, never be afraid to experiment with your router profiles.  You may have your eye on a fancy profile bit, but break the design down to more basic round overs, coves and chamfers, and you may discover you can use two or three bits you already own to make an exact match.

In order for me to keep my collection – and you to keep yours – in tip top shape, it always pays to follow the standard advice:

  • Don’t let the bits knock together.  Carbide is tough stuff, but it’s also very brittle.  Allowing the bits to knock together while in storage or on your workbench can cause the cutters to chip or shatter.
  • Keep ’em clean.  Just like saw blades, router bits can get gunk build up on them.  Your best bet to keep them clean is to first remove any bearings (if the bits are so equipped) and wipe them down with mineral spirits. You can use an old toothbrush to help scrub the stuff off, but nothing more abrasive than that.
  • Tighten them properly.  Your router’s collet does a great job grabbing the bits – when it’s properly torqued down.  To install a router bit properly, don’t let it bottom out in the collet – pull the bit up a fraction of an inch to keep the bottom of the bit off the router’s spindle.  Then, snug up the collet nut and gently twist it to make sure it sets firmly.  Don’t crank down on the wrench – you might damage the collet or make it nearly impossible to release.
  • Store them where you can see them.  If you don’t know which bits you have, how will you now they are available for you to use?  Store them out of harm’s way, but someplace where they are easy to get to and put them to use.

Have I bought my last router bit?  Not by a long shot.  I’m sure a new jig, a new application or a classic molding profile will be announced, and a new Uber-Bit  will be promoted which will be capable of joinery, decoration and establishing world peace.

And, when I do buy it, I’ll proudly add it to my collection.  It will become a new conversation piece in my living room.

A moving experience

Wood moves. As temperature and humidity levels change, wood’s cells will absorb and emit water to reach an equilibrium point. Sure, it can be slowed down by a wood finish, but it can’t be eliminated.

This is a universal truth that all woodworkers need to understand when they build a project.  All too often,  woodworkers need to learn this lesson at least once the hard way before it truly sinks in.

Sure, there are lots of tables and charts that will tell you exactly how much wood will move, but to get a real life idea, I’ve decided to set up a little experiment.  My shop is in the Tampa Bay area, and I’ve enlisted the help of two talented woodworkers who live in different areas of the country with wildly different weather conditions.

First is the Wood Whisperer himself, Marc Spagnuolo.  Marc lives in the greater Phoenix, Arizona area.  The other woodworker helping me out is Dave Campbell, deputy editor of Wood Magazine.  Dave calls the greater Des Moines, Iowa home.

While this is a wood-based article, it also gives me a chance to strut my weather geekiness in the name of woodworking. It’s obvious that changes in latitude will have a dramatic effect on the weather, but geography and location from the nearest large body of water will also play a part in the picture.

To help you understand the differences, I will reference the mean daily temperature and dew points for each city.  Why these two readings?  First, the mean temperature is an average temperature of the air as indicated by a properly exposed thermometer during a given time period, usually a day, month, or year. This way, we don’t have to wonder about abnormal cool snaps or heat waves – the data will be a little more smoothed out and better representative of a typical day.  In this case, we’ll look at the mean temperature of a given day – May 25 – for each of our cities.

The other reading is the dew point, which is the temperature at which the air becomes saturated and produces dew or – if it’s cold enough – frost.  Why not use relative humidity?  Well, relative humidity is – errr –  relative to the temperature, and will rise as the air cools off overnight and drop as the air warms.  The dew point produces a better apples-to-apples measurement for our purposes.

Here are some of the stats from the cities:

Tampa, Florida – May 25 mean temperature 79 degrees F, Dew Point 69 degrees.
Lying in the humid subtropical zone, Tampa’s prevailing winds pull hot, moist air off the Gulf of Mexico and the western Caribbean Sea and push it ashore.  This leads to exceptionally hot and humid conditions, with frequent thunderstorms throughout the late spring and summer.  Basically, you can take a shower and, unless you are in an air conditioned building, never truly dry off.

Des Moines, Iowa – May 25 mean temperature 65 degrees, Dew Point 55 degrees
While Des Moines is at a much higher latitude than Tampa, the prevailing summer winds will still push hot humid air from the Gulf of Mexico.  However, at this time of the year, both cooler and warmer air masses are still battling for possession of the region, which leads to variability in the conditions until the summer pattern truly sets in.

Phoenix, Arizona – May 25 mean temperature 84 degrees, Dew Point 30 degrees
Phoenix is in a very hot, arid climate,  It’s too far west to be affected by Gulf moisture, and the Rocky Mountain complex to the west cuts off Pacific moisture.  I’ve heard it described as standing in front of a giant hair dryer…  This is not to say that Phoenix doesn’t get rain.  In fact, by late July, a monsoonal flow will come off the Gulf of California, leading to a rise in humidity and thunderstorms.  So, we’re hitting Phoenix at an ideal time for this test.

The wood samples for this test have been cut from plain old boards that have been acclimating in my shop for – I dunno – as long as five years.  I chose a series of samples from frequently used cabinet woods to give a good representation of what most woodworkers will use.  They include; maple, poplar, cherry, ash, red oak and a surprise board.

Yes, it’s a surprise to me, because I picked up what I thought was ash from my hardwood supplier. Got it for a steal – rough – at $1 a board foot. However, once I started planing it for this experiment, well, it’s not ash.  I’m going to guess from the photo that it’s red elm, but I could be way off base. Maybe one of my esteemed panelists will be able to put a better ID on it.  Hey, at least it’s a different species!

I planed, ripped and crosscut the boards to exactly 5” wide and 8” long.  I will be shipping the boards by US Postal Service tomorrow  (today is Memorial Day, an official federal holiday) to Marc and Dave with a copy of the steel ruler I used to measure the boards.  I took the time to ensure the measurements on each rule lined up to give as accurate a reading as possible.

I have asked both Marc and Dave to let the boards sit in their shops for two weeks, then measure the board samples on June 8 to see what kind of changes have occurred.  How will the boards react to the changes in temperature and humidity?

Stay tuned…

Quick Poll

A Maloof Rocker
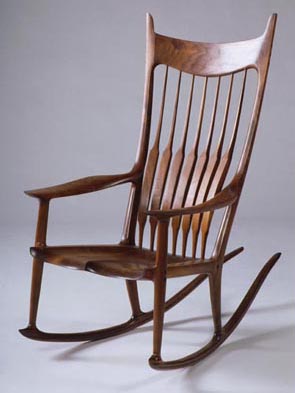
Sam Maloof was an inspiration to many woodworkers.  Whether citing his humble beginnings, the organic lines of his projects or the joy he felt while in the shop, woodworkers have found few better examples to emulate than Sam.

His rocking chairs, regular chairs, tables and other pieces have caught the attention of collectors and museums around the world.

While his works are absoutley gorgeous, some woodworkers might see his projects as too involved, too challenging or just not their style.

This week, in honor of Sam, I’d like to know if you have ever built a Sam Maloof inspired project, and what you thought about the piece and the process.

[poll id=”75″]

Link of the week

Eastman Publishing’s Free Flag Case Plan

Free Flag Case PlanWith the Memorial Day weekend upon us here in the United States, it’s only fitting that I feature a project such as this one.

In the United States – as in many other countries – when a veteran of the armed forces passes, his or her casket is draped with the nation’s flag, which is presented to the surviving family members.

There are few honors for a woodworker greater than building a case for the family of a fallen serviceman or woman to display the flag.

This plan, provided for free by Eastman Publishing, gives woodworkers detailed instructions and drawings  for the construction of one of these cases.  The construction methods are easy enough for a beginning woodworker to tackle, and the measurements can serve as a starting point for more advanced woodworkers hoping to use different joinery techniques.

Unfortunately, many of my countrymen and women see Memorial Day as just an opportunity to get a day off work, take a vacation or enjoy a barbecue.  The deeper meaning – a commemoration of the ultimate sacrifice made by those who answered the call of service – should never be forgotten.

It Figures…

Forrest GumpIf you can remember the big Tom Hanks’ 1994 hit movie Forrest Gump, no doubt you will recall one of the movie’s most repeated lines:

Life is like a box of chocolates. You never know what you are gonna get.

If you have ever received a box of chocolate candies as a gift and had to negotiate it without the help of a map on the lid (those are for cheaters!), the first bite into a piece pulled from the box is always a surprise. Will it be one of the tasty caramels, or will it be something you just don’t like?

In many ways, when a sawyer slices into a log of a maple, cherry, walnut, ash, elm or hundreds of other species, it is a very similar experience. More often than not, you get exactly what you were after – beautiful boards of exceptional character.

But, every so often, there’s a big surprise.

A very pleasant one at that.

Bell Forest ProductsSometimes the boards will display a wavy pattern known as figure. This is not the same as the wood’s grain. According to Eric Poirier of Bell Forest Products, an online wood supplier that specializes in figured lumber, this distinction is very important. “Grain and figure are often confused with one another. The easiest way to differentiate between them is to understand that grain occurs in every board because it is how the tree actually grows. Figure occurs independent of the grain and is actually a defect, which happens to be very rare and sought after.”

Of course, there is an exception to every rule. A ray flake appearance in white or red oaks is actually part of the grain, but it is considered figure by the National Hardwood Lumber Association (NHLA). Go figure.

Bird's Eye MapleFigure can occur nearly anywhere in a tree. According to Eric, “It varies from tree to tree and is different with the different types of figure. In bird’s eye, the whole log might be full of bird’s eye or just part of one side of the log might have it. Sometimes the bird’s eye can even start and stop at different points in the life of the tree. There may be some sort of defect in the log that also causes the figure to start or stop at a certain point in the log.”

While figured lumber is beautiful, it is considerably more difficult to work with than non-figured lumber. Curly, tiger, fiddle back, pecky, burl or other beautifully figured woods tend to tear out more, and demand exceptionally sharp tools and care in their milling.

VeneerSupplies.com logoThe number and variety of species exhibiting figure can be tremendous. Another great way to add these dramatic woods to a project is through veneering. Joe Goreleski, Jr. of VeneerSupplies.com, has seen a tremendous variety of figured veneers move through of his shop. “To the best of my knowledge, most domestic and exotic woods have the ability to display each type of figure. In my stock, I have some truly rare combinations of species and figure that some would think do not exist.” How rare? Think of such odd specimens as bird’s eye walnut and bubinga burl.

Tamo Ash VeneerWhile working with figured hardwoods can be a challenge, Joe says going the figured veneer route takes some practice, but is not very different than working with regular unfigured veneers. According to Joe, “some burls may require grain filler, but the basic veneering skills should be able to get you through with no problems.”

Looking at an unfishished figured board or sheet of veneer may not be impressive. However, once a finish goes on the piece, you’ll immediately understand why woodworkers search out figured boards. These imperfections in the log translate into lustrous whorls, stripes and other features that appear nearly three-dimensional under an oil-based finish.

One issue many woodworkers have during finishing is that boards tending to be splotchy are even more difficult to get finished perfectly. A sanding sealer of a one pound cut of dewaxed shellac applied and sanded down with some 320 grit sandpaper helps to control the blotchiness. Again, these rare specimens require care in all stages of woodworking.

While both Eric and Joe get some incredible specimens through their shops, each has his own preference for his favorite.

Eric leans toward curly maples. “I love the way that the figure runs from the flat-sawn to the quarter-sawn grain. I use it whenever I can in different projects around the house. It is my favorite wood to use because I love seeing the ‘tiger’ stripes when the sunlight hits it just right!”

Joe is more of a tamo ash and walnut burl kinda guy. “But, I have not yet found a figured veneer that I didn’t like.”

Momma always said to keep your options open…

The Sharper Image

A close shaveWhen I turned 14, my dad had a surprise for me.

He handed me a new razor, a can of shaving cream and showed me how to shave.  Even though I was using a safety razor, I still managed to cut myself.  Ahh, the joys of inexperience.

Since then, I’ve had a love/hate relationship with the male rite of shaving my face.  Some days, I walk away from the sink in the morning with a perfect shave – feeling fresh and ‘kissably smooth’ according to my wife.  Other days, I swear I took my belt sander to my face – all red, irritated and scraped up.  Since I’m not sure which kind of shave I’ll get, I tend to avoid shaving if at all possible.  Sure, it’s tough to get moving on a Monday morning, but at least my face had a weekend’s rest from the blade.

Later on, when I became a hobby woodworker, I ran into another group of folks who liked to shave – a lot.  And, not just to keep up appearances.

Some of the woodworkers I spoke with had an extreme fascination with sharpening and honing their plane irons and chisels to razor-sharp perfection.  And, with a salesman’s zeal, these folks will call friends and neighbors over to demonstrate how well their blades can clear their arm or leg hairs.  It’s a stunning trick, and I have to hand it to them.  They do have persistence.

But, is sharpening to that keen of an edge really necessary for woodworking?

One Sharp PlaneNo one is going to argue with the fact that sharp tools are a pleasure to use.  They are safer, cut more cleanly and make your shop tasks a whole lot more pleasant.  Dull tools will ruin more boards – and hurt more woodworkers – than we can ever fully account for.

But, when should you say ‘when’ during the sharpening process?

Hey, I used to fall into the trap of  meticulously sharpening my chisels and plane irons.  There were times when I used to fuss for half an hour over each edge, honing until the back face of the bevel was reflective enough to signal rescue planes if I was marooned on a desert island.  Then I would flip the blade over and work on the bevel, building a lustrous shine before tipping the edge up enough to create the perfect one degree microbevel.

And, yes, I would then shave arm hairs to prove to myself that the chisels were ready for use.

While sweating over a sharpening job in my shop one hot Florida summer afternoon, the little voice of reason in my head started screaming at me.  “Can we get this over with?  It’s hot, and I want to go inside!  Besides, how much better can that edge really get?”

It was that afternoon when I changed my sharpening procedure and added an important step.  I went to the scrap bin and pulled out a piece of hardwood and  clamped it in my bench vise.  I took the chisel – still far from its mirror-like destiny – and started paring the edge.  The wood yielded.  Easily. In an end grain cut.  With little effort on my part.  Wow.

I was stunned to see how much earlier in the process I could stop with minimal – if any –  effect on the cutting ability.  Not only could I save myself quite a bit of time while sharpening, this result also convinced me that I could sharpen my tools more frequently, without having to take the tool through the onerous process of honing to that fine degree.

My mind then turned to previous episodes of the Woodwright’s Shop, hosted by Roy Underhill.  I have watched Roy for years, working with his planes and chisels in his throwback workshop.  Sure, his tools are plenty sharp, but not so reflective, if you catch my meaning.

While I was reading the Woodwright’s Companion, I noticed that Roy also touched on the fact that woodworkers relied on quarried stones to bring their edges into true.  No, these old masters didn’t get into a heated debate about the micron size of the abrasive they were using – they used the best stones possible to get their blades sharp and then returned to the bench.

And, when they shaved their faces, they didn’t use plane irons – they used straight razors made with much finer and more flexible blades.

The Sharpening Tools
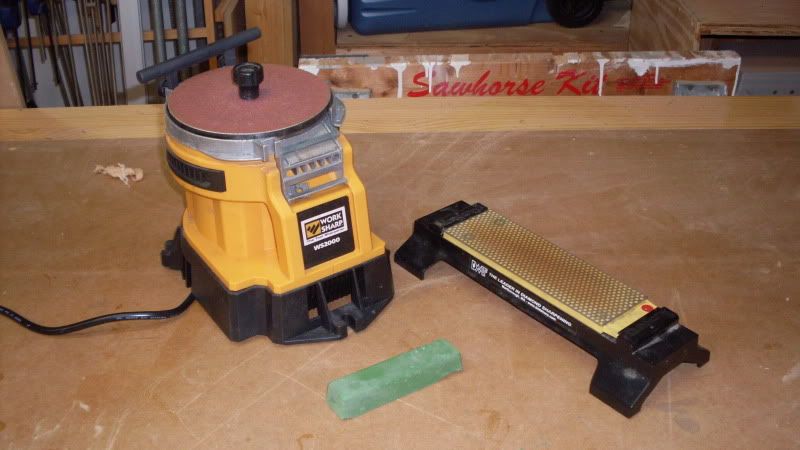
When I buy an old plane or chisel, I will regrind the bevel on my Work Sharp 2000, and then either use the Scary Sharp method (sandpaper glued to a piece of float glass) or the DMT Diamond Stone my wife gave me a few birthdays ago.  I’ve gotten so I can regrind and hone an old chisel in about five minutes, and have it cutting easily through wood.  It takes even less time to hone blades that just need some touching up after a project.

I will also use a piece of MDF with some of the Lee Valley green honing compound to put an even finer edge on the edge, but that’s it.

Will woodworkers still hone their irons and chisels to a mirror finish? Of course they will.  There are also people who will shop for stereo systems that faithfully reproduce tones well outside of the normal range of human hearing.  Hey, to each his or her own, and if leaving bare patches of skin on their arms is an outward sign of their sharpening prowess, more power to them.

I already have a mirror in my bathroom so I can see what I’m doing when I pick up my razor to get ready for work in the morning.

part of the Wood Talk Online community