All posts by Tom

I'm the guy who writes the blog...

The weekly plan

Make your own light saber

Our friend Lawrence Wroten is at it again at his blog Midnight Woodworking. He and his son Adam have figured out a great project that definitely fills the bill for a Last Minute Elf project…

Light Sabers for both sides of the force..

Using just a simple block of walnut to turn a handle, an inexpensive flashlight and a length of PEX plumbing tubing, this father and son have made enough elegant Jedi weapons to rule the universe together…

With the new edition of Star Wars in production, this may be a great project to finish off your holiday projects.

Link of the week

The importance of hobbies for stress relief

It’s no secret – living in today’s world can be a stressful experience. Work demands, active kids, bills,the works. Add to the fact that this is one of the most stressful times of the year and, well, you start to get the point.

Woodworking can be fun

This article posted at About Health explores the psychological benefits to having a hobby – like woodworking – and how having that release can help you cope in today’s stressful times.

Don’t we need just about every possible benefit we can get?

Rollin, rollin, rollin…

My new table saw is awesome. Seriously. I have been loving the heck out of it for the past week or so, and if it performs half as well as it has already, it will easily be the last table saw I will ever have to own.

But, as I had stated when I posted about it originally, it has two small flaws. First, the wheels on it are not designed for the saw to be moved around a lot – they are more for the occasional shift to sweep up behind the saw every so often. And, the top of the saw is about a good inch and a half short of my bench top. Since I use my bench as an outfeed table, that is a problem.

The PortaMate 2500

Fortunately, my friends at HTC Tools heard my cry for help, and suggested that I try one of their new PM2500 rolling tool bases to make my saw a little more mobile.

The package arrived at my house, and I could tell it was heavy duty without having to open the package. This sucker weighed a ton – betraying the fact that it was made out of heavy duty metal.

The kit consists of four corners – two to hold the front swiveling casters and lifting mechanism, and two to hold the fixed rolling casters in the rear. These corners are held together by pieces of heavy-duty steel bars with holes drilled in them, allowing you to create bases as small as 12 x 12 inches to as large as 36 x 36 inches. They are held together with nuts and bolts, and give a good purchase.

The base, assembled

It took me less than an hour to assemble the base to accommodate the table saw’s footprint. I had to go with 20 x 21 inch base, which meant I didn’t have to bolt together bars to make up the distance. The assembly could have gone a little faster had they increased the size of the diagram, but with my cheaters and a little squinting, I had it all together after a little bit.

Alone, the base raised my saw about half an inch above the floor. Given that the rails extended up 2 inches above the platforms on the corners where the base rests, I figured I could cut out a 3/4 inch plywood platform to set down first, to get me close to the benchtop height. Cutting the platform was easy with the saw, and once I had it snugly in place, it was time to get the saw onto the base.

With a plywood deck

Now, I’m not going to joke with you.. the saw is heavy. But, with some muscle, I was able to wrestle it onto the base with only a minimal amount of cursing. On its new base, the saw glides easily around the shop. When I have the saw where I want it to be, a simple flip of the lift pedals on the front casters and the saw sets down on a pair of rubber feet mounted at the end of a bolt. This is a standard arrangement for this kind of stand, and it allows the saw to sit firmly on the shop floor.

Perched atop the base

With the new base in place, it’s going to be easy to move the saw where it needs to go when I have to move it, and get it out of the way when I don’t.

I’m out of my elfing mind…

Yeah, I decided to get into the Last Minute Elf mode this weekend, and I have got to tell you, it was a crazy one to get some new projects started!  After all, we’re closing in on the last few days before the holidays really take off, and my wife’s birthday is just a day away…

But, hey, that’s why we do the Last Minute Elf in the first place, right?

So, I decided to build a few cutting boards from the plans that the folks at Bell Forest Products have. They are simple designs, and take only a few hours to crank out, so why not?  I sorted through my lumber rack and saw that I had plenty of maple. Since maple is an awesome cutting board material, I was in hog heaven.  But, I wanted to get some other species to do a little accenting.

An array of woods...

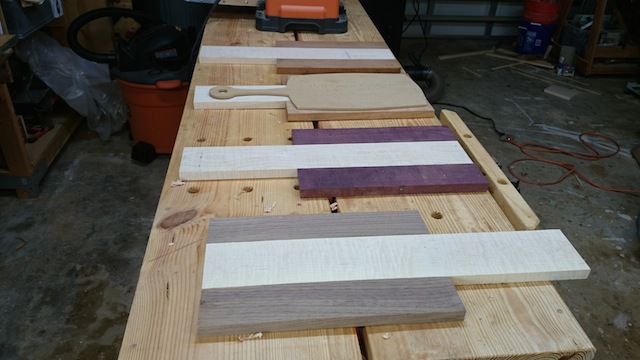
So, I dug around in my shorts… bin, that is. And found a bunch of really sweet woods to serve as accents. Some purpleheart, walnut, cherry and African mahogany. What the heck, right? They looked pretty, and I figured they would be great looking pieces.

Iggy supervising the glue up

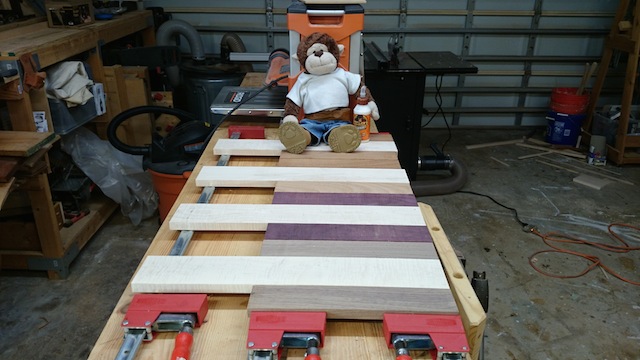
Iggy came out to the shop to supervise the build. After all, when it comes to building gifts, the monkey has the gig down cold.

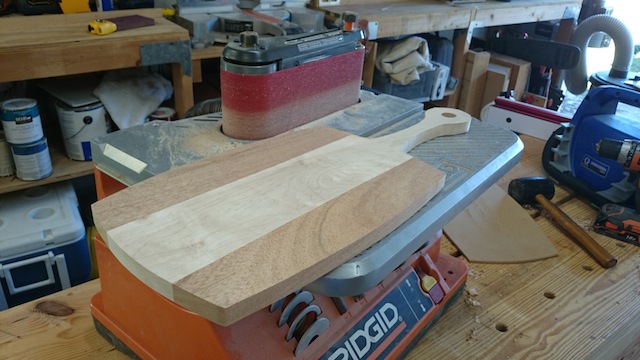
With the boards glued up, I simply traced the outline of the pattern onto each of the boards, and then used the drill press to bore out the holes for the handles and the band saw to rough out the outline of the boards. I then turned to my router table to do a little pattern routing to make the boards all the same size and shape. All was going swimmingly, until I had an oopsie…

crack!

Oh, well, one of the boards was going to to need a handlectomy…

OK, so I turned instead to plan B for the shaping, which involved some abrasive shaping. That seemed to work pretty well, taking the boards down to the lines and refining the shape.

abrasive shaping

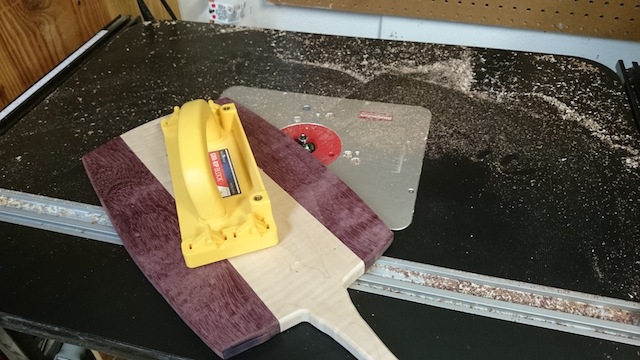
Not too shabby. After that I turned back to the router table to put on a round over bit to make these boards a whole lot smoother and softer to the touch. I was careful to use my GRR-ripper push block just to keep my hands safe… remember, nothing ruins the look of maple quite like giant blood stains…

Round those edges

Now, all I have to do is sand them down and finish them with some mineral oil. I hope the recipients like them… I guess time will tell!

The weekly plan

Make a decorative Menorah

Hanukkah begins at sundown this coming Tuesday. If you want to build your own Menorah, or have friends or family who celebrate the holiday, this is a fast yet fun project to celebrate the festivities with.

Lowe's Menorah

This plan, offered by Lowe’s Home Improvement Center, uses dowels, some construction lumber, paint and a few flameless LED candles to build this traditional symbol of Hanukkah, making it a perfect project to get children and the less-experienced woodworkers involved in a meaningful family project.

Link of the week

Countdown to Christmas Finishes

So, you are participating in the Last Minute Elf this year. Or, at least you want to.

And, since it is the LAST MINUTE elf, you are undoubtedly waiting until the last minute to get the work done, right?

How about that finish? What can you use to finish your project to ensure that – you know – the recipient won’t need to clean his or her hands with mineral spirits after handling it?

Will your finish dry in time?

Fortunately, Wood Magazine has a great guide to last minute finishes for your project. Using a countdown clock, the article offers suggestions if you even wait until the last day. Sure, you may not plan to wait until then, but this is a good article to tuck into your back pocket… just in case…

‘Tis the season

Gift lists are being drawn up as we speak. People are starting to get nervous, thinking about shipping deadlines. And, woodworkers around the world are starting to think, “Wow, I really should get out into the shop to start building those holiday presents.”

Last Minute Elf 2014

Yup, the Last Minute Elf week is in full swing, and we’re hoping that the spirit of the season is upon each of you and in your shops.

Yesterday, I posted an entry over at the Modern Woodworkers Association website about the meaning behind the gifts that we can build, and I hope you take the opportunity to read it. It’s not my usual funny banter, but more of a heartfelt look at the meaning behind what we build.

We are also still looking for you guys to submit your entries for projects for the Last Minute Elf contest. Submit some creative ideas for easy to build projects for the holiday season.   We are looking for you to show off your absolutely awesome ideas for holiday gifts can can be built quickly, finished easily and shipped in time to make that special someone tickled to be the lucky recipient.

We are coming up with some special prize packages for the best ideas for some different categories, including:

  • Best Turned project
  • Greenest project (using recycled materials)
  • Best project that will fit inside a large USPS flat rate shipping box (12 inches x 12 inches x 5 1/2 inches)
  • Best gift for a child
  • Best gift for an adult
  • Coolest tip to build a holiday project on time

If you think you can build something to fit one of these categories, we want to hear from you. Be sure to submit your entry – photos included – to iggy@tomsworkbench.com with the subject line that reads:  Last Minute Elf Entry no later than December 28 (we figure that you will be rushing to get the project done by December 25 or 26, and will want to spend some time with your families instead of posting pics to us… thus, the extra days!). Once we get the entries, we will read the tea leaves and pick ourselves a few winners.

Be sure to check out the projects we will be posting over at the Modern Woodworkers Association webpage.

Now, can I get something built in time? Only if Iggy and I work together…