When I was looking for a car to replace my old minivan last year, someone at my office suggested that I check out Car and Driver magazine to see what they had to say about my choices. After all, it’s a great resource for all things automotive.
Unfortunately, they also have a bunch of articles and reviews about powerful sports cars. Before long, I was drooling over the muscular exotic beauties. Their sleek styling. Their tremendous power to weight ratios. Their ability to sit in the corners and ride them like they are on rails.
When I did purchase my new car, it wasn’t anything like I had fantasized about and my dreams were thwarted again.
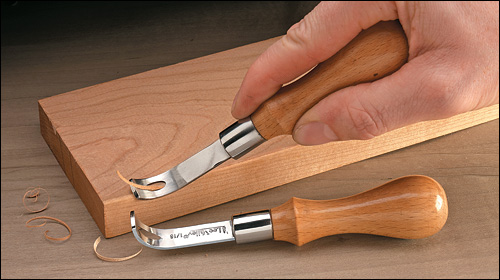
That doesn’t mean that I don’t get to handle the corners. In fact, I have a fast, nimble set of tools that allows me to ride right on the edge of my projects and leave me breathless. They are my Lee Valley cornering tools.
These little babies are very handy. Before I had them, I used to do a number of different things to round over the edges of my projects. I would sometimes break out the random orbit sander and do the deed that way. The problem with this method was that I could round some areas more than others – it was difficult to control. Or, I could use hand-held sandpaper, which was great. But, it could take some time to get everything rounded over, and I was back to the troubles I had with the random orbit sander – I could have uneven round overs.
When I really wanted to get everything identical, I would break out my router. But, that was a little bit of a pain in the butt to get everything set up, break out all of my safety gear and dust collection. And, if the piece was small, it was tough to balance the router on it, and I might have to shift to the table-based router. This seemed like overkill.
These babies didn’t cost too much (about $25 for the set) and have tools to create a 1/16″ and a 1/8″ round over. The 1/16″ model is great for just breaking the edge of your projects. If you want to go for the larger radius, the recommendation is to start with the smaller model then move to the larger.
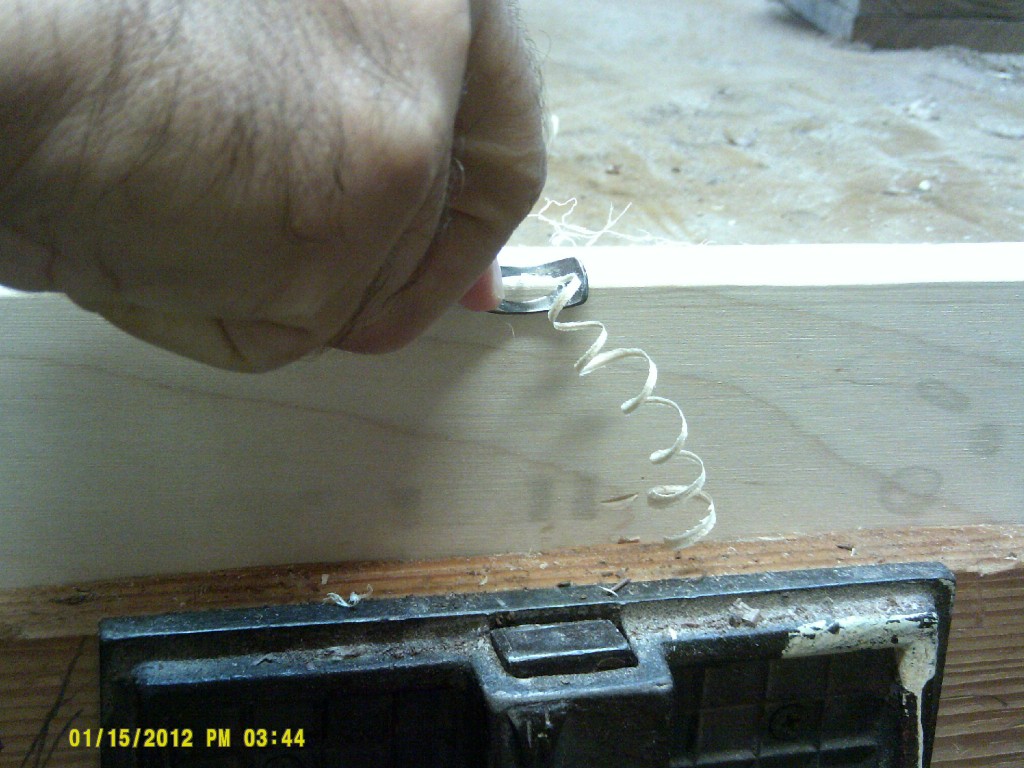
Their unique look may make you wonder how they are used, but they couldn’t be any easier. There is a groove on the bottom of the curve that registers right on the edge of the board. These tools cut on both the pull and push strokes, but after getting a few sharp splinters shoved into the tips of my fingers while pushing, I’d recommend that you stick to the pull. A few quick strokes and your edge is perfectly rounded over.
These tools not only cut with the grain, but – when kept sharp – can cut across the grain as well. As with any other work across end grain, it’s best to work from both sides to the middle to prevent any blow-out on the tool’s exit.
You should also work to read the grain direction of the board you are working on. The cuts are silky-smooth when you pull with the grain, but the tool can raise an ugly splinter when pulling against the grain. Always start with the smaller tool and light passes, adjusting your direction based on performance.
Sure, these cornering tools are specialty tools, but after one try with them, your heart will be pounding as you watch them handle the corners.


Does anyone else agree that the first picture of the cornering tools being used looks as if the user is going against the grain? Isn’t that the photo from the LV site?!?
That first photo is from Lee Valley’s site… I dunno…
But, I can assure you the hand model at the bottom was going with the grain! 🙂
Tom,
The Lee Valley cornering tools are excellent, especially on soft woods. Mine may see a bit less use now that I’ve got a trim router with a permanently chucked 1/8″ round over bit in it, but they’ll never be fully replaced.
I have a set as well – the older or “other style” that resemble an old fashioned bottle opener with different radii at each end. I love them indeed, but have had little in the way of success when it comes to sharpening them. Any ideas or tips?
Very cool I am using slick planes now and have not gotten the best results. How do you sharpen these tools.
Fortunately, Lee Valley has excellent instructions on how to do this involving some sandpaper and a dowel… http://www.leevalley.com/US/shopping/Instructions.aspx?p=49912
Cool looking little gadgets, but I usually just pull out my low-angle block plane and take a few passes. I love the feel in my hands as those little curls peel off the blade.
Yet another tool that I don’t have!
Can I possably live without it?
Well, yea…..for now. 🙂
Rog
For now, Rog… for now…
How well do these work on curved stock? I’m thinking this would be a safer (well, for me…Mr. Fumblefingers) and obviously less expensive alternative to a router to round over the edges on the Telecaster body I’m making.
You know, I’ve never tried them on curved work. But, I’d imagine as long as you carefully read the grain, they would probably work pretty darned well.