January 2011
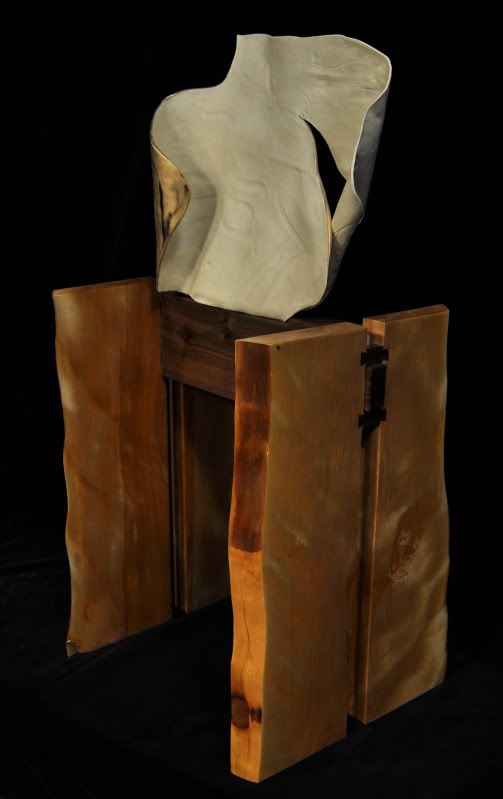
It’s art contest time again at the county courthouse (Brought to us through the National Arts Program), and again, I’m in the contest with a collaborative effort between myself and talented ceramic artist Debra Lansdowne. Normally, I’ll post multiple views of the project to show how things are made, but the shot below links to a very high resolution image that shows how this simple project was put together.
The base was my responsibility. Debra had showed me her sculpture – an interesting piece made out of a single sheet of clay. It’s sculpted to look like the torso of a well-muscled man (it almost looks like he’s also wearing a cape, floating in the wind off his right side). Unlike last year, she had the sculpture done and was looking for me to create a base.
I had to build something that would show strength and a lot of visual interest. During my lunch hours, I sketched out ideas on a notepad in my office. Maybe something with bent legs like Mars and Venus Rising, the project we entered last year. Nah, we’ve already been there. Maybe something with a Greek influence. Meh… that would be something to easy to expect. Eventually, inspiration struck me, and I sketched up something that looked a whole lot like the final project.
A quick e-mail to Eric Poirier of Bell Forest Products led to a search of the kiln – and this piece of live-edge slab flame birch. This is the board I was having a bear of a time smoothing a few weeks ago. I cut the slab into 24 inch long segments, then ripped them down the middle with my track saw. They were perfect right off the bat, requiring just a little touching up to get smooth inside faces. I carefully maintained the order and arrangement of the segments so they would stay in matched pairs as I laid them out.
The slabs are joined by a pair of walnut ‘pins’ that are joined to both sides by sliding dovetail joints. I went with the sliding dovetail because it would be a tight holding joint and add visual interest to the piece.
Once those pins were in place, the next step was to find a walnut stretcher. Fortunately, I had a chunk of walnut – 8/4 by 8 inches by 24 inches long. I shortened it a little bit, and then cut a tennon on both ends to fit in the void between the two slabs and the pair of pins. The fact that the stretcher had some knots in it added to the appearance as far as I’m concerned. On the top of the stretcher, I custom carved out a pocket where the base of the sculpture would fit in snugly when on display.
I affixed the stretcher in place with a 1/2 inch dowel drilled through the pins. It was a basic, available at your local home improvement center kind of dowel, but it fit beautifully and locks everything together.
Once everything was in place, I finish sanded the piece down to 220 grit. Once I cleaned off the dust, I coated the piece in a 1# cut of dewaxed shellac and sanded it with 320 grit paper when it was dry. I then applied two coats of Watco Danish oil, sanding between each coat. Finally, I buffed on a coat of wax to finish things off.
The artwork is due to be delivered on January 24, so this one is done. Meanwhile, I have another project on the bench I made some progress on this past weekend. I’m hoping to have that one done in time for the contest, but it’s gonna be close.


That is a beautiful piece of work. Good luck with contest.
yaakov….
Interesting project Tom. It took me a bit to really appreciate the final result. But your description and notes helped a lot. I would like to try this kind of project someday.
Tom,
To me, your base looks more suited to a cabinet than a sculpture. It is too detailed and competes with the sculpture for attention. It’s nicely made, but in my opinion, isn’t the right design for the application.
Chris
Great Work! I think the live edge and wood selection really complements the sculpture.