Link of the week

Woodooz.com

While we hear a lot about woodworking in Europe, North America, China and Japan, we don’t normally hear a lot about the woodworking tradition in the world’s second most populous country.

Concept of Do it yourself - Somu Padmanabhan

Surprisingly, there is a vibrant hobby woodworking scene in India. Today’s link is to a site that caters to the Indian hobby woodworking community, and provides an interesting insight into what is being built on the subcontinent.

Spiraling in – and out

When it comes to most carbide router bits, you typically have a body and a pair of cutters that mimic the shape of the body of the bit. From a basic straight cutting bit to the most elaborate molding bit, it’s easy to see what I mean. The cutter does the cutting, while the body backs up the cut and prevents the board from overfeeding. For some bits, you can throw in a bearing guide and you are in business.

Spiral router bit

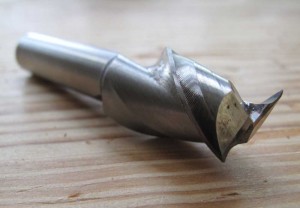
But, there is a class of bits that break this mold, and they have a ton of different uses. These bits look a lot like drill bits, but, believe me, they are entirely different animals that you won’t want to use in your drill press!

Spiral bits, as the name says, are indeed shaped like stubby drill bits. Unlike drill bits, which do their cutting at the tip, the leading edges of the flutes do the cutting, which means that the router bit will cut as you move it along the workpiece side to side.

These bits basically cut the same type of profile that a straight bit can make, but that’s like saying that a tricked out Ducati motorcycle is the same as a rusty, single speed beach cruising bike… Sure, they do, but the spirals can do so much more – with so much more style.

Up vs. Down Spiral Bits

For instance, spiral bits can direct the cutting action and the resulting chips exactly where you want them to go. Think about cutting a mortise with a straight cutting bit. Sure, when you plunge the bit into the hole, it will bore in. But, the shavings that the bit makes can get packed into the hole, creating friction that can break down that carbide edge. An up-spiral bit, on the other hand, not only plows the hole, but it directs the chips out of the hole, clearing a path and preventing that packed-in feel.

The jig becomes the base

Now, if you wanted trim the edge of a board with a straight cutter, you might get some splintering and tearout on the top of the board, but with a down-spiral bit, it pushes the fibers down toward the surface of the board, preventing that fraying on top.

Flush Trim Router Bit in action

So, you say you need BOTH faces to be clean? No problem, there are even combination up/down-spiral bits that can make both faces look their best. These are awesome when paired with a bearing guide for pattern routing… Perfect edges every time.

And, how about those edges? While straight bits can do a great job routing along edges, they can leave small scallops, similar to the milling marks you would see on the face of a board after it goes through a planer. Because the spiral bits cut with a shearing action, the surface is super smooth.

Hey, I love my straight cutting bits as much as the next guy, but when the situation is right, my head totally spins for a spiral bit!

Revived from suspended animation

It’s definitely summer in Florida. Try as I might, the shop is always just too darned hot to get into to do a lot of woodworking. So, projects like the dresser top valet – remember when I started that project? – tend to sit in suspended animation. I was, however, able to get some time and energy this weekend to revive that project from its slumber and get it back on its feet. Kinda like the crew of the Nostromo mining ship in that movie Alien.

suspended-animation-alien

When last I left the project, I had pretty much gotten it to the phase where the frame was set up, ready for the top to be crafted.

The next step was to create a frame that would fit into the dados in the sides and back. This would be the outer edge of the top shelf where I could put my keys, wallet, multi tool… the works. Cut from four pieces of stock milled to one half inch thick, the frame was joined with stub tenons and grooves I had cut on the table saw.

After gluing and clamping those suckers together, I rabbeted out the bottom tongue of the groove out to capture a middle panel.  With some sanding to round over the edges, I glued it into the middle area to serve as the base of the lid.

The frame glued in

The original plan had that panel covered with some padded vinyl, but I opted instead to go with some anigre veneer. I thought that would be a cool contrast with the walnut. I stuck the veneer to the plywood substrate with hide glue and let it dry, then mounted it into the frame.

With the shelf

I dunno, but this is really starting to take shape. Now, I need to get the time out in the shop to build the drawer. Once that is done, it will be sanding and finishing… then I can declare this project done, and start thinking about batching out some of these for the nephews.

Once the weather cools down … or I am eaten by an alien. Whichever comes first.

The weekly plan

Canadian Woodworker Designing a Segmented Bowl

Wood turning is such an awesome skill to develop. Besides that, it’s very fast… you can go from a chunk of wood to a bowl, platter, goblet or some other finished item in no time flat.

A segmented turned bowl

But, if you really want to step up your game, you need to try segmented turning. The folks over at Canadian Woodworking have created this landing page that will help you design a segmented bowl with little trouble!

Link of the week

The Hawaii Forest Institute’s Reforestation Projects Page

The island state of Hawaii is famous for many things. Beautiful beaches. Amazing volcanoes. Radical surfing. Awesome food.

A gorgeous koa desk built by Mats Fogelvik

And, Koa wood. The tree that begets this gorgeous wood was harvested extensively for the past two centuries, and has been cleared to make room for ranch and farmland. Since the tree only grows in Hawaii, the reduction of half of it’s natural habitat put tremendous stress on the species and the hardwood harvesting.

Groups such as the Hawaii Forest Institute have worked extensively with private and public entities to plant hundreds of thousands of acres of land with young Koa trees, helping to restore the number of these valuable trees and to provide breathtaking wood for future furniture makers.

Species Spotlight: Red Zebrawood

In my day job as a public information officer, I work closely with our local media outlets – TV, radio and print. And, over the years, I have heard a lot of jokes about our friends who work in the media and the media industry in general.

But, my all time favorite is one that I heard back in second grade:  What’s black and white and read all over? A newspaper!  Of course, when you see the joke in print, it loses some of its punch, with read and red being homophones and all…

Black and white and read all over

Recently, though, my friend Eric Poirier at Bell Forest Products told me about a wood that’s black and red all over… and it’s a relative newcomer to the lumber scene.

Known as red zebrawood or ebiara, it’s a handsome wood that comes from western Africa where the trees grow up to 90 feet tall, with a fairly narrow trunk. These trees can often be found shading coffee plantations. Think about that before you suck back your next cuppa joe…

Red Zebrawood

The wood has a coarse texture, and, for the most part, has a straight grain habit. There are areas of the board, however, where that grain is interlocked, so some care should be exercised when hand planing.

A turned box by Al Fox

As with zebrawood, it features bold, dark striping on a lighter background. As you might guess, the lighter background wood is more red tinged than that of zebrawood, leading to its naming.

Unlike many other tropical woods from the area, red zebrawood is not known to cause allergic reaction, and isn’t oily, meaning that standard gluing and finishing procedures can be used.

A beautiful box made by John Collicott

What can red zebrawood be used for? Just about anything, really. Cabinetry, marquetry, veneers, furniture, instruments … the stuff is even used to build boats and to make railroad sleepers back in Africa. It turns beautifully and takes a beautiful polish, making for some stunning pieces.

Sure, red zebrawood may be relatively new to the woodworking community, but one look at it, and you’ll want to share the news about it as well!

A la chitarra

I love to do some home cooking. And, as with the woodworking thing, I like to get my two sons involved in the process. It’s such a great thing to watch the boys get into the creation of their meal from beginning to end.

making pasta

For instance, yesterday we made some homemade pasta. I showed them how to build ring of flour on the table, and to crack the eggs and drizzle the olive oil into the middle before they mix it with their fingers, creating the dough. We kneaded it, and then used our pasta maker to roll out sheets of pasta before slicing them into ribbons. Sure, it was hard work, but I told the guys that it could have been tougher – we could have made the pasta the real old fashioned way.

Now, I have waxed poetically in the past about the combination of wood and food. And, I know that there are plenty of wooden gadgets you can build and use in the kitchen. Cutting boards, tortilla presses, knife handles and pepper grinders come to mind, and I have seen dozens of awesome examples proudly built in woodworking shops. But, how many of you know about the pasta guitar?

la chitarra

Yes, you heard me right – a kitchen guitar, on which you can make spaghetti alla chitarra. Basically, this kitchen implement is a wooden frame across which a series of thin wires is tightly stretched, and it makes some of the most unique pasta you have ever tasted.

How is it used? Flash back to the Abruzzo region of Italy on the eastern Adriatic Sea coast in the mid 1800s. In the days before automated pasta machines, the housewives of the region would make a standard pasta with eggs, durum and soft wheat flour and a pinch of salt. After kneading the dough, she would roll out the pasta with a rolling pin into thin sheets that would fit on top of her pasta guitar.

Rolling the pasta

After moving the dough on top of the wires, she would then use her rolling pin to apply pressure to the sheet. The wires would then slice the sheet into individual strands. Since the individual strands might not fully release from the chitarra, the housewife would – and I love this – play an arpeggio by strumming her fingers across the wires of the chitarra to ensure that the individual strands would fall free. 

A quick dusting with flour to keep the strands separated, and they would be ready for a three to four minute dip in salted boiling water.

spaghetti-alla-chitarra

The pasta itself is unlike a round extruded pasta. In fact, it is square in cross section, and quite porous, which aids in holding on to sauces.

The process is pretty cool to watch in action. Here’s a video showing exactly how it works:

While my woodworking plans don’t have me making a chitarra any time soon, I wanted to make sure that 1) you were aware of this totally awesome wooden kitchen tool, and 2) I cataloged it, just in case I wanted to make one in the future!

part of the Wood Talk Online community