Category Archives: Shop Talk

In tip-top condition

The one thing I enjoy most about Tom’s Workbench readers is your concern for my well-being and the well-being of my shop.

For instance, when I cut my finger while trimming bushes this past May, lots of folks e-mailed me to see how I was doing and to wish me a speedy recovery. I even got one e-mail where the poster made a mistake and referred to me as Einstein… I was flattered to be held in the same company as the genius himself, but it certainly wasn’t necessary.

So, it comes as no surprise that when I posted the picture of my poor table saw top after this weekend’s Halloween festivities there were plenty of people who were concerned about what they saw. I mean, with those rust rings from cold drinks and some mysterious sticky substance that appeared gray on the saw top, who could blame them?

One person wrote that he was worried about the lack of respect I was showing for the cast iron top.  Another was so concerned, that he urged me to give up woodworking to prevent the possibility of inflicting more damage to the poor saw.

Bless your hearts…

Fortunately, cast iron is pretty tough stuff, capable of taking some abuse before giving up the ghost.  And, recognizing the need to get myself right with the iron, I set out on my plan to restore the top to its shiny dignity.

What I needed was already in my shop…

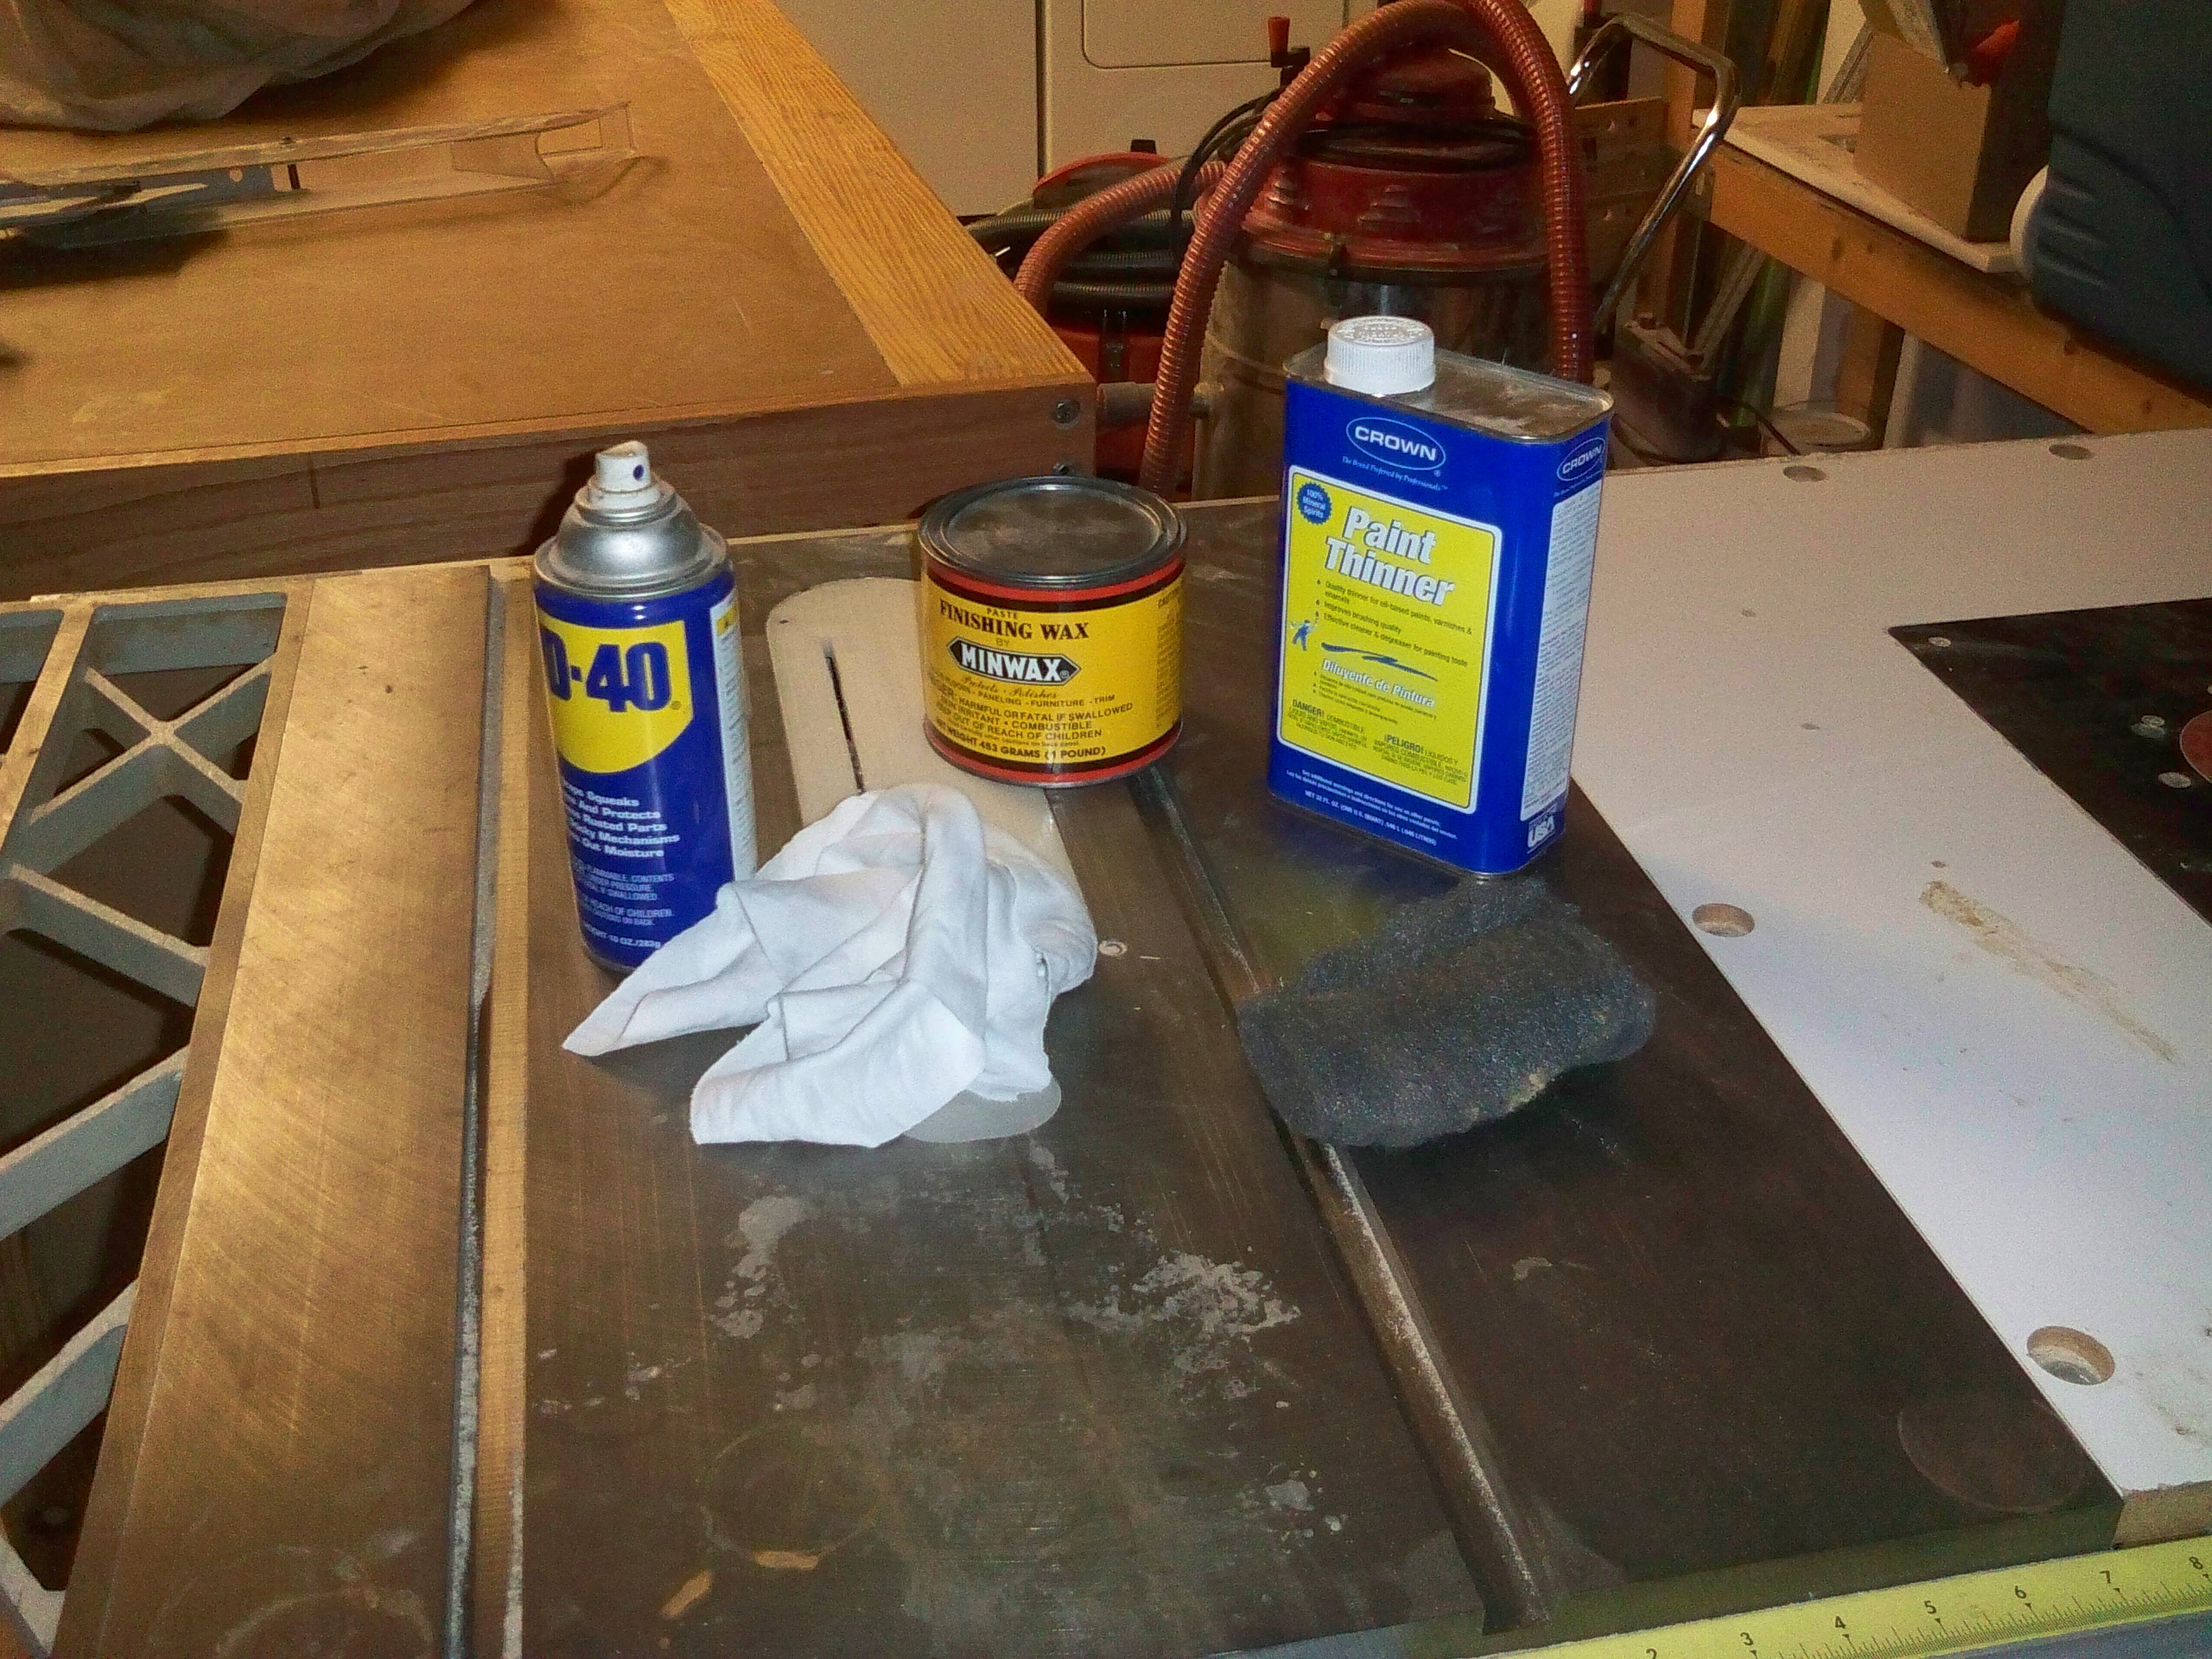
From left to right, there’s a can of the most popular spray lubricant in the known universe, a scrap of t-shirt (I actually used two…), a can of paste wax, some paint thinner and a steel wool pad.


Oh, and the most important ingredient of all… ELBOW GREASE!  Ask for it by name…

First, I started by removing the splitter, guard and lowering the saw blade below the table.  And, I made sure the saw was unplugged.. Very important step. Then, I dampened the piece of cloth with some paint thinner and started wiping the saw top.  Within – oh – seconds of starting, the red rust from the rings and the mysterious goop was removed from the saw top, deposited firmly on the surface of the cloth.  This removed not only the badness from the party, but the old paste wax from the last time I did the saw.

I was happy with the results, but the rust stains were still semi-etched into the top… bummer.  Well, there’s only ONE solution for that.. a quick spritz of WD-40 and the steel wool.  Rub, rub, rub… soon, I had built a little slurry on top of the saw (with just a little help from some 400 grit wet/dry sandpaper). A wipe with the t-shirt and bango…  the rings were gone.

Well, now that the top was looking good, there was only one thing left to do. That was to use some silicon-free furniture paste wax.  I grabbed a little glob out of the can, buffed it into the top and then buffed it off.

A grand total of six minutes from rust rings to shiny smooth top.  I got so inspired, I waxed the front and rear rip fence rails as well as the two faces of the rip fence so things would slide beautifully across the top.  I even waxed the splitter so there would be less friction should a board rubbed against it during a rip cut. I even went a little nuts and checked the blade/fence/miter slot alignment… it was all well within spec.  Tonight, I’ll take the blades out, give them a once-over for pitch and hit them with a little dry blade lube.

Hey, I want to thank all of you out there for keeping an eye on the shop and preventing me from letting my tools suffer the abuse of neglect!

A masquerade event

I have a room in my house that has a large door that opens overhead, a bare concrete floor and florescent lights.  There’s an attic access panel, a breaker box panel and even a side access door. It’s got 8 foot finished ceilings and a nice, open floor plan.

The real estate agent called it a garage, but it’s known as my shop. It’s where I keep the tools, build the projects and get away from it all at the bench. And, no, it hasn’t seen a car inside of it for the past eleven years…  But, there’s one day each year where the shop is neither a garage nor a shop – it becomes the base of operations for our annual Halloween pumpkin carving party.

In order to convert the shop into the Halloween wonderland, I have to move some stuff around.  Actually, a LOT of stuff around. I have to clean up the shop, push the table saw and other tools to the side of the room and pull the bench onto the driveway to serve as a – uhh – workbench for carving the gourds.

This is always a great opportunity to finally get under the bench to sweep. So, my oldest son and I pushed the heavy bench to the side of the shop to get better access to the bench… wow. Since I move the bench to do this once a year, I get a chance to see all of the projects I have worked on during the year.  For instance, in this year’s rat nest, I saw the refuse from the wine racks, the purple heart and maple cutting boards, the cradle, Carolina’s hope chest and lots of bits and pieces from the cabinet job.

Oh, and that’s where my screwdriver rolled off to!

Once that mess was cleaned up, the shop was relatively clean and ready to receive guests.  And, boy, did they come in droves!  Normally, we’ll invite a bunch of folks, but many have other obligations and can’t make it.  Not this year… we had more than 30 folks in attendance! While there was lots of catching up and laughing, the star of the night was the gourd carving.  Quite a bit of them were done, with some impressive entries…

While lots of our guests let us know how much fun our event was, there were more than a few who pulled me aside and asked, “So, where did all the tools go?”  Hey, they were hiding as my shop masqueraded as a pumpkin carving lab.

Now, to get the shop back into shape…

The Door to Completion

One question I have gotten about the cabinet job Paul and I are working on is what we are doing for the doors and drawer fronts. Something fancy with raised panels and beaded rails and stiles?  A wildly veneered flat panel door?

Actually, Paul wants to go simple.  Slab doors made of cherry. This way, the doors will match those in the tidy and well laid out kitchen.

And, no, we’re not building them.  He ordered them from Raw Doors online, an outfit that makes all kinds of doors including the basic solid wood slab doors.

Surprising, isn’t it?

Paul had his reasons, and when I left his house this past Saturday, he told them to me.

First, he said that he wanted to learn how to build cabinets.  That’s why he asked me to build them – this way, he could get the cabinets he needed and see how one woodworker does the task.  No truer statement could have been made – we have both learned a lot from this project. Did he need to learn how to edge glue boards together?  No.  That’s pretty much what we would have been doing to build the doors anyway.

Second, there is the time factor. Paul’s a busy guy. And, he also respects the fact that I’m eking out time after work and on weekends.  Building the doors and drawer fronts would have taken a considerable amount of time for all of the glue ups, but only a few weeks when ordered online.

Finally, we’re building this project in Florida. Solid cherry is available here – at a premium price. The cost between the complete set of doors built by Raw Doors and all of the stock wood wasn’t very large, so it made sense economically as well.

Paul and his wife Gail are finishing the doors in their garage, and they are looking very good. Visions of well-aligned drawer fronts and doors enclosing the insides of the project are dancing in my head…

My Mythic Labor

For those playing along, today is Labor Day in the United Sates and Canada, so let’s hear it for those hard working men and women who bust their butts every other day of the year!

Today, sit back, relax, and I’ll tell you a story about a guy who really did some work.

His name is Hercules, a mythical Roman figure (who went as Heracles in Greece…) who was asked by Jupiter (Zeus in Greece) to come over for some pizza and beer in order to help scratch a few things off the to do list around Mount Olympus.

Well, just as everyone knows, when you are asked to ‘lend a hand’ tackling a few chores, the magnitude of the tasks at hand seems to grow exponentially. Before he knew it, Hercules was asked to go and handle some tasks that were believed to be so difficult that no mortal could complete them.

You know, easy stuff like slaying the Nemean lion, capturing the Golden Hind of Artemis and obtaining the Girdle of the Amazon Queen. I can see the exchange now. “Jupiter, seriously?  You want me to go on a panty raid?”

One of the most demeaning tasks for our hero was that he had to clean the Augean stables in a single day. Since these cattle were immortal, they created quite a healthy layer of cow pies. And, since everyone looked the other way for the  30 years prior to his job, well, it was piled higher than you could find on Capitol Hill.  Just barely.

Our pal Hercules had a trick up his sleeve (he’s usually painted at least half-naked, so I’m wondering where he may have actually hid that trick.  In his boot, perhaps?) and turned hydraulic engineer, diverting a few rivers through the stables.  Before you can say, “Don’t drink the water downstream!” the stables were sparkling and shiny new.

I’m wondering if I can give good old Hercules a call to give me a hand with my shop…

Now that the cabinet job is entering its final phases, just about all of the pieces that need to go to Paul’s house are there.  Which means I no longer have any excuses for not being able to get to the dust anymore. All of those piles of sawdust and tools I took out but never put back immediately are out there, taking up space. The plug ends of tools are mixed together in a knot on the floor near my power strip…. so I have to sort those out. The vacuums are full of dust and shavings and need to be emptied … aww, heck, it looks like my day off from work is going to have me out in the shop.

Well, at least I have a barbecue on the schedule today… that will give me some time to rest before my next labor.

Trust in the Wedgie

If you ever grew up with siblings, mischievous friends or spent the night at a sleepover camp, you probably know what a wedgie is.

Yeah, it’s a prank that grade school kids often pull on each other which leads to humiliation or even – if done with enough force – discomfort or pain. I’ve had it done to me – a danger of wearing loose-waisted jeans without a belt in grade school.  I’ve also given my fair share of ’em – mostly in retaliation.  Ya know…

Thankfully, I have grown beyond that phase in my life now.  Although the urge to give a wedgie to the guy who cut me off in traffic does pass my mind… but I don’t act on the impulse…

Instead, I am here today to propose that a wedgie is a good thing,  Something that woodworkers should come to embrace to make your work more efficient.  Something that can save you money while solving a number of problems.

Oh, I mean a wedge!  Yes, that simple triangular mechanical device that has been in use for the past 9,000 years or so. By tapping a wedge into place, you can solve a number of difficult woodworking conundrums for a small investment.

One of the best uses I have recently put wedges to are as a clamping tool. As you can see, it’s a simple arrangement.  Any bar type clamp can be clamped in place on the cabinet body, and a wedge – this case, a commercially available shim – is driven in under the bar to put pressure on the piece until the glue dries.

On the  cabinet project that Paul and I are building, we wanted our face frame to be unified… you know – one solid top and bottom rail with individual stiles covering where the cabinet boxes meet.  I  think that arrangement looks better.  We were able to join the pieces with pocket screws, and we were able to use pocket screws to attach the top and bottom rails to the cases.  But, those stiles needed to be snugged down until the glue locked everything into place.  Most importantly, Paul and his wife didn’t want to have to see filled brad holes when they looked at the piece.  We employed this strategy… and it came out pretty darned nice.

This is a great little trick, but it’s not all that the wonderful wedge can do. Many woodworkers fail to realize one of the best uses for a wedge at the workbench.

While working on a workbench, the most critical thing to remember is that the work needs to be secured for you to do what you need to on it. A vise becomes an important piece of equipment, but, with the economy the way it is and the price of premium bench vises, not everyone can afford to put one in their shop. Other issues, such as the set height of a vise’s jaws can also make planing a tough task. You don’t want to whack your plane iron against a metal stop, unless, of course, you would rather sharpen than woodwork.

But, with a bench dog or two and a wedge, you can easily secure a piece of wood at your bench.  Just set up the dogs and use a larger wedge – cut from a piece of your scrap pile – to lock the board in place. A tap or two on the wedge secures the piece, another tap can loosen the board so you can move it.  You can also make the wedge any thickness you want. So, if you need to hand plane a 3/8″ thick board, you can easily cut a wedge out of 1/4″ thick  material.  Should your plane’s iron hit the wedge, it’s no big deal. Remember it is made out of wood.

It’s surprising how often we overlook the basics.  However, if you want to give your woodworking headaches a wedgie, going with wedges isn’t a bad idea.

The Cat’s Out of the Bag

Did you ever hear the expression never buy a pig in a poke?


That  was a very strange one for me – a kid growing up in New Jersey where a poke is what the Three Stooges did to each others’ eyes.  I had heard people use the expression, but, in an age before Google, I never understood what the heck it meant.

It turns out that the expression was first used in the middle ages by less-than-reputable merchants. Basically, the scam artist would be holding a poke – a colloquial term for a sack – and tell his potential victim that it contained a suckling pig that would make a very tasty dinner. If the customer was an idiot, he would say ‘sure’, fork over his hard-earned money and get the sack with the ‘wriggling piggy’ inside.

After the merchant beat a hasty retreat, the dupe would open the sack and, to his surprise, see that it contained a cat. Not exactly the best eating. This also led to the creation of two other well known idioms, to let the cat out of the bag (something the scam artist never wanted to happen) and to be left holding the bag (to get nothing for your hard work).

Now that I have impressed the heck out of you with my Bachelor of Arts degree in English Literature and Language, what does this have to do with woodworking?

Glad you asked. Woodworkers are very sensory-driven people. We need to see the wood we are going to use in our projects in order to match the grain and colors. We need to feel the wood to see if it is soaking wet or ready to work. We need to smell the boards because hey, that’s what we do.

And, I’d be willing to bet that’s what’s holding some folks back from buying their wood online.

“It’s something we do see in woodworkers,” said Eric Poirier of Bell Forest Products. “For first time buyers, we notice a lot of anxiety when they believe they aren’t going to have control over the board selection process.”

To help put wood shoppers at ease, reputable online wood dealers take great care when selecting boards they sell to customers. “No, we’re not going to select the worst of the lot and ship them off to our customers. That would be about the worst business practice ever. We have built our reputation on providing quality wood for woodworkers to build their treasures, and any shenanigans would ruin us.”

For those who may want additional control over the process or who may want to find a board with particular characteristics for a project, Bell Forest Products also offers a program where customers can hand pick their boards. “OK, I’ll admit that customers will handle their mouse to select their board, but what a selection they will have to pick from.”

Yes, customers can actually look board by board from some choice pieces for their projects. “We feature burls, boards with unique figure and boards with live-edges. Exotics and domestics. If you are looking for something special to feature in a project, it’s not a bad place to start.” Selecting the hand-picked board link provides photos and descriptions of nearly 500 different spectacular boards to choose from.

And, if you can’t find something that tickles your fancy? “Just give us an idea of what you are looking for. We’ll keep an eye out for you. Who knows? That dream piece of wood may be coming out of the kiln right now.”

Particle Board the Beautiful

No, it doesn’t have the gorgeous grain and strength of premium hardwood.

Nor does it have the beautiful veneers and screw holding capacity of cabinet grade plywood.

It doesn’t even have the smooth, fine texture of MDF that makes painting easy.

Instead, it forms the basis of all uber-cheap, mass produced big box discount store ready to assemble furniture.  It’s frequently covered in a pseudo-wood-looking plastic contact paper like substance and is assembled with cams, dowels and other bizarre hardware that requires an allen wrench.

Attempting to lift a sheet of it by yourself can cause you to make an appointment with your chiropractor.  Shelves made of it bow with the lightest of weight and sides exposed to the smallest quantity of water swell like a sponge.

Yes, it’s particle board, and it’s the most beautiful substance you can have in your shop.

Born of the refuse of lumber mills, the lowly particle board (or chip board) consists of fairly rough sawdust treated with a resins, waxes and other goodies and heat pressed into standard sized sheet goods.

During the construction of this large cabinet project, I have come to appreciate some of the finer qualities of this oft maligned material. No, the boxes themselves are being made out of some high quality 3/4″ plywood – either prefinished birch or A-faced cherry.  The cabinet shelves will be made of the same materials as well. The base the cases are standing on is made from 2×4 fir lumber.

So, where’s the particleboard?

Glad you asked.  A while ago, I had bought a sheet of particleboard to create a bending form for my Mars and Venus Rising table.  I was going to stack and cut pieces and use them to clamp the thinly sliced ash and walnut leg pieces around while the hide glue dried.  However, I was having trouble getting the pieces to work on the press and opted for a different method of bending.

So, I took the sheets of particleboard and hid them behind my clamp rack.  I probably figured I would find them three or four years later and just throw them out.

The fates were on my side when the project started.  Those ugly, edge-abused sheets hidden behind the clamp rack called to me. With my old big ugly bench, I would have just cut the sheets up on the bench top, figuring that any grooves that formed on the bench would have added character.  But, with my current bench, that was out of the question.  No way was I going to slice  up my new bench’s top.

That’s when I fished those sheets of particleboard from behind the clamp rack and set them down on the bench as a sacrificial top. My friend Paul was a little caught off guard by my wanton disregard for the particle board’s safety, but I forged on. In fact, after the cutting, it also served well as a sacrificial base when I predrilled the screw holes to reinforce the dadoes and rabbets, saving my bench tremendous abuse.

Today, the cabinet pieces are cut, the particle board pieces are showing the wear and my bench top has never looked so good.

So, today, I ask, dear friends, that each of you reconsider your opinion of the lowly particle board sheet. Truly, it’s not the material of fine woodworking, but I boldly contend that it is one of the substances that makes fine woodworking possible.