All posts by Tom

I'm the guy who writes the blog...

From D’Oh to Woah…

If I had read James Krenov’s work the Impractical Cabinetmaker when I started woodworking, there’s a very good chance I would be writing about golf right now.

How do I come to this revelation more than a decade into my woodworking hobby?  Easy.  I don’t throw things away when I make mistakes.  In fact, mistakes should be considered opportunities to stretch your skills.

When I first read Krenov’s master work, the one thing that really stuck with me was his passion for perfection.  Krenov lavishes time on the board selections, the stock preparation, the jonery and the finishing, and he encourages other woodworkers to rise to the highest level of craftsmanship.  There’s nothing wrong with that – we should all be working to make our work shine.

Krenov, however, made clear his dislike for mistakes in the workpiece.  He hates them.  He’d rather see you as a woodworker get rid of a piece of wood than continue, trying to repair or undo what you had done.

I disagree, because if I didn’t, my scrap bucket would be overflowing with some pretty nice pieces of wood.  Case in point – this is the box I was building a few weekends ago – the one I put the stopwatch on.  It’s a nice little box, and the couple who will receive it will be pretty darned happy to have it on display in their home.

While I could have just documented the extra 40 minutes of work (or six hours of work plus drying time) to put the final touches and finish on the box, there was a much more valuable lesson to be learned when I built the top.

In order to dress up the edges of the top, I decided to route an ogee profile.  A simple yet elegant way to make the top look nicer.  The only problem is that I was routing it with a hand held router, and when I got to one corner, the router wobbled, leaving a gouge in the profile.  Ouch.

According to Krenov, I was looking at a piece of chiminea chow, suitable for use when keeping warm on a cool night.  And, for a few days, that’s all I thought I had.

That was, until I had an idea.

Since I was only working on a piece of junk, I thought I would take a chance, break out the rasp and try to round the corners over.  Just to make them look a little nicer.

At first, I wasn’t sure what I was doing, but after a while, I fell into a rhythm, slowly grinding away the edge profiles.  Then, I turned to a sanding block with 100 grit, then 150 grit sandpaper.  Before long,  I was left with an interesting looking box top with a pretty cool looking design feature.  The lines of the ogee on the edges die into the curved corners, giving a unique and quite handsome look to the box top.

And, to think, I probably would have just chucked the piece and started over again…

In my opinion, it looks so nice that I may try making that profile a signature feature for some of my other upcoming projects.

Funny – all that from what other learned woodworkers would call trash.

A Manic Mother’s Day

No, this didn’t happen yesterday… but, every Mother’s Day, I’m reminded of a unique project I had to undertake for a neighbor.  It all started with a new kitchen range back in 2004…

The kitchen display cabinet
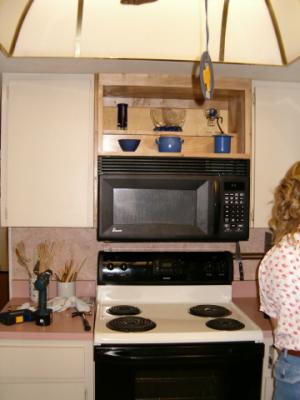
My neighbor Chris is a handy guy.  He’s been a sushi chef, has rebuilt carburetors and today cleans rugs for the local school system.  He’s a hustler, never allowing grass to grow under his feet.  So, it came as  no surprise that he was installing a new range in his home for his wife as a Mother’s Day gift.

I just happened to show up at the house as Chris ran into a huge problem.  He had taken out the old range and remembered that he had tiled under it a few years earlier when doing some other kitchen improvements.  Unfortunately, the new range had a higher control panel on the back, and it wouldn’t fit under the cabinet above.  What a bummer…

As he was contemplating major surgery on the range to make it fit, I had already consumed two of the beers he had offered me.  I could sit for hours and watch him work. Seriously.  My wife and Chris’ wife joined us at the dining room table, watching Chris try desparately to fit the too-tall range into the too-short space.  That’s when I opened my big mouth.  “I can build something for there.”

The room went silent.  Chris’ wife turned to me and asked, “Can you?”

“Sure,” I said.  “I’ll just need Chris’ help.”

“Great!” She said.  “We need it done before we all go back to work on Monday, though.  I can’t live without a kitchen…”

Boy, did I ever stick my foot in it.  I had never really built a cabinet before, nor had I selectively removed existing cabinetry to make a new unit.  This was going to be a real test.

And, early on Mother’s Day morning, Chris was knocking on my door asking if we could get ready to build.  We went to the local home improvement center and bought our supplies, then came back home.

At this point, we had already showered the ladies in gifts.  The next one was the offer that we would stay at home to work on the cabinet and the moms would be able to go to the beach together – without the kids.  Besides, Chris’ daugther was just about old enough to watch the three other little ones with some minor help…

The box was easy to build – just 3/4″ birch plywood and some maple edging.  In order to hide the electric hook up and display some of her Swedish glassware, we decided to build a ‘step’ into the piece.  Once it was built, we used a spray can of lacquer to finish the piece – it dried in a flash.

I had failed to realize how precise I needed to be when building the piece.  A horrible thought hit me as we took it over… What if it didn’t fit….

After removing the existing cabinet, we hoisted the new unit into place and it slid in beautifully.  Whew.  Chris drove screws into the studs and neighboring cabinets while I ran home to mill some molding for the sides of the piece.  Total time for the project was about five hours, and the results weren’t all that terrible to look at.

After we finished, I looked outside the window and noticed that the moms were out in Chris’ pool with the kids.  I took off my shoes and put my wallet, keys and cell phone on the cabinet.  I walked outside onto the pool deck shaking my head.  “What’s wrong?” asked Chris’ wife.

“There’s nothing left to do on the project!” I yelled as I cannonballed into the pool, to the surprise of the kids and the moms.  Chris pushed the new range into place, and had already started dinner for both families.

The display case didn’t last too long, though.  Their home was destroyed in a fire seven months later and the display case was broken out and heaved into a dumpster.  I still look back fondly at that project and the manic Mother’s Day we spent with our good friends.

Quick Poll

Tropical Hardwoods
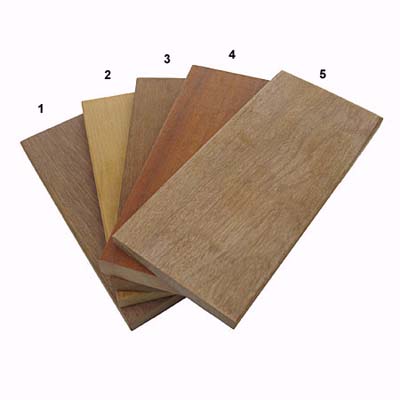
While local hardwoods can be a pleasure to work with and can leave you with a gorgeous project, tropical hardwoods can be eye-poppingly beautiful.  Whether the vividly colored bloodwood or purpleheart from South America, the highly desirable bubinga or wenge from Africa or the hard wearing teak or rosewood from Asia, these boards from the planet’s tropical areas can be a woodworker’s dream, giving your projects a style all their own.

They do come with some drawbacks, however.  First, they have different characteristics than the native wood you work with, leaving a splintery mess where a clean cut should normally be.  They can also be very expensive, since they have to be harvested and shipped great distances to your supplier. And, the harvesting of these trees isn’t always done in a responsible manner, possibly being pulled from forests without consideration of their future health.

This week, let us know how you feel about using these tropical hardwoods.

[poll id=”73″]

***

Please help support Tom’s Workbench by visiting our advertiser Eagle America. Thanks!

Link of the week

OSHA’s Woodworking Page

Safe woodworkingWhen it comes to places to find information to keep employees safe, there are few better resources than the the US Department of Labor’s Occupational Safety and Health Administration (OSHA). There are resources for employees in many different industries at the OSHA website, including a page for woodworkers.

While much of the information provided is geared toward the industrial setting, home woodworkers can learn a lot about how to keep themselves safe while working in their shops.

This site is very complete, with the safety information broken into logical segments – from rough milling through assembly all the way to finishing.  Regardless which part of the project process you are in, there is something for everyone.

The most important safety device

The market for woodworking safety devices is huge.  Seriously.

Safety GearDust masks.  Eye protection.  Hearing protection.  Powered dust respirators with built in hearing and eye protection. Aftermarket splitters for your table saw.  Safety covers for router bits used in router tables.  First aid kids.  First aid kits with tourniquets should something get hacked off.  Dust collector ports.  Push sticks.  Push blocks.  Emergency shut-off switches.  Small part holders.  Hold down clamps so you can build your own safety devices…

You could go into serious debt buying a selection of woodworking safety devices – before you even buy a single tool. And these safety devices can help reduce the likelihood that you will have a woodworking accident, or make that accident a lot less traumatic should something happen.

But, unfortunately, they are not a substitute for the most important shop tool in your arsenal – your brain.

Before I get accused of encouraging people to give up on safety equipment, hold the phone.  The truth is that you really do need many of the basic protective devices and first aid products should the worst happen.  But, let me draw you an interesting parallel.

Many of us have vehicles and drive them daily.  Of those who don’t have their own cars to drive themselves about, I’d be willing to wager that many of you get a lift with friends of relatives when you have to go somewhere.  Let’s face it, cars are an important part of life.

Wearing a seatbelt
And, when we get into our cars, one of the first things you should do is buckle your seat belt.  In many areas, this is the law of the land – click it or get a ticket. While this may be the case, I’m sure the other main reason you wear seat belts is to help prevent injury should you get into an accident.  By wearing your seat belt, your odds of surviving a crash increase 45%, according to a study conducted by the National Highway Traffic Safety Administration.

But, even with a seat belt buckled and air bags in your vehicle, you still take the necessary precautions to prevent getting into an accident in the first place.  Stopping for red lights, using your brakes to prevent plowing into the car in front of you… ya know, the basics.

A crosscut sled can make cutting safer

In much the same way, woodworking safety is an exercise in engaging your brain.  Think before you cut, route, chisel or do something else which can harm you.  Is the area clear of obstructions? Does the board have a warp in it that could bind the table saw blade?  Will the routing operation bring my hands too close to the bit?

Listen to the little voice in your head.  If it’s screaming “Danger! Danger!” before you turn the table saw switch on, see if there might be a better way to make that cut.

Don’t rush through your work.  Unlike a lousy score on the back nine of your favorite golf course, rushing your work in the shop could lead to a nasty injury.  Take it easy, and safe those tough cuts for when you are feeling fresh and rested.

Finally, you need all of your brain with you when you are working with tools.  If you just had a fight with your spouse, are upset after a lousy day of work or are under the influence of alcohol or drugs – illegal or prescription – maybe you should make any shop time more about cleaning up and selecting boards for the next project instead of trying something you might regret later.

Just remember to treat your brain right – the rest of your body will thank you.

Who was that masked man?

For those who regularly follow Tom’s Workbench, you may have noticed that there was no link of the week posted this past Friday.  An oversight?  Something more sinister?

Surgical masks in Mexico City
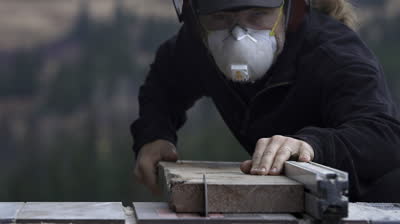
Uhh, no.  I was, however, tasked to go and assist our local health department with the public education effort in response to the 2009 Swine Flu outbreak.  Yup, when there’s a crisis, I typically get called in.  It makes my job a little more interesting.

One of the questions I heard time and again from the callers and the media concerned the use and effectiveness of surgical masks to halt the spread of the virus.  After all, aren’t folks all across Mexico City wearing them at the orders of the health ministry?

Well, while working at our local health office, I discovered that those masks are exceptionally effective at preventing your germs from contaminating others, and not so good at keeping you from getting infected in the first place.

If you want to see a good use of a filtering mask to prevent the intake of potentially dangerous particles, you need look no further than your workshop.

Saw dust is one of those shop dangers that falls to the bottom of the list when you think of the other things that can happen in your shop.  The prospect of amputating fingers on a table saw is far more concerning than the pretty colors of saw dust collecting at your feet. But, the ubiquitous byproduct of cutting, routing and sanding can cause big issues all by itself.

First up, saw dust is a known carcinogen.  Yup, after years of exposure, constant inhalation of these fine particles can lead to nasal cancer and the development of polyps in the sinuses.  Cutting manufactured wood panels (MDF, Plywood, hardboard, etc) also adds the chemicals from the binding glues to the air as well – and I doubt many of those products are touted for their health-enhancing benefits.  Many exotic woods – and some domestics – carry in them different oils and other chemical compounds that can lead to severe allergies in some woodworkers, and inhaling them only brings them more deeply into your sinuses and lungs where your body’s reaction can be extreme.

Besides, the dust itself can be an irritant and aggravate other allergies as well.  Believe me, after a long woodworking session this spring (which was on top of the oak pollen in the atmosphere – another allergen I am sensitive to), I had to spend about a week out of the shop with severe sinus headaches.

Cutting the dust should be a priority in your shop.  Dust collectors and dust filters are the best first line of defense against the raging cloud.  Besides pulling these harmful particles out of the air, they help keep your workspace clean and tidy and help prevent slips.  A cleaner and safer workplace…  nice.

For those who work on outbuildings with large doors and windows or garages, providing adequate ventilation will help greatly.  Of course, at my garage workshop, the cars in my driveway may end up with a fine powdery coating on them, but such is the price of safety.  This, with very few exceptions, would probably be an issue with a basement workshop…

Dust Mask Line UpFinally, while you may be working with the right equipment, it still won’t hurt to use a dust mask or respirator when doing very dusty jobs – sanding comes to mind.  Even with highly-efficient dust collecting sanders, enough of the fine stuff is produced and can affect your health after prolonged sanding sessions.  It’s always a good idea to put on a dust mask and just be sure you are covered.

What kinds to use?  Well, for really dusty environments, there are dust respirators and even powered dust respirators, which filter and supply fresh air to the user.  These are really sweet, but can be quite expensive.  Of course, we are talking about your health here…

Another option are paper or woven masks. These are inexpensive and can do a decent job keeping the dust out. Before you commit to buying the uber-large package at your local mega-mart, buy a small package first to ensure they fit you well. For example, if you have a beard, these masks may not fit as well as you would like them to, so a respirator might be a better route.

Do I mean to cause a panic?  Of course not.  But, as some wise guy said many years ago, “An ounce of prevention is worth a pound of cure…”  Or, keeping an ounce of sawdust out of your nose…

I dunno…

Quick Poll

Parts of a table saw splitter/blade guard set upWelcome to Woodworker’s Safety Week 2009 where we will start by taking a look at one of the most dangerous tools in the shop – the table saw.  All saws come with two basic pieces of safety equipment – a splitter or riving knife which keeps the wood being cut from closing behind the blade or being accidentally pushed into the back of the blade should you make an error in feeding and pull the board away from the rip fence.

Manufacturers also include a blade guard, which helps to prevent your hand from hitting the spinning blade. The blade guard also deflects sawdust and wood chips away from you, and many models also feature a sawdust collection port which can be hooked up to a dust collector.

While the stock blade guards and splitters or riving knives are effective, there are many after market models out there which can offer even greater performance.

So, this week’s question – when you use your table saw for typical cuts (NOT dado or non-through cutting), what is the most frequently seen set up on your saw?  Do you use stock equipment, after market stuff or nothing at all?

[poll id=”72″]