All posts by Tom

I'm the guy who writes the blog...

The final push

So, did anyone happen to hear about a big football game that happened last night?

Super Bowl Interception

Rumor has it that there was some big play at the end of the game that determined the outcome. Maybe I should pay better attention to these things…

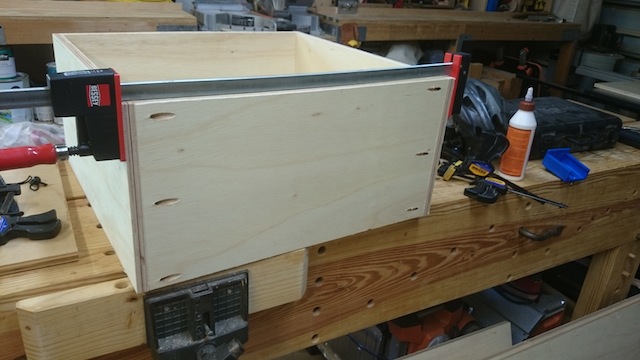
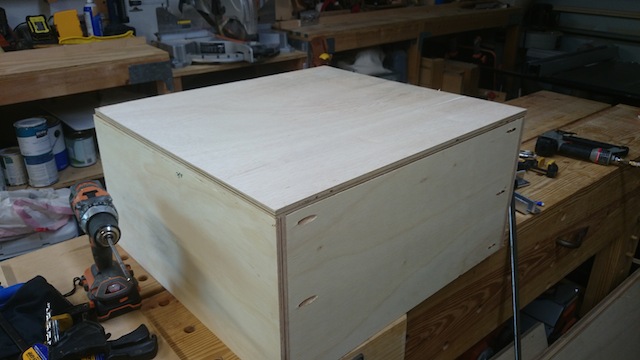
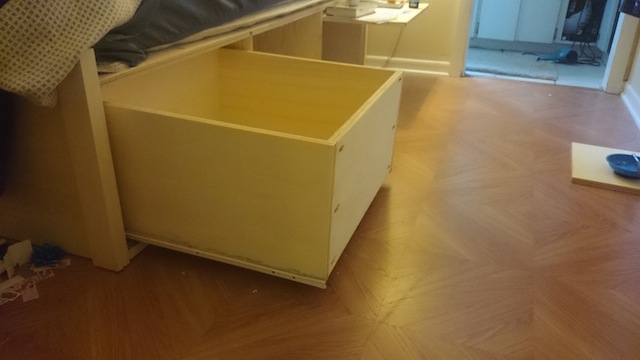
Part of the reason why I wasn’t into the big game was that I was busy pushing to the last parts of the bed project. Yes, my sinus/double ear/bronchitis issue slowed me down, so this weekend, I had to finish the last of the drawers. It took some time, but each of the drawers was relatively easy to finish, and they all roll like a dream on the 3/4 extension hardware that I picked up for the project.

The drawers in place

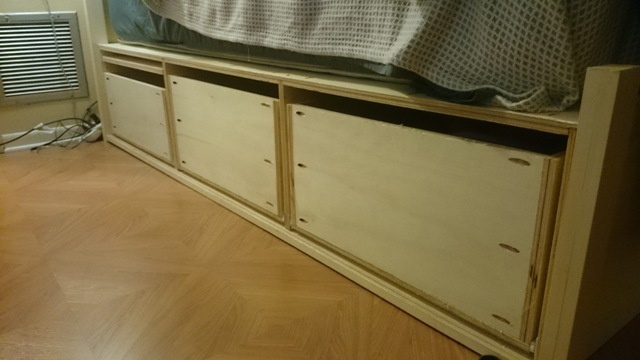
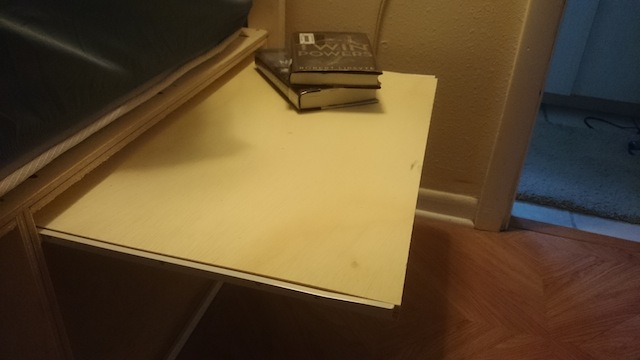
Now that they are all in, the next step is to create the drawer fronts that will cover these drawer boxes and unify the sides of the bed. Since these cabinets are built without face frames, it’s going to be critical that I get everything lined up nicely so the fronts look balanced. The added bonus is that they will also serve as drawer stops, preventing me from pushing the drawers in too deep.

After that, I will need to put the finish on this project. Again, I am going with some water based finish, which should make this look pretty sweet and limit the amount of fumes in the house.

The next project is waiting...

And, I had better get that done soon, because the wood for the next project has already arrived. What will it be? I can’t tell you, but I know that there is a young lady who will be expecting it sometime in the not too distant future!

The weekly plan

The Drunken Woodworker’s beer caddy

So, I hear there may be some kind of big football game on today… and I hear that this game – more than any other – may require some tasty snacks and a few adult beverages.

David's Beer Caddy

Well, if you are going to watch the game in style, there’s nothing more awesome than bringing those adult beverages to the celebration in a hand-crafted beer tote. This plan by David Picciuto, the Drunken Woodworker, allows you to build an awesome tote for your favorite beverages and show off your woodworking skill.

So, I would recommend you get out to the shop ASAP so you will have yours read for kickoff!

Link of the week

OSHA’s page on saw dust

No, I’m not taking a job in a cabinet shop or sawmill. However, I have been laid up the past few days with a sinus and ear infection (can you believe at age 46?), and while it’s probably not related to the sawdust in my shop, it’s not a bad time to remind folks about the potential dangers of breathing sawdust.

Sawdust

Simple steps, such as hooking up a shop vac to dust creating tools and using dust masks can make a huge difference in the comfort and safety of your shop. Plus, I mean, the better you can capture sawdust right at its source, the less cleaning you will be doing later.

Never a bad reminder…

Get thinking about Get Woodworking

So, I told you about my recent trip to Colorado. That was some special trip for me, since I had never seen mountains, and it had been about 20 years since I last went skiing.

The final run...

It was a magical experience. The air was rarified at more than 7,000 feet above sea level, the temperatures were a bone chilling – 5 degrees Fahrenheit on the coldest morning, and the air up there is as dry as a bone. So, why was I there in the first place?

Funny, I was speaking about hurricane preparedness. More accurately, preparedness for natural disasters, regardless of where they happen.  It was appropriate, since while most of the United States is out of hazardous weather season, tornado season kicks into high gear in a few weeks, hurricane season is right behind that, and we can expect to see lots of flooding during heavy summer rains.

GWW15

Just as the time to start planning for hazardous weather is right now, it’s also time to start planning for our annual event Get Woodworking Week!

Just as we have in years past, this is the one week during the year when we in the woodworking community seek out those who may be on the fence and share our stories, lessons, know how, expertise and enthusiasm for the craft to get them into the game.

What am I looking for? Well, I need your help. I need each of you on your blogs, in your guilds, in your shops – to help spread the word about woodworking. Find someone to invite into your shop to pass on a skill to. Build a project to give someone. Pass some woodworking magazines on to some folks who are looking to get into the craft.

If you do something Get Woodworking Week related, be sure to let me know, and I’ll list it here on my blog in order to help folks find out more about what you are doing.

And, as in years past, I’ll be beating the bushes to see if we can get some awesome prizes. I’ll have more information as we get closer to GWW.

###

MicroJig Art

The weekly plan

Woodgears’ Ski Rack Plan

I’m back!  Did you miss me?

Steamboat Springs

So, here’s where I was for the better part of a week. Steamboat Springs, Colorado, for a weather summit. I know, it was kind of odd to be someplace 7,000 feet above sea level and in temperatures as cold as -5 degrees Fahrenheit talking about hurricanes, but hey, it was pretty darned cool!

So, while I was away, I tried my hand at skiing. And, I am pleased to report that I returned home with two intact knees, making it that much sweeter!  I also came back to Florida with an appreciation for how much stuff it takes to participate in outdoor winter sports.

The Ski Rack

So, this week, I’m linking to Woodgears’ Ski Rack plan, for those of you who pursue the Alpine or Nordic flavors of this outside sport. It’s a great place to store and organize the skis, poles, wax, boots and million other accessories that are required to pursue this popular winter pastime.

Water you good for?

So, the bed project is rounding the clubhouse turn, and it’s time to start thinking finish. So, I need to start thinking about my options when it comes to finish, and it’s looking a little bit like I know where I am headed.

Painting a wood project

You see, my first thought was to paint the bed – perhaps something like a milk paint or some kind of acrylic that would be tough, durable and would make the piece look more unified. I have used paint several times, and since this project is mostly plywood, I wasn’t going to have too much heartburn going that route. It has served me well on utility projects for years.

But, then, a funny thing happened on the way to that decision. Rhonda decided that perhaps we didn’t want to paint the piece. She is now leaning toward applying a stain or dye and then using a finish over that.

Applying stain

Now, I’m not a big one for the stain. However, I do have to say that getting the piece to match the rest of the furniture in the room color wise wouldn’t be a terrible idea. I’m dealing with a plywood project, so this isn’t some outstanding piece of curly maple that I could ruin. I know that stains are made of pigments that are ground up and suspended in a solvent, embedding in the small nooks and crannies of the wood.

Applying a dye

We could also conceivably go with a dye. These babies have the color as a liquid – a lot like what clothes are colored with – allowing them to be more transparent. They can be a little tricky to apply, so I’m not sure I want to go that route.

Oh, by the way, now that I’m this far into the post, I should also let you know that I have already assembled the bed – inside my bedroom. Which means that traditional oil-based stains and dyes are going to be right out. I need this bed to dry fast and without choking fumes that will leave me out on the couch for days.

Nice challenge, right?

Minwax stain

That means I’m probably going to have to go with something like a water-based stain. The cool thing about this is that it can be tinted at the local home improvement center paint counter, which means I can bring in a drawer from an existing piece of furniture and have them match the color exactly.

Minwax Polycrylic

The same issue goes for my topcoat, which – as far as I can tell – the best option is to go with a water-based finish. I know the science behind these babies has changed tremendously over the past ten years, and they are becoming a lot easier to apply and more resistant to abuse. Plus, they dry fast and they don’t stink, two huge pluses as far as I am concerned.

How well will this work?  Not entirely sure. This will be my first crack at using products like these, so I’l be testing and letting you know how well they work.

So far, the bed has been an easy build. I hope that the finish goes as smoothly as the build.

But, if it doesn’t, there’s always paint!

Adjusting my drawers

No, this post has absolutely nothing to do with my underwear. Although, it could be a good place for me to store them… especially since I like to wear high quality skivvies from places like Duluth Trading.

Some nice buck naked boxer briefs

It is, instead, an article of about how I built the drawers on the bed. After my angst-ridden debate on how I was going to make things happen, I decided to build the drawers using pocket screw joinery. First, I had to measure the size of the opening. I was going to put the pocket screws through the front and backs of the drawers into the sides, and I also needed to account for one inch on the inside of the drawer width to account for the drawer runners. So, I did the best thing I could have possibly done.

Stacked

That’s right, I left my tape measure on the bench and stacked the two drawer sides and my 1-2-3 measuring block into place, and marked how long I needed the fronts and backs to be. This way, I was positive I was getting exactly the measurement instead of trying to read the right tick mark on my tape measure – and getting it wrong.

Boring pocket holes

With the pieces all cut, I hopped quickly over to my pocket hole jig and started blasting out holes. It’s always amazing to see just how quickly you can cut joints with that sucker.

Drawer assembly

Using some clamps, a little glue and some screws, I was able to snug the drawers together and screw everything together in very short order. Instead of plowing dadoes for the drawer bottoms, I decided to just glue and nail them on. I figure that the runners I use mount to the bottom of the drawers, and they will hide the side of the bottom boards.

The drawers

Again, that made things very easy for assembly. I was also able to use the drawer bottoms to ensure that the entire assembly was perfectly square – an important next step in the process.

Using some inexpensive 3/4 extension bottom mount Euro drawer glides, it took very little time to get the drawers mounted and gliding perfectly, Since I am building the bed as a frameless cabinet, the next step will be to build some drawer faces to attach, and I will be just about done with this project.

The first drawer in place

Oh, by the way, I used a very similar – and hopefully clever – way to create night stands for the bed. Using a simple piece of piece of plywood and some 18 inch drawer glides, I was able to create flat surfaces for both sides of the bed. This way, Rhonda and I can put our books, electronics and other items down next to the bed.

Night stand

And, if we don’t need them, we can push them out of the way, totally hidden.

Night stand, closed

Rhonda likes this feature, since it creates a less cluttered, more compact bed area. Not too shabby…