One of the first real woodworking ‘tricks’ I learned was how to join two boards together without using metal fasteners. I had gone to a building supply store that was going out of business to buy wood, hinges and a special tool I had heard a lot about – a doweling jig.
While my first woodworking project wasn’t anything to look at, it marked a real monkey-and-the-monolith moment in my woodworking avocation – using wooden dowels to join project parts together.
Using dowels is a tried and true woodworking technique that stretches back thousands of years ago. The massive joints in timber-framed buildings are set in place with treenails – wooden dowels across mortise and tenon joints. Craftsmen have similarly pegged smaller mortise and tenon joints in their furniture projects for just as long. Masters such as Krenov and Maloof used dowels in their projects as well.
If we’re going to get to the bottom of dowels, we need to break them into two groups…
The first group involves visible dowels. These joints are created by drilling through a project and driving a dowel in. How versatile is this joint? I dunno – how creative can you be? I’ve seen through dowels being used to affix breadboard edges on tables, to join sides to fronts on drawers – even just for decoration.
Do you need glue for the joint? It depends – is the joint permanent (locking together a mortise and tenon joint) or is it part of a project that can be disassembled (like locking a stretcher on a trestle table base in place)?
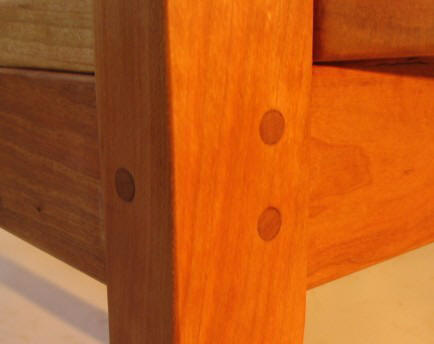
The dowel material can be a simple ambiguous ‘hardwood’ dowel picked up in a home center, a dowel of a specific species ordered from a supplier or even one you custom turn from a treasured blank on your lathe.
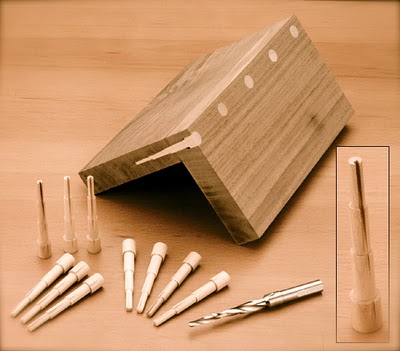
While these joints can be made with a drill and the right sized bit, there is a product that allows for through dowel joints that get extra bite. The Miller Dowel system relies on a tapered drill bit and specially formed dowels that step down in diameter. These steps on the dowel allow it to be driven into the tapered hole and get a solid grip. They come in an assortment of commonly-available species.
The other type of dowel joints involves hidden dowels. This is when you drill mating holes into two parts of a joint and insert a length of dowel that’s hidden from view. These dowels work like a small floating mortise and tenon joint.
Needless to say, the two holes had better be drilled accurately into both pieces, or they won’t mate properly. You can lay out these holes with a ruler and pencil… and, if you take your time and work carefully, yes, you can do a fair job.
One tool you can use to help ensure better accuracy is called a dowel center. After you drill the first hole, you insert one of these centers in it. The part that sticks out from the hole has a sharp point that – when pressed against the mating board – accurately marks the center of the hole you will need to drill.

The next step up is the basic dowel jigs you can find on the market. The most popular of these models are self centering, with adjustable jaws that grip the work and hardened steel bushings in the guide itself. Simply line up your center marks, clamp the guide in place and drill with the properly sized bit. These jigs no only help ensure the dowel hole is centered on the edge of the board, but also perpendicular to the face you are drilling.
If you are looking for more flexibility, there are some high-end doweling jigs that offer even more usefulness. The DowelMax and Joint Genie are two models that allow you to drill just about anywhere and get accurate holes.
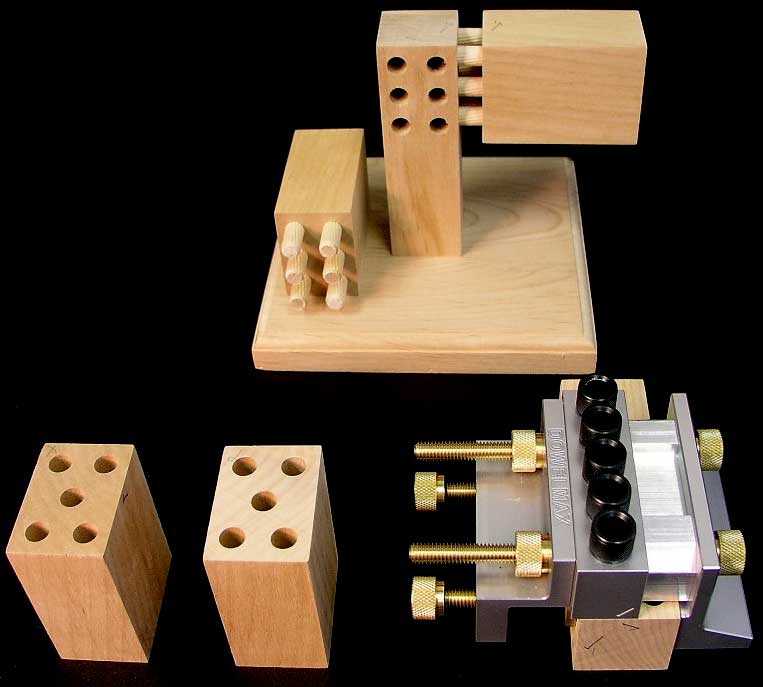
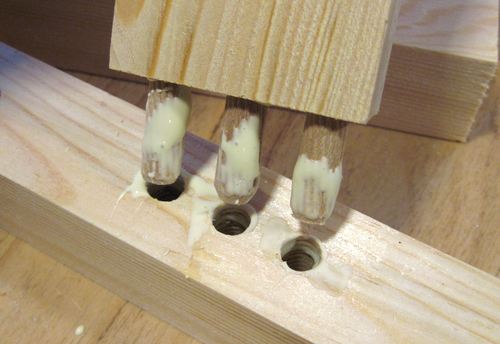
When it comes to the hidden dowels themselves, you can certainly use lengths of store-bought dowel cut to size, but there are also dowels designed specifically for the task. These dowels have flutes or spirals carved down their sides to allow room for excess glue to move to, preventing hydraulic pressures from letting the joint come together.
Dowel joints are fairly strong joints, especially when larger dowels are used. Also, when drilling the holes for the dowels, you want them clean and as straight as possible. To get the best holes, opt for brad point drill bits.

Thanks for the discussion. I’m a big fan of doweling and pegging.
Also, I am stealing your monkey/monolith analogy – it’s too good not to use.
Hi, great story on doweling! I am looking for a way to dowel miter joints. I don’t mean miters as used in picture frames, but miters along the short side. I discovered doweling last year and I bought this great Dowel Master from Wolfcraft. But it is to bulky for small pieces of wood. I should buy a router, but I don’t want to just now. How do I connect without visible dowels on a miter joint?
Hey Rowie, was reading and saw your comment. The easiest way I see to dowel the miters without going through a hassle is to drill the dowel holes after you lay out the miters but before you cut them. That way the holes will line up. The downside is that it won’t be quite as strong as managing to dowel across the 45 angle, but should help reinforce the miter joint. The other downside is if you’re a little off on where you cut the miters, the holes won’t line up.
It appears some of you are not aware of the Dowel Wizard wood doweling tool. This neat little tool/jig is the perfect tool for making dowel joints the easy and accurate way. This tool will also make mitered box joints as well as face miter joints the easy way.
Do yourself a favor and check out their website http://www.dowelwizard.com.