Hand cut dovetails can be a challenge. But, they are also a great hallmark of a true craftsman. So….
[poll id=”30″]

Hand cut dovetails can be a challenge. But, they are also a great hallmark of a true craftsman. So….
[poll id=”30″]
 So, you want to try drawing your own woodworking plans, but you aren’t so good with the pencil and paper, and you can’t afford to buy an expensive CAD program.
Never fear, because the folks at Google have created a free program that will allow you to draw plans and see them rendered in stunning, near-lifelike 3-D.
Whether you have a PC or a Mac, once you download the free program, you are off to the races. You can draw the entire project, complete with doors, drawers and other components, show the joints that you plan to cut and even overlay the project with wood tone skins so you can get an idea of you should go darker or lighter with those inset door panels you were thinking of building.
Unlike other programs which require intensive study of phone-book-sized manuals, Sketchup offers online tutorials that are easy to follow, and there are forums where you can ask other users how they accomplished their designs.
Oh, did I mention the program is free? 😀
A three year strategic plan. A financially sound retirement plan. A solid game plan.
Seems these days, no matter where you look, people are planning. A lot. For good reason. If you were to do something without a plan, you might never achieve your goal.
 When it comes to woodworking, there are lots of plans out there. Plans to build new shops. Plans to squeeze the maximum amount of space out of your existing shop. Heck, there are even plans to clean your shop. But, those are usually put at the bottom of the to-do list.
The plans most woodworkers deal with are project plans. From the most rudimentary sketch on the back of a cocktail napkin to elaborately produced plans with complete cut lists and 3-D projections of what the final piece will look like, there are plans out there for every level of woodworker.
After woodworking for a decade, I’ve (finally) come to the realization that there are basically three different types of plans out there to choose from:
 The next type of plan are shop-drawn ones made to reproduce an existing piece of furniture. Whether it’s from a drawing of a project you saw in a museum or a picture of an exquisite antique piece you wanted to bid on at an auction, these projects can be fun to plan and build. I find myself looking at pictures of projects from the modern masters – Krenov, Nakashima, Maloof – and sketching out ideas of how I would build pieces. Sure, your project will strongly resemble what exists, but, in some cases, that’s a good thing. Also, again, you can work your own signature touch in to a project that makes it your very own. One day, I really do plan on building a Maloof-Iovino inspired rocker… That’s the plan, at least.
Regardless of how you choose to plan out your next project, just remember to save yourself a lot of hassle and try some of these simple tips:
 Draw the piece out to scale. Once you start cutting and shaping boards into component parts, you will want to know exactly how large that piece needs to be.
Sounds like a plan to me!
OK, so we all need sharp tools to do our best work. But, there are many ways to get to that goal. What’s your preferred method to sharpen your blades?
[poll id=”29″]
As an American, I want to wish my fellow countrymen and women a happy and safe Independence Day. To get the festivities off right AND involve woodworking, here’s a great link.
 The Freedom Pens Project was established by the members of the Sawmill Creek Woodworking Forum. They have established this non-profit 501 (c)(3) organization to make wooden pens for the American service men and women stationed overseas in combat areas.
Since its inception in 2005, volunteers turning pens for the Freedom Pen effort have produced more than 80,000 pens. Contributions from corporate partners such as Penn State Industries, Rockler and Woodcraft have helped defray the costs, and turning clubs from around the country have – quite literally – turned out thousands of pens.
You don’t even need to own a lathe to help. A contribution of $1.90 is enough to send one pen to a service man or woman deployed overseas.
While the right to disagree with the government’s overseas policy is guaranteed by the Constitution of the United States, supporting the young men and women who have answered the call of duty is widespread across our country. The Freedom Pens Project can show service personnel that we are thinking about them and their day to day safety. Plus, you’ll be providing a tool that person can use to write the folks back home.
While the main site does appear to need some updating, the Sawmill Creek forum that deals with the project can be found here, and the effort is still alive and well.
As with just about every woodworker, all of my first projects were built of 3/4″ material. The plywood, the lumber – everything was exactly as thick as it had come from the home center.
 One day, I was holding some sweet wood that was given to me by a local hardwood supplier, and I thought to myself, “There has got to be an easier way to get all of these boards the same thickness without using a belt sander.”
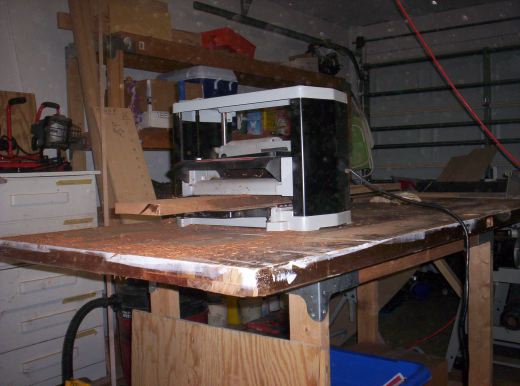
That’s when I went out and got a portable thickness planer.
Sure, I considered some very expensive models. But, since I thought I was only going to need it for a few projects and money was tight, I went with the ‘entry level’ Delta.
When I unpacked the unit, it looked very solid and straightforward. A simple crank handle to adjust depth, two sturdy tables for infeed and outfeed, a cord wrap. Even better was an access port to remove and replace the motor brushes to help with future maintenance. Obviously, Delta didn’t plan on this to be a disposable piece of equipment.
The first project I ‘fed’ this planer was a laminated picture frame stile – strips of walnut, mahogany and maple. The planer’s depth was easy to set, and it made short work of evening out the irregularities. I was stunned how quickly I could produce a really nice surface that only needed some sanding to perfect.
Unfortunately, there was quite a bit of snipe on the ends of the board. I planned for this and made my glue ups longer than I needed, so I was able to cut off the sniped ends and build around it. Since the project was made of free scrap, it didn’t affect me much.
Now that I’m building with more expensive wood, I’ve had to create a work around to reduce the amount of snipe I get. The solution was use a piece of melamine shelving with two cleats screwed to the underside to register it to the infeed and outfeed tables. I also lift up on the edge of the board as it comes out of the planer. These workarounds do OK for now.
I’ve reversed and changed the blades, and the process is relatively simple. It involves unscrewing two allen bolts from each end of the disposable blades. They were also easy to remove and replace. One word of caution, however. Planer blades – even dull ones – can cut you badly if you make contact with them. Always be careful when handling them!
Since this is the first planer I have ever bought or used, I’m sure my review isn’t as valuable as those who have used many others. But, hey, it works for me, and I’m really in no hurry to go out and replace it. My plan is to use it until the thing falls apart. Or, at least, until I hit the lottery!
[poll id=”28″]