
I am really starting to get old. At last weekend’s Woodworking in America, I told someone that I was Apollo era technology, and I had to stop to explain what I meant. Oy.
And, at work, I am the oldest of the public information officers. By a pretty good margin. One of my colleagues was born after I graduated college… grumble grumble grumble…

But, every so often I ‘get’ a modern reference. For instance, I recently heard about this person named Meghan Trainor who wrote a song about my favorite musical instrument, the bass. What that has to do with the way she is dressed (and, she never picks up a bass guitar, which I also find puzzling), I’m not quite sure, but hey, I’ll go with it.
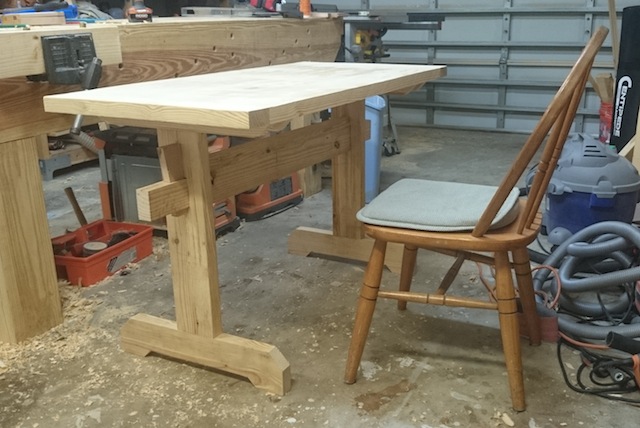
Just as with the music video, a trestle table is all about that base. After all, it’s all about that base, or there’s no table. So, I set out, to get my table base started so I could bring this sucker back to the office.
Unlike many modern iterations of the trestle table, I really wanted this one to be able to be broken down and moved. Sure, I have my corner office now, but you never know when someone might want to move me, and I’ll have to pack up the table to make the shift. So, no permanent joinery on the table base.
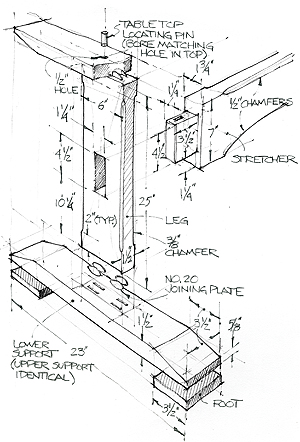
To make this happen, I started by attaching a pair of battens to the bottom side of the table. These battens will work together with the breadboard ends to keep the top flat. I spaced them so they would hold the tops of the trestles tightly, eliminating the need to screw the trestles to the table top.

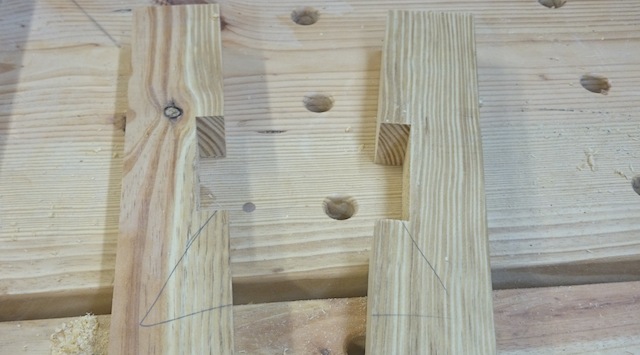
Oh, and how about those trestles? I cut a pair of pieces for the two tops, some larger pieces for the bottoms and some straight boards for the uprights. Before I did any joinery, I ripped the two uprights in half, then notched for what would be the through mortise to hold the stretcher. With those cut, I just glued the legs back together, and voila, you have a nice, square through mortise.
To attach the tops and bottoms, I finally broke out the Mortise Pal and got to work. I routed twin mortises for the feet and tops of the trestles, then mirrored those on the tops and bottoms of the uprights, then glued them into place. That’s a fast joint that’s just not going to go anywhere.

The stretcher was very easy to cut – I marked out the height of the mortise from the table onto the ends of the stretcher and marked out the length between the inside faces of the two uprights, then just notched those over at the Laguna bandsaw. Easy as pie.
I hogged out for the through mortises on the trestle stretcher ends on the drill press, then chiseled a 10 degree angle on the outside face. I then cut a pair of wedges with an outside slope of 10 degrees. Those babies snug in nicely, and when tapped home, there is absolutely no wiggle on the table base.
Now, just a little bit of sanding and finishing, and I think this one will be ready to go!